Chapter 1. Introducing HTML5
If HTML were a movie, HTML5 would be its surprise twist.
HTML wasn’t meant to survive into the 21st century. The official web standards organization, called the W3C (short for World Wide Web Consortium), left HTML for dead way back in 1998. The W3C pinned its future plans on a modernized successor called XHTML. It took a group of disenfranchised rebels to resuscitate HTML and lay the groundwork for the features that you’ll explore in this book.
In this chapter, you’ll get the scoop on why HTML died, and how it came back to life. You’ll learn about HTML5’s philosophy and features, and you’ll consider the thorny issue of browser support. You’ll also get your first look at a bona fide HTML5 document—both in its simplest form, and as a more practical template that you can use as a starting point for any website.
The Story of HTML5
As you know, HTML is the language you use to write web pages. The basic idea of HTML—that you use elements to structure your content—hasn’t changed since the Web’s earliest days. In fact, even the oldest web pages still work perfectly well in the most modern web browsers (including several browsers that didn’t exist at the time, like Firefox and Chrome).
Being old and successful also carries some sizable risks—namely, everyone wants to replace you. In 1998, the W3C stopped working on HTML and attempted to improve it with an XML-powered successor called XHTML 1.0.
XHTML 1.0: Getting Strict
XHTML has most of the same syntax conventions as HTML, but it enforces stricter rules. Much of the sloppy markup that traditional HTML permitted just isn’t acceptable in XHTML.
For example, suppose you want to italicize the last word in a heading, like so:
<h1>The Life of a<i>Duck</i></h1>
And you accidentally swap the final two tags:
<h1>The Life of a<i>Duck</h1></i>
When a browser encounters this slightly messed-up markup, it can figure out what you really want. It italicizes the last word, without even a polite complaint. However, the mismatched tags break the official rules of XHTML. If you plug your page into an XHTML validator (or use a web design tool like Dreamweaver), you’ll get a warning that points out your mistake. From a web design point of view, this is helpful—it lets you catch minor mistakes that might cause inconsistent results on different browsers, or might cause bigger problems when you edit and enhance the page.
At first, XHTML was a success story. Professional web developers, who were frustrated with browser quirks and the anything-goes state of web design, flocked to XHTML. Along the way, they were forced to adopt better habits and give up a few of the half-baked formatting features found in HTML. However, many of XHTML’s imagined benefits—like interoperability with XML tools, easier page processing for automated programs, portability to mobile platforms, and extensibility of the XHTML language itself—never came to pass.
Still, XHTML became the standard for most serious web designers. And while everyone seemed pretty happy, there was one dirty secret: Although browsers understood XHTML markup, they didn’t enforce the strict error-checking that the standard required. That means a page could break the rules of XHTML, and the browsers wouldn’t blink. In fact, there was nothing to stop a web developer from throwing together a mess of sloppy markup and old-fashioned HTML content, and calling it an XHTML page. There wasn’t a single browser on the planet that would complain. And that made the people in charge of the XHTML standard deeply uncomfortable.
XHTML 2: The Unexpected Failure
The solution was supposed to be XHTML 2. It was set to tighten up the error-handling rules, forcing browsers to reject invalid XHTML 2 pages. XHTML 2 also threw out many of the quirks and conventions it had inherited from HTML. For example, the system of numbered headings (<h1>, <h2>, <h3>, and so on) was super-seded by a new <h> element, whose significance depended on its position in a web page. Similarly, the <a> element was eclipsed by a feature that let web developers transform any element into a link, and the <img> element lost its alt attribute in favor of a new way to supply alternate content.
These changes were typical of XHTML 2. From a theoretical point of view, they were cleaner and made more sense. From a practical point of view, they forced everyone to change the way they wrote web pages (to say nothing of updating the web pages they already had), without adding new functionality to make all the work worthwhile. And along the way, XHTML 2 dumped a few well-worn elements that some web designers still loved, like <b> (for bold text), <i> (for italics), and <iframe> (for embedding one web page inside another).
But perhaps the worst problem was the glacial pace of change. Development on XHTML 2 dragged on for five years, and developer enthusiasm slowly leaked away.
HTML5: Back From the Dead
At about the same time (starting in 2004), a group of people started looking at the future of the Web from a different angle. Instead of trying to sort out what was wrong (or just “philosophically impure”) in HTML, they focused on what was missing, in terms of the things web developers wanted to get done.
After all, HTML began its life as a tool for displaying documents. With the addition of JavaScript, it had morphed into a system for developing web applications, like search engines, e-commerce stores, mapping tools, email readers, and a whole lot more. And while a crafty web application can do a lot of impressive things, creating one isn’t easy. Most rely on a soup of handwritten JavaScript, one or more popular JavaScript toolkits, and a web application that runs on the web server. It’s a challenge to get all these pieces to interact consistently on different browsers. Even when you get it to work, you need to mind the duct tape and staples that hold everything together.
The people creating browsers were particularly concerned about this situation, and a group of forward-thinking individuals from Opera Software (the creators of the Opera browser) and the Mozilla Foundation (the creators of Firefox) lobbied to get XHTML to introduce more developer-oriented features. When they failed, Opera, Mozilla, and Apple formed the loosely knit WHATWG (Web Hypertext Application Technology Working Group) to think of new solutions.
The WHATWG wasn’t out to replace HTML, but to extend it, in a seamless, backward-compatible way. In fact, the earliest version of its work had two add-on specifications called Web Applications 1.0 and Web Forms 2.0. Eventually, these standards evolved into HTML5.
Note
The number 5 in the HTML5 specification name is supposed to indicate that the standard picks up where HTML left off (that’s HTML version 4.01, which predates XHTML). Of course, this isn’t really accurate, because HTML5 supports everything that’s happened to web pages in the decade since HTML 4.01 was released, including strict XHTML-style syntax (if you choose to use it) and a slew of JavaScript innovations. However, the name still makes a clear point: HTML5 may support the conventions of XHTML, but it enforces the rules of HTML.
By 2007, all the excitement was in the WHATWG camp. After some painful reflection, the W3C decided to disband the group that was working on XHTML 2 and work on formalizing the HTML5 standard instead. At this point, the original HTML5 was broken into more manageable pieces, and many of the features that had originally been called HTML5 became separate standards (see the box on this page).
Tip
You can read the official W3C version of the HTML5 standard at www.w3.org/TR/html5.
HTML: The Living Language
The switch from the W3C to the WHATWG and back to the W3C again has led to a rather unusual arrangement. Technically, the W3C in charge of determining what is and isn’t official HTML5. But at the same time, the WHATWG continues its work dreaming up future HTML features. Only now, they no longer refer to their work as HTML5. They simply call it HTML, explaining that HTML will continue as a living language.
Because HTML is a living language, an HTML page will never become obsolete and stop working. HTML pages will never need a version number (even in the doctype), and web developers will never need to “upgrade” their markup from one version to another to get it to work on new browsers.
Because HTML is a living language, new features (and new elements) may be added to the HTML standard at any time. Some web pages may choose to take advantage of these features, and some browsers may choose to support them. But features won’t be tied to a specific version number.
When web developers hear about this plan, their first reaction is usually unmitigated horror. After all, who wants to deal with a world of wildly variable standards support, where developers need to pick and choose the features they use based on the likelihood these features will be supported? However, on reflection, most web developers come to a grudging realization: for better or worse, this is exactly the way browsers work today, and the way they’ve worked since the dawn of the Web.
As explained earlier, today’s browsers are happy with any mishmash of supported features. You can take a state-of-the-art XHTML page and add something as scandalously backward as the <marquee> element (an obsolete feature for creating scrolling text), and no browser will complain. Similarly, browsers have well-known holes in their support for even the oldest standards. For example, browser makers started implementing CSS3 before CSS2 support was finished, and many CSS2 features were later dropped. The only difference is that now HTML5 makes the “living language” status official. Still, it’s no small irony that just as HTML is embarking on a new, innovative chapter, it has finally returned full circle to its roots.
Tip
To see the current, evolving draft of HTML that includes the stuff we call HTML5 and a small but ever-evolving set of new, unsupported features, go to http://whatwg.org/html. To follow the latest HTML news in a less formal setting, check out the WHATWG blog at http://blog.whatwg.org.
Three Key Principles of HTML5
By this point, you’re probably eager to get going with a real HTML5 page. But first, it’s worth climbing into the minds of the people who built HTML5. Once you understand the philosophy behind the language, the quirks, complexities, and occasional headaches that you’ll encounter in this book will make a whole lot more sense.
1. Don’t Break the Web
“Don’t break the Web” means that a standard shouldn’t introduce changes that make other people’s web pages stop working. This rarely happens.
“Don’t break the Web” also means that a standard shouldn’t casually change the rules, and in the process deem perfectly good current-day web pages to be obsolete (even if they still work). For example, XHTML 2 broke the Web because it demanded an immediate, dramatic shift in the way web pages were written. Yes, old pages would still work—thanks to the backward compatibility that’s built into browsers. But if you wanted to prepare for the future and keep your website up to date, you’d be forced to waste countless hours correcting the “mistakes” that XHTML 2 had banned.
HTML5 has a different viewpoint. Everything that was valid before HTML5 remains valid in HTML5. In fact, everything that was valid in HTML 4.01 also remains valid in HTML 5.
2. Pave the Cowpaths
A cowpath is the rough, heavily trodden track that gets people from one point to another. A cowpath exists because it’s being used. It might not be the best possible way to move around, but at some point it was the most practical working solution.
HTML5 aims to standardize these unofficial (but widely used) techniques. It may not be as neat as laying down a nicely paved expressway with a brand-new approach, but it has a better chance of succeeding. That’s because switching over to new techniques may be beyond the ability or interest of the average website designer. And worse, new techniques may not work for visitors who are using older browsers. XHTML 2 tried to drive people off the cowpaths, and it failed miserably.
Note
Paving the cowpaths has an obvious benefit: It uses established techniques that already have some level of browser support. If you give a web developer a choice between a beautifully designed new feature that works on 70 percent of the web browsers out there and a messy hack that works everywhere, they’ll choose the messy hack and the bigger audience every time.
The “pave the cowpaths” approach also requires some compromises. Sometimes it means embracing a widely supported but poorly designed feature. One example is HTML5’s drag-and-drop ability (see Reading an Image File), which is based entirely on the behavior Microsoft created for IE5. Although this drag-and-drop feature is now supported in all browsers, it’s universally loathed for being clumsy and overly complicated. This has led some web designers to complain that “HTML5 not only encourages bad behavior, it defines it.”
3. Be Practical
This principle is simple: Changes should have a practical purpose. And the more demanding the change, the bigger the payoff needs to be. Web developers may prefer nicely designed, consistent, quirk-free standards, but that isn’t a good enough reason to change a language that’s already been used to create several billion documents. Of course, it’s still up to someone to decide whose concerns are the most important. A good clue is to look at what web pages are already doing—or trying to do.
For example, the world’s third most popular website (at the time of this writing) is YouTube. But because HTML had no real video features before HTML5, YouTube has had to rely on the Flash browser plug-in. This solution works surprisingly well because the Flash plug-in is present on virtually all web-connected computers. However, there are occasional exceptions, like locked-down corporate computers that don’t allow Flash, or Apple-designed devices (like the iPhone and iPad) that don’t support it. And no matter how many computers have Flash, there’s a good case for extending the HTML standard so that it directly supports one of the most fundamental ways people use web pages today—to watch video.
There’s a similar motivation behind HTML5’s drive to add more interactive features—drag-and-drop support, editable HTML content, two-dimensional drawing on a canvas, and so on. You don’t need to look far to find web pages that use all of these features right now, some with plug-ins like Adobe Flash and Microsoft Silverlight, and others with JavaScript libraries or (more laboriously) with pages of custom-written JavaScript code. So why not add official support to the HTML standard, and make sure these features work consistently on all browsers?
Note
Browser plug-ins like Flash won’t go away overnight (or even in the next few years). Despite its many innovations, it still takes far more work to build complex, graphical applications in HTML5 (for example, see the browser-hosted games at www.flasharcade.com). But HTML5’s ultimate vision is clear: to allow websites to offer video, rich interactivity, and piles of frills without requiring a plug-in.
Your First Look at HTML5 Markup
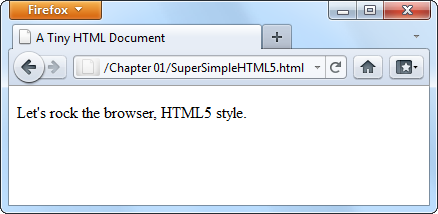
Here’s one of the simplest HTML5 documents you can create. It starts with the HTML5 doctype (a special code that’s explained on The HTML5 Doctype), followed by a title, and then followed by some content. In this case, the content is a single paragraph of text:
<!DOCTYPE html><title>A Tiny HTML Document</title><p>Let's rock the browser, HTML5 style.</p>
You already know what this looks like in a browser, but if you need reassuring, check out Figure 1-1.
You can pare down this document a bit more. For example, the HTML5 standard doesn’t really require the final </p> tag, since browsers know to close all open elements at the end of the document (and the HTML5 standard makes this behavior official). However, shortcuts like these create confusing markup and can lead to unexpected mistakes.
The HTML5 standard also lets you remove the <title> element if the title information is provided by another mechanism. For example, if you’re sending an HTML document in an email message, you could put the title in the title of the email message and put the rest of the markup—the doctype and the content—into the body of the message. But this is obviously a specialized scenario.
More commonly, you’ll want to flesh out this bare-bones HTML5 document. Most web developers agree that using the traditional <head> and <body> sections can prevent confusion, by cleanly separating the information about your page (the head) and its actual content (the body). This structure is particularly useful when you start adding scripts, style sheets, and meta elements:
<!DOCTYPE html><head><title>A Tiny HTML Document</title></head><body><p>Let's rock the browser, HTML5 style.</p></body>
As always, the indenting (at the beginning of lines three and six) is purely optional. This example uses it to make the structure of the page easier to see at first glance.
Finally, you can choose to wrap the entire document (not including the doctype) in the traditional <html> element. Here’s what that looks like:
<!DOCTYPE html><html><head><title>A Tiny HTML Document</title></head><body><p>Let's rock the browser, HTML5 style.</p></body></html>
Up until HTML5, every version of the official HTML specification had demanded that you use the <html> element, despite the fact that it has no effect on browsers. However, HTML5 makes this detail completely optional.
Note
The use of the <html>, <head>, and <body> elements is simply a matter of style. You can leave them out, and your page will work perfectly well, even on old browsers that don’t know a thing about HTML5. In fact, the browser will automatically assume these details. So if you use JavaScript to peek at the DOM (the set of programming objects that represents your page), you’ll find objects for the <html>, <head>, and <body> elements, even if you didn’t add them yourself.
Currently, this example is somewhere between the simplest possible HTML5 document and the fleshed-out starting point of a practical HTML5 web page. In the following sections, you’ll fill in the rest of what you need, and dig a little deeper into the markup.
The HTML5 Doctype
The first line of every HTML5 document is a special code called doctype. It clearly announces to anyone who’s reading the document markup that HTML5 content follows:
<!DOCTYPE html>The first thing you’ll notice about the HTML5 doctype is its striking simplicity. Compare it, for example, to the ungainly doctype that web developers need when using XHTML 1.0 strict:
<!DOCTYPE html PUBLIC "-//W3C//DTD XHTML 1.0 Strict//EN""http://www.w3.org/TR/xhtml1/DTD/xhtml1-strict.dtd">
Even professional web developers were forced to copy-and-paste the XHTML doctype from one document to another. But the HTML5 doctype is short and snappy, so you won’t have much trouble typing it in by hand.
The HTML5 doctype is also notable for the fact that it doesn’t include the official specification version (that’s the 5 in HTML5). Instead, the doctype simply indicates that the page is HTML. This is in keeping with the new vision of HTML5 as a living language (HTML: The Living Language). When new features are added to the HTML language, they’ll automatically be available in your page, without requiring you to edit the doctype.
All of this raises a good question—if HTML5 is a living language, why does your web page require any doctype at all?
The answer is that the doctype remains for historical reasons. Without a doctype, most browsers (including Internet Explorer and Firefox) will lapse into quirks mode. In this mode, they’ll attempt to render pages according to the slightly buggy rules that they used in older versions. The problem is that one browser’s quirks mode differs from the next, so pages designed for one browser are likely to get inconsistently sized fonts, scrambled layouts, and other glitches on another browser.
When you add a doctype, the browser recognizes that you want to use the stricter standards mode, which ensures that the web page is displayed with consistent formatting and layout on every modern browser. The browser doesn’t even care what doctype you use (with just a few exceptions). Instead, it simply checks that you have some doctype. The HTML5 doctype is simply the shortest valid doctype, so it triggers standards mode.
Tip
The HTML5 doctype triggers standards mode on all browsers that have a standards mode, including browsers that don’t know anything about HTML5. For that reason, you can start using the HTML5 doctype now, in all your pages, even if you need to hold off on many of HTML5’s less-supported features.
Although the doctype is primarily intended to tell web browsers what to do, other agents can also check it. This includes HTML5 validators, search engines, design tools, and other human beings (when they’re trying to figure out what flavor of markup you’ve chosen for your page).
Character Encoding
The character encoding is the standard that tells a computer how to convert your text into a sequence of bytes when it’s stored in a file (and how to convert it back again when the file is opened). For historical reasons, there are many different character encodings in the world. Today, virtually all English websites use an encoding called UTF-8, which is compact, fast, and supports all the non-English characters you’ll ever need.
Often, the web server that hosts your pages is configured to tell browsers that it’s serving out pages with a certain kind of encoding. However, because you can’t be sure that your web server will take this step (unless you own it), and because browsers can run into an obscure security issue when they attempt to guess a page’s encoding, you should always add encoding information to your markup.
HTML5 makes that easy to do. All you need to do is add the meta element shown below at the very beginning of your <head> section (or right after the doctype, if you don’t define the <head> element):
<head><metacharset="utf-8"><title>A Tiny HTML Document</title></head>
Design tools like Dreamweaver or Expression Web add this detail automatically when you create a new page. They also make sure that your files are being saved with UTF encoding. However, if you’re using an ordinary text editor, you might need an extra step to make sure your files are being saved correctly. For example, when editing an HTML file in Notepad (on Windows), you must choose UTF-8 from the Encoding list at the bottom of the Save As dialog box. In TextEdit (on Mac OS), you need to first choose Format→Make Plain Text to make sure the program saves your page as an ordinary text file, and you must then choose “Unicode (UTF-8)” from the Plain Text Encoding pop-up menu in the Save As dialog box.
The Language
It’s considered good style to indicate your web page’s natural language. This information is occasionally useful to other people—for example, search engines can use it to filter search results so they include only pages that match the language of the searcher.
To specify the language of some content, you use the lang attribute on any element, along with the appropriate language code. That’s en for plain English, but you can find more exotic language codes at http://people.w3.org/rishida/utils/subtags.
The easiest way to add language information to your web page is to use the <html> element with the lang attribute:
<htmllang="en">
This detail can also help screen readers if a page has text from multiple languages. In this situation, you use the lang attribute to indicate the language of different sections of your document (for example, by applying it to different <div> elements that wrap different content). Then, screen readers can determine which sections they can read aloud.
Adding a Style Sheet
Virtually every web page in a properly designed, professional website uses style sheets. You specify the style sheets you want to use by adding <link> elements to the <head> section of an HTML5 document, like this:
<head><metacharset="utf-8"><title>A Tiny HTML Document</title><linkhref="styles.css"rel="stylesheet"></head>
This method is more or less the same way you attach style sheets to a traditional HTML document, but slightly simpler. Because CSS is the only style sheet language around, there’s no need to add the type=“text/css” attribute that web pages used to require.
Adding JavaScript
JavaScript started its life as a time-wasting way to add glitter and glamour to humdrum web pages. Today, JavaScript is less about user interface frills and more about novel web applications, including super-advanced email clients, word processors, and mapping engines that run right in the browser.
You add JavaScript to an HTML5 page in much the same way that you add it to a traditional HTML page. Here’s an example that references an external file with JavaScript code:
<head><metacharset="utf-8"><title>A Tiny HTML Document</title><scriptsrc="scripts.js"></script></head>
There’s no need to include the language=“JavaScript” attribute. The browser assumes you want JavaScript unless you specify otherwise (and because JavaScript is the only HTML scripting language with broad support, you never will). However, you do still need to remember the closing </script> tag, even when referring an external JavaScript file. If you leave it out or attempt to shorten your markup using the empty element syntax, your page won’t work.
If you spend a lot of time testing your JavaScript-powered pages in Internet Explorer, you may also want to add a special comment called the mark of the Web to your <head> section, right after the character encoding. It looks like this:
<head><metacharset="utf-8"><!-- saved from url=(0014)about:internet --><title>A Tiny HTML Document</title><scriptsrc="scripts.js"></script></head>
This comment tells Internet Explorer to treat the page as though it has been downloaded from a remote website. Otherwise, IE switches into a special locked-down mode, pops up a security warning in a message bar, and won’t run any JavaScript code until you explicitly click, “Allow blocked content.”
All other browsers ignore the “mark of the Web” comment and use the same security settings for remote websites and local files.
The Final Product
If you’ve followed these steps, you’ll have an HTML5 document that looks something like this:
<!DOCTYPE html><htmllang="en"><head><metacharset="utf-8"><title>A Tiny HTML Document</title><linkhref="styles.css"rel="stylesheet"><scriptsrc="scripts.js"></script></head><body><p>Let's rock the browser, HTML5 style.</p></body></html>
Although it’s no longer the shortest possible HTML5 document, it’s a reasonable starting point for any web page you want to build. And while this example seems wildly dull, don’t worry—in the next chapter, you’ll step up to a real-life page that’s full of carefully laid-out content, and all wrapped up in CSS.
Note
All the HTML5 syntax you’ve learned about in this section—the new doctype, the meta element for character encoding, the language information, and the style sheet and JavaScript references, work in browsers both new and old. That’s because they rely on defaults and built-in error-correcting practices that all browsers use.
A Closer Look at HTML5 Syntax
As you’ve already learned, HTML5 loosens some of the rules. That’s because the creators of HTML5 wanted the language to more closely reflect web browser reality—in other words, they wanted to narrow the gap between “web pages that work” and “web pages that are considered valid, according to the standard.” In the next section, you’ll take a closer look at how the rules have changed.
Note
Of course there are still plenty of obsolete practices that browsers support but that the HTML5 standard strictly discourages. For help catching these, you’ll need an HTML5 validator (HTML5 Validation).
The Loosened Rules
In your first walk through an HTML5 document, you discovered that HTML5 makes the <html>, <head>, and <body> elements optional (although they can still be pretty useful). But HTML5’s relaxed attitude doesn’t stop there.
HTML5 ignores capitalization, allowing you to write markup like this:
Capital and lowercase letters<P>don't matter<EM>in tag names.</eM>.</p>
HTML5 also lets you omit the closing slash from a void element—that’s an element with no nested content, like an <img> (image), a <br> (line break), or an <hr> (horizontal line). Here are three equivalent ways to add a line break:
I cannotmove backward<br/>or forward.<br>I am caught<br/>
HTML5 also changes the rules for attributes. Attribute values don’t need quotation marks anymore, as long as the value doesn’t include a restricted character (typically >, =, or a space). Here’s an example of an <img> element that takes advantage of this ability:
<imgalt="Horsehead Nebula"src=Horsehead01.jpg>
Attributes with no values are also allowed. So while XHTML required the somewhat redundant syntax to put a checkbox in the checked state…
<inputtype="checkbox"checked="checked"/>
…you can now revive the shorter HTML 4.01 tradition of including the attribute name on its own.
<inputtype="checkbox"checked>
What’s particularly disturbing to some people isn’t the fact that HTML5 allows these things. It’s the fact that inconsistent developers can casually switch back and forth between the stricter and the looser styles, even using both in the same document. But this really isn’t different from XHTML. In both cases, good style is the responsibility of the web designer, and the browser tolerates whatever you can throw at it.
Here’s a quick summary of what constitutes good HTML5 style (and what conventions the examples in this book follow, even if they don’t have to):
Including the optional <html>, <body>, and <head> elements. The <html> element is a handy place to define the page’s natural language (Character Encoding); and the <body> and <head> elements help to keep page content separate from the other page details.
Using lowercase tags. They’re not necessary, but they’re far more common, easier to type (because you don’t need the Shift key), and not nearly as shouty.
Using quotation marks around attribute values. The quotation marks are there for a reason—to protect you from mistakes that are all too easy to make. Without quotation marks, one invalid character can break your whole page.
On the other hand, there are some old conventions that this book ignores (and you can, too). The examples in this book don’t close empty elements, because most developers don’t bother to add the extra slash (/) when they switch to HTML5. Similarly, there’s no reason to favor the long attribute form when the attribute name and the attribute value are the same.
HTML5 Validation
HTML5’s new, relaxed style may suit you fine. Or, the very thought that there could be inconsistent, error-ridden markup hiding behind a perfectly happy browser may be enough to keep you up at night. If you fall into the latter camp, you’ll be happy to know that a validation tool can hunt down markup that doesn’t conform to the recommended standards of HTML5, even if it doesn’t faze a browser.
Here are some potential problems that a validator can catch:
Missing mandatory elements (for example, the <title> element)
A start tag without a matching end tag
Incorrectly nested tags
Tags with missing attributes (for example, an <img> element without the src attribute)
Elements or content in the wrong place (for example, text that’s placed directly in the <head> section)
Web design tools like Dreamweaver and Expression Web have their own validators, but only the very latest versions have support for HTML5. In the meantime, you can use an online validation tool. Here’s how to use the popular validator provided by the W3C standards organization:
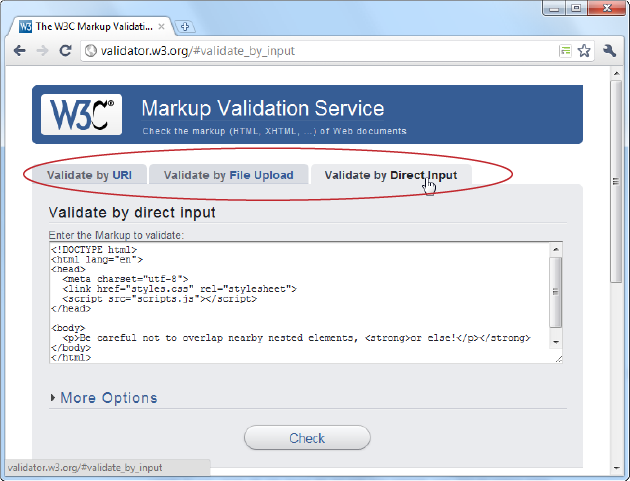
In your web browser, go to http://validator.w3.org (Figure 1-2).
The W3C validator gives you three choices, represented by three separate tabs: “Validate by URI” (for a page that’s already online), “Validate by File Upload” (for a page that’s stored in a file on your computer), and “Validate by Direct Input” (for a bunch of markup you type in yourself).
Figure 1-2. The website http://validator.w3.org gives you three options for validating HTML. You can fill in the address of another web page, you can upload a file of your own, or you can type the markup in directly (shown here).Click the tab you want, and supply your HTML content.
“Validate by URI” lets you validate an existing web page. You just need to type the page’s URL in the Address box (for example, http://www.MySloppySite.com/FlawedPage.html).
“Validate by File Upload” lets you upload any file from your computer. First, click the Browse button (in Chrome, click Choose File). In the Open dialog box, select your HTML file and then click Open.
“Validate by Direct Input” lets you validate any markup—you just need to type it into a large box. The easiest way to use this option is to copy the markup from your text editor and paste it into the box on the W3C validation page.
Before continuing, you can click More Options to change some settings, but you probably won’t. For example, it’s best to let the validator automatically detect the document type—that way, the validator will use the doctype specified in your web page. Similarly, use automatic detection for the character set unless you have an HTML page that’s written in another language and the validator has trouble determining the correct character set.
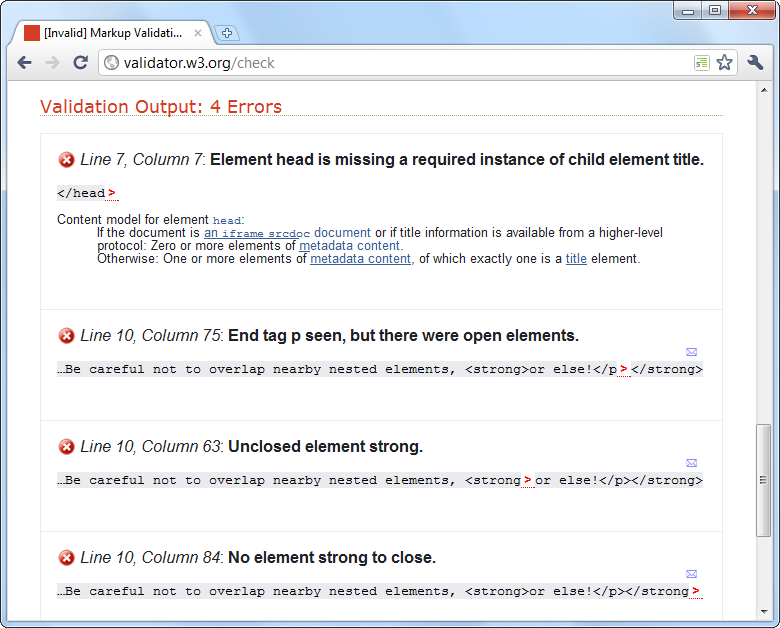
Click the Check button.
This sends your HTML page to the W3C validator. After a brief delay, the report appears. You’ll see whether your document passed the validation check and, if it failed, what errors the validator detected (see Figure 1-3).
Note
Even in a perfectly valid HTML document, you may get a few harmless warnings, including that the character encoding was determined automatically and that the HTML5 validation service is considered to be an experimental, not-fully-finished feature.
The Return of XHTML
As you’ve already learned, HTML5 spells the end for the previous king of the Web—XHTML. However, reality isn’t quite that simple, and XHTML fans don’t need to give up all the things they loved about the past generation of markup languages.
First, remember that XHTML syntax lives on. The rules that XHTML enforced either remain as guidelines (for example, nesting elements correctly) or are still supported as optional conventions (for example, including the trailing slash on empty elements).
But what if you want to enforce the XHTML syntax rules? Maybe you’re worried that you (or the people you work with) will inadvertently slip into the looser conventions of ordinary HTML. To stop that from happening, you need to use XHTML5—a less common standard that is essentially HTML5 with the XML-based restrictions slapped on top.
To turn an HTML5 document into an XHTML5 document, you need to explicitly add the XHTML namespace to the <html> element, close every element, make sure you use lowercase tags, and so on. Here’s an example of a web page that takes all these steps:
<!DOCTYPE html><htmllang="en"xmlns="http://www.w3.org/1999/xhtml"><head><metacharset="utf-8"/><title>A Tiny HTML Document</title><linkhref="styles.css"rel="stylesheet"/><scriptsrc="scripts.js"></script></head><body><p>Let's rock the browser, XHTML5 style.</p></body></html>
Now you can use an XHTML5 validator to get stricter error checking that enforces the old-style XHTML rules. The W3C validator won’t do it, but the validator at http://validator.nu will, provided you click the More Options button and choose XHTML5 from the Preset list. (You’ll also need to choose the “Be lax about HTTP Content-Type” option, unless you’re using the direct input approach, and pasting your markup into a text box.)
If you follow these steps, you’ll be able to create and validate an XHTML document. However, browsers will still process your page as an HTML5 document—one that just happens to have a XML inferiority complex. They won’t attempt to apply any extra rules.
If you want to go XHTML5 all the way, you need to configure your web server to serve your page with the MIME type application/xhtml+xml or application/xml, instead of the standard text/html. (See Browser Support for Media Formats for the lowdown on MIME types.) But before you call your web hosting company, be warned that this change will prevent your page from being displayed by any version of Internet Explorer before IE 9. For that reason, true XHTML5 is an immediate deal-breaker in the browser.
Incidentally, browsers that do support XHTML5 deal with it differently than ordinary HTML5. They attempt to process the page as an XML document, and if that process fails (because you’ve left a mistake behind), the browser gives up on the rest of the document.
Bottom line? For the vast majority of web developers, from ordinary people to serious pros, XHTML5 isn’t worth the hassle. The only exception is developers who have a specific XML-related goal in mind (for example, developers who want to manipulate the content in their pages with XML-related standards like XQuery and XPath).
Tip
If you’re curious, you can trick your browser into switching into XHTML mode. Just rename your file so that it ends with .xhtml or .xht. Then open it from your hard drive. Most browsers (including Firefox, Chrome, and IE 9) will act as though you downloaded the page from a web server with an XML MIME type. If there’s a minor error in the page, the browser window will show a partially processed page (IE 9), an XML error message (Firefox), or a combination of the two (Chrome).
HTML5’s Element Family
So far, this chapter has focused on the changes to HTML5’s syntax. But more important are the additions, subtractions, and changes to the elements that HTML supports. In the following sections, you’ll get an overview of how they’ve changed.
Added Elements
In the following chapters, you’ll spend most of your time learning about new elements—ingredients that haven’t existed in web pages up until now. Table 1-1 has a preview of what’s in store (and where you can read more about it).
Category | Elements | Discussed in… |
Semantic elements for structuring a page | <article>, <aside>, <figcaption>, <figure>, <footer>, <header>, <hgroup>, <nav>, <section> <details>, <summary> | |
Semantic elements for text | <mark>, <time> <wbr> (previously supported, but now an official part of the language) | |
Web forms and interactivity | <input> (not new, but has many new subtypes) <datalist>, <keygen>, <meter>, <progress>, <command>, <menu>, <output> | |
Audio, video, and plug-ins | <audio>, <video>, <source> <embed> (previously supported, but now an official part of the language) | |
Canvas | <canvas> | |
Non-English language support | HTML5 specification at http://dev.w3.org/html5/markup |
Removed Elements
Although HTML5 adds new elements, it also boots a few out of the official family. These elements will keep working in browsers, but any decent HTML5 validator will smoke them out of their hiding places and complain loudly (HTML5 Validation).
Most obviously, HTML5 keeps the philosophy (first cooked up with XHTML) that presentational elements are not welcome in the language. Presentational elements are elements that are simply there to add formatting to web pages, and even the greenest web designer knows that’s a job for style sheets. Rejects include elements that professional developers haven’t use in years (like <big>, <center>, <font>, <tt>, and <strike>). HTML’s presentational attributes died the same death, so there’s no reason to rehash them all here.
Additionally, HTML5 kicks more sand on the grave where web developers buried the HTML frames feature. When it was first created, HTML frames seemed like a great way to show multiple web pages in a single browser window. But now, frames are better known as an accessibility nightmare that causes problems with search engines, assistive software, and mobile devices. Interestingly, the <iframe> element—which lets developers put one page inside another—squeaks through. That’s because web applications use the <iframe> for a range of integration tasks, like incorporating YouTube windows, ad units, and Google search boxes in a web page.
A few more elements were kicked out because they were redundant or the cause of common mistakes, including <acronym> (use <abbr> instead) and <applet> (because <object> is preferred). But the vast majority of the element family lives on in HTML5.
Note
For those keeping count, HTML5 includes a family of just over 100 elements. Out of these, almost 30 are new and about 10 are significantly changed. You can browse the list of elements (and review which ones are new or changed) at http://dev.w3.org/html5/markup.
Adapted Elements
HTML5 has another odd trick: sometimes it adapts an old feature for a new purpose. For example, consider the <small> element, which had fallen out of favor as a clumsy way to shrink the font size of a block of text (a task more properly done with style sheets). But unlike the discarded <big> element, the HTML5 keeps the <small> element, with a change. Now, the <small> element represents “small print”—for example, the legalese that no one wants you to read at the bottom of a contract:
<small>The creators of this site will not be held liable for any injuries that
may result from unsupervised unicycle racing.</small>
Text inside the <small> element is still displayed as it always was, using a smaller font size, unless you override that setting with a style sheet.
Note
Opinions on this <small> technique differ. On the one hand, it’s great for backward compatibility, because old browsers already support the <small> element, and so they’ll continue to support it in an HTML5 page. On the other hand, it introduces a potentially confusing change of meaning for old pages. They may be using the <small> element for presentational purposes, without wanting to suggest “small print.”
Another changed element is <hr> (short for horizontal rule), which draws a separating line between sections. In HTML5, <hr> represents a thematic break—for example, a transition to another topic. The default formatting stays, but now a new meaning applies.
Similarly, <s> (for struck text), isn’t just about crossing out words anymore—it now represents text that is no longer accurate or relevant, and has been “struck” from the document. Both of these changes are subtler than the <small> element’s shift in meaning, because they capture ways that the <hr> and <s> elements are commonly used in traditional HTML.
Bold and italic formatting
The most important adapted elements are the ones for bold and italic formatting. Two of HTML’s most commonly used elements—that’s <b> for bold and <i> for italics—were partially replaced when the first version of XHTML introduced the look-alike <strong> and <em> elements. The idea was to stop looking at things from a formatting point of view (bold and italics), and instead substitute elements that had a real logical meaning (strong importance or stress emphasis). The idea made a fair bit of sense, but the <b> and <i> tags lived on as shorter and more familiar alternatives to the XHTML fix.
HTML5 takes another crack at solving the problem. Rather than trying to force developers away from <b> and <i>, it assigns new meaning to both elements. The idea is to allow all four elements to coexist in a respectable HTML5 document. The result is the somewhat confusing set of guidelines listed here:
Use <strong> for text that has strong importance. This is text that needs to stand out from its surroundings.
Use <b> for text that should be presented in bold but doesn’t have greater importance than the rest of your text. This could include keywords, product names, and anything else that would be bold in print.
Use <em> for text that has emphatic stress—in other words, text that would have a different inflection if read out loud.
Use <i> for text that should be presented in italics but doesn’t have extra emphasis. This could include foreign words, technical terms, and anything else that you’d set in italics in print.
And here’s a snippet of markup that uses all four of these elements in the appropriate way:
<strong>Breaking news!</strong>There's a sale on<i>leche quemada</i>candy at the<b>El Azul</b>restaurant. Don't delay, because when the last candy is gone, it's<em>gone</em>.
In the browser, the text looks like this:
Breaking news! There’s a sale on leche quemada candy at the El Azul restaurant. Don’t delay, because when the last candy is gone, it’s gone.
It remains to be seen if web developers will follow HTML’s well-intentioned rules, or just stick with the most familiar elements for bold and italic formatting.
Tweaked Elements
HTML5 also shifts the rules of a few elements. Usually, these changes are minor details that only HTML wonks will notice, but occasionally they have deeper effects. One example is the rarely used <address> element, which is not suitable (despite the name) for postal addresses. Instead, the <address> element has the narrow purpose of providing contact information for the creator of the HTML document, usually as an email address or website link:
Our website is managed by:<address><ahref="mailto:jsolo@mysite.com">John Solo</a>,<ahref="mailto:lcheng@mysite.com">Lisa Cheng</a>, and<ahref="mailto:rpavane@mysite.com">Ryan Pavane</a>.</address>
The <cite> element has also changed. It can still be used to cite some work (for example, a story, article, or television show), like this:
<p>Charles Dickens wrote<cite>A Tale of Two Cities</cite>.</p>
However, it’s not acceptable to use <cite> to mark up a person’s name. This restriction has turned out to be surprisingly controversial, because this usage was allowed before. Several guru-level web developers are on record urging people to disregard the new <cite> rule, which is a bit odd, because you can spend a lifetime editing web pages without ever stumbling across the <cite> element in real life.
A more significantly tweak affects the <a> element for creating links. Past versions of HTML have allowed the <a> element to hold clickable text or a clickable image. In HTML5, the <a> element allows anything and everything, which means it’s perfectly acceptable to stuff entire paragraphs in there, along with lists, images, and so on. (If you do, you’ll see that all the text inside becomes blue and underlined, and all the images inside sport blue borders.) Web browsers have supported this behavior for years, but it’s only HTML5 that makes it an official, albeit not terribly useful, part of the HTML standard.
There are also some tweaks that don’t work yet—in any browser. For example, the <ol> element (for ordered lists) now gets a reversed attribute, which you can set to count backward (either toward 1, or toward whatever starting value you set with the start attribute), but no browsers recognize this setting yet.
You’ll learn about a few more tweaks as you make your way through this book.
Standardized Elements
HTML5 also adds supports for a few elements that were supported but weren’t officially welcome in the HTML or XHTML language. One of the best-known examples is <embed>, which is used all over the Web as an all-purpose way to shoehorn a plug-in into a page.
A more exotic example is <wbr>, which indicates an optional word break—in other words, a place where the browser can split a line if the word is too long to fit in its container:
<p>Many linguists remain unconvinced that<b>supercali<wbr>fragilistic<wbr>expialidocious</b>is indeed a word.</p>
The <wbr> element is useful when you have long names (sometimes seen in programming terminology) in small places, like table cells or tiny boxes. Even if the browser supports <wbr>, it will break the word only if it doesn’t fit in the available space. In the previous example, that means the browser may render the word in one of the following ways:
Many linguists remain
unconvinced that
supercalifragilisticexpialidocious
is indeed a word.
Many linguists remain
unconvinced that
supercalifragilistic
expialidocious is indeed a
word.
Many linguists
remain
unconvinced
that supercali
fragilistic
expialidocious
is indeed a
word.
The <wbr> element pairs naturally with the standard <nobr> element (which you can use to prevent a term from being split where there’s a space). But until HTML5, the <wbr> existed as a nonstandard extension that was supported in only some browsers.
Using HTML5 Today
As you’ve seen, HTML5 is an odd mix. At the same time that it revives (and standardizes) some of the old laissez-faire rules of HTML, it also introduces bleeding-edge features that won’t work in anything but the newest browsers around.
As far as browser compatibility is concerned, you can think of HTML5 features in three categories:
Features that already work. This includes features that are well supported but weren’t an official part of HTML in the past (like drag-and-drop). It also includes features that can work on older browsers with very little extra work, like the semantic elements described in Chapter 2.
Features that degrade gracefully. For example, the new <video> element has a fallback mechanism that lets you supply something else to older browsers, like a video player that uses the Flash plug-in. (Supplying an error message is somewhat rude, and definitely not an example of degrading gracefully.) This category also includes nonessential frills that older browsers can safely ignore, like some of the web form features (like placeholder text) and some of the formatting properties from CSS3 (like rounded corners and drop shadows).
Features that require a JavaScript workaround. Many of HTML5’s new features are inspired by the stuff web developers are already doing the hard way. Thus, it should come as no surprise that you can duplicate many of HTML5’s features using a good JavaScript library (or, in the worst-case scenario, by writing a whack-load of your own custom JavaScript). Creating JavaScript workarounds can be a lot of work, and if you decide a feature is essential and needs a workaround, you may simply decide to use that workaround for everybody, and save the HTML5 approach for the future.
This book assumes that you want to use the HTML5 approach when it’s completely safe—that’s the first feature category in the list above. If a feature falls into one of the other categories (and many do), it’s up to you to determine if you want to put the work into developing an old-browser solution, or whether you’re just here to bide your time and prepare for the greener pastures ahead. If a good JavaScript workaround exists on the Web, this book will point it out. However, many times you’ll face a murky choice between fancy new features and universal compatibility.
Evaluating Browser Support
The people who have the final word on how much HTML5 you use are the browser vendors. If they don’t support a feature, there’s not much point in attempting to use it, no matter what the standard says. Today, there are four or five major browsers (not including mobile browsers designed for web-connected devices like smartphones and iPads). A single web developer has no chance of testing each prospective feature on every browser—not to mention evaluating support in older versions that are still widely used.
Fortunately, there’s a website named http://caniuse.com that can help you out. It details the HTML5 support found in every mainstream browser. Best of all, it lets you focus on exactly the features you need. Here’s how it works:
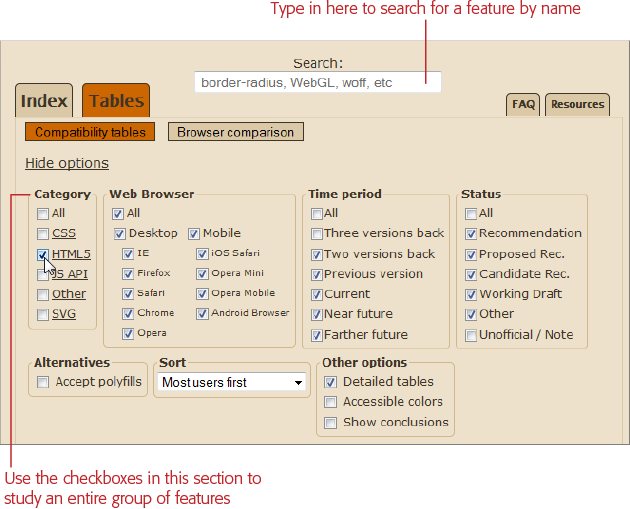
First, at the top of the page, pick the feature (or group of features) that you’re interested in using in the checkboxes (Figure 1-4).
You can search for a specific feature by typing its name into the Search box near the top of the page. Or, you can look at a whole category of features (in which case, you’ll get a separate compatibility table for each subfeature) by using the checkboxes in the Category box. For example, click HTML5 and clear the other checkboxes to see only those features that are considered a part of the HTML5 standard. Choose JS API to see many of the JavaScript-powered features that began as part of HTML5 but have since been split off. And choose CSS to explore support for fancy new CSS3 features.
Optionally, pick your other options using the other checkboxes.
You can refine your tables by removing some details. For example, you may not want to see compatibility information for mobile browsers or for browsers that are still in development and not officially released. However, it’s usually easiest to just keep all these options switched on, since the tables are still easy to read.
Scroll down to see your results (Figure 1-5).
If you’re looking at a large batch of features, you’ll see only 20 tables at a time. You can move from one page to the next by clicking the “Show next 20” link at the bottom of the page.
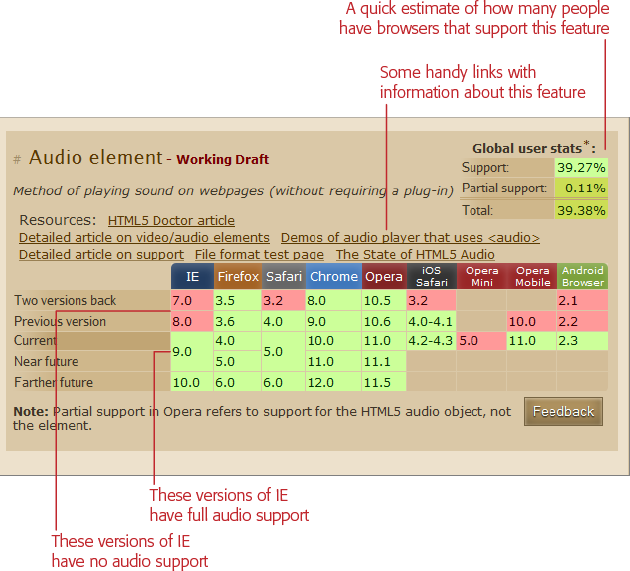
Each feature table shows a grid of different browser versions. The tables indicate support with the color of the cell, which can be red (no support), bright green (full support), olive green (partial support), or gray (undetermined, usually because this version of the browser is still under development and the feature hasn’t been added yet).
Browser Adoption Statistics
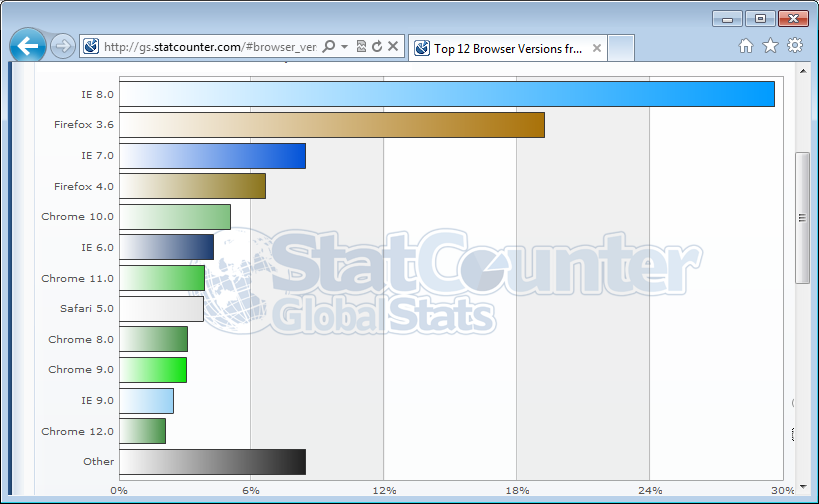
Browser adoption statistics fill in the last piece of the puzzle. They tell you what portion of your audience has a browser that supports the features you plan to use. One good place to get a look is the popular GlobalStats site http://gs.statcounter.com. Once you get there, choose Browser Version in the Statistic list box (under the chart). This chart lets you consider not just which browsers are being used, but which versions of each browser. You can also pick a geographic region, like North America, from the Country/Region list box.
Lastly, you can pick the chart type using the option buttons that are just to the right of the chart box. Pick Bar to see a bar chart that shows a snapshot of the current situation. Pick Line to see a line chart that shows the trend in browser adoption over time. By default, line charts show the entire previous year (Figure 1-6), but you can tweak the date range to focus on the time period that interests you.
GlobalStats compiles its statistics daily using tracking code that’s present on millions of websites. And while that’s a large number of pages and a huge amount of data, it’s still just a small fraction of the total Web, which means you can’t necessarily assume that your website visitors will have the same browsers.
Furthermore, browser-share results change depending on the web surfer’s country and the type of website. For example, in Germany, Firefox is the top browser with 60 percent of web surfers, while in Belarus, Opera wins the day with a 49 percent share. And on the TechCrunch website (a popular news site for computer nerds), barely 16 percent use any version of the world’s most popular web browser, Internet Explorer. So if you want to design a website that works for your peeps, review the web statistics generated by your own pages. (And if you aren’t already using a web tracking service for your site, check out the top-tier and completely free Google Analytics, at www.google.com/analytics.)
Feature Detection with Modernizr
For the next few years, it’ll be a fact of life that some of your visitors’ browsers won’t support HTML5. That doesn’t need to stop you from using these features, if you’re willing to put in some work to create a workaround or degrade gracefully. Either way, you’ll probably need the help of some JavaScript code. The typical pattern is this: Your page loads and a script runs to check whether a specific feature is available.
Unfortunately, because HTML5 is, at its heart, a loose collection of related standards, there’s no single support test. Instead, you need dozens of different tests to check for dozens of different features—and sometimes even to check if a specific part of a feature is supported, which gets ugly fast.
Checking for support usually involves looking for a property on a programming object, or creating an object and trying to use it a certain way. But think twice before you write this sort of feature-testing code, because it’s so easy to do it badly. For example, your feature-testing code might fail on certain browsers for some obscure reason or another, or quickly become out of date. Instead, consider using Modernizr (www.modernizr.com), a small, constantly updated tool that tests the support of a wide range of HTML5 and related features. It also has a cool trick for implementing fallback support when you’re using new CSS3 features, which you’ll see on Strategy 3: Add Fallbacks with Modernizr.
Here’s how to use Modernizr in one of your web pages:
Look for the “Download Modernizr” box. In it, click the Development button to download the Modernizr JavaScript file.
Typically, this file has a name like modernizr-2.0.6.js. The exact name depends on the version you’re using. Some developers rename the file so it doesn’t include the version number (say, modernizr.js). That way you can update the Modernizr script file in the future without needing to modify the script reference in the web pages that use it.
Tip
The full Modernizr script is a bit bulky. It’s intended for testing purposes while you’re still working on your website. Once you’ve finished development and you’re ready to go live, you can create a slimmed-down version of the Modernizr script that tests only for the features you need. To do so, click the Production button in the “Download Modernizr” box. This takes you to a page where you can pick and choose the features you want to detect (by clicking the appropriate checkboxes) and then create your custom version (by clicking the Generate button).
Place the file in the same folder as your web page.
Or, place it in a subfolder, and modify the path in the JavaScript reference (see the next step) accordingly.
Add a reference to the JavaScript file in the <head> section of your web page.
Here’s an example of what your markup might look like:
<head><metacharset="utf-8"><title>HTML5 Feature Detection</title><scriptsrc="modernizr-2.0.6.js"></script>...</head>Now, when your page loads, the Modernizr script runs. It tests for a couple of dozen new features, in mere milliseconds, and then creates a JavaScript object called Modernizr that contains the results. You can test the properties of this object to check the browser’s support for a specific feature.
Tip
For the full list of features that Modernizr tests, and for the JavaScript code that you need to examine each one, refer to the documentation at www.modernizr.com/docs.
Write some script code that tests for the feature you want and then carries out the appropriate action.
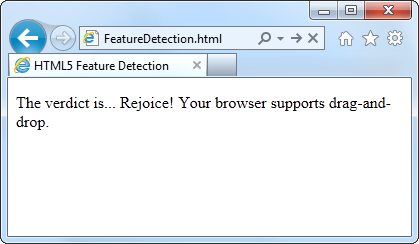
For example, here’s how you might test whether Modernizr supports the HTML5 drag-and-drop feature, and show the result in the page:
<!DOCTYPE html><htmllang="en"><head><metacharset="utf-8"><title>HTML5 Feature Detection</title><scriptsrc="modernizr-2.0.6.js"></script></head><body><p>The verdict is...<spanid="result"></span></p><script>// Find the element on the page (named result) where you can show// the results.varresult=document.getElementById("result");if(Modernizr.draganddrop){result.innerHTML="Rejoice! Your browser supports drag-and-drop.";}else{result.innerHTML="Your feeble browser doesn't support drag-and-drop.";}</script></body></html>Figure 1-7 shows the result.
Tip
This example uses basic and time-honored JavaScript techniques—looking up an element by ID and changing its content. If you find it a bit perplexing, you can brush up with the JavaScript review in Appendix B.
Feature “Filling” with Polyfills
Modernizr helps you spot the holes in browser support. It alerts you when a feature won’t work. However, it doesn’t do anything to patch these problems. That’s where polyfills come in. Basically, polyfills are a hodgepodge collection of techniques for filling the gaps in HTML5 support on aging browsers. The word polyfills is borrowed from the product polyfiller, a compound that’s used to fill in drywall holes before painting (also known as spackling paste). In HTML5, the ideal polyfill is one you can drop into a page without any extra work. It takes care of backward compatibility in a seamless, unobtrusive way, so you can work with pure HTML5 while someone else worries about the workarounds.
But polyfills aren’t perfect. Some rely on other technologies that may be only partly supported. For example, one polyfill allows you to emulate the HTML5 <canvas> on old versions of Internet Explorer using the Silverlight plug-in. But if the web visitor isn’t willing or able to install Silverlight, you need to fall back on something else. Other polyfills may have fewer features than the real HTML5 feature, or poorer performance.
Occasionally, this book will point you to a potential polyfill. If you want more information, you can find the closest thing there is to a comprehensive catalog of HTML5 polyfills on GitHub at http://tinyurl.com/polyfill. But be warned—polyfills differ greatly in quality, performance, and support.
Tip
Remember, it’s not enough to simply know that a polyfill exists for a given HTML5 feature. You must test it and check how well it works on various old browsers before you risk incorporating the corresponding feature into your website.
With tools like browser statistics, feature detection, and polyfills, you’re ready to think long and hard about integrating HTML5 features into your own web pages. In the next chapter, you’ll take the first step, with some HTML5 elements that can function in browsers both new and old.
Get HTML5: The Missing Manual now with the O’Reilly learning platform.
O’Reilly members experience books, live events, courses curated by job role, and more from O’Reilly and nearly 200 top publishers.

