Chapter 4. Web Surfing Enhancements
Hacks 33-43
The problem with software is that there’s never enough choice. There are only a few really good word processors, only a few really good graphic design tools, and only a few really good web browsers. Among those few choices, it’s just not possible for one browser, not even Firefox, to satisfy all of the people all of the time. This chapter explains how to change the Firefox user interface so that it behaves the way you want it to.
They say dog owners tend to look like their dogs, and maybe the same is true of web surfers and their web browsers. How Firefox looks to you depends on which parts of it you spend the most time with. A classic example is bookmarks [Hack #33] . The Firefox bookmark system is quite a rich little thing, as you’ll see. If you happen to be a heavy user of bookmarks, there are many powerful and less well-known bookmark tricks to try out.
Most of the power features of Firefox are not bundled with the browser. They’re available as extensions, both from Mozilla’s official update web site (update.mozilla.org) and from miscellaneous places around the Web. Most of this chapter is a tour of the very best user extensions currently available. Finding an extension that matches your activity profile—one that blesses you with faster workflow and less frustration—is like finding a gold nugget in your own backyard. So start digging. There are new extensions being published all the time.
Use Fancy Bookmarks
Bookmarks can do more than record web pages. See how they’ve grown.
Hidden inside Firefox’s bookmark system are a number of advanced features. This hack explains how to use them.
The Firefox bookmarks user interface is different from that of the Mozilla Application Suite or Netscape. In particular, the Check for Updates and Notify functionality is missing in Firefox 1.0. That feature causes the browser to optionally poll bookmarked web pages to see whether they have changed recently. Firefox supports the same bookmark format as other Mozilla browsers, but Version 1.0 just doesn’t do any polling. Check the release notes for later, minor versions to see if that feature has been added back in recently. In these modern times, RSS is probably the new way forward for polled web content. See “Live Bookmarks” later in this hack for more on RSS.
In addition to the features described in this hack, there are several extensions that extend the bookmark system. Feed readers [Hack #37] are just one example. Have a look at the Bookmarks category at http://update.mozilla.org.
Use Tab Group Bookmarks
If you have multiple tabs open at once, you can bookmark them all in one go. Choose Bookmarks→Bookmark this Page and tick the “Bookmark all tabs in a folder” checkbox, as shown in Figure 4-1.
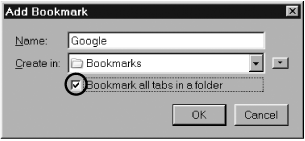
The folder will be named with the title of the leftmost tab. To reopen that set of bookmarks as tabs, drill down through the Bookmarks menu and submenus to the folder you want to see and then choose the bottom menu item (the one labeled Open in Tabs).
It’s also possible to start up Firefox so that multiple tabs are displayed. This functionality is not available in bookmarks. Use a URL in this format to make it happen:
http://www.example.com/page1.html|http://www.example.com/page2.htmlThe vertical bar character (|) separates the URLs for each tab. This
syntax can be used on the command line when starting Firefox, or it
can be specified as the default home page in the Tools→Options→General dialog box. Because the pipe
character has other historic uses, this syntax is not locked in stone
yet, but it is available and working in Firefox 1.0.
Use Sidebar Bookmarks
A bookmark can be opened in the Firefox sidebar rather than in the main page. To do so, first create the bookmark. Next, open the Bookmark Manager using Bookmarks→Manage Bookmarks.... Drill down to the bookmark, right-click on it, and choose Properties. In the dialog box, tick the “Load this bookmark in the sidebar” checkbox, as shown in Figure 4-2.
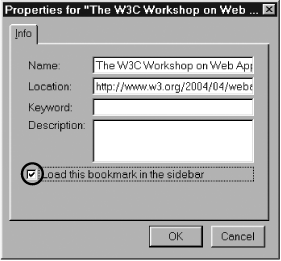
Once the bookmark is saved, recalling it opens the sidebar and loads the page into it.
Use Keyword Bookmarks
A keyword bookmark matches more than one web page. Usually, the page you
want is parameterized, which means that it
represents an HTTP GET request and
includes special query values. Keyword bookmarks allow one parameter
of the bookmark’s URL to be left unspecified. When that is done, the
bookmark can’t (usually) be loaded by clicking on any bookmark icon.
Instead, you use the bookmark by typing a keyword and parameter into
the Location bar.
Here are two examples. The first URL identifies a Mozilla Bugzilla bug report by bug number. The second identifies an Amazon.com book by its Amazon ASIN, which for a book is typically its ISBN number:
https://bugzilla.mozilla.org/show_bug.cgi?id=273050
http://www.amazon.com/exec/obidos/ASIN/0131423436/
After the special bookmarks are created, you can recall any bug or any book just by typing short keywords into the Location bar:
bug 273050
book 0131423436
In short versions, the second term can be varied without changing the bookmark, so all of these are supported as well:
bug 12345
bug 13
book 0131313131
To create such a keyword bookmark, construct a bookmark for each original URL and open the Properties dialog box for each one. Then, make the URL for the bookmark more generic by changing the Location: field as follows:
https://bugzilla.mozilla.org/show_bug.cgi?id=%s

http://www.amazon.com/exec/obidos/ASIN/%s
/
The %s characters (stolen
from the syntax of printf() format
masks) will be replaced with the single parameter supplied. %s can appear only once. In the Keyword:
field, type in the new keyword for the bookmark, in this case one of
these two:
bug
book
Save these changes. Figure 4-3 shows the final setup for the Amazon.com example.

The SmartSearch extension adds some user-interface niceties to keyword bookmark functionality. Find it at http://update.mozilla.org.
Live Bookmarks
Firefox’s major bookmark innovation is to integrate RSS feeds into the bookmark system. In this case, one bookmark stands for a whole RSS feed and appears as a bookmark folder. When the folder is opened (usually after being placed on the Bookmarks Toolbar), the feed is downloaded and a bookmark is created in the folder for each feed item found. The simplest way to create a Live Bookmark is to click on the RSS feed icon [Hack #4] that appears on the status bar when a web page advertises that a feed is available.
To create a live bookmark manually, just open the Bookmark Manager window (Bookmarks→Manage Bookmarks), click on the folder that will hold the live bookmark, and choose File→New Live Bookmark. Fill in the RSS XML- or RDF-based URL, and you’re finished.
Modify Tabbed Browsing
Customize the look and behavior of tabs to any degree.
Tabbed browsing is often touted as one of Firefox’s killer features. Indeed, it’s very useful, but the default preferences aren’t perfect for everyone. That’s OK, because Firefox offers plenty of preferences for customizing your tabbed-browsing experience. If you can’t find what you want in the preferences, you can go a step further by installing one of the many Firefox extensions that can make minor alterations to your tabs.
Still not satisfied? The most aggressive of all the tab-related extensions, discussed at the end of this hack, completely replaces Firefox’s tabs with its own.
Tabbed-Browsing Preferences
Firefox preferences allow you to control how tabs respond to certain types of events. Some of the preferences are easily set in the Preferences window, while others require you to use the special about:config page in the browser.
Tip
To find tabbed-browsing preferences in about:config, type tabs in the Search box at the top of the
list.
Links from other applications
When a link is sent from another application, such as when you click on a URL in an email, what should the browser do? There are three options: open the page in a new window, open the page in a new tab in the front window, or replace the current page in the front window.
The options for this behavior are shown at the top of the
Tabbed Browsing panel in the Preferences window. If you ever feel
the need to set this preference via about:config, look for browser.link.open_external. Setting this
preference to 1 opens the link in
the current tab and window, 2
opens it in a new window, and 3
opens it in a new tab in the front window.
Loading tabs in the foreground or background
There are three preferences that control whether new tabs load in
front of the current tab or behind it. These preferences correspond to the
three types of events that can open a new tab. Two can be set in the
Preferences window (checked or true means “load in foreground”; unchecked
or false means “load in
background”), while the third requires the
about:config page, described earlier in this
hack:
- Control (Command)-clicking a link in the browser to open a new tab
Set this in the Preferences window with the checkbox labeled “Select new tabs opened from links” or in about:config by changing
browser.tabs.loadInBackground.- Opening a tab from a bookmark or the browser history panel
In the Preferences window, this event is called “Select new tabs opened from bookmarks or history.” In about:config, it’s
browser.tabs.opentabfor.bookmarks.- Opening a tab from a link sent by another application
There is no checkbox in the Preferences window for this setting. In about:config, this preference is
browser.tabs.loadDivertedInBackground.
Getting rid of tabs when there’s only one
This preference hides the tab bar at the top of the set of tabs when only one tab exists:
browser.tabs.autoHide /* set to true to enable hiding */
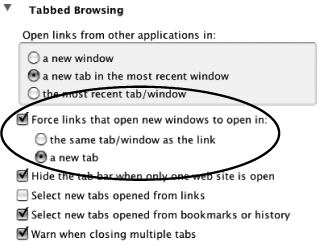
Single Window mode
Do you hate it when links on web pages open new windows (because they set a
target attribute on the link)?
You can force Firefox to open those links in a new tab instead of a
new window. This is called Single Window mode. It doesn’t prevent
all new windows, but it catches most of them. The radio buttons for
setting this preference are in the Preferences window, but only if
Firefox knows you want to see them. Go to
about:config and set browser.tabs.showSingleWindowModePrefs to
true. Figure 4-4 shows the items
that are added to the Preferences window’s Tabbed Browsing panel
after making this change.
Extensions that Alter Tabbed Browsing
There are a number of Firefox extensions that interact with tabbed browsing. Two are designed to make it easier to set the preferences exactly how you like, and one adds some useful new features via the creative use of tabs and keystrokes. New extensions are being written all the time, so check the Mozilla Updates web site (http://updates.mozilla.org/) for the latest additions.
Tabbrowser Preferences
The Tabbrowser Preferences (TBP) extension (http://www.pryan.org/mozilla/site/TheOneKEA/tabprefs/), by Bradley Chapman, organizes all of the preferences related to tabbed browsing into a single pane in the Preferences window. You can set all of the same preferences via the special about:config page, but by using TBP, you don’t have to remember what the different preference names mean or what value to set in order to get the behavior you want.
Quick Tab Pref Toggle
The Quick Tab Pref Toggle (QTPT) extension (http://jedbrown.net/mozilla/extensions/#QuickTabPrefToggle), by Jed Brown, allows you to maintain two sets of tabbed-browsing preferences. The idea is that you’ll usually want to divert all new windows into new tabs, but occasionally you’ll work with a page that really should pop up a separate window. This extension lets you put a small button (a toggle) in the toolbar to flip back and forth between two sets of preferences with a single click.
Magpie
Magpie (http://www.bengoodger.com/software/tabloader/), by lead Firefox developer Ben Goodger, is not a tabbed-browsing extension per se, but it has a related feature that demonstrates a completely different use for tabs. Magpie can save all of the tabs to the right of the one you’re currently viewing to files on disk. (It’s intended for media files, such as pictures.)
For example, if you open a photo album web page that contains thumbnails of a dozen pictures, you could Ctrl-click (Command-click) each of them to open the full size photos in separate tabs. Then, a single use of Magpie’s Ctrl-Shift-S would save all of those images to disk in a single folder and close the tabs. This is much faster than saving each image to disk one at a time.
Tabbrowser Extension: A Complete Tabbing Overhaul
The Tabbrowser Extension (TBE, http://piro.sakura.ne.jp/xul/_tabextensions.html.en), by Shimoda “Piro” Hiroshi, is a power user’s tool. It’s the super-ultra-deluxe tabbing system, with every feature you can imagine and a few you probably can’t. TBE completely replaces the built-in browser tabs with TBE’s own. Review the install notes and latest status, as TBE is still being polished and debugged as this goes to print.
TBE’s tabs look just like the regular tabs in Firefox (by default, anyway) but offer lots of features you simply can’t get any other way. In fact, TBE is so flexible that the Preferences window for tweaking its behavior has almost as many options as Firefox’s own Preferences window! TBE allows you to do the following things:
Rearrange tabs by dragging them to the left or right
Duplicate tabs in the same window or into a new window
Color your tabs
Display tabs on any side of the browser window (not just the top)
Automatically load the same group of tabs you were using when you last quit Firefox
Undo a closed tab (reopen it to the same page)
Lock a tab so that all links within it automatically open in a new tab
Block the page in a specific tab from being listed in the
Referer: header when you click a linkAutomatically reload a tab every n seconds, minutes, or days
Add a Close button to every tab
Loads more...
TBE also supports plug-in modules of its own. You’ll find these plug-ins and more listed at http://piro.sakura.ne.jp/xul/_tabextensions_modules.html.en:
- ContextMenu Rearrangement Module
Adds another preference panel to change the order of menu items in the tab bar’s context menu (the menu shown when you right-click or Ctrl-click anywhere on the browser’s tab bar).
- Tab Numbering Module
Even Firefox’s regular tabs allow you to switch to a specific tab by Ctrl-
#, where#is the number of the tab (1 to 9) you want to switch to. With TBE and the Tab Numbering Module installed, holding down the Control key causes the tab numbers to pop up over the tabs, so you immediately know which number you need.- Highlight Unread Tab Module
When a new tab is opened in the background (behind the tab you’re currently viewing), TBE marks it as unread. This module allows you to change how the unread tabs are displayed, making it easy for you to see which tabs you haven’t looked at yet.
- Smooth Resizing Patch
When your browser window has lots of tabs open, you might find that resizing the browser window is slower or jerkier than expected, especially if your computer is not the latest and greatest model. This module lets you resize the windows much more smoothly, but it causes a slight delay when switching tabs.
- Focus Previously Selected Tab Module
Keeps track of which tabs you visit and in which order and allows you to step backward and forward through that history, which is useful when you have many, many tabs open and accidentally switch to another tab before finishing with the current one. One quick keystroke, and you’re back where you started.
The Tabbrowser Extension is far too feature-rich to cover everything here. If you take your tabbed browsing seriously and want full control over every aspect, then TBE is worth a look.
—Seth Dillingham
Govern Image and Ad Display
A picture is worth a thousand words; here’s how to make the most out of web page pictures.
Images are a big fraction of web content. They consume most of your Internet bandwidth and most of the energy your brain devotes to comprehension. There are many tricks you can apply to poke and tweak images to suit your taste. This hack describes a few.
Block Images and Advertising Content
Firefox provides simple image-blocking options under Tools→Options→Web Features. You can also turn to extensions or your own custom styles. Attempting to block advertising is a technology war. Web browsers can now block pop-ups, straightforward advertising banners, and Flash ads, so if you don’t want such things, you’re currently enjoying a well-earned respite. In the near future, though, commercial web sites will discover ways around these blocking techniques.
Using standard features
If you uncheck Tools→Options→Web Features→Load Images, no images at all will be downloaded for display and web pages will load faster. Locally cached copies of images will not be used. Images drawn in via CSS stylesheets will not be used. If the page displayed comes from local disk, then local images will be displayed. In all cases, blocks of color on the web page added with CSS color styles might still appear.
If Load Images is enabled but “for the originating web site only” is also checked, web pages that try to load images from other web sites for display in their own pages will not be able to do so. This option can be used to check a web site for image copyright violations.
Here’s the preference for these two checkboxes:
network.image.imageBehavior /* 0 = default, 1 = origin only, 2 = none */
The Exceptions button next to these options implements a combined blacklist and whitelist for web sites, which overrides the other two options. If you enter http://www.example.com, then all pages on that web site will be either allowed or denied, according to the button pressed. You can add an image’s web site to the blacklist by context-clicking on it and choosing “Block image from [url].”
If images aren’t displayed, this preference controls whether a placeholder icon is shown where the image would otherwise have been:
browser.display.show_image_placeholders /* true = default */
The ultimate image roadblock is the user’s
userContent.css stylesheet. This file placed in the profile area can
override, via the CSS !important
directive, any layout of any web page. For example, this fancy new
CSS3 selector can be used to block all ads from the imaginary
http://www.adspam.com
ad-placement web site:
img[src*="adspam.com"] { display : none !important; }Using the Adblock extension
The Adblock extension (http://update.mozilla.org) is a well-maintained filtering system for advertising banners and spots that are embedded in web pages. It has a Hide option that downloads but doesn’t display ad content, and a Remove option that prevents that content from being downloaded in the first place. It can also block Flash ads.
After installation, Adblock must be trained before it will do anything. You must context-click on a web page image and choose Adblock Image to prevent that image from being displayed again.
A more systematic approach is to build a set of filters that apply to all web sites loaded. These can be added from the Tools→Adblock→Preferences dialog box. Filters can be added by hand or imported as a group from a file by clicking on the Adblock Options text in the dialog box. You can find a recommended set of filters at http://www.geocities.com/pierceive/adblock/. Choose the most recent file and follow the instructions in the -instructions.txt file. To delete that file on Unix/Linux after use, type the following command:
rm ./-instructions.txtEach filter in such a file is a string pattern that is matched against the URL of every image reference on every loaded page. Those image URLs that match are never loaded/displayed, so the set of filter lines in a filter file form a blacklist. A URL need only fail one filter to be rejected entirely.
The two kinds of filter content are plain-text substring
matches, which can be typed directly and can contain * wildcards:
*.adsource.com
and JavaScript regular expression literals, which must be surrounded by forward slashes:
/advert[a-z]{,4}.com/Forward and backward slashes don’t need to be escaped in these regular expressions because they’re fed to the AdBlock processor as a string. You can find popular resources for image-quashing rules at http://www.floppymoose.com and http://krath.dk/writing/flash_blocking/.
Manage the Way Images Are Displayed
Firefox supports all the image-resizing features implied by HTML 4.01. If an image is displayed alone in a window, rather than as part of a web page, then simple resizing is available. To see this in action, go to a web site that shows big images, such as http://antwrp.gsfc.nasa.gov/apod/astropix.html, and context-click to view an image in its own window. Shrink the window to see the image resize, and then click on the image to make it toggle between full size and “fit to window” size. This feature is enabled by the preference:
browser.enable_automatic_image_resizing /* default = true */
Extensions that modify or enhance image display behavior are common; browse the Page Display category at http://update.mozilla.org for the latest list. There is not yet an extension as popular or as useful as the freeware Windows image viewer IrfanView, although there is an image-viewer extension called mozImage. Here are a few of the more useful extension offerings:
- AniDisable
Stops animated GIFs from running via a context menu option.
- Image Zoom
Provides context-menu support for image zooming using step-wise magnification. Expands on the features of the default click-to-resize functionality.
- Nuke Anything
Allows you to temporarily remove images from pages. Similar to DOM Inspector and Web Developer Toolbar functionality, but lighter and simpler.
- Show Image
Makes failed image downloads retry without reloading the whole page. If you’re on a slow dial-up connection, this context-menu enhancement can be helpful.
- ImageShowHide
Makes an easy-to-reach toolbar copy of the Load Images configuration option. This tool allows toggling of page images like that available for the Web Developer Toolbar.
- Image Toolbar
Makes a floating image toolbar appear over images, providing file and print features. This tool works just like the irritating image toolbar provided by Internet Explorer.
- Magpie
Functions mostly as a spidering tool [Hack #42] . Magpie includes Digit Flipper functionality that resembles the Site Navigation Bar of the Mozilla Application Suite. It allows pages in a photo-album-like (or otherwise numbered) web site to be stepped through using special Next and Previous keys. It’s also useful for HTML-based slideware presentations.
Get More Search Tools
Update the Search bar with more search engines, and add some other search tools as well.
Searching the Web has never been easier in Firefox. All you need to do is enter one or more terms into the search box in the upper-right corner, press Return, and you’re on your way. But the searching capabilities of Firefox are far more than a single field.
Adding Search Engines
By default, the Search box queries the Google search engine. You can tell this from the small G icon that appears on the left side of the box. If you click on that icon, however, you’ll see a list of several other available engines, such as Yahoo!, Dictionary.com, and Amazon.com. You can change which search engine is used. Just select a different engine from this list before hitting Return to launch your query.
If the site you want to query isn’t listed, you’ll want to visit the Mycroft extension site at http://mycroft.mozdev.org.
Tip
You can also get there by selecting Add Engines from the bottom of the search engine list and following the last link in the Add New Search Engines section.
Mycroft is a project dedicated to collecting a wide variety of search plug-ins for Mozilla-based browsers. You can find plug-ins for hundreds of sites, from A9.com to Zoek.nl. If you’re looking to add a specific site to your Search bar, you can query the site name using the search option on the main page, or you can browse the list of submitted engines by category. Once you find the site you want, just click on the name and Firefox will add it to your list automatically.
Tip
The search plug-ins are installed in the directory where Firefox was installed, not in your profile directory. If you do not have permission to write to this directory, Firefox will silently fail in its attempt to install the plug-in.
If there is a web site you want to search using the Search box that is not listed in Mycroft, don’t despair: it’s easy to create your own. We’ll see how to do that shortly.
Searching Without the Search Box
There are various extensions you can explore that add more searching flexibility to Firefox. For example, the Dict extension (available at http://dict.mozdev.org/) allows you to select a word on a page and query a Dict server with the selected word by right-clicking the selected word and choosing “Define....” The results appear in a pop-up window.
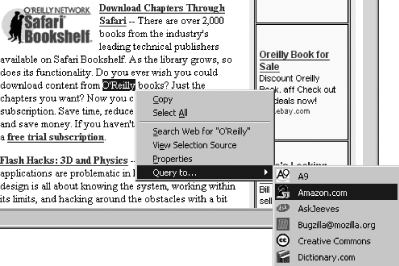
One of the most useful search extensions is one called Conquery (http://conquery.mozdev.org/). This tool adds a context menu that allows you to select an area of text from the page you are viewing and send that directly to any of the search engines you have installed, as shown in Figure 4-5. The effect is almost the same as if every piece of text on a web page were instantly linked to the search engine of your choice!
Anatomy of a Search Plug-in
Under the covers, the Search box is simple. By selecting an engine from the drop-down list, you choose a search plug-in. Each plug-in consists of two files, located in the searchplugins subdirectory where Firefox is installed: a .src file, and an image file (either GIF, JPG, or PNG format).
The .src file contains the real meat of the plug-in. It contains information about the site itself, how the site builds the URL for a search query, and how it displays its results. Its syntax is based on Apple’s Sherlock specification, with a few extensions. (The project name Mycroft, a character from Sherlock Holmes stories, is a play on that name.)
The image file must have the same base name as the source file, and it is displayed as the small icon displayed next to each site name on the search box and the drop-down list.
The easiest way to create your own plug-in is to copy an existing plug-in and modify it to suit your needs. Many of the parameters expose functionality for Mozilla’s Search sidebar, which is not available in Firefox by default but is still easy to provide.
Let’s start by looking at a sample plug-in—the one for Creative Commons—and go through it line by line to see how it works.
Nearly all plug-ins have four major sections: the search tag, one or more input tags, the interpret tag, and the browser tag.
The <search> tag
The search tag defines what
the plug-in is and what site it will query. Looking at our
sample Creative Commons plug-in, we see the following:
#
# Mozilla/Netscape 6+ MyCroft Plugin for search.creativecommons.org ...
# Created by Ben Snider on April 1, 2004.
# E-Mail: stupergenius@columbus.rr.com.
#
# Updated by Matt Haughey on August 26, 2004.
# E-Mail: matt@creativecommons.org
#
<search
        version="7.1"
        name="Creative Commons"
        description="Find photos, movies, music, and text to rip, sample, mash,
and share"
        action="http://search.creativecommons.org/"
        searchForm="http://search.creativecommons.org/"
        method="GET"
The version, name, and description parameters identify this
particular search plug-in. name
is what is displayed in the search box drop-down list.
The action and method parameters indicate how the query
is submitted and the base part of the URL to be queried. At the time
of writing, only GET methods are
supported, so if you are building a plug-in for a site that works
using POST forms only, you might
be out of luck.
Tip
Actually, you can try using a
bookmarklet (a special bookmarked URL
starting with javascript:) to
change the form from POST to
GET and use that information to
construct your plug-in. However, if the site explicitly checks for
POSTed values or includes
user-specific cookies, you’re definitely stuck.
The searchForm parameter
denotes the main search page for the site, and is not strictly
necessary.
The <input> tags
Next, the input values
define the query parameters for the URL:
    <input name="q" user>
    <input name="sourceid" value="Mozilla-search">
There is only one argument passed to the plug-in, which is the
search term. The term user in the
first input tag is replaced with
this value. For example, this plug-in will add &q=searchterm to the query URL. This
parameter is URL-encoded automatically by the browser, so "firefox browser" will become &q=firefox+browser.
The sourceid value is
included in all plug-ins, to help webmasters identify how many users
are conducting searches from a Gecko-based browser. If any other
parameters need to be sent to the search engine, you should include
them here as well.
The <interpret> tag
The interpret tag
tells us how the search results are displayed, so the
browser can parse the results into individual items in the
sidebar:
<interpret
        browserResultType="result"
        resultListStart="<!-- start results -->"
        resultListEnd="<!-- end results -->"
        resultItemStart='<p class="resultitem">'
        resultItemEnd="</p>"
>
The browserResultType
parameter indicates whether the page being returned lists actual
search results or a list of categories for browse-oriented searches.
You can typically omit this parameter from most searches.
The remaining parameters indicate the HTML code that denotes the beginning and end of the list of items and the beginning and end of each individual item. You can usually figure this out by examining the HTML source of the page returned by the search engine. If the HTML is essentially tag soup and there is no easily definable way to delineate individual results, don’t worry about this tag. This isn’t real XML, by the way; don’t encode your quotes or angle brackets, unless they appear that way on the results page.
The <browser> tag
Last is the browser
tag, which provides information about this plug-in:
<browser
        update="http://mycroft.mozdev.org/plugins/creativecommons.src"
        updateIcon="http://mycroft.mozdev.org/plugins/creativecommons.png"
        updateCheckDays="3"
>
</search>
The update and updateIcon parameters indicate where the
browser should check for updates of this plug-in, while the updateCheckDays parameter says how many
days it should wait in between checks. This tag is strictly optional
if you aren’t planning to make your search plug-in available to
others.
Finally, don’t forget to close the search tag we used to open the
file.
—Keith M. Swartz
Get More Feeds and News
Not getting enough information? You have several different ways to get more in Firefox.
This hack introduces you to the push content that a couple of extensions—Sage and ForecastFox (previously named WeatherFox)—make possible. Push content comes to you without you asking, or at least without you asking much.
Get Feeds with Sage
Long before Live Bookmarks came out in Firefox 1.0, Sage, a sidebar extension (shown in Figure 4-6), provided RSS and Atom feed aggregation in the Firefox sidebar. It’s still a very useful extension.
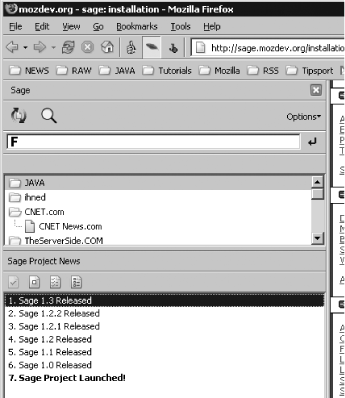
Sage provides full-service feed aggregation. It includes a feed preview rendered in the contents area; a tooltip description of each item in the feed, usually containing a brief excerpt of the article; the ability to mark items as read or unread; and many other features.
To begin using Sage, you first need to install it from the Mozilla Update web page (http://update.mozilla.org). Don’t forget to place the Sage icon in your toolbar (context-click on a toolbar, select Customize, and drag and drop the icon onto the toolbar). Once Sage is installed, you can start setting up some feeds.
Setting up the feed system
First, you must create a folder in your Bookmarks hierarchy. That’s where you will place either bookmarks pointing to the feed URLs or live bookmarks that directly implement the feed (live bookmarks use Firefox’s autodiscovery service). When such a folder is created and you’ve placed some bookmarks into it, you can open Sage in the sidebar. This can be done several ways:
Sage’s toolbar button
Keyboard shortcut Alt-S
Tools→Sage
View→Sidebar→Sage
Once that’s done, click the Options drop-down menu in the Sage sidebar and select Settings. Here, you can find and select the folder into which you have put the feed bookmarks. That should be all that’s required to begin with.
In the Sage Settings window, you can also choose automatic update of the feeds and switch between 12- and 24-hour time display mode. You can also select the sorting method: chronological order or source order. The latter uses the order from the feed source.
Adding feeds
There are several ways to add feeds in the Sage sidebar:
Display a web page that has a feed link. Right-click the link and select Bookmark This Link.
If the orange RSS feed icon appears on the status bar, just click the icon and follow the instructions.
Use the discovery service of Sage to put the feeds in. It’s available via the Sage icon on the sidebar.
Just make sure that all the bookmarks and live bookmarks to be shown in Sage are placed in the common bookmark folder that you set as Feed Folder in the Sage configuration.
Show the content
Now, when you select a feed in the Sage sidebar, the last 10 feed items will load, provided that you selected automatic feed update. If not, you must press the Refresh button.
Hovering over the feed items might show Description Tooltips, if you have enabled them in the Options menu. When you click an item, the content will load in the content area, unless you configured Sage to render feeds in the sidebar. When shown in the sidebar, you can customize the matching CSS file to change the look of rendered feeds. As a starting point, just modify Sage’s default CSS file at chrome://sage/content/res/sage.css and save it in any convenient location. Then, open Sage settings and choose Using Custom Stylesheet and browse to your modified file.
Get Weather News with ForecastFox
Another example of a news-retrieving extension is ForecastFox, which allows you to have the weather forecast at your fingertips. The first step is to download the ForecastFox extension, available through the Mozilla Update web site (update.mozilla.org). Figure 4-7 shows its About dialog box.
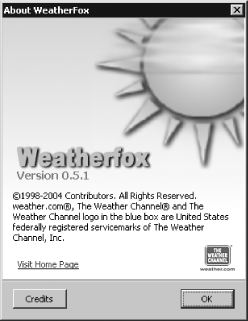
Tip
The figures in this hack display the original name of the extension (WeatherFox), which has since been renamed ForecastFox.
Setting a location
Once the installation process has been completed, you need to set up a location for the forecast you want:
Open the extension’s Options window. Start it from either the Extension Manager or from the pop-up menu that appears when you click the ForecastFox extension icon on the Status bar.
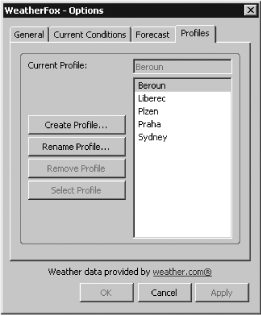
In the Options window, select the Profiles tab.
Create a new profile by pressing the Create Profile button and providing a profile name. These profiles are geographic profiles specific to ForecastFox. They’ve got nothing to do with Firefox profiles.
Once the profile has been created, set it as the current profile by highlighting it in the list and pressing the Select Profile button. The name of the profile will then displayed in the Current Profile field. Figure 4-8 shows the completed dialog box.
A profile is just a name. Next you need to choose the location for the forecast you want to obtain. Just select the General tab and, assuming you don’t know the location code, press the Find Code button.
In the opened Location Search window, type the name of the city you want to watch and then press Search. In the returned list of found locations, choose the one you’ve been looking for. Close the Location Search window.
Lastly, just press Apply or OK to refresh the data on your status bar and close the Options box.
Tweaking the display
On the General tab of the ForecastFox Options window, you can adjust several attributes that specify how the data is displayed:
In the Unit of Measure section, choose between displaying Metric (Celsius) or American (Fahrenheit) units.
In the Location section, choose the location where you want ForecastFox to be placed. If you have some toolbars installed, your list of options will also include those.
You can also define display options for both the current conditions and the forecast. The two tabs for these purposes are again located in the Options window:
- Current Conditions
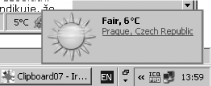
In this tab, you can enable or disable whether the current conditions show up at all, and enable or disable showing images on the toolbar and labels when the mouse is hovering. You can also enable popping up of the Alert Slider. If the Slider is enabled, you can define in what frequency it shows up. The highest frequency is 1, which tells ForecastFox to show the pop-up at every refresh. Figure 4-9 shows the pop up hovering over the Windows dashboard.
- Forecast
In the Forecast tab, you can define the number of days for which you want to show the forecast. Nine days is the maximum. In the Display Options area of the tab, you can choose to show days and/or nights, as well as images and/or labels for each day.
Customizing tooltips and labels
In the General tab, if you click the Customize Tooltips and Labels button, a new window will appear, allowing you to change the look of labels and tooltips, as shown in Figure 4-10.
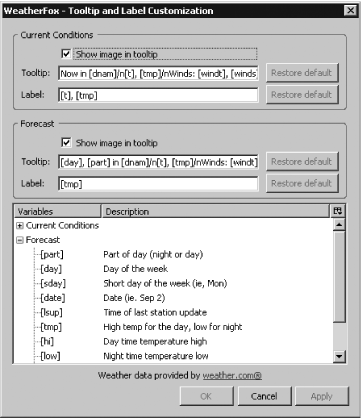
Here, you can define tooltip and label text using predefined variables and choose whether to show images in tooltips for both the current conditions and the forecast. Descriptions of the variables used can be found at the bottom area of the window. This window acts like a very simple report of ForecastFox’s template system.
Tomás Marek
Add Stuff to Your Toolbars
Install extra stuff on the Firefox toolbars and use it to browse in new ways.
This hack shows how to upgrade Firefox toolbars and use the new features added. There are many extensions that can be usefully put on toolbars, but currently few extensions do this automatically. This hack focuses on two example extensions that benefit from toolbar icons: InfoLister and Gmail Notifier.
Adding toolbar icons, whether they’re standard Firefox ones or special extension ones, is simplicity itself. Make sure the toolbar you’re interested in modifying is already displayed; then, choose View→Toolbars→Customize to see the list of available icons. Merely drag an icon to the desired spot on the desired toolbar and release the mouse button. Some extensions do this set up for you when they install; others don’t. If nothing seemed to happen after you installed an extension and restarted, check the set of available icons in case more have been added.
Try InfoLister
Let’s generate an HTML list of all the stuff you currently have installed in your implementation of Firefox. All you need to achieve this is InfoLister, a Firefox/Thunderbird extension (http://mozilla.klimontovich.ru/infolister/) by Nickolay Ponomarev.
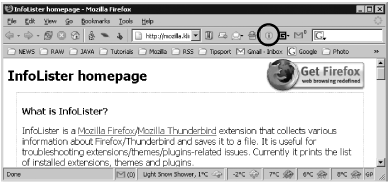
Once you have installed the extension and placed its icon in the Location toolbar, it looks something like Figure 4-11. You can see lots of extra toolbar icons in this screenshot.
Displaying the InfoLister window
Clicking the InfoLister toolbar icon brings up the InfoLister window, shown in Figure 4-12. In the main area of the window, an HTML page lists all your extensions, themes, and plug-ins. All the extension and themes names in the list are linked to their respective home pages.

Customizing the page
If you want to tweak the info page a bit, just press the
Options... button. A new InfoLister Options window will pop up. In
the Customize section of this window, you can choose whether to
display the page in HTML or plain text. Then, if you choose HTML
formatting, you can provide content details of the <head> tag. In the next part of the
form, also available for plain text, you can put some stuff at the
head of the page. Then you can define the appearance of extensions
and themes on the page, using several variables:
%homepageURL%Replaced by the actual extension’s homepage URL
%name%Holds the extension’s real name
%version%Holds the extension’s version number
You can also compose footnotes at the base of the page. There are three checkboxes that, if selected, generate their respective information just under the page’s headline:
- Last Update Time
Specifies whether to write a timestamp when the InfoLister report is saved to disk
- User Agent
Gives you an exact description of your implementation of Firefox (i.e., agent name, platform, locale, build, and browser name), including its version
- Plugins List
Allows you to switch the plug-ins list on or off
Some extensions might be disabled. To list them separately on the page, just choose the last option: “Make a separate list for disabled extensions.”
Saving the page
There are two ways to save the generated page: in a local file or on a remote server. To save it locally, just fill in the file location in the “Autosave to file” section. Once you provide the file location, you can write to it immediately by clicking the “Write now” button, or have it rewritten each time you restart the browser. To upload the page to a remote server, you need to provide some information to set up a connection and log to the server. Press the “FTP settings...” button to display a form in which you can include these details, as shown in Figure 4-13.

Try Gmail Notifier
Another example of a useful extension that provides a toolbar icon is Gmail Notifier by Doron Rosenberg. This extension checks your Gmail (Google Mail) inbox and alerts you when new mail arrives.
Installing Gmail Notifier
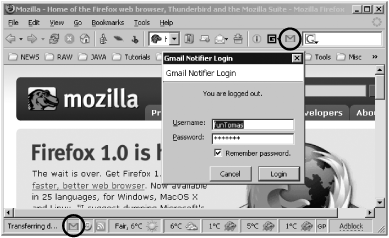
To start using Gmail Notifier, you first need to install it. It’s available from the Mozilla Update web site (http://update.mozilla.org). As with InfoLister, when the install is complete, place Gmail Notifier’s icon on your Firefox toolbar using View→Toolbars→Customize. Figure 4-14 shows the installed extension’s toolbar icon, status bar icon, and its initial login window.
Getting to your inbox
To get access to your inbox, you need to set up Gmail Notifier with your username and password. If you hate remembering passwords, you can select the “Remember password” option on the login form. Firefox will then skip this prompt the next time it gets online, and you’ll log on automatically. Once you are logged on, simply click the toolbar or status bar icon and you’ll display your Gmail inbox. You can open this page in the current tab, a new tab, or even a new window, depending on what you have configured in Notifier’s Preferences pane.
Gmail Notifier preferences
You can use Gmail Notifier’s Preferences pane to specify where your inbox page will open, how often Gmail Notifier will check for new email, and other options. To change your settings, just context-click (Right-click or Command-click) on the Gmail Notifier icon on the status bar and choose Preferences. Figure 4-15 shows the context-menu options.
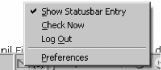
In the User Interface section of the Preferences pane, you can choose to also show the icon on the status bar, select where to open your inbox page (current tab, new tab, or new window) when you click the icon, and choose to be alerted when new mail arrives. The last setting is currently available for Windows only. Figure 4-16 shows that standard alert.

In the Connection section, you can define how many minutes the Gmail Notifier should wait between periodic checks for new email and whether you want to log in automatically. Enabling this last feature is much appreciated when you don’t share the computer with others.
Gmail tips
When Gmail Notifier spots a number of new email messages in your inbox, the Gmail icon is marked with that number, but unfortunately you don’t have a clue what kind of emails they are, unless you open the inbox page. This might be cumbersome in some circumstances. To gain a list of arrived emails subjects, you will need to create a Live Bookmark [Hack #33] with the following URL:
https://yourUserName:yourPassword@gmail.google.com/gmail/feed/atom
Note that this stores your Gmail username and password in cleartext in the bookmarks file. A Live Bookmark with this URL will check the content of your Gmail inbox with the frequency set in Firefox for Live Bookmarks. When you open the Live Bookmark folder, any new emails appear just as if the email were part of a news feed (which it effectively is), as shown in Figure 4-17.

Be aware that sometimes the number of new email messages shown by this Live Bookmark might be out of step with the number of new email messages shown in the Gmail Notifier icon. In such a case, just choose Refresh Live Bookmark from the context menu of the Live Bookmark.
Finally, this Live Bookmark works only when there is new email in your inbox. If there isn’t, Firefox fails to download the Live Bookmark feed. Hopefully, this functionality will be nicely embedded into the Gmail Notifier icon by the time you read this. Gmail Notifier is an extension with a bright future.
Tomás Marek
Upgrade Firefox Feature Managers
Turn Firefox into Firefox Deluxe with extensions that upgrade standard features.
The standard Firefox browser has a standard set of dialog boxes. If you want to do more than those dialog boxes offer, you need to install extensions. This hack describes extensions that provide more functionality than the existing dialog boxes. Expand your horizons!
Extensions rarely replace Firefox’s existing dialog boxes; they usually provide additional menu options instead. If you want full replacement of existing dialog boxes, you’ll have to unbundle, hack, and rebundle the extensions one at a time. The required hack necessitates making each extension’s browser overlay [Hack #87] match the spot where the existing dialog box is normally called from and also disabling that normal call. A complete solution is to bundle the hacked extensions with a new Firefox installer, effectively creating Firefox Deluxe.
If you don’t want to go to all that trouble, just pick your least favorite Firefox feature and go extension shopping. You can also erase the feature you don’t like [Hack #77] , if you want.
Table 4-1 provides a shopping list of alternatives for you to explore. With more extensions being created every week, this list is likely to be a taste of the full range of options, at best. Table 4-1 includes only well-established extensions.
User interface item | Related extensions |
File→Open File | Filer Extension Open Long Url |
File→Save Page As ... | Down Them All Mozilla Archive Format |
File→Print Preview | Print Preview |
View→Toolbars→Navigation | Magpie, AutoMarks |
View→Sidebar | Optimoz Tweaks OutSidebar |
View→Text Size | TextZoom |
View→Character Encoding | Right Encoding |
View→Page Source | ViewSourceWith |
Bookmarks→Manage Bookmarks→File→ New Bookmark | Pagebookmarks OpenBook |
Bookmarks→Manage Bookmarks→File→ Live Bookmark | Sage Live Bookmark This LiveLines |
Bookmarks→Manage Bookmarks→File→Export ... | Bookmarks Synchronizer Favorites Converter SyncMarks |
Tools→Web Search | Mycroft Advanced Highlighter Button Advanced Search Button All-In-One Search Button |
Tools→Read Mail ... | Launchy |
Tools→New Message ... | Launchy |
Tools→Downloads | Download Manager Tweak Download Statusbar Disable Targets for Downloads |
Tools→JavaScript Console | JS Console |
Tools→DOM Inspector | Web Developer Toolbar |
Tools→Page Info | View Cookies |
Tools→Options | Prefbar |
Tools→Options→General→Fonts & Colors | ColorZilla Web Color Names |
Tools→Options→General→Connection Settings | SwitchProxy Tool Tweak Network Settings |
Tools→Options→Privacy→Saved Passwords→Set Master Password ... | Secure Password Generator |
Tools→Options→Privacy→Cookies→Exceptions | Add & Edit Cookies Cookie Culler |
Tools→Options→Privacy→Cookies→View Cookies | CookieBar |
Integrate Firefox with Other Tools
Juggle all your info tools from Firefox with cross-application integration features.
If you’re moving over to Firefox from Mozilla, you’ve surely noticed how Firefox is built to be a sleeker, faster browsing engine. It accomplishes this in part by shedding all of its counterparts from the Mozilla Suite, including an email/news client, composer, and chat client. But that doesn’t mean this functionality is no longer available. With a few extensions—or with no work at all—you can make Firefox integrate with your email client as though it were still part of a suite. You don’t have to stop there, either; at least one valuable extension gives you the power to connect Firefox with virtually any program on your system.
Integrate Email and News
Firefox does not include a mail client: this functionality has been outsourced to its cousin, Thunderbird. However, a quick glance at some of the menu options might make you think the Firefox developers didn’t get that memo:
- File→Send Link
For emailing the current URL
- Tools→New Message
For composing a new email message (Windows only)
- Tools→Read Mail
For opening your mail client to read new messages (Windows only)
In addition to these menu items, there are frequent
mailto: or news: links on the
Web that should allow you to send an email message or read a
newsgroup. Firefox contains just enough glue to pass all these
potential actions on to another program.
The good news is that if you have a default mail program set up on your operating system, all of these functions will integrate seamlessly with that program without any additional work. (The process for defining a default mail program varies according to operating system.)
If you are running Firefox on Unix/Linux and you don’t have a default mail program set up on Linux, or if you want Firefox to use a different program, you can integrate Firefox with your mail program by setting the following preferences:
network.protocol-handler.external.mailto /* set to true, no default */
network.protocol-handler.app.mailto
/* set to filepath, no default */
For example, if you want Linux Firefox to launch Thunderbird
when you click on a mailto: link, set the network.protocol-handler.app.mailto
preference to the following filepath, if that happens to be where
Thunderbird’s startup program is located:
/usr/local/bin/thunderbird/thunderbird
To do the same thing for links that use the news:, snews:, or nntp: protocols, verify that the following
preferences are set to true:
network.protocol-handler.external.news
network.protocol-handler.external.snews
network.protocol-handler.external.nntp
Then, set one or more of these matching preferences to the name of your newsreader:
network.protocol-handler.app.news
network.protocol-handler.app.snews
network.protocol-handler.app.nntp
Another option for handling mailto: links is to use the Launchy
extension, as discussed in Section 4.9.4, later in
this hack.
If you prefer to use a web mailer, such as Gmail or Hotmail,
there’s a solution for that, too. The Webmailcompose extension
(http://jedbrown.net/mozilla/) allows you to
override the behavior of mailto:
links by directing you to a web mail provider of your choice. It also
replaces the various mail-related menu options with a list of
supported services from which you can choose.
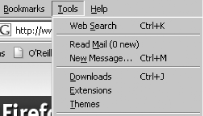
Integrate Email Message Counts
On Windows operating systems, there are two additional items
under the Tools menu: Read Mail and New Message. The New Message
button will start a new message in your default mail client (or
whatever client you have chosen to override the default), just as
though you had clicked on a mailto:
link with no recipient. The Read Mail option does the same thing,
except that it also displays how many new unread messages you have.
That might seem curious, given that Firefox has no mail functionality
of its own. Figure 4-18
shows these options.
In fact, you might find that it indicates you have 125 new messages, but you’ve already checked and are sure you don’t. Or maybe it reads “(0 new),” even when you know you have unread mail waiting for you.
The problem here is that Firefox is not actually checking to see
if you have new mail but rather is relying on Windows to provide this
information. More specifically, Firefox is looking in the Windows
Registry for the key HKEY_CURRENT_USER\Software\Microsoft\Windows\CurrentVersion\UnreadMail.
If the key exists, it queries the MessageCount registry property for the
default mail account (or the first one that is listed if there is no
default). This property is updated by mail utilities such as Outlook
Express. It is not used by Thunderbird or other third-party mail
clients. Therefore, the text in the Tools menu will be accurate only
if your mail client tells Windows this information on a regular
basis.
Integrate IRC
If you’re a fan of Chatzilla, the native IRC client for Mozilla, you’ll be happy to know it’s only a click away. The Chatzilla extension for Firefox (http://update.mozilla.org, under the Chat category) will provide you with the same functionality, sidebar and all.
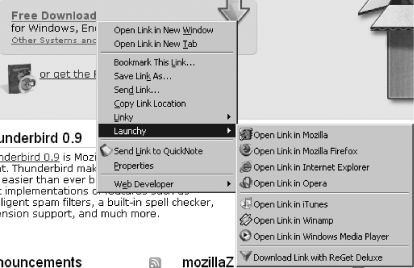
Integrate Everything Else with Launchy
The Launchy extension (http://gemal.dk/mozilla/launchy.html), shown in Figure 4-19, is a veritable Swiss Army knife when it comes to integrating Firefox with other programs. It provides you with a new context menu for pages, links, and images, giving you the ability to open these items in any of dozens of recognized external programs. On Windows, these programs are all discovered automatically, but you can customize the list and even add your own on any operating system.
Launchy is an ideal way to handle all kinds of integration points that are otherwise unavailable in Firefox. For instance, if you want to edit the current web page, you can use the Launchy context menu to send the page source to Mozilla Composer or NVu. If you’re on a page with an extremely large image, you can send it to Photoshop for better viewing or editing with a single click.
If you’re forced to use a web site that has the audacity to only work in Internet Explorer, perhaps the best feature of Launchy is its ability to send the page straight to Internet Explorer—but hopefully, this won’t ever happen to you!
—Keith M. Swartz
Create Your Own Search Plug-in
Found a search engine that suits you? Put it up front on the Search bar.
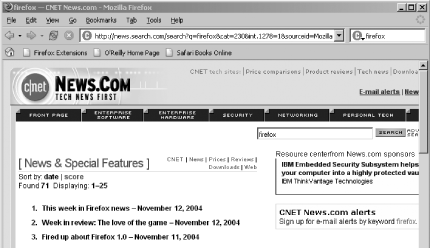
Now that we’ve looked at a sample plug-in [Hack #36] , let’s make our own. We’ll query for articles in the CNET News.com archive.
The first step is to visit the web site and conduct a sample
query, to see how the query URL is formed. Go to http://www.news.com, enter
firefox in the Search box, and click
on “See all matching results.” This submits the following
query:
http://news.search.com/search?q=firefox&cat=230&int.1278=1
From this we can deduce the following items for our plug-in:
The
actionparameter in the search tag ishttp://news.search.com/search.The
inputparameterqis set to our user-specified input.The input parameters
catandint.1278should also be specified.
Building the Plug-in
With the information in the previous section in hand, we have enough details to build most of our plug-in:
<search
   version="1.0"
   name="CNET News.com"
   description="Search CNET News.com"
   method="GET"
   action="http://news.search.com/search"
>

<input name="q" user>
<input name="cat" value="230">
<input name="int.1278" value="1">
<input name="sourceid" value="Mozilla-search">
If we look at the HTML source, we can see that the results are
neatly captured as an enumerated list, with each news story as a list
item. We can use this information to build the interpret tag in the following code. We’ll
also add a browser tag, so we can
make our plug-in available to other users and enable them to retrieve
updates automatically when the site changes and we change our plug-in
to accommodate it:
<interpret
    resultListStart="<ol start="
    resultListEnd="</ol>"
    resultItemStart="<li>"
    resultItemEnd="<br>"
>
<browser
  update="http://www.kswartz.com/kswartz/projects/mycroft/cnetnews.src"
  updateIcon="http://www.kswartz.com/kswartz/projects/mycroft/cnetnews.png"
  updateCheckDays=3
/>
</search>
There’s a lot more that can be done with Mycroft plug-ins than just tabulating simple results. For a complete definition of the plug-in syntax, read the Mycroft Developer’s Guide at http://mycroft.mozdev.org/deepdocs.html.
All that’s left now is to create a 16 16 icon for the site, which is left as an exercise for the reader. Remember to save it with the same basename as your search plug-in.
Tip
One easy trick is to capture the site’s favicon.ico file, if it has one. Just type its URL to get it: http://www.example.com/favicon.ico. Such files are conveniently 16 16 pixels in size. Just use a freeware tool such as Icon2Png or the GIMP to convert it to a .png, .jpg, or .gif file.
Installing the Plug-in
Before we install the plug-in, it’s usually a good idea to run it through a validator, such as the one available at http://www.mindzilla.com/auditform.php. You can use this page to verify your plug-in syntax, as well as to verify your list and item start/end identifiers.
If the validation page reports no errors in your plug-in, it’s time to install it. There are two ways you can install your plug-in. If you are only developing the plug-in for yourself, you can manually install it by copying the file to the searchplugins directory where Firefox is installed and restarting your browser to have it reread that directory.
Alternatively, you can post the files to a web site, and use this JavaScript code to download the files to the searchplugins directory and dynamically update the list of known plug-ins:
<script type="text/javascript">
function addEngine(name,ext) {
  if ((typeof window.sidebar == "object") &&
      (typeof window.sidebar.addSearchEngine == "function")) {
    window.sidebar.addSearchEngine(
      "http://mycroft.mozdev.org/plugins/"+name+".src",
      "http://mycroft.mozdev.org/plugins/"+name+"."+ext,
      name, '');
  }
}
</script>
Include the preceding code on an HTML page, and then link to your search plug-in with the following line:
<a href="javascript:addEngine('myplugin','png')">Install myplugin</a>At this point, you should see the icon and name of your plug-in in the drop-down list of the Search box, as shown in Figure 4-20.
Your new search plug-in is ready to use!
—Keith M. Swartz
Spider the Web with Firefox
Save lots and lots of web pages to your local disk without hassle.
If a web page is precious, a simple bookmark might not be enough. You might want to keep a copy of the page locally. This hack explains how to save lots of things at once with Firefox. Usually this kind of thing is done by a web spider . A web spider is any program that poses as a user and navigates through pages, following links.
For heavy-duty web site spidering done separately from Firefox, Free Download Manager (http://www.freedownloadmanager.org) for Windows
and wget(1) for Unix/Linux (usually
preinstalled) are recommended.
Save One Complete Page
The days of HTML-only page capture are long gone. It’s easy to capture a whole web page now.
Saving using Web Page Complete
To save a whole web page, choose File→Save Page As... and make sure that “Save as type:” is set to Web Page Complete. If you change this option, that change will become the future default only if you complete the save action while you’re there. If you back out without saving, the change will be lost. When the page is saved, an HTML document and a folder are created in the target directory. The folder contains all the ancillary information about the page, and the page’s content is adjusted so that image, frame, and stylesheet URLs are relative to that folder. So, the saved page is not a perfect copy of the original HTML. There are two small oddities to watch out for:
On Windows, Windows Explorer has special smarts that sometimes treat the HTML page and folder as one unit when file manipulation is done. If you move the HTML page between windows, you might see the matching folder move as well. This is normal Windows behavior.
If the page refers to stylesheets on another web site using a
<link>tag, these stylesheets will not be saved. As a result, Firefox will attempt to download these stylesheets each time the saved HTML copy is displayed. This will take forever if no Internet connection is present. The only way to stop this delay is to choose File→Work Offline when viewing such files.
Saving using Print
One problem with saved web pages is that the copy is just a snapshot in time. It’s difficult to tell from a plain HTML document when it was captured. A common technique that solves this problem and keeps all the HTML content together is to use Acrobat Distiller, which comes with the commercial (nonfree) version of Acrobat Reader.
When Distiller is installed, it also installs two printer drivers. The important one is called Acrobat PDFWriter. It can convert an HTML page to a single date-stamped PDF file. Although such PDF files are large and occasionally imperfect, the process of capturing web pages this way is addictive in its simplicity, and the files are easy to view later with the free (or full) Reader. The only drawback is that PDF files can be quite large compared to HTML.
To save web pages as PDF files, choose File→Print... from the Firefox menu, choose Adobe PDFWriter as the device, and select the Print to File checkbox. Then, go ahead and print; you’ll be asked where to save the PDF results.
Save Lots of Pages
To save lots of Web pages, use an extension. The Download Tools category at http://update.mozilla.org lists a number of likely candidates. Here are a few of them.
Down Them All
The Down Them All extension (http://downthemall.mozdev.org), invoked from the context menu, skims the current page for foreign information and saves everything it finds to local disk. It effectively acts as a two-tier spider. It saves all images linked from the current page, as well as all pages linked to from the current page. It doesn’t save stylesheets or images embedded in linked-to pages.
Two of the advantages of Down Them All are that it can be stopped partway through, and download progress is obvious while it is underway.
Magpie
The Magpie extension (http://www.bengoodger.com/software/tabloader/) provides a minimal interface that takes a little getting used to. For spidering purposes, the context menu items that Magpie adds are not so useful. The special keystroke Ctrl-Shift-S, special URLs, and the Magpie configuration dialog box are the key spidering features.
To find the Magpie configuration system, choose Tools→Extensions, select the Magpie extension, and then click Options. Figure 4-21 shows the resulting dialog box.
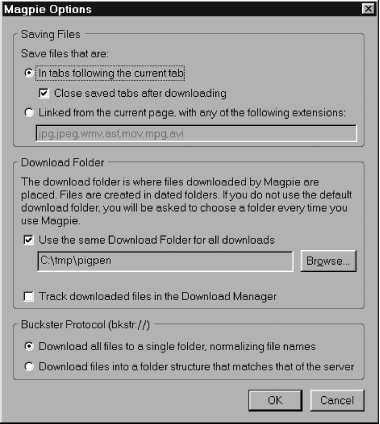
Using this dialog box, you can set one of two options for Ctrl-Shift-S (detailed in the radio group at the top). Everything else in this window has to do with folder names to be used on local disk.
The first time you press Ctrl-Shift-S, Firefox asks you for the name of an existing folder in which to put all the Magpie downloads. After that, it never asks again.
By default, Ctrl-Shift-S saves all tabs to the right of the current one and then closes those tabs. That is one-tier spidering of one or more web pages, plus two-tier spidering for any linked images in the displayed pages.
If the “Linked from the current page...” option is selected instead, then Magpie acts like Down Them All, scraping all images (or other specified content) linked from the current page.
In both cases, Magpie generates a file with the name
YYYY -
MM -
DD HH - MM - SS (a
datestamp) in the target directory and stuffs all the spidered
content in there.
The other use of Magpie is to download collections of URLs that have similar names. This is like specifying a keyword bookmark, except that only numbers can be used as parameters and they must be hand specified as ranges. For example, suppose these URLs are required:
http://www.example.com/section1/page3.html
http://www.example.com/section1/page4.html
http://www.example.com/section2/page3.html
http://www.example.com/section2/page4.html
Using the special bkstr:
URL scheme (an unofficial convenience implemented by Magpie), these
four URLs can be condensed down to a single URL that indicates the
ranges required:
bkstr://ww.example.com/section{1-2}/page{3-4}.htmlRetrieving this URL retrieves the four pages listed directly to disk, with no display. This process is also a one-tier spidering technology, so retrieved pages will not be filled with any images to which they might refer. This technique is most useful for retrieving a set of images from a photo album or a set of documents (chapters, minutes, diary entries) from an index page.
Slogger
Rather than saving page content on demand, the Slogger extension (http://www.kenschutte.com/firefoxext/) saves every page you ever display. After the initial install, the extension does nothing immediately. It’s only when you highlight it in the Extensions Manager, click the Options box, and choose a default folder for the logged content that it starts to fill the disk. The configuration options are numerous, and Perl-like syntax options make both the names of the logged files and the content of the log audit trail highly customizable.
Since Slogger saves only what you see, how well it spiders depends on how deeply you navigate through a web site’s hierarchy. Note that Mozilla’s history mechanism works the same way as Slogger, except that it stores downloaded web pages unreadably in the disk cache (if that’s turned on), and that disk cache can be flushed or overwritten if it fills up.
Learning from the Master
Bob Clary’s CSpider JavaScript library and XUL Spider application are the best free tools available for automating web page navigation from inside web pages. You can read about them here: http://www.bclary.com/2004/07/10/mozilla-spiders.
These tools are aimed at web programmers with a systematic mindset. They are the basis of a suite of web page compatibility and correctness tests. These tools won’t let you save anything to disk; instead, they represent a useful starting point for any spidering code that you might want to create yourself.
Waste Time with Toys and Games
Amuse and inspire yourself with these decorative inventions made by bored minds.
Not everything’s about substance. Sometimes, you just want to be entertained. This hack describes a few such things. Calling them fluff would be unkind, though; there’s a fair bit of talent, imagination and effort at work here. Most of them won’t get you a pay raise, though.
Messing Around with Games
Any computing environment worth its salt will eventually be able
to play Tetris, or at least adventur. Firefox is no different. With lots
of scripting and display technology, it’s no surprise that simple
games are knocking on the door. Of course, the biggest game you can
play with Firefox is called “Where’s that web page I forgot
about?”
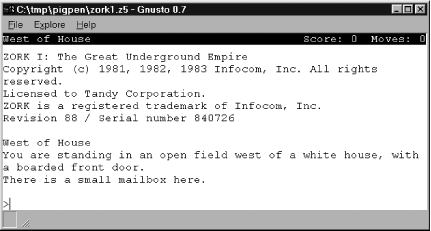
Text adventures
You can play Zork and other retro text adventures of days gone by. The Gnusto Firefox extension uses JavaScript to implement a virtual Z-machine required for all such games. Some games are listed at http://gnusto.mozdev.org. Zork, shown in Figure 4-22, can be found at http://www.batmantis.com/zorks/. It’s best to download the .z5 games to local disk and then open them from the Gnusto window. Don’t try to load them directly from web links.
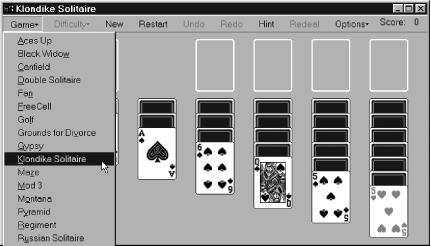
Card games
The Card Games extension provides dozens of single-person card games if you happen to be snowed in over winter. Figure 4-23 shows an example of a game in progress.
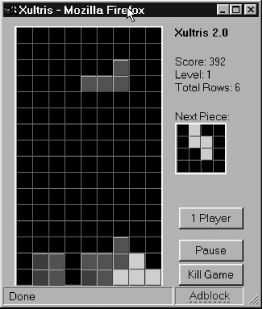
Console games
It’s also possible to play simple 2 1 /2 D console games from the 80s and 90s. Dynamic HTML (and Dynamic XUL) provide a fast enough basis for the required sprites. To play these games, you don’t even need an extension. Just visit the MozDev Games web page (http://games.mozdev.org). You can run the games online by clicking their links, or you can download the games pages to your laptop and open them whenever you want. Figure 4-24 shows Xultris, a Tetris-like game.
Stretching Your Wings with Gestures and Pie Menus
Pie menus aren’t seen much in desktop applications, but they’re common in games, ever since they were made popular in fantasy console games (change from sword to potion!). Pie menus link a mouse movement to a context menu in a way that offers fast selection. Such things are innovative enough to get you a job at Microsoft.
The easyGestures extension presents a fully customizable pie menu for your enjoyment. Figure 4-25 illustrates the default set of options.
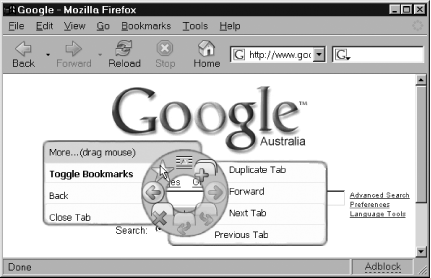
Move the mouse upward sharply to see the secondary menu, press Alt for the alternate menu, or do both to amaze and confuse yourself.
The easyGestures extension is highly configurable; just double-click it in the Extensions Manager window.
Of all the Firefox extensions, gesture extensions probably sit least well with each other. By all means, try out the many excellent alternatives, such as Mouse Gestures and Radial Context, but it’s probably better to have only one installed at any given time.
Get Firefox Hacks now with the O’Reilly learning platform.
O’Reilly members experience books, live events, courses curated by job role, and more from O’Reilly and nearly 200 top publishers.

