Fix Flash Falloff
Built-in flashes on digital point and shoots sure are handy—that is, up to about eight feet. Here’s how to brighten those dark areas when your flash runs out of juice before your subject does.
During the holidays and other social events, the setting is usually larger than our little flashes can cover. So, the people in the front of the scene get overexposed and the folks in the back fade to black. Thanks to a nifty tool in Photoshop called an overlay mask , you can correct this uneven treatment of your guests.
Tip
You can use Photoshop Elements or CS for this hack. I’ll work in Elements this time around, just to show how powerful this entry-level image editor really is.
After opening your picture, open the Layers floating palette, found in the Window drop-down menu. Select Layer→New Layer. Choose Overlay from the Mode pop-up menu and set the opacity to 50%, as shown in Figure 6-23.

Figure 6-23. Adding an Overlay layer
Check your Tools palette to ensure that your foreground color is white and the background black. Then, click on the Gradient tool, as shown in Figure 6-24.
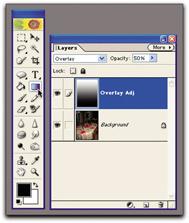
Figure 6-24. Choose the Gradient tool from the Tools palette
Use your Gradient tool to draw a black-and-white linear (rather than, say, radial) gradient straight up the image, from the brighter guys ...
Get Digital Photography Hacks now with the O’Reilly learning platform.
O’Reilly members experience books, live events, courses curated by job role, and more from O’Reilly and nearly 200 top publishers.

