With the revisions you made from the feedback your customers provided on your initial assumptions, you are ready to take the first step of visualizing your app. I want to be very clear that this task is not about design. If “visualization” to you means colors, fonts, and the aesthetics of your app, let me use a different word. For this stage of your app, let visualization mean “blueprint.” Think functional rather than finished. Drafting your concept will prepare you for the design (covered in Chapter 5), but for now, I want you to think of yourself as an architect who is creating a vision and not as a designer who is bringing life to that vision.
I’m ashamed to admit that way back in middle school I stayed after school for extra help...in art class. I was a bit of an overachiever, but generally speaking, where the rest of my family seemed gifted in painting and drawing, those skills just never came naturally to me. In spite of that right-brain deficiency, I went on to oversee multimillion-dollar websites, build highly visible startups, launch successful apps, and more generally make a livelihood being creative.
The reason I share that embarrassing anecdote is that if you don’t have artistic abilities, this doesn’t mean you won’t be able to help architect your concept app. Although I’ve come a long way since making my poor art teacher stay after school, I owe part of my success to realizing how best to focus my energies. Where I add the biggest benefit, and where you can too, is not in making things look pretty; there are extremely talented people who will help you do that. You will make better use of your time and progress your app further overall by being disciplined in attending to the larger vision and not the design details.
Depending on your exposure to design, and in particular, to web design, the term “wireframe” may or may not be familiar to you. In the web world, wireframes (see Figure 3-2) are visual guides that highlight key elements, structures, and relationships among the web pages of a website. Wireframes are typically created in black and white, with little or no use of font styling (beyond font sizes) or images, instead keeping the focus on the architecture and layout of the site.
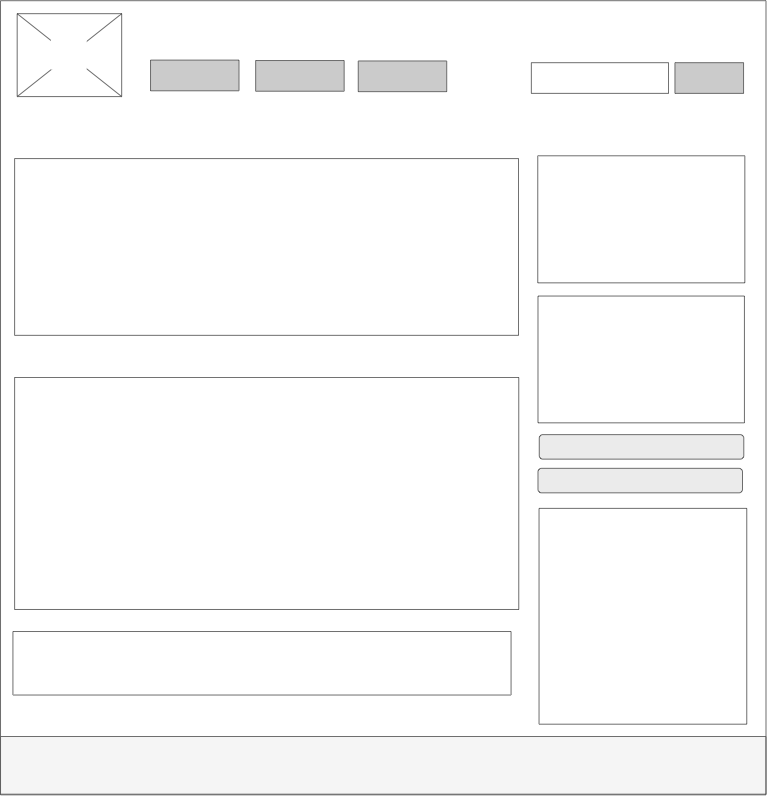
Of course, the larger idea behind wireframes was not birthed with the Web, nor does it stop with it. Ultimately, the advantage of including wireframes in any development process is to focus on getting the structure and functionality right, before spending significant time making it visually appealing. When mixing structure and design, it’s possible to bias customers with something that looks good but is not necessarily easy to use. Similarly, it is significantly harder to revise a concept that includes design elements. Consider, for example, how much easier it is to move a room in a house when you’re working with a blueprint than it is after you’ve started building the structure. Since you’ll be using wireframes to develop the first draft of your concept app, keeping the wireframes focused on the structure and flow will allow you to quickly iterate and revise the design when you get additional feedback from customers.
The secondary benefit to wireframing your app goes back to my point in the preceding section. You won’t get wrapped up in ensuring that the app looks right and instead will focus on the two or three key screens and functions of your app.
Creating wireframes is considerably easier today than in the past, thanks to the graciousness of the larger development community and some significant advances in software tools developed specifically for wireframing and rapid prototyping. For this reason, I do not advocate wireframing on paper, although some people may be more comfortable with that. Just remember that you’ll want to continually edit and share your wireframes, so having a digital copy will make this process smoother.
Note
It’s much harder to wireframe if you are designing a game versus most other apps, because significantly more artwork is required when dealing with games. You still should spend some time thinking about the game mechanics, rules, and flow, which can be captured in a wireframe. It also might be useful to either sketch character ideas (if needed) on paper, or hire someone who has a relevant background, such as a graphic artist, to do that for you.
In creating your wireframes, start with one or two screens that focus on what you discussed with your customers. These should be the defining screens of your app, representing the core of your offering. As questions arise about how the user should interact with elements on the screen, add those thoughts to the wireframe as an annotation or note. Don’t get caught up in trying to answer all those questions now; at this point, it’s more important to identify questions and problems than it is to answer them. It is also sometimes helpful to include screenshots from competing apps or apps you admire as a page within your wireframes. These can be used to remind you of what other apps are doing and also serve to inspire your own user experience (UX).
In the following list, I’ll highlight a sampling of some of the wireframing tools I’ve used or recommend. Each tool relies on stencil libraries—a collection of shapes you can use in the wireframe—which include the core UI components for the iPhone and iPad. I list them in order of simplicity and usefulness, although your experience may dictate differently. Having been a PC user for many years, I am sympathetic to those using that platform. Thankfully, a more popular choice—Balsamiq’s Mockups for Desktop—is also available for those using a PC. The others require a Mac, iPhone, or iPad.
Wireframe Example
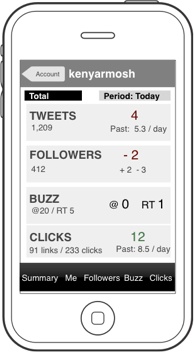
To give you a frame of reference for what an app wireframe looks like, here is a screen (see Figure 3-3) from a final round of wireframes for my app Tweeb. I’ve been wireframing for some time now and this definitely represents a more polished and sophisticated wireframe using a more advanced tool (OmniGraffle for Mac).
Based on feedback I received from customers, this wireframe went through about five to seven rounds of revisions. At this stage or even at the end of wireframing your concept app, you won’t need to get to this level of detail. I’m including it to show you how much can be communicated in a wireframe without really focusing on the design. In Chapter 5, I’ll show you how this wireframe was translated into an actual design.
- Balsamiq Mockups for Desktop
Balsamiq’s Mockups for Desktop (a.k.a. Mockups) is probably the best tool for those just getting started with wireframing. I’ve seen people who have never created wireframes produce very well-thought-out concepts using Mockups. This is because Balsamiq has distilled the key iPhone and iPad components into its tool, including only what’s necessary to create a concept app. It also makes its wireframes appear like hand-drawn sketches, even though they are digital. This helps those creating the wireframes and those looking at the concepts to focus on ideas and not on design.
Mockups also offers a nice way to link wireframes together, which is useful once your concept has matured. Putting Mockups into presentation mode for a customer allows the customer to navigate the app through these links by clicking elements on the screen. Balsamiq’s CEO, Peldi Guilizzoni, discusses this feature, and more generally, the purpose of wireframing, in an interview at the end of this chapter.
For more information, see http://www.balsamiq.com/products/mockups/desktop.
- iMockups for iPad
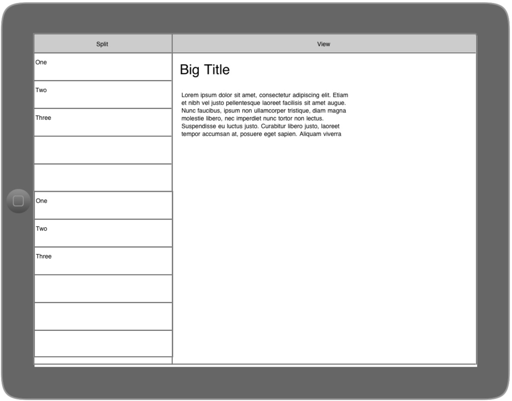
iMockups for iPad, by Endloop (http://endloop.ca/; shown in Figure 3-4), is similar to Mockups. It initially launched with the opening of the iPad App Store and only exists on the iPad (at the time of this writing).
Creating a wireframe on the iPad (whether it’s for the iPad or the iPhone) is a unique experience because everything is controlled by touch. I find that paradigm allows me to much more quickly draft a wireframe at the expense of it being less detailed. Because of that, it is a good place for you to draft your wireframe, since it won’t allow you to obsess over details. iMockups can also export files for use in Balsamiq’s Mockup tool.
For more information, see http://itunes.apple.com/app/imockups/id364885913.
- OmniGraffle
OmniGraffle is a full-featured Mac and iPad app used by many information architecture and user experience professionals. It can do much more than wireframing, which results in it requiring a little more patience to learn. This also results in it being the most expensive option to use on your Mac or iPad.
The stencils you’ll need to wireframe for the iPhone or iPad aren’t bundled with OmniGraffle. Because of its popularity, however, they are easily downloaded for the Mac from sites such as Graffletopia (http://graffletopia.com/stencils/tags/iphone).
It’s not fair to say that you should “graduate” to OmniGraffle, because the other tools are extremely capable of helping you get your job done. My recommendation, however, is to start with the other tools and then expand your horizons based on needs. For example, I use all of these tools together, and sometimes will start a wireframe in Balsamiq’s Mockups and then revisit it in OmniGraffle. If you are creating wireframes for a client, you may also consider using OmniGraffle to create a more polished wireframe.
For more information, see http://www.omnigroup.com/products/OmniGraffle/.
Other tools to watch in this space include Interface, Stencils, Review Sync, Live View, and Screenport. Interface (http://lesscode.co.nz/interface) and Stencils (http://www.stencilsapp.com) are iOS apps that allow you to link together the mockups you create, showing how they progress from one screen to another (similar to Balsamiq Mockups, but on the device itself). There’s also a growing trend to wireframe in Apple’s Keynote, which most Mac users have installed on their computers (e.g., http://keynotekungfu.com/ and http://keynotopia.com/).
Review Sync (http://getreviewapp.com/), LiveView (http://www.zambetti.com/projects/liveview/), and Screenport (http://tapmates.com/screenport/) aren’t wireframing tools, but instead allow you to easily display your wireframes or design assets on your devices.
I don’t want to make this process seem as sequential as I wrote it in this chapter. You may, for example, need to have subsequent discussions with customers to receive confirmation of your assumptions. That is, you should not necessarily begin drafting a wireframe until your ideas have been validated and you have identified and understand your customers’ problems.
With wireframes, you need to be careful about which customers to show them to and at what point. Don’t use your first attempt at wireframes to get reactions from customers. You’ll want to revise your ideas, and possibly get some immediate comments from friends, family, or colleagues. You should solicit feedback from customers once you have two or three screens that have gone through some amount of revision and feel complete to you. Make sure they communicate the direction in which you are trying to take the app.
When you do present wireframes to customers, ensure that they understand why you used wireframes. Be selective with the number of customers who see your wireframes, because even with the context you provide, they might not understand their purpose and be turned off by how basic they look. Although the wireframes will allow you to get additional customer insight, in many ways they will be more important to you and others that help you build your app.
Get App Savvy now with the O’Reilly learning platform.
O’Reilly members experience books, live events, courses curated by job role, and more from O’Reilly and nearly 200 top publishers.

