If you have your own web site, you can mirror your Amazon listings there so you can reach your audience as well.
Amazon has millions of customers at their site looking for items, and getting your listing in front of them is important. If you have a web site, though, letting your own audience know about your sale items could be just as important. It’s not only the number of people that see a listing that matters, but getting the right person to see the listing.
The easiest way to point your web visitors to your sale items is to link to a list of all your open Marketplace items on Amazon. To find the link, visit your seller account (http://www.amazon.com/seller-account/) and click "View your Member Profile.”
Tip
The URL of your Member Profile page contains your Seller ID. The
alphanumeric string following customer-glance is
your unique ID number. Jot it down while you’re there because it’s
necessary for the following hack.
On your member profile page, click "View Open Marketplace Listings.” The page lists all of your open sale items. This page is publicly viewable, so just copy the URL from the address bar of your browser and include it in an HTML link on your site like this:
<a href="http://s1.amazon.com/exec/varzea/ts/[RETURN]
customer-open-marketplace-items/your seller ID/">Buy my stuff!</a>
If you want to integrate beyond a link, you can list every item you’re selling on your site.
Included in every listing confirmation email [Hack #49] you’ll find a link that leads to a page for your specific product listing. If you want to include all of the items you have for sale on your web site, you could copy each of these links and paste them into an HTML file. You’d also need to copy the name of the product and how much you’ve listed it for. You’d have to revisit this HTML every time an item sells or anytime you make a change to your listings.
Luckily, you can automate this entire process with Amazon Web Services.
This ASP script requests your latest items for sale on Amazon and formats them as a local web page. You’ll need an Amazon developer’s token Section 6.4 to run the script, and you can include an affiliate tag. You’ll also need to find your Seller ID and set it at the top of the code.
<%
  ' Set Associate ID, Developer Token, and Seller ID
  Const AFF_TAG = "insert associate tag"
  Const DEV_TOKEN = "insert developer token"
  Const SELLER_ID = "insert seller ID"

  XMLURL = "http://xml.amazon.com/onca/xml3" & _
           "?t=" + AFF_TAG & _
           "&dev-t=" + DEV_TOKEN & _
           "&SellerSearch=" + SELLER_ID & _
           "&type=heavy" & _
           "&page=1" & _
           "&offerstatus=open" & _
           "&f=xml"

  ' Issue the request and wait for the response
    Set xmlhttp = Server.CreateObject("Msxml2.SERVERXMLHTTP")
    xmlhttp.Open "GET", XMLURL, false
    xmlhttp.Send(Now)
    If Err.Number <> 0 Then
        response.write "Unable to connect to Amazon."
        response.end
    End If

    Set XMLDoc = xmlhttp.responseXML
    'response.write "<xmp>" & XMLDoc.xml & "</xmp>"
    If XMLDoc.parseError.ErrorCode <> 0 Then
        response.write "Error: " & XMLDoc.parseError.reason
        response.end
    End If

    ' Look for the ErrorMsg tag
    Set XMLError = XMLDoc.SelectNodes("//ErrorMsg")

    ' If it exists, display the message and exit
    If XMLError.length > 0 Then
       response.write XMLDoc.SelectSingleNode("//ErrorMsg").text
       response.end
    End If

    ' If there's no error, loop through items for sale
    Set ProdDetail = XMLDoc.SelectNodes("//ListingProductDetails")
    For x = 0 To (ProdDetail.length - 1)
      strExID = ProdDetail(x).selectSingleNode("ExchangeID").text
      strTitle = ProdDetail(x).selectSingleNode("ExchangeTitle").text
      strPrice = ProdDetail(x).selectSingleNode("ExchangePrice").text
      strOffer = ProdDetail(x).selectSingleNode("ExchangeOfferingType").text
      response.write "<b>" & strTitle & "</b><br>"
      response.write strPrice & " (" & strOffer & ")"
      response.write "<br><br>" & vbCrLf
    Next
%>
Save the code to a file called SalesListings.asp and upload it to your IIS server. Request the file from a browser to see your product listings:
http://your.server/SalesListings.aspTaking this script one step further, you can let your visitors add your items directly to their Amazon shopping carts. Include the following HTML form to print a “Buy from Amazon.com” button along with each item.
<form method="POST" action="http://www.amazon.com/o/dt/assoc/[RETURN]
handle-buy-box=insert ASIN">
<input type=hidden
    name="exchange.insert exchange ID.insert ASIN.insert Seller ID"
    value="1">
<input type="hidden" name="tag-value" value="insert affiliate tag">
<input type="hidden" name="tag_value" value="insert affiliate tag">
<input type="submit" name="submit.add-to-cart" value="Buy From Amazon.com">
</form>
You’ll need to insert the proper exchange ID, ASIN, and Seller ID,
and these values are available as variables in the script. To add
this form to SalesListings.asp, insert the
following code just before the last line of the loop
(response.write "<br><br>“), and
include the necessary variables.
strASIN = ProdDetail(x).selectSingleNode("ExchangeAsin").text
strSellerID = ProdDetail(x).selectSingleNode("ExchangeSellerId").text
%>
<form method="POST" action="http://www.amazon.com/o/dt/assoc/[RETURN]
handle-buy-box=insert ASIN">
<input type=hidden
    name="exchange.<%= strExID %>.<%= strASIN %>.<%= strSellerID %>"
    value="1">
<input type="hidden" name="tag-value" value="insert affiliate tag">
<input type="hidden" name="tag_value" value="insert affiliate tag">
<input type="submit" name="submit.add-to-cart" value="Buy From Amazon.com">
</form>
<%
When someone visiting the page clicks “Buy from Amazon.com,” your specific item will be added to their cart and the sale will go to you.
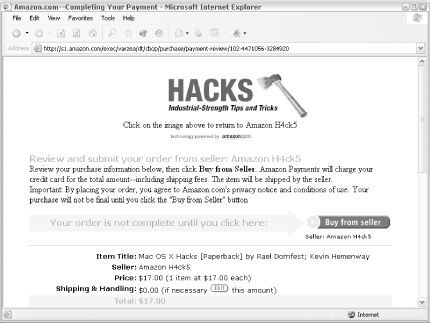
For more hacking-the-hack fun, you can ease the transition from your site to Amazon’s with some co-branding. By setting the following form with each item listing, the “Buy from Amazon.com” button will tell Amazon to show your logo as customers step through the checkout process on their server.
<form action="http://s1.amazon.com/exec/varzea/dt/cbop/order-checkout/"
     method="post">
<input type="hidden" name="purchase-navbar"
   value="insert image URL">
<input type="hidden" name="purchase-store-name"
   value="insert your store name">
<input type="hidden" name="purchase-return-url"
   value="insert your store URL">
<input type="hidden" name="purchase-exchange-id"
   value="insert exchange ID"/>
<input type="hidden" name="purchase-quantity" value="1">
<input type="hidden" name="purchase-storefront-name"
   value="insert your store name"/>
<input type="submit" name="go" value="Buy from Amazon.com">
</form>
To include this co-branded checkout in
SalesListings.asp, just fill in the image, store
name, store URL, and exchange ID, and include the HTML just before
the last line of the product loop. Be sure to turn off script
processing with %> just before this form, and
then turn script processing back on with <%
just after this code. You can also insert the exchange ID with the
variable set earlier in the script in an ASP tag, like
<%= strExID %>.
Instead of sending customers from your site directly to Amazon’s cart page, you can send them to a minimalist checkout process (as shown in Figure 4-8) that includes your site’s logo.
Get Amazon Hacks now with the O’Reilly learning platform.
O’Reilly members experience books, live events, courses curated by job role, and more from O’Reilly and nearly 200 top publishers.

