In Chapter 3, I discussed how pages are organized into sequences, how page masters are selected for processing, and how the page area is divided into regions. In this chapter, we will delve deeper into what happens on a page. We will go into some detail about page layout. After this, you should appreciate why the formatter produces output as it does, and perhaps have some sympathy with implementors.
As you have seen in Chapter 3,
formatting objects contain data that should be rendered as a series of
marks on the canvas â text, images, lines, etc. The formatter turns
objects into series of imaginary rectangles on the page, called
areas. One object may produce more than one area:
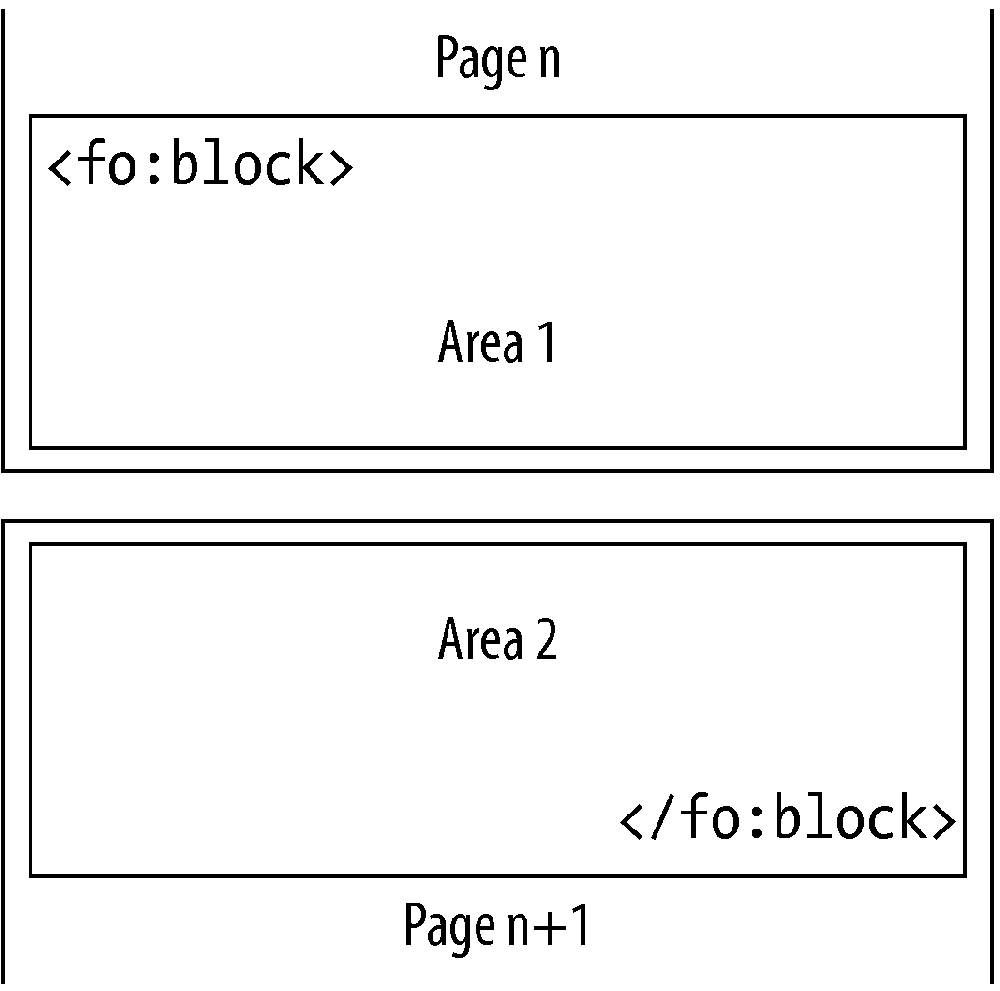
e.g., an fo:block element produces
two areas if split by a page break, as shown in Figure 4-1.
FOs have properties that specify constraints on the appearance and
placement of areas generated by them. These constraints are used to
calculate area traits , which are attributes of areas that uniquely identify
their placement, appearance, and contents. Most properties and traits
have one-to-one correspondence: e.g., the color property unambiguously defines a trait
with the same name. But there are several cases where relations between
properties and traits are more complicated; they will be considered
later.
Tip
Traits are actual attributes of an area as calculated by the formatter, whereas properties are a set of constraints imposed on the traits.
Areas form a tree structure: a larger area can contain smaller subareas. Typically, the area tree closely resembles the source FO tree: an area generated by formatting object A contains subareas generated by descendant elements of A. Important exceptions are out-of-line elements, such as floats and footnotes.
Areas created by formatting objects can be of two principal types:
- Inline-areas
These areas correspond to text chunks, inline images, etc. Areas of this type are stacked on a line in the
inline-progression-direction(see Chapter 6). Inline-areas are placed inside other inline-areas or inside line areas. The following objects create only inline-areas:fo:character,fo:inline,fo:inline-container,fo:bidi-override,fo:leader,fo:external-graphic,fo:instream-foreign-object,fo:page-number, andfo:page-number-citation.- Block-areas
These areas correspond to text paragraphs, tables, lists, etc. Areas of this type are stacked on a page in the
block-progression-direction(see Chapter 5). The following objects create only block-areas:fo:block,fo:block-container,fo:table,fo:table-and-caption, andfo:list-block.
Each area has a set of font traits, derived from font properties
of the respective formatting object. These traits uniquely define a
nominal font associated with the area. The area need not actually
contain glyphs from this font; parameters of the nominal font may be
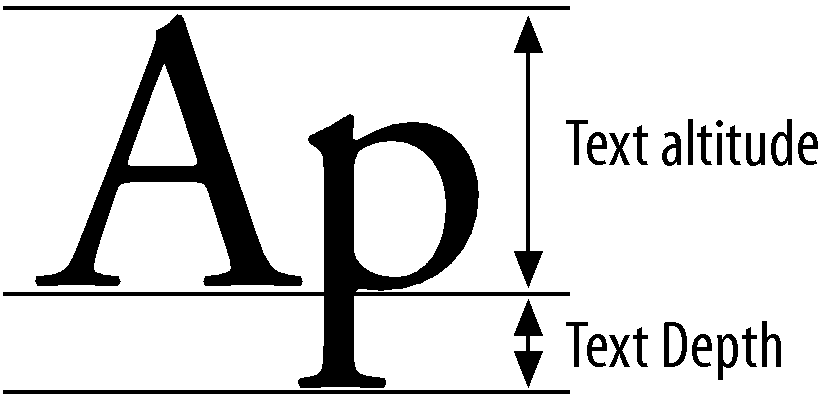
used in calculating area position. Two such traits are text-altitude and text-depth
: they specify the inline-progression-dimension of glyph-areas
and are used in line-stacking calculations. These are the low-level
items that determine the area sizes.
Two more area types are useful for defining the area model:
- Glyph-area
These areas can be viewed as an extreme case of an inline-area, corresponding to a single glyph. Every printable character of the text data in the source FO tree generates a glyph area. A glyph-area has two important traits that other areas donât have:
-
text-altitude The height of the nominal ascender of the font to which the glyph belongs
-
text-depth The depth of the nominal descender of the font
These are illustrated in Figure 4-2.
Note that text-altitude and
text-depth are
font properties, common to all glyphs in a given
font, rather than glyph properties: two glyph-areas containing glyphs
from the same font will get identical values for these traits. The
specification says conforming implementations may choose as any value in
the range of text-altitudes used by
fonts of the same script and font-size, instead of the values from the
font data.
Tip
The height of the content-rectangle of a glyph-area is different from the font-size (the latter is greater by the amount of the default leading for the font).
In the inline-progression-dimension, glyph-area size
is determined by the glyph itself (for Western fonts, this would be the
glyph width inclusive of left and right bearings). This is worth being
aware of, even though the stylesheet author has no control over
them.
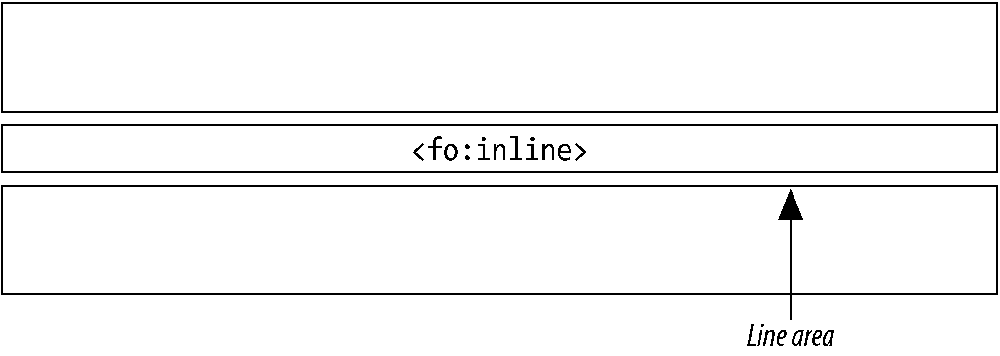
- Line-area
This is a special kind of a block-area, corresponding to a single line of text. It has no corresponding formatting object; its traits are derived from properties of the embracing block-level object, such as
line-height,line-height-shift-adjustment, andline-stacking-strategy. It is a useful abstraction to describe the switch between inline-level and block-level areas: inlines are stacked inside line-areas, which are packaged into the surrounding block-area. Line-areas cannot have borders or padding, and their stacking in theblock-progression-directionis controlled by special rules (see Section 4.5.4 for line stacking strategies). Figure 4-3 shows a line-area containing an inline.
There are other area types, used in constructing upper levels of the area tree, which also have no formatting objects directly corresponding to them:
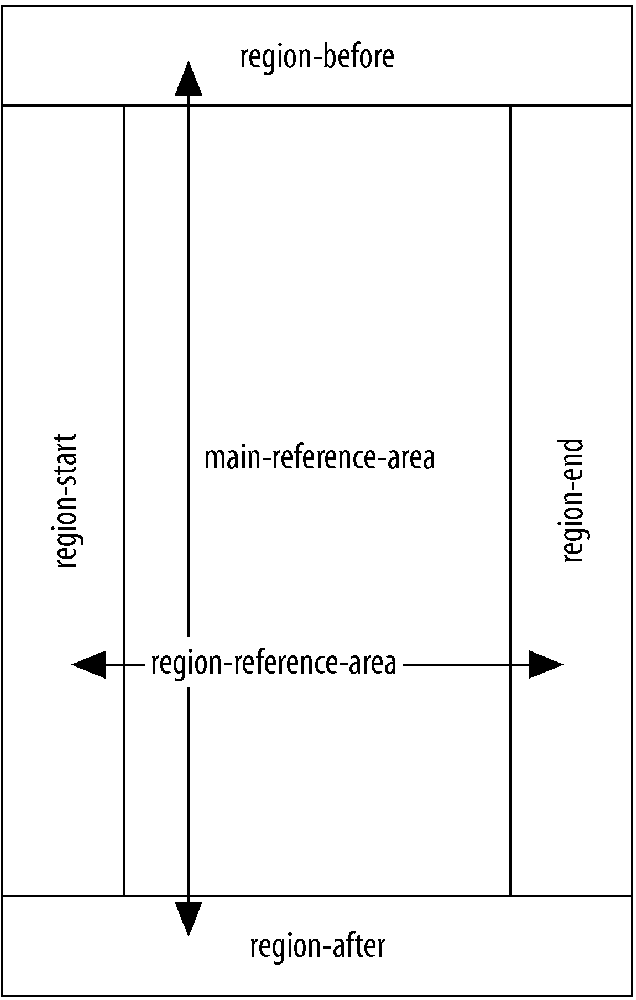
- Region-reference-areas
Each region into which a page is divided (
region-before,region-after,region-start,region-end, andregion-body) forms an area. The dimensions of the regions are defined by the respective region descriptors in thefo:simple-page-mastercurrently selected.- Main-reference-area
This implicit area is created inside the region area that accepts the contents of the
fo:flow(typically,region-body) and differs from it by the adjustments necessary to allocate conditional subregions:xsl-float-before,xsl-footnote, andxsl-footnote-separator. When there are no out-of-line elements on the page, the page-reference-area coincides with the region-reference-area. It contains one or more span-reference-areas.- Span-reference-area
In a multicolumn layout, a block-level element may have an attribute
span="all"making it span all columns on the page; others havespan="none", meaning that areas produced by these elements lay within one column. When laying out the page, a formatter partitions the flow into chunks such that all blocks in a chunk have the same value of thespanattribute. Each chunk creates a span-reference-area. This enables common column areas to be laid out together.- Column-area
A span-reference-area is further subdivided into areas for single columns. For span-reference-areas with
span="all", there will be only one such area, coinciding with the span-reference-area itself. Forspan="none", the number of areas is defined by thecolumn-countproperty, and their separation by thecolumn-gapproperty of thefo:region-bodyelement in the currentsimple-page-masterelement.
Figure 4-4 shows the main areas of a normal page.
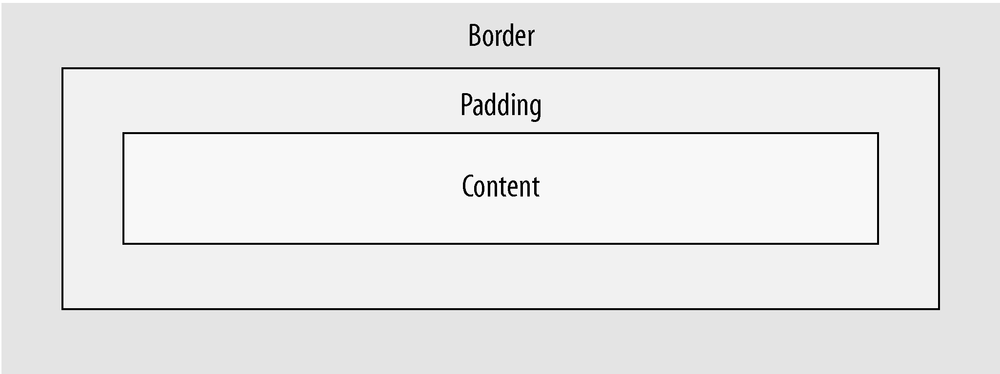
An area may have a border around it, with or without a background inside it (which may be an image or a color fill). The following are terms for rectangles that constitute an area:
- Content rectangle
This is the innermost part of an area. It represents the space actually available to host area contents, such as children areas, glyphs, and graphics.
- Padding rectangle
This rectangle extends up to the inner boundary of the border. It includes the content rectangle plus padding offsets from all the four sides. This rectangle delimits the zones covered by the background of the area.
- Border rectangle
This rectangle is delimited by the external edge of the border frame. It includes the padding rectangle, plus border widths of all the four sides. Except for special cases (absolute/relative positioning, overflow, out-of-line elements, etc.), no marks are produced by a formatting object outside the border rectangle of its generated area(s) â the rectangle is surrounded by spaces transparent to marks left by other areas.
All these rectangles should be present in CSS2 box model. There is one more rectangle defined in CSS: a margin rectangle that incorporates margins around the border. In XSL, margins are not used for area positioning (they are replaced by spaces); so it does not make sense to include the respective rectangle in the model. Figure 4-5 shows the content, padding, and border rectangles.
In CSS2, normally positioned blocks have properties that determine their placement with respect to the content rectangle of their parent box. All boxes are equivalent: children inside a box are always stacked in the same manner.
XSL takes a different approach: it designates some areas for use as reference for defining inline-progression-dimension and orientation of their descendant areas. Such areas are called reference areas ; I will refer to other areas as normal.
Reference areas have the following distinctive features:
They define starting points for
start-indentandend-indenttraits of all descendant normal block-areas.They can set new writing-mode and
reference-orientation(normal areas can changeinline-progression-directiononly via thedirectionproperty orbidimechanism).Their dimension is always bound in both directions, and the
display-aligntrait can be set to align their contents in theblock-progression-dimension.
All region and column
areas are reference areas; areas produced by fo:block elements are normal. table-cell is a reference area; label and body of a list item are normal. Only three
formatting objects can explicitly generate reference
areas:
fo:table-cellfo:block-containerfo:inline-container
The XSL specification defines a large variety of properties to express constraints over the appearance of areas on a page. The formatter tries to choose an optimal location for the area. This is not a straightforward process: properties may clash with each other, giving rise to an overconstrained geometry specification. Itâs the formatterâs task to choose a location for an area that will satisfy as many constraints as possible. The XSL spec is flexible about rule conflicts: it defines rules for prioritizing some constraints over others, but delegates the right to make the final decision to the formatter engine.
Next, I will analyze properties for expressing area position and dimensions, and describe their interaction rules.
It is not uncommon that a single formatting object produces two or more areas. A single block of text may be split by a page break; an inline element may be scattered into several lines. Traits of the resulting areas are controlled by properties of their source formatting object.
Borders and padding can be applied conditionally, using the
extended property, border-after-width.conditionality, for
instance. The values are either retain or discard, and affect the border or padding
when it is at the beginning or the end of a reference area. This can
cause problems when you actually want the border or padding at the
before or start side, and the conditionality is set to discard (the default). It is explained
further when I discuss space resolution in Section 4.5.4.
This is another case where a trailing
area (here, a border) may be discarded if it is the
last in a reference area. Roughly, this means if a sequence of areas
has a border specified, the final one may be discarded, because its
area is lost in the parent area. For example, if you have specified
border-after on six successive
areas, with the final one ending a chapter, this may be discarded
(default) by the formatter, because its area will be lost in the break
before the start of the next chapter. Similar logic works in the
inline-progression-direction.
Again, this is controlled by the spaces and conditionality logic. If
the conditionality is set to retain, the normal logic is
overridden.
There are also a number of constraints that donât directly assign traits to the areas; rather, they control the number and the appearance of the areas produced by the formatting object that bears them. They are expressed by the following properties:
break-beforeThe first area generated by a formatting object with
break-beforeset to something other thanautoshould be placed first in the area-tree inside some reference-area. The stylesheet author specifies the condition, and the formatter determines the placements. The type of this reference-area depends on the value of the property:autoNo constraint is present; the property is discarded.
- column
The object starts a column-reference-area.
- page
The object starts a page-reference-area.
- odd-page
The object starts an odd-numbered page-reference-area.
- even-page
The object starts an even-numbered page-reference-area.
This property triggers a break immediately before the first area generated by the current object, starting a new column, page, odd-page, or even-page. Note, however, that this property is not like a form-feed command for a printer; if the constraint on area placement had been generated without this property, no additional pages would be generated. In plain words, consecutive break constraints separated by objects that create no areas are merged.
Break-afterAn inversion of the preceding property, with the same set of values. It generates a break after the object: the last area generated by the object should be last in its column-area, and the next area should start a new column, page, odd-page, or even-page.
Keep-with-previousThe opposite of
break-before: the first area generated by the object should not be the first in the area. This property is compound, with the following components:- .within-line
The object should not start a new line.
- .within-column
The object should not start a column.
- .within-page
The object should not start a page.
Each component may assume the following values:
- auto
Constraint disabled.
- Integer value
Specifies the strength of the constraint.
- always
Specifies a strength value greater than any integer.
The strength of the constraint is used to arbitrate its conflicts with other constraints.
keep-with-nextInhibits break after the last area produced by the object. It has the same component structure and the same choice of values.
keep-togetherThis property prescribes that the formatting object should generate only one area â in other terms, it inhibits respective breaks between areas generated by the formatting object. The components and the set of values are the same as for the preceding two values.
Like space specifiers, keep and break constraints can lead to overconstrained specification, when it is impossible to satisfy them all simultaneously. In these cases, the following rules of constraint relaxation apply:
All break constraints are satisfied first.
Keep constraints with lower strength are relaxed first.
The resulting set should satisfy the maximum number of constraints with the highest strength possible.
There are two more properties that constrain area placement
inside reference areas: orphans
and widows
. They specify the minimum number of line-areas that can
be left at the end of the page (orphans) or carried over to the next page
(widows). The spec does not define
how these properties should interact with other keep
constraints.
Each area has two traits that define its dimension: inline-progression-dimension and block-progression-dimension . These traits define the width and height of the
content rectangle of the area; which one is horizontal and which is
vertical depends on the current writing-mode and reference-orientation. However, not all
formatting objects may have properties that directly map to these
traits; they are permitted only on objects that create reference areas
or images:
fo:simple-page-mastergetspage-widthandpage-heightproperties, and margins. There is asizeshorthand, too.fo:region-bodyhas margins to specify its offsets from the page-reference-area content rectangle (defined in its parentfo:simple-page-master). While there are no traits for direct settings of dimensions, it is still possible to fix the size because the dimensions ofpage-reference-areaare known.fo:region-before,fo:region-after,fo:region-start, andfo:region-endcannot control their dimension in the direction parallel to the sheet edge to which they are attached. In the other direction, their size is given by theextentproperty.fo:block-containerandfo:inline-containermay have explicit attributes ofinline-progression-dimensionandblock-progression-dimension, specified either as a percentage, range, or length.widthandheightmay be also specified for these two elements. In addition, when anfo:block-containeris absolutely positioned, it may get its dimensions from top, bottom, right, or left.fo:external-graphicandfo:instream-foreign-objecthave the same size-related properties as the containers above.
Warning
Note that there is no link between extent and margins on
fo:region-body. It is the
stylesheet writerâs responsibility to ensure that side regions fit
into the place left free by fo:region-body.
All other elements can only specify their dimensions in terms of distance from the edges of a reference area. (This is more a feature than a limitation; to set any dimension explicitly, you always have an option of wrapping the desired element into a block- or an inline-container).
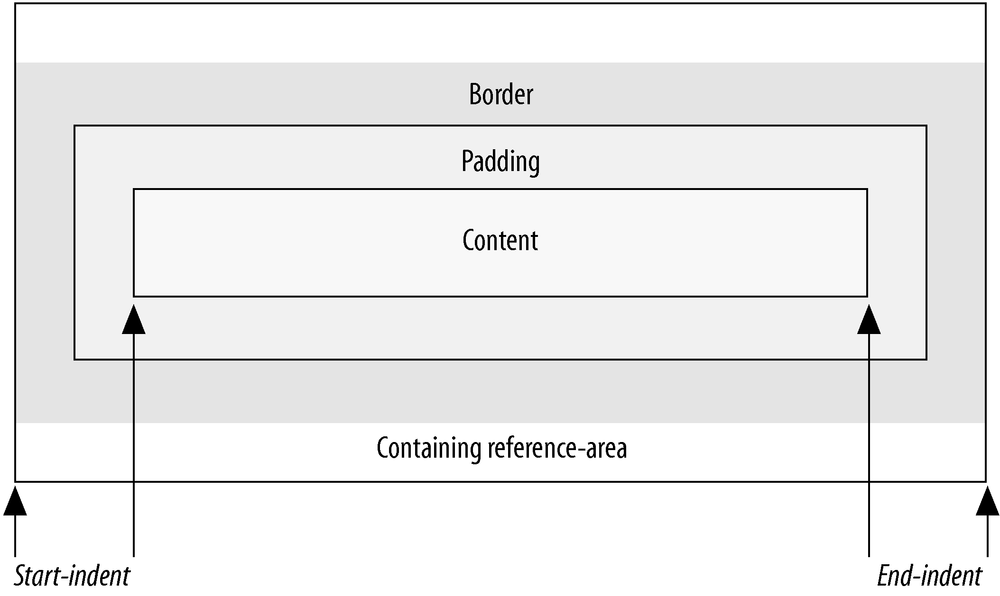
Each block-area has two traits that specify its position
and size in the inline-progression-dimension: start-indent and end-indent
. They specify the distance from an edge of the content
rectangle of the area (start-edge
for start-indent, end-edge for end-indent) to the respective edge of the
content-rectangle of its closest ancestor reference area. Each
formatting object that produces areas may have properties that map
directly to these traits (and are named the same). See Figure 4-6.
XSL has an alternative mechanism for setting indent
traits: an area can be positioned using margin properties. There are
four margin properties: margin-top
, margin-bottom
, margin-left, and
margin-right . A margin property specifies the distance from the
respective edge of the content-rectangle of the closest ancestor
reference-area to the edge of the border-rectangle of the current
area. Margin properties can only be absolutely oriented: no writing-mode relative equivalents are
provided. There is also a short form[1] property margin that
sets all the four margins simultaneously, using standard CSS2
rules.[2]
In XSL, indents are inheritable. Unless you set them explicitly
(in either of the two ways described previously), the
content-rectangle of a nested area gets the same inline-progression-dimension as that of an
embracing area. Inheritance is discussed further in Appendix E. If you add padding and/or
border to the nested area, its border-rectangle will extend outside
the content-rectangle of its parent. Note that this differs from CSS2
habits: there, the border-rectangle of a contained box always fits
inside the content-rectangle of the container one. If you want to
enforce CSS2-style box nesting, you have to specify margin="0pt" explicitly on every contained
block.
For the sake of completeness, letâs now mention the effects that
side floats have on the placement of block-areas. These are areas specified to
float in the start or end direction, as might
be found in an explanatory note. A side float F is said to intrude
into a block-area B
if:
BandFhave the same nearest ancestor reference-area.There is a line parallel to the
inline-progression-directionthat intersects border rectangles of bothBandF. Think of this as the float stealing space from the block.
Intruding floats make no impact on the placement of normal
block-areas. However, they do influence the inline-progression-dimension of the
following types of areas:
line-areas
reference-areas (generated by a
fo:block-containerelement)Areas generated by
list-item-body
If an area belongs to one of these types, and has one or more
side-floats intruding into it, then its start-indent and end-indent are calculated from the inner
side of the float box, rather than from the respective edge of an
ancestor-reference-area.
In a typical case, a paragraph of text with an intruding float will have lines shortened to make room for the float. Note that the block itself is not influenced by the float; if it has a border around it, the float will be pasted inside the border. On the other hand, a block-container with an automatically determined width will shrink as a whole, leaving the float outside.[3]
Letâs now consider how block-areas are stacked one after
another in the block-progression-dimension. We have already
seen that the XSL model is based on spaces; now we will see which
properties can be used to constrain spaces between areas, and how they
interact.
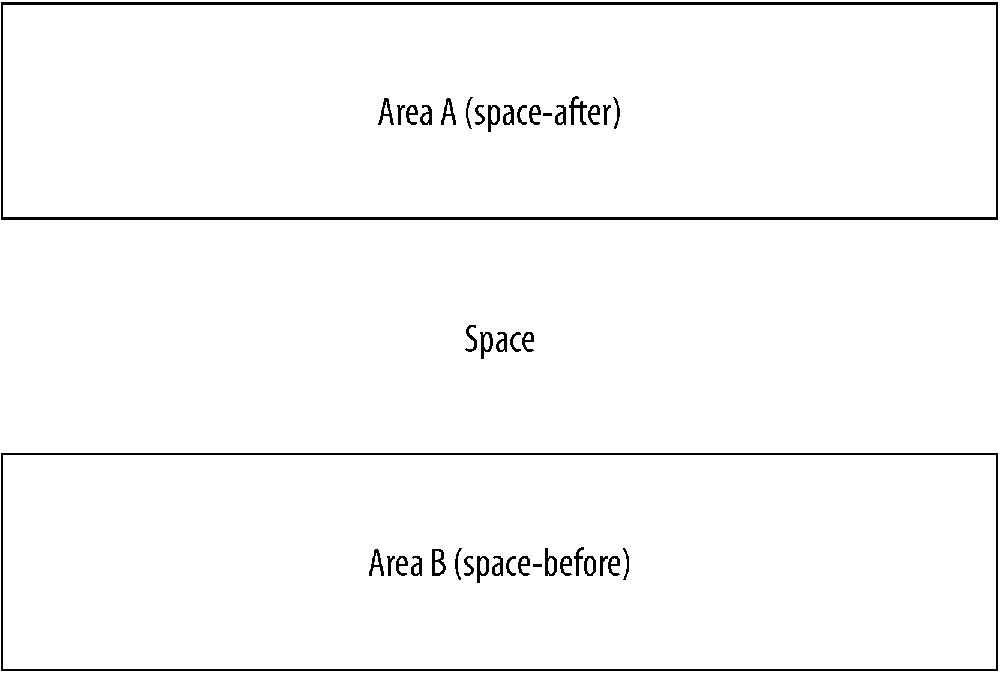
What is a space? Informally speaking, a space is a distance
between the areaâs border-rectangle and the closest visible
mark left on the page by any normally positioned area. This
mark may be left by a nonzero border, by padding (because padding may
contain background), or by a nonempty content-rectangle of any area.
Border and padding need not belong to the next or previous area: they
may be left by an embracing block that happens to start or end just
before or after the current area. Note also that for two consecutive
areas, the space-before of the
first area is equal to the space-after of the second area. See Figure 4-7.
Spaces before and after a block-area are controlled by space-before and space-after
properties. These two properties are
compound, with the following components:
.minimumA length. Default is 0pt.
.optimumA length. Default is 0pt.
.maximumA length. Default is 0pt.
precedenceA number or a special token,
force. Default is 0.conditionalityEither
discardorretain. Default isdiscard.
There is also a shorthand notation: by specifying space-before="X" you set all numerical
components (.minimum, .optimum, and .maximum) to the same value of X.
These compound properties represent a very versatile mechanism:
you can constrain a range for the space (from minimum to maximum), indicate the preferred value
(optimum), set the relative
strength for the constraints (precedence), or define space behavior when
there is no adjacent area in the same reference-area (conditionality).
This complexity is due to the fact that space constraints are not independent. When two consecutive areas meet, there may be several space constraints applicable: a single space value should be chosen to satisfy them all (or rather, to satisfy them to the best extent). In this situation, it is desirable to give a stylesheet writer the maximum control over the selection of the correct space.
As I mentioned earlier, a space constraint between two
consecutive areas A and B can be specified in any of the following
ways (see Figure 4-8):
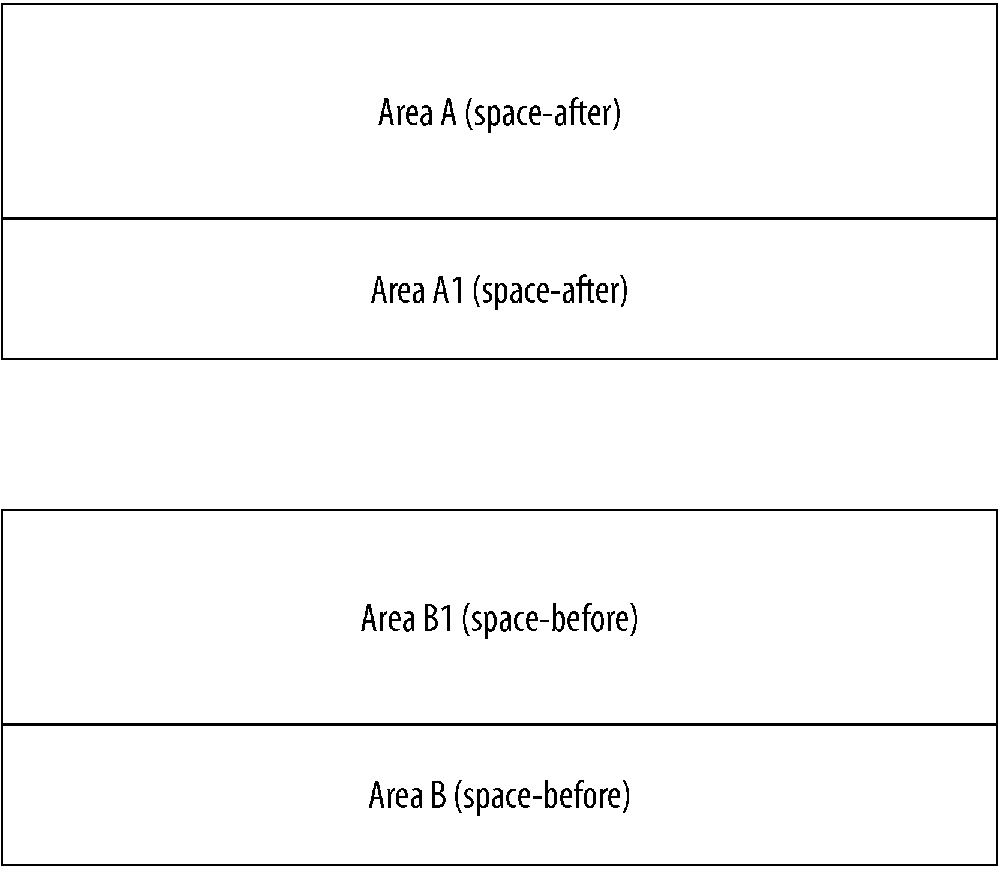
All these constraints are considered together and merged into a
single value, or better, a single range specifier with .minimum, .maximum, and .optimum components. The final decision is
delegated to the XSL formatter; it should stick to the resolved
.optimum value whenever possible,
and choose another value within the .minimum to .maximum range if there are other
constraints to satisfy.
The merged space specifier is calculated by the following algorithm:
If any space property has
.precedence="force"(forcing spaces), all space specifiers but forcing ones are discarded. The resulting space specifier should have the sum of.minimumcomponents as its.minimum, the sum of.optimums as.optimum, and the sum of.maximums as.maximum. In other words, forcing spaces are additive: they suppress all other spaces but donât merge with each other.Otherwise, spaces with the maximum value of
.precedenceare selected, and others are discarded. If there is more than one space specifier with the same precedence, the one with the higher.optimumvalue is selected. If there are two or more specifiers with the same.precedenceand.optimumvalues, the resulting space specifier will be equal to the intersection of their ranges; that is, the.minimumwill be equal to the greatest of all.minimums, and the.maximumwill be set to the smallest of all.maximums.
If an area happens to be the first on the page with no preceding
marks from which to count space-before, space-before is counted from the before-edge
of the content-rectangle of the closest ancestor reference-area.
Remember that in this case, only specifiers with .conditionality="retain" are taken into
consideration.
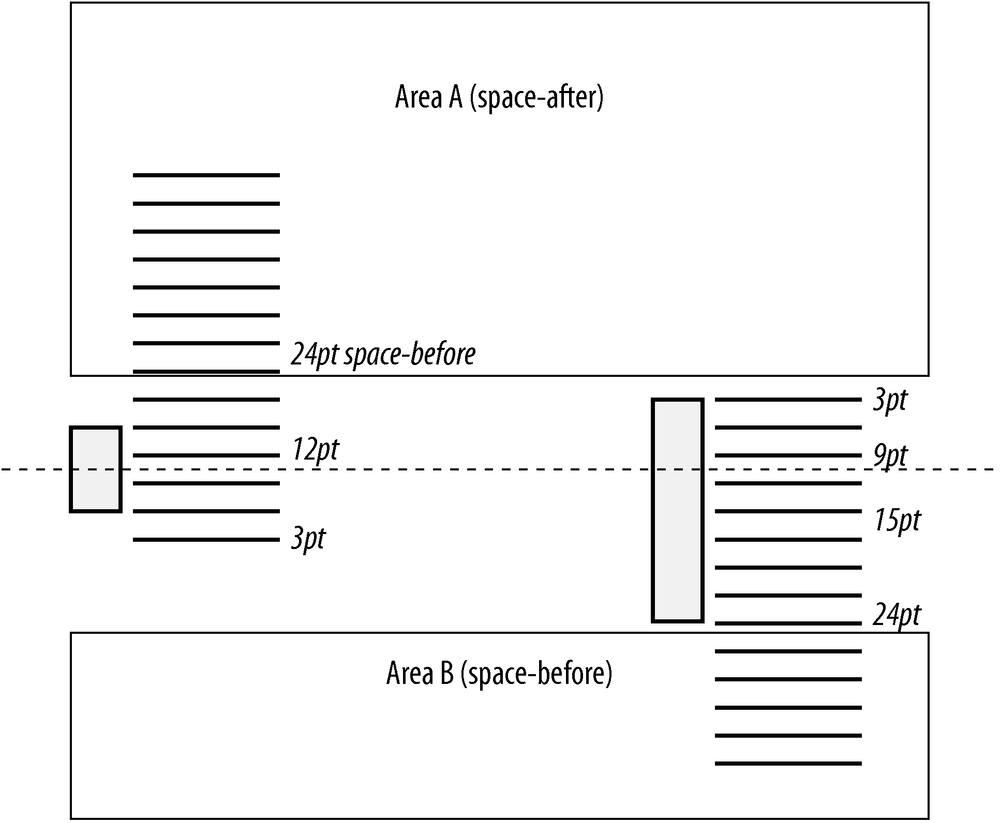
Now letâs see an example of how all this works. Figure 4-9 represents a typical
configuration. Two blocks, each specifies a space: the first specifies
a space-after and the second
specifies a space-before. Example 4-1 demonstrates how to
achieve this.
Example 4-1. Space resolution
<fo:block space-after.minimum="3pt">
            space-after.maximum="24pt"
             space-after.optimum="12pt">
  .....

</fo:block>
<fo:block space-before.minimum="6pt"
             space-before.maximum="18pt"
             space-before.optimum="12pt">
....
</fo:block>
The resolution is for the resultant minimum to be set to 6pt, the maximum to be set to 18pt, and the computed
value, set to 12pt. This is shown in Figure 4-9, with the shaded area
indicating the extents. When the optimum values are equal, take the greatest
minimum and least maximum, so the resolved space in this case
has a minimum of 6pt.
It is easy to create a contradictory set of space constraints. In such a case, formatter behavior is not described by the specification and remains application-specific. The stylesheet writer is responsible for the consistency of the constraint system. The space mechanism is powerful and versatile, but not fool proof.
This differs drastically from the CSS box model where top- and bottom-margins are a single value. Margins in CSS are self-contained and additive in most cases, and the margin merging algorithm is rudimentary â the widest margin is selected. XSL supports margin properties on before-edge and after-edge, too; they are converted into space-specifiers as follows:
margin-{correspondent}="X":
   .minimum = .optimum = .maximum = X
   .conditionality="retain"
   .precedence="force"
This permits you to simulate CSS-style box stacking in XSL. Note that CSS-style margins wonât merge with each other and will overcome every non-forcing space specifier.
Stacking inline-areas inside a line-area is perfectly parallel to
stacking block-areas inside a reference-area. An inline-area has
traits to control free space left before and after it in the inline-progression-direction:
space-start and space-end for inline-areas are calculated by
the same rules as space-before and
space-after for block-areas
(accounting for possible change of direction). Any conditionality
components control constraint suppression at the start or end of a
line-area.
Alignment of inline-areas in the block-progression-direction is controlled by
the baseline mechanism (see Chapter
6).
Stacking line-areas inside a block-area is less trivial. The
distance between lines is controlled by the compound property line-height, with the same components as
other space specifiers. Its interpretation depends on the algorithm
selected for line-stacking. There are three algorithms available,
switched by the line-stacking-strategy property on the parent block-area: font-height, max-height, and line-height.
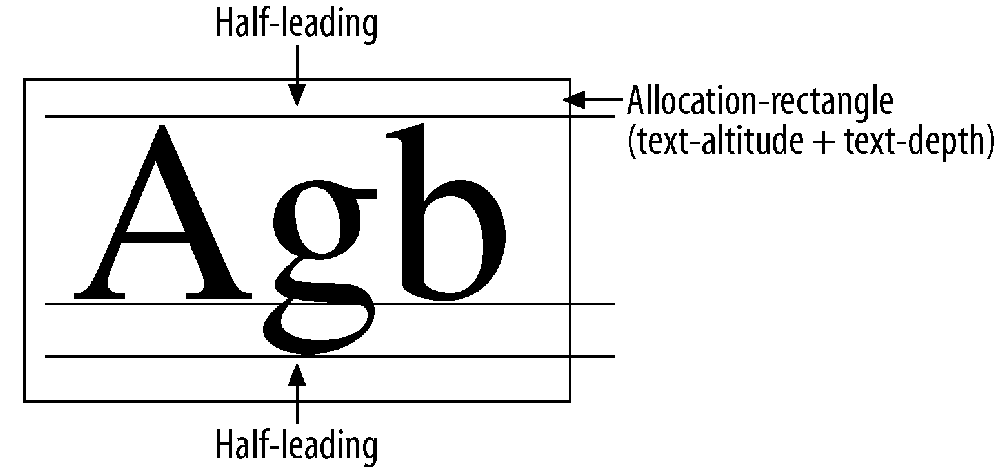
To describe the placement of lines in terms of stacked areas, here are some terms. A line-area can be logically divided into three parts (see Figure 4-10):
The allocation-rectangle is the central part of the line-area around the baseline. It roughly corresponds to the content-rectangle, but doesnât necessarily coincide with it. Its size in the
block-progression-dimensionis determined differently depending on theline-stacking-strategyselected.There are two spaces around the allocation-rectangle, which are both equal to half-leading . Half-leading spaces get
.conditionalityand.precedenceattibutes from theline-heightproperty and can be merged with other spaces and suppressed in the beginning or at the end of a reference area â just like other spaces. However, half-leading spaces never get merged with their likes.
Line-areas are stacked one after another inside a block-area, leaving no other space before or after them but the half-leadings from both sides. The gap between allocation rectangles of two adjacent line-areas consists of the half-leading-after of the first line plus the half-leading-before of the second line. (Note that these two spaces arenât merged.)
The available line-stacking strategies are line-height, font-height, and max-height.
Note that for lines built entirely of text using a nominal font,
all three line-stacking strategies give the same value of base line
separation (equal to the line-height). They differ only in the
treatment of large elements that go outside the
nominal-requested-line-rectangle: the simplest strategy is font-height: separation between baselines of
adjacent line areas is constant throughout the whole block and does
not depend on the actual contents of any line. Inter-line distance
should equal line-height.optimum,
unless the formatter chooses another value in the range .minimum to .maximum to satisfy other constraints on
block placement. Sizes of line-area elements are determined as
follows:
Allocation-rectangle for
line-stacking-strategy="font-height"depends solely on the nominal font for the block. Its before-edge is offset bytext-altitudefrom the baseline, and its after-edge is placed attext-depthfrom the baseline in theblock-progression-direction. In the XSL spec, this is called nominal-requested-line-rectangle, and is likely to be the most common one used.Half-leading is half the difference between the
line-heightchosen and the height of the allocation rectangle:half-leading = (line-height - text-altitude - text-depth) / 2
In other words, this strategy stacks lines as if the whole block
consisted entirely of plain text, with text-altitude and text-depth remaining constant across the
block. Eventual inclusions of other font glyphs or large images donât
influence the distance between the baselines. Using font-height will certainly make a mess of
things if you include, for instance, graphics in your document. In
such a case, use max-height.
max-height is a more
complicated strategy. The half-leading is calculated by the same
formula as with font-height and
remains constant for all lines in the block. The allocation-rectangle,
instead, is calculated in a more complex way: its dimension in the
block-progression-dimension is
determined by the elements whose before-edge and after-edge are the
most distant from the baseline (for Western scripts these are determined by the tallest/deepest
elements; thatâs why the strategy is called max-height). With this strategy, the gaps
between the lines remain constant across the block; if the line has
elements bigger than glyphs of nominal font, its separation from its
neighboring lines will be increased so as to leave the gap between
lines equal to the constant value (two half-leadings). However, if the
line consists only of small elements, the baseline separation is not
stretched: the allocation-rectangle will always contain the
nominal-requested-line-rectangle.
One more trait influences line placement with this strategy:
line-height-shift-adjustment
. It controls processing of areas whose baselines are
shifted from the common baseline of the line-area. There can be two
values for this trait:
consider-shiftsWhen calculating the allocation-rectangle, baseline shift elements are taken into account. For instance, if a line contains a subscript, the next line will be placed lower because the allocation-rectangle will extend to reach the after-edge of the subscript glyph.
disregard-shiftsBaseline shifts are disregarded. If a line contains subscripts or superscripts, its placement is not influenced by their presence.
The last strategy is line-height. This way of stacking lines
comes from CSS and differs greatly from the preceding two. In this
method, the line-height trait is
considered a property of each inline-area, rather than the whole
block-area, and may vary across the block: it is even possible that
areas within the same line have different values of line-height. There is no common half-leading
defined for the block; instead, every single area gets margins before
and after it, depending on the local value of the line-height trait. The allocation-rectangle
of the line-area is defined to be the least rectangle to include both
the nominal-requested-line-rectangle and all inline-areas with their
margins. Allocation-rectangles defined this way are stacked one after
another, with no additional gap between them.
The algorithm to determine margins on inline-areas is similar to
the method of calculating line separation in the max-height strategy:
For inline images and reference-areas (containers), margins are set by normal space-specifiers that are treated as CSS margins: conditionality and precedence are neglected, and no merging ever occurs.
For other types of areas, the half-leading is calculated as a function of
line-height,text-altitude, andtext-depth. The formula is the same as earlier forfont-heightandmax-height, but trait values are taken from the inline-area. This half-leading is added before and after the content-rectangle (determined bytext-altitude/text-depthtraits). Note that theblock-progression-dimensionof the resulting margin-rectangle will be always equal to theline-height.
Within this strategy, line-height-shift-adjustment is also
applicable and has the same meaning: when line-height-shift-adjustment="disregard-shifts"
is set, all calculations are performed as if all inline-areas were
aligned along the same baseline. This permits exclusion of inter-line
gap widening due to subscripts and superscripts.
font-heightneglects big elements â line separation is always fixed. This strategy gives the tightest line placement. Other strategies can only increase inter-line spaces.max-heightadjusts separation in such a way that visible gap between lines remains constant.line-heightpermits variation of the treatment of outstanding elements on a case-by-case basis.
[1] Setting all components of a compound property by omitting the component specification is termed a short form.
[2] In fact, margins are tolerated in XSL as a secondary mechanism to ensure CSS2 compatibility, but they donât integrate well with XSL layout model based on constrained spaces. We strongly advise using indents instead of margins.
[3] This is expected to change significantly in the next version of the XSL spec.
Get XSL-FO now with the O’Reilly learning platform.
O’Reilly members experience books, live events, courses curated by job role, and more from O’Reilly and nearly 200 top publishers.

