Chapter 4. Creating Posts
Now that you’ve signed up for a WordPress.com account (Chapter 2), or installed the WordPress software on your web host (Chapter 3), you’re ready to get started publishing on the Web. In this chapter, you’ll go to your fledgling WordPress site and start posting content, which can be anything from bracing political commentary to cheap celebrity gossip. Along the way, you’ll learn several key WordPress concepts.
First, you’ll get comfortable in WordPress’s dashboard—the administrative cockpit from which you pilot your site. Using the dashboard, you’ll create, edit, and delete posts, all without touching a single HTML tag (unless you really want to).
Next, you’ll learn how to classify your posts by using categories and tags, so you can group them in meaningful ways. WordPress calls this art of organization taxonomy, and if you do it right, it gives your readers a painless way to find the content they want.
You’ll also take a hard look at the web address (URL) that WordPress generates for every new post. You’ll learn how to take control of your URLs, making sure they’re meaningful, memorable, and accessible to search engines. You’ll also learn how to shorten the web address of any post, which is handy if you need to wedge a link to your post into a small place (like a Twitter message, Facebook post, or a bit of bathroom graffiti).
Introducing the Dashboard
The dashboard is the nerve center of WordPress administration. When you want to add a new post, tweak your site’s theme, or review other people’s comments, this is the place to go.
The easiest way to get to the dashboard is to take your WordPress website address and add /wp-admin (short for “WordPress administration”) to the end of it. For example, if you host your site at http://magicteahouse.net, you can reach the site’s dashboard at http://magicteahouse.net/wp-admin. When you do, WordPress asks for your user name and password. Once you supply them, you’ll see a page like the one in Figure 4-1.
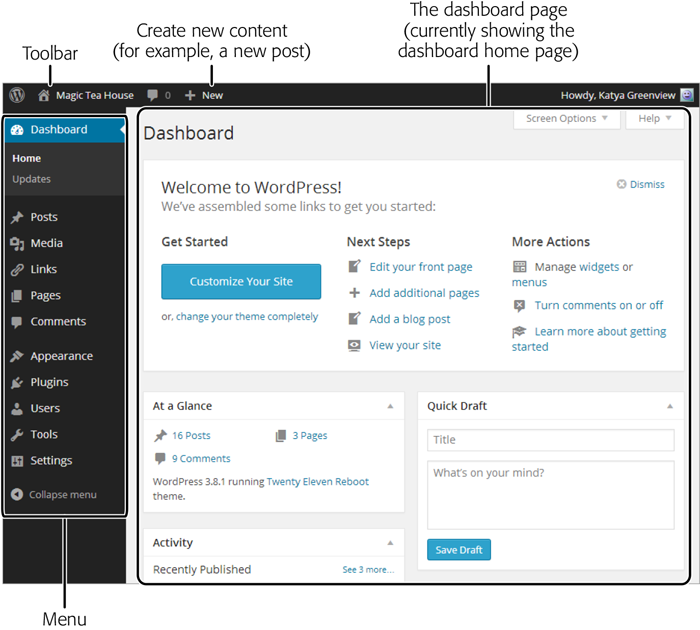
Figure 4-1. Getting your bearings in the dashboard is easy enough. At the top is a thin toolbar with some handy shortcuts—for example, if you point to “+ New” without clicking, a menu pops up with commands for quickly creating new posts and other types of content. Along the left edge of the dashboard is the all-important WordPress menu—a strip of commands that let you move to different parts of the dashboard so you can use different WordPress features.
When you finish working at the dashboard, it’s a good idea to log out. That way, you don’t need to worry about a smart-alecky friend hijacking your site and adding humiliating posts or pictures while you’re away from your computer. To log out, click your user name in the top-right corner of the toolbar, and then click Log Out (on a self-hosted site) or Sign Out (on a WordPress.com site).
There’s another way to go backstage with your site. When WordPress creates a new site, it adds a small section of timesaving links named “Meta.” The exact location of this section depends on the theme your site uses, but you’ll usually find it at the bottom of a sidebar on the left or right side of your home page (Figure 4-2). Inside the Meta section, you can click the “Log in” link to go directly to the dashboard. (If you’re already logged in, you’ll see a Site Admin link instead, which does the same thing.)
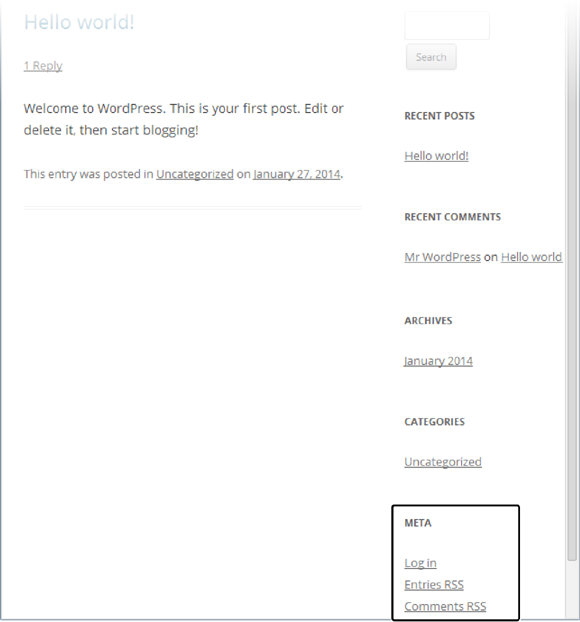
Figure 4-2. The Meta section of your home page has links that can take you to the dashboard, show you the feeds that publish your content (page 433), and transport you to the WordPress.org site. It’s a holdover from the earliest days of WordPress.
Note
Although the Meta section is helpful when you first start out, you definitely don’t want these administrative links in a finished site. “Positioning Your Widgets” explains how to remove them, once you’re accustomed to breezing in and out of the dashboard on your own.
The Menu
To browse around the dashboard, you use the menu—the panel that runs down the left side of the dashboard. It has a link to every administrative feature WordPress offers.
WordPress groups the menu commands into submenus. To see a submenu, hover over one of the menu headings (like “Posts”) and it pops open (Figure 4-3).
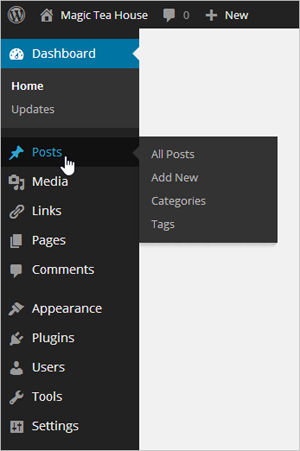
Figure 4-3. WordPress’s menu packs a lot of features into a small strip of web page real estate. Initially, all you see are first-level menu headings. But point to one of the items without clicking, and WordPress opens a submenu. (The exception is the Comments heading, which doesn’t have a submenu. You just click it to review comments.)
When you click a menu command, the rest of the dashboard changes to reflect the task you picked. For example, say you choose Posts→Add New. (In other words, you mouse over to the left-side menu, hover over “Posts” until its submenu appears, and then click the “Add New” command.) Now, the dashboard shows an HTML-savvy editor where you can write your post.
You can also click a menu heading directly (for example, “Posts”). If you do, you go to the first item in the corresponding submenu, as shown in Figure 4-4.
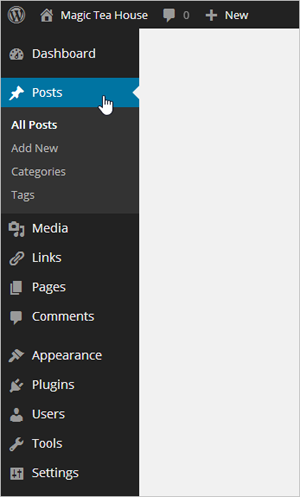
Figure 4-4. If you click the heading Posts, you actually go to the submenu item Posts→All Posts. And if you lose your bearings in the dashboard, just look for the bold text in the menu to find out where you are. In this example, that’s All Posts.
Note
If you resize your web browser window to be very narrow, the menu shrinks itself to free up more space, removing the menu names (like Posts, Media, and Links), and leaving just the tiny menu icons. Hover over one of these icons, and the submenu appears, but with a helpful difference: Now WordPress displays the menu name as a title at the top.
The Home Page
Your starting place in the dashboard is a densely packed home page. You can get back to this page at any time by choosing Dashboard→Home from the menu.
If you just created a new self-hosted WordPress site, you’ll see a welcome box filling the top part of the dashboard (Figure 4-5). It provides links that lead to some of the more important parts of the dashboard, where you can edit settings and add new posts.
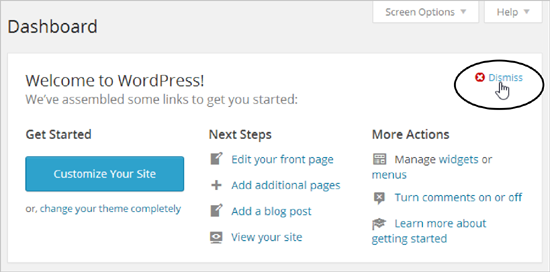
Figure 4-5. Although the links in the welcome box work perfectly well, it’s probably a better idea to get used to finding what you need on the dashboard. Before you continue, scroll down past the welcome box or click the Dismiss link to remove the box altogether, so you can see the rest of the home page. (If you want it back later on, use the Screen Options button described on page 124.)
The dashboard home page may seem like a slightly overwhelming starting point, because it’s crowded with boxes. Each one handles a separate task, as detailed in Figure 4-6. Sometimes, you’ll also see boxes with important news (for example, an announcement about an update to the WordPress software).
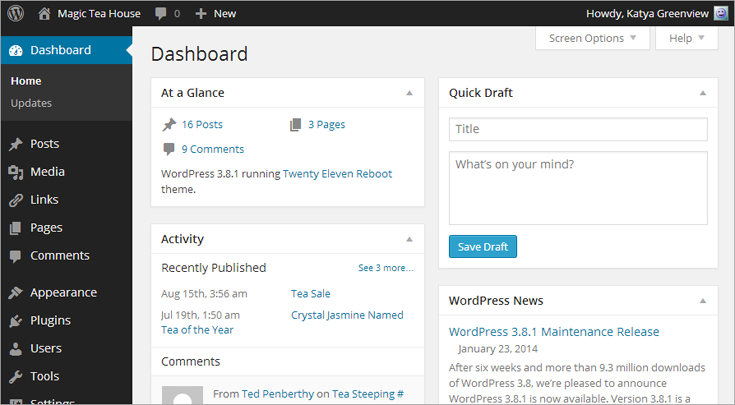
Figure 4-6. At the top of the dashboard home page, the “At a Glance” box displays your site’s vital signs—including how many posts, pages, and comments it has. To the right is a Quick Draft box that lets you create a new post in a hurry. Below that, you’ll find boxes with information about recent posts (articles you’ve written), recent comments (that other people have left in response to your posts), and links to WordPress news.
Don’t be surprised to find that your brand-new WordPress site has some content in it. WordPress starts off every new site with one blog post, one page, and one comment, all of which are dutifully recorded in the At a Glance box. Once you learn to create your own posts, you’ll see how to delete these initial examples (“Creating a Sticky Post”).
Note
WordPress continually evolves. When you use the latest and greatest version, you may find that minor details have changed, such as the exact wording of links or the placement of boxes. But don’t let these details throw you, because the underlying WordPress concepts and procedures have been surprisingly steady for years.
Dashboard Practice: Changing Basic Settings
Now that you understand how the dashboard works, why not try out a basic task? The following steps show you how to change a few useful WordPress settings, which are worth reviewing before you start posting. And, best of all, they’ll help you get used to clicking your way through the dashboard menu to find what you need.
In the dashboard menu, choose Settings→General.
The rest of the dashboard loads up a page of tweakable settings (Figure 4-7).
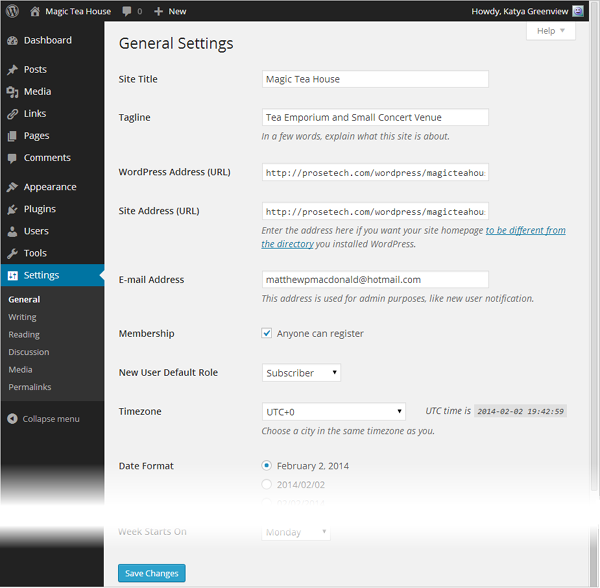
Figure 4-7. Point to the dashboard’s Settings menu item without clicking to reveal a submenu, and then click General. That brings you to the page of options shown here (partially, with some options omitted).
If you like, change some settings.
Here are some suggestions:
Site Title and Tagline. In a basic WordPress site, every page has a header section at the top. WordPress puts the site title and tagline there (Figure 4-8). The site title also shows up at the top of the browser window (or tab), and, if a visitor decides to bookmark your site, the browser uses the site title as the bookmark text. You shouldn’t change these details often, so it’s worthwhile to double-check that you’ve got a clear title and catchy tagline right now.
Timezone. This tells WordPress where you are, globally speaking. (For example, UTC-5 is the time zone for New York.) If WordPress doesn’t have the right time zone, it will give posts and comments the wrong timestamp. For example, it might tell the world that a comment you left at 8:49 PM was actually recorded at 3:49 AM. If you’re not sure what your time zone offset is, don’t worry, because WordPress provides a list of cities. Pick the city you live in, or another city in the same time zone, and WordPress sets the offset to match.
Date Format and Time Format. Ordinarily, WordPress displays the date for every post you add and the time for every comment made. These settings control how WordPress displays the date and time. For example, if you want dates to be short—like “2014/12/18” rather than “December 18, 2014”—the Date Format setting is the one to tweak.
Week Starts On. This tells WordPress what day it should consider the first day of the week in your country (typically, that’s Saturday, Sunday, or Monday). This setting changes the way WordPress groups posts into weeks and the way it displays events in calendars.

Figure 4-8. A WordPress header includes the site’s title and tagline. The title (Magic Tea House) appears in a large font. The tagline, a one-sentence description (Tea Emporium and Small Concert Venue), sits underneath.
Click Save Changes to make your changes official.
WordPress takes a fraction of a second to save your changes and then shows a “Settings saved” message at the top of the page. You can now move to a different part of the dashboard.
One More Task: Choosing a Starter Theme
Every WordPress site has a theme that sets its layout and visual style. As you begin to refine your site, you’ll take a closer look at themes, starting in Chapter 5. But before you even get to that point, you need to pick a good starter theme for your site.
WordPress includes a few themes with every new installation. Somewhat awkwardly, it names each theme after the year it released the theme. At the time of this writing, a WordPress installation includes the Twenty Twelve, Twenty Thirteen, and Twenty Fourteen themes.
It’s natural to assume that the best theme is the latest one, and that later themes should replace earlier ones in new sites. However, the creators of WordPress actually take a different approach. They aim to have each new theme showcase a popular style, while admitting that no single theme will suit everyone. The Twenty Fourteen theme, for example, is a dark, slick, image-heavy production that suits online magazines and photo blogs. By comparison, Twenty Twelve is a clean, streamlined theme that’s perfect for a basic blog or a solid foundation for more ambitious customizations.
You can learn the fundamentals of WordPress using any theme. However, you’ll have an easier start using a clean and simple one like Twenty Twelve rather than a heavy one like Twenty Fourteen. (You’ll also have an easier time following along with the examples in this chapter, which use Twenty Twelve.)
To start yourself out right, here’s how to change your site’s theme to Twenty Twelve:
In the dashboard, click Appearance→Themes.
If you’re working with a self-hosted site, you’ll see a small gallery of preinstalled themes.
If you’re working with a WordPress.com site, you’ll see a much larger gallery with all the themes you can choose.
In the “Search themes” text box on the right, type “twenty twelve.”
As you type, WordPress filters the list of themes to show those that match your search text (Figure 4-9).
Hover over the Twenty Twelve box and click Activate.
WordPress applies this theme to your site immediately. Click your site name (near the top-left corner of the page) to view your site and see the results.

Figure 4-9. When you finish typing in the search box, you’ll see a single entry for the Twenty Twelve theme.
Adding Your First Post
Comfortable yet? As you’ve seen, the WordPress dashboard gives you a set of relatively simple and anxiety-free tools to manage your website. In fact, a good part of the reason why WordPress is so popular is because it’s so easy to take care of. (And as any pet owner knows, the most exotic animal in the world isn’t worth owning if it won’t stop peeing on the floor.)
But to really get going with your website, you need to put some content on it. So it makes perfect sense that one of the first dashboard tasks that every WordPress administrator learns is posting.
Creating a New Post
To create a new post, follow these steps:
In the dashboard menu, choose Posts→Add New.
The Add New Post page appears, complete with a big fat box where you can type in your content (Figure 4-10).
Note
Figure 4-10 is cropped so that it doesn’t show the dashboard menu on the left. Rest assured that the dashboard menu is there. We’ve trimmed this detail on many of the pictures in this book so you can focus on the task at hand (and so we don’t need to make our pictures micro-small).

Figure 4-10. The minimum ingredients for any post are a descriptive title and a block of text. To the right is the all-important Publish box, which holds buttons that let you preview a post, publish it, or save it as a draft for later.
You can save time by using the toolbar at the top of the WordPress screen. If you run WordPress on your own web host, click New→Post. If you signed up with WordPress.com, click the WordPress “W” icon (in the left-hand corner) and then click New Post.
Start by typing a post title into the blank box at the top of the page (right under Edit Post).
A good post title clearly announces what you’re going to discuss. Often, visitors will come across your post title before getting to your post text. For example, they might see the title in a list of posts or on a search engine results page. A good title communicates your subject and entices the reader to continue on to the post. A lousy title might be cute, clever, or funny, but fail to reflect what the post is about.
Here are some good post titles: “Obama Struggles in Recent Poll,” “Mad Men Is Officially Off the Rails,” and “My Attempt to Make a Chocolate-Bacon Soufflé.” And here are weaker titles for exactly the same content: “Polls, Polls, and More Polls,” “Mad Men Recap,” and “My Latest Kitchen Experiment.”
Click in the big box under the post title (or just press the Tab key). Now type in the content for your post (Figure 4-10).
A basic blog post consists of one or more paragraphs. After each paragraph, press the Enter key (once) to start the next paragraph. WordPress automatically adds a bit of white space between paragraphs, so they don’t feel too crowded. Resist the urge to sign your name at the end, because WordPress automatically adds this information to the post.
Tip
Paragraphs and line breaks give your web page two different looks. When you start a new paragraph by pressing Enter, WordPress includes some extra blank space between paragraphs. When you add a line break, the adjacent lines remain relatively close together. (For example, you’d use line breaks to separate lines in a mailing address or a poem.) When you want a line break instead of a new paragraph (to avoid getting the space between paragraphs), hold down the Shift key while you press Enter.
If you want fancier formatting for your post, the toolbar that sits above the content box lets you add lists, subheadings, pictures, and more. You’ll take a closer look at these features on “Making Fancier Posts”.
Note
Don’t worry if you’re not yet feeling inspired. It’s exceptionally easy to delete blog posts, so you can add a simple post just for practice and then remove it later (see “Creating a Sticky Post”).
Double-check your post.
A post with typographic errors or clumsy spelling mistakes is as embarrassing as a pair of pants with a faulty elastic band. Before you inadvertently reveal yourself to the world, it’s a good idea to double-check your writing.
If you use a browser with a built-in spell checker, which includes Internet Explorer 10 and any modern version of Firefox and Chrome, you get automatic spell checking. You’ll see red squiggly lines under your mistakes, and you can right-click misspelled words to choose the right spelling from a pop-up menu.
When you finish writing and editing, click Preview.
Your post preview opens in a new browser tab or new browser window. It shows you a perfect rendition of what the post will look like on your site, with the current theme.
Note
In some cases, your browser may block the preview because this feature uses a pop-up window. If your browser displays a warning message and no preview window, you may need to lower your browser’s pop-up security settings. Although every browser is different, you usually accomplish that by clicking the pop-up warning icon and choosing an “Allow pop-ups” option.
If you like what you saw in the preview window, click Publish.
In a self-hosted site, a message box will appear at the top of the page, confirming that your post has been published. In a WordPress.com site, a side panel pops into view, with a message that tells you how many posts you’ve written to date.
The moment you publish a post, it becomes live on your site and visible to the world. WordPress.com shows you the results right away; if you run a self-hosted WordPress site, you need to click the “View post” link to see the published post (Figure 4-11).
If you’re not quite done but you need to take a break, click Save Draft instead of Publish. WordPress holds onto your post so you can edit and publish it later. Returning to a draft is easy—click Posts in the menu to see a list of all your posts, and then click your draft post to resume editing it. Afterward, you can continue postponing the moment of publication (click Save Draft again), you can publish it like a normal post (click Publish), or you can discard it altogether (click Move to Trash).
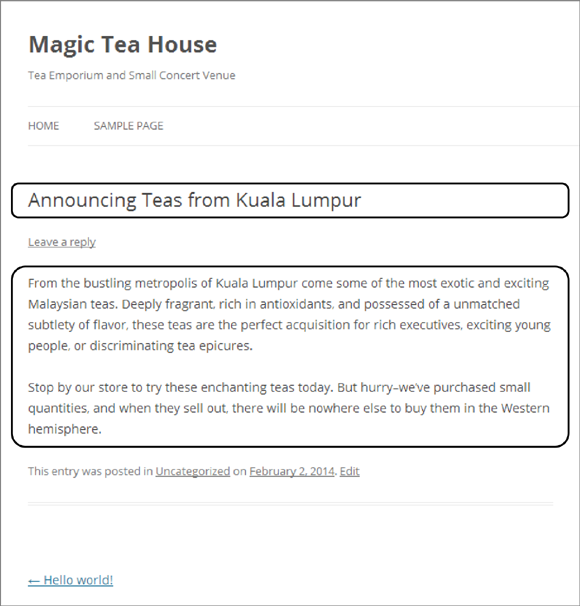
Figure 4-11. Here’s the finished post, transplanted into the stock layout of your WordPress site. The two circled sections represent the content you contributed. WordPress has added plenty of details, like the category and date information below your post. You’ll learn to take charge of these details in this chapter and the next.
Browsing Your Posts
Adding a single post is easy. But to get a feel for what a real, thriving blog looks like, you need to add several new posts. When you do, you’ll find that WordPress arranges your posts in the traditional way: one after the other, in reverse-chronological order.
To take a look, head to the home page of your blog (Figure 4-12). To get there, just enter your WordPress site address, without any extra information tacked onto the end. Or, if you’re currently viewing a post, click the Home button in the menu bar (just under the header section and the stock picture).
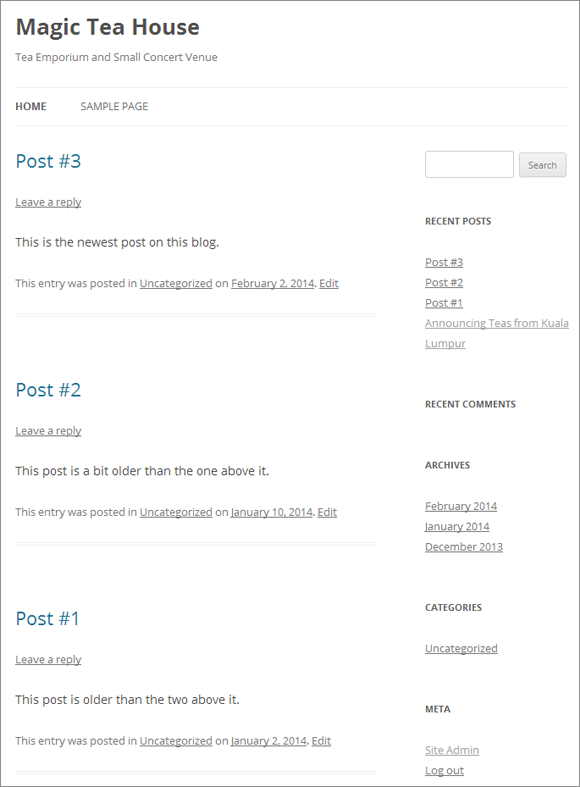
Figure 4-12. When you visit the home page of a blog, you start out with a reverse-chronological view that puts the most recent post first. If you don’t like to scroll, the sidebar on the right gives you several other ways to browse posts.
The number of posts you see on the home page depends on your WordPress settings. Ordinarily, you get a batch of 10 posts at a time. If you scroll to the bottom of the home page, you can click the “Older posts” link to load up the next 10. If you want to show more or fewer posts at once, choose Settings→Reading and change the “Blog pages show at most” setting to the number you want.
WordPress.com sites include an infinite scroll feature. When it’s switched on, you won’t see the “Older posts” link. Instead, WordPress loads new posts as you scroll down, creating an ever-expanding page (until you reach the very first post on the site). To turn this feature off, choose Settings→Reading and then turn off the checkbox next to “Scroll infinitely.”
You don’t need to read every post in a WordPress site from newest to oldest. Instead, you can use one of the many other ways WordPress gives you to browse posts:
By most recent. The Recent Posts list lets you quickly jump to one of the five most recently created posts. It’s the first set of links in the sidebar on the right.
By month. Using the Archives list, you can see a month’s worth of posts. For example, click “June 2014” to see all the posts published that month, in reverse-chronological order. Some WordPress blogs also include a calendar for post browsing, but if you want that you’ll need to add it yourself (see “The Calendar Widget” to learn how).
By category or tag. Later in this chapter, you’ll learn how to place your posts in categories and add descriptive tags. Once you take these steps, you’ll have another way to hunt through your content, using either the Categories list in the sidebar or the category and tag links that WordPress adds to the end of every post.
By author. If your site has posts written by more than one person, WordPress automatically adds a link with the author name at the bottom of every post. Click that link and you’ll see all the posts that person has created for this site, in reverse-chronological order (as always). You can’t use this feature just yet, but it comes in handy when you create a blog that has multiple authors, as you’ll learn to do in Chapter 11.
Using a search. To search a blog, type a keyword or two into the search box, which appears at the top right of your site, and then press Enter. WordPress searches the title and body of each post and shows you a list of matching posts.
Delayed Publishing
Sometimes, you might decide your post is ready to go, but you want to wait a little before putting it on the Web. For example, you might want your post to coincide with an event or product announcement. Or maybe you want your post to appear at a certain time of day, rather than the 2:00 a.m. time you wrote it. Or maybe you simply want to add a bit of a buffer in case you get new information or have a last-minute change of heart.
In all these situations, you can choose to save your post as a draft (click Save Draft) and publish it later. That gives you complete control over when the post appears, but it also forces you to make a return trip to your computer. A different approach is to use delayed publishing, which allows you to specify a future publication time. Before that time arrives, you may return and edit your post (or even cancel it). But if you do nothing, the post will magically appear, at exactly the time you specified.
To use delayed publishing, follow these steps:
Before you start, make sure WordPress has the right time settings (“Dashboard Practice: Changing Basic Settings”).
If WordPress thinks you’re in a different time zone, its clock won’t match yours, and when you tell it to publish a post at a certain time, it will actually appear a few hours before or after you expect.
To write your post, choose Posts→Add New in the dashboard.
Write your post in the usual way.
In the Publish box, click the Edit link next to “Publish immediately.”
A new group of settings drops into view (Figure 4-13).
Use the provided boxes to pick a forthcoming date and the exact time when the post should go live.
Here, WordPress uses a 24-hour clock, so put in 14:00 for 2:00 p.m.
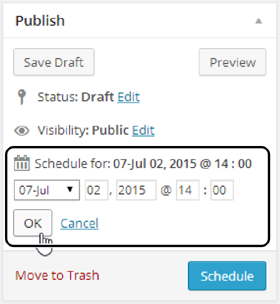
Figure 4-13. WordPress lets you schedule content for future publication down to the minute.
Click OK to apply your changes.
At this point, the Publish button turns into a Schedule button.
Click the Schedule button to commit to publishing the post.
WordPress will wait until the time you specify, and then publish your work.
If you decide you don’t actually want to publish the post at the time you set, you can edit the post (as described on “Editing a Post”) and put the scheduled time to a very distant future date. Or you can delete the post altogether (“Deleting a Post”).
Tip
You can use the same technique to create a post with an older publication date. To do that, just type in a date and time that falls in the past. Although this trick is less useful than delayed publishing (because no one wants to make her content look old), it’s occasionally useful. For example, it’s handy if you publish several posts at the same time and you want to change their order or spread them out.
Editing a Post
Many people assume that posting on a blog is like sending an email message: You compose your thoughts, write your content as best you can, and then send it out to meet the world. But the truth is that you can tinker with your posts long after you publish them.
WordPress gives you two easy ways to edit a post. If you’re logged in as the site administrator and you’re viewing a post, you’ll see an Edit button or an Edit link somewhere on the page (its exact position depends on your theme). Click that link, and WordPress takes you to the Edit Post page, which looks almost identical to the Add New Post page. In fact, the only difference is that the Publish button has been renamed “Update.” Using the Edit Post page, you can change any detail you want, from correcting a single typo to replacing the entire post. When you finish making changes, click the Update button to commit your edit.
Another way to pick a post for editing is to use the dashboard. First, choose Posts→All Posts, which shows you a list of all the posts you’ve published (Figure 4-14). Find the post you want to edit, hover over it, and then click the Edit link to get to the Edit Post page, where you can make your changes.
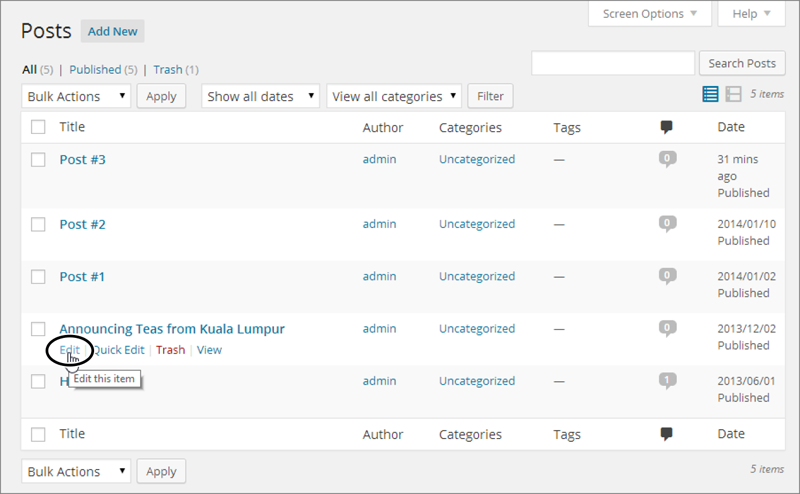
Figure 4-14. The Posts page lists your posts in reverse-chronological order, starting with the most recent, and including any drafts. When you point to a post (without clicking), you see links that let you edit, delete, or view the post.
Along with the Edit link, the Posts page includes a Quick Edit link. Unlike Edit, Quick Edit keeps you on the Posts page but pops open a panel that lets you edit some of the post details. For example, you can use Quick Edit to change a post’s title, but you can’t use it to change the actual text.
Being able to edit in WordPress is a nearly essential feature. Eventually, even the best site will get something wrong. There’s no shame in opening up an old post to correct an error, clean up a typing mistake, or even scrub out a bad joke.
Note
Unlike some blogging and content management systems, WordPress doesn’t display any sort of timestamp or message about when you last edited a post. If you want that, you’ll need to add it as part of your edit. For example, you might tack an italicized paragraph onto the bottom of a post that says, “This post edited to include the full list of names” or “Updated on January 25th with the latest survey numbers.”
Deleting a Post
As you’ve just seen, you can edit anything you’ve ever written on your WordPress website, at any time, without leaving any obvious fingerprints. You can even remove posts altogether.
The trick to deleting posts is to use the Posts page (Figure 4-14). Point to the post you want to vaporize, and then click Trash. Or, on the Edit Post page, click the “Move to Trash” link that appears in the Publish box.
Tip
Now that you know how to remove a post, try out your new skill with the “Hello world!” example post that WordPress adds to every new blog. There’s really no reason to keep it.
Trashed posts aren’t completely gone. If you discover you removed a post that you actually want, don’t panic. WordPress gives you two ways to get your post back.
If you realize your mistake immediately after you trash the post, look for the message “Item moved to Trash. Undo.” It appears in a box at the top of the Posts page. Click the Undo link, and your post returns immediately to both the Posts list and your site.
If you want to restore a slightly older trashed post, you need to dive into the Trash. Fortunately, it’s easy (and not at all messy). First, click Posts→All Posts to get to the Posts page. Then click the Trash link that appears just above the list of posts (Figure 4-15). You’ll see every post that’s currently in the trash. Find the one you want, hover over it, and then click Restore to resurrect it (or click Delete Permanently to make sure no one will find it again, ever).
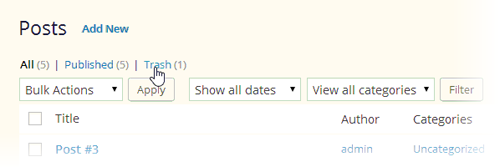
Figure 4-15. Three links at the top of the list of posts let you choose what content you see: All (every published post and draft), Published (only published posts), and Trash (posts you deleted).
Note
Of course, removing posts from your blog and scrubbing content from the Web are two vastly different things. For example, if you post something impolite about your boss and remove it a month later, the content can live on in the cache that search engines keep and in Internet archival sites like the Wayback Machine (http://web.archive.org). So always think before you post, because WordPress doesn’t include tools to reclaim your job or repair your online reputation.
Creating a Sticky Post
As you know, WordPress orders posts by date on the home page, with the most recent post occupying the top spot. But you might create an important post that you want to feature at the top of the list, regardless of its date. For example, you might write up a bulletin that announces that your business is temporarily closing for renovations, or answers frequently asked questions (“No, there are no more seatings available for this Sunday’s Lobster Fest”). To keep your post at the top of the list so it can catch your readers’ eyes, you need to turn it into a sticky post.
Note
WordPress displays all your sticky posts before all your normal posts. If you have more than one sticky post, it lists the most recent one first.
You can designate a post as sticky when you first write it (on the Add New Post page) or when you edit it later (on the Edit Post page). Either way, you use the Publish box. Next to the label “Visibility: Public,” click Edit. A few more options will drop into view (including the private post options you’ll explore on “Hiding and Locking Posts”). To make your post sticky, turn on the checkbox next to “Stick this post to the front page,” and then click Publish or Update to confirm your changes.
The only caveat with sticky posts is that they stay sticky forever—or until you “unstick” them. The quickest way to do that is to choose Posts→All Posts, find the sticky post in the list, and then click the Quick Edit link underneath it. Turn off the “Make this post sticky” checkbox and then click Update.
Organizing Your Posts
WordPress gives you two complementary tools for organizing your posts: categories and tags. Both work by grouping related posts together. In the following sections, you’ll learn how to use them effectively.
Understanding Categories
A category is a short text description that describes the topic of a group of posts. For example, the Magic Tea House uses categories like Tea (posts about teas for sale), Events (posts about concert events at the tea house), and News (posts about other developments, like renovations or updated business hours).
Categories are really just text labels, and you can pick any category names you want. For example, the categories Tea, Events, and News could just as easily have been named Teas for Sale, Concerts, and Miscellaneous, without changing the way the categories work.
In a respectable WordPress site, every post has a category. (If you don’t assign a category, WordPress automatically puts your post in a category named Uncategorized, which presents a bit of a logical paradox.) Most of the time, posts should have just one category. Putting a post in more than one category is a quick way to clutter up the structure of your site, and confuse anyone who’s browsing your posts one category at a time.
Tip
A good rule of thumb is this: Give every post exactly one category. If you want to add more information to make it easier for people to find posts that are related to each other, add tags (“Understanding Tags”). (The exception is if you use multiple categories to “flag” posts for special features. For example, you’ll see a theme trick on “Featured Images” that uses a category to denote featured posts. In this sort of example, some posts may appear in two categories—one “real” category used for classification and browsing, and another category you use to tap into the special feature.)
You don’t need to create all your categories at once. Instead, you can add them as needed (for example, when you create a new post that needs a new category). Of course, you’ll have an easier time organizing your site if you identify your main categories early on.
It’s up to you to decide how to categorize posts and how many categories you want. For example, the Magic Tea House site could just as easily have divided the same posts into more categories, or into different criteria, as shown in Figure 4-16. The box on “How to Choose Good Categories” has some tips for choosing good categories.
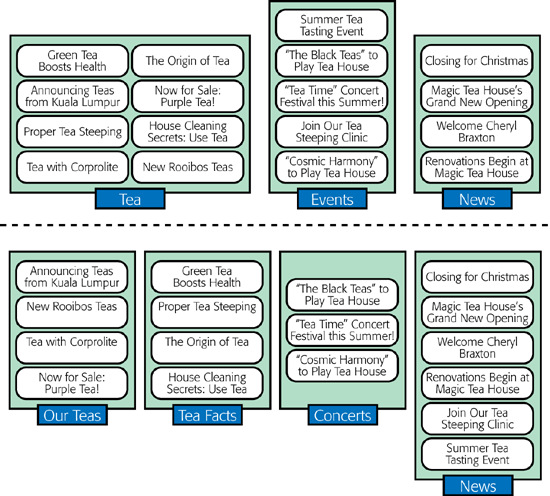
Figure 4-16. Here are two ways to organize the same 17 posts. Neither is necessarily better than the other, but the grouping on the bottom makes it easier to promote the teas that the Magic Tea House sells. It also assumes the site will feature regular articles about teas, and that concerts are a common type of event. If that’s not the case, it’s probably not worth having separate categories named Tea Facts and Concerts.
Categorizing Posts
You can easily assign a category to a post when you first add the post. Here’s how:
Choose Posts→Add New to start a new post.
Or you can start editing an existing post (“Editing a Post”) and then change its category. The Add New Post and Edit Post pages work the same way, so it’s easy.
Look for the Categories box.
You’ll find it near the bottom-right corner of the page, under the Publish and Format boxes (Figure 4-17).
If the category you want exists, skip to step 5.
If your post needs a new category, one that you haven’t created yet, continue on to step 3.

Figure 4-17. The Categories box has two tabs. The one you usually see, All Categories, lists all your post categories in alphabetical order. If you’ve created quite a few categories, you might find it faster to choose one from the Most Used tab, which lists the categories you use most often.
At the bottom of the Categories box, click Add New Category.
This expands the Categories box so you can enter category information.
Enter the category name in the box underneath the Add New Category link, and then click Add New Category.
Don’t worry about the Parent Category box underneath—you’ll learn to use that on “Using Subcategories”, when you create subcategories.
Once you add your category, it appears in the Categories box.
Find the category you want to use in the list, and then turn on the checkbox next to it.
When you add a new category, WordPress automatically turns on its checkbox, because it assumes this is the category you want to assign to your post. If it isn’t, simply turn off the checkbox and pick something else.
You can add a post to more than one category, but it’s best not to unless you’re a pro. Doing so is likely to mask a poor choice of categories, and it makes it hard to change your categories later on.
Carry on editing your post.
That’s it. When you publish your post, WordPress assigns it the category you chose (Figure 4-18). If you didn’t choose any category, WordPress automatically puts it in a category named (paradoxically) Uncategorized.
Tip
Ordinarily, the category named Uncategorized is WordPress’s default category—that means WordPress uses it for new posts unless you specify otherwise. However, you can tell WordPress to use a different default category. Simply choose Settings→Writing and pick one of your categories in the Default Post Category list.
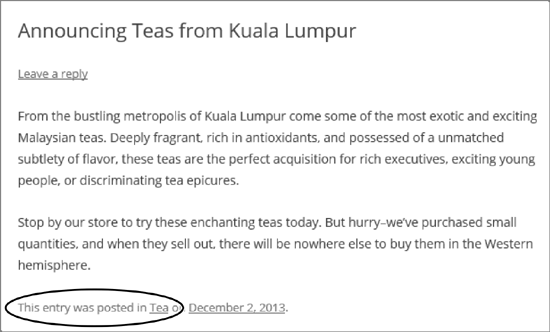
Figure 4-18. This post is in the Tea category. Click the link (the word “Tea,” under the post), and you’ll see all the posts in that category.
Using Subcategories
If you have a huge site with plenty of posts and no shortage of categories, you may find that you can organize your content better with subcategories.
The idea behind subcategories is to take a large category and split it into two or more smaller groups. However, rather than make these new categories completely separate, WordPress keeps them as subcategories of the original category, which it calls the parent category. For example, the Magic Tea House site could make Tea a parent category and create subcategories named Black Tea, Green Tea, Rooibos, and Herbal Tea.
Done right, subcategories have two potential benefits:
You can show a category tree. A category tree shows the hierarchy of your categories. In a complex site with lots of categories, most readers find that this makes it easier to browse the categories and understand how the topics you cover are related. You’ll learn how to build a category tree in just a moment.
Visitors can browse posts by subcategory or parent category. That means that people using the Magic Tea House site can see all the tea posts at once (by browsing the Tea category) or they can drill down to the subcategory of tea that interests them the most.
You can create subcategories using the Categories box—in fact, it’s just as easy as creating ordinary categories (Figure 4-19). The only requirement is that you create the parent category first. Then enter the subcategory name, pick the parent category in the Parent Category list, and then click Add New Category.
Note
Yes, you can create subcategories inside of subcategories. But doing so can complicate life and make it more difficult to fit a proper category tree in your sidebar. If possible, stick with one level of subcategories.
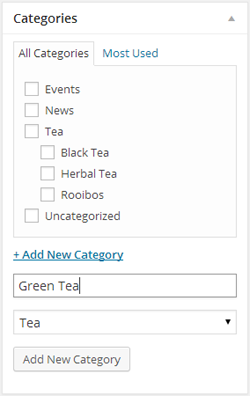
Figure 4-19. To add a post subcategory, you need to supply one extra piece of information: the parent category, which you select from a drop-down list.
WordPress displays categories hierarchically in the Categories box. That means that you’ll see your subcategories (like Green Tea) displayed underneath the parent category (Tea). However, there’s an exception—when you first add a new subcategory, WordPress puts it at the top of the list, and it stays there until you refresh the page or add a new category. Don’t let this quirk worry you; your new category is still properly attached to its parent.
Note
When you assign a post to a subcategory, make sure you pick the subcategory only, not the parent category. That means that if you want to add a post about green tea, you should turn on the checkbox next to the Green Tea box, but not the Tea box. Because Tea is the parent category, people who browse the Tea category will automatically see your Green Tea posts.
When you start adding subcategories to your site, you’ll probably be disappointed by how they appear in the Categories list, the category-browsing links that appear in the sidebar alongside your posts. The standard list of categories is a flat, one-dimensional list in alphabetical order. You can’t see the relationships between parent categories and subcategories (Figure 4-20, left).
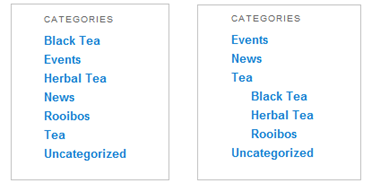
Figure 4-20. Ordinarily, the Categories list ignores subgroups (left). But fear not: With a simple configuration change you can get a more readable tree (right).
Note
The Categories list shows only the categories you currently use. So if you create a new category but don’t assign it to a post, you won’t see it in the Categories list.
Fortunately, it’s easy to change the standard list of categories into a tree of categories, by borrowing a theme-altering trick you’ll explore in more detail in the next chapter. Technically, the Categories list is known as a widget. Like all widgets, it can be moved, removed, and reconfigured. Here’s how:
On the dashboard, choose Appearance→Widgets.
The Widgets page shows you all the individual ingredients that WordPress puts into the sidebar on your site.
In the Main Sidebar box, find the Categories widget.
This is the widget that creates the list of categories that appears next to your posts.
Click the down-pointing arrow on the right side of the widget.
This expands the Categories widget, so you can see its settings.
Turn on the checkbox in the “Show hierarchy” settings and then click Save.
Now return to your site and admire the result (Figure 4-20, right).
Note
No matter what setting you tweak, WordPress always orders categories alphabetically. If you want to put a specific category on top, you need to put in some extra work and create a menu (“Custom Menus”).
Managing Categories
As you’ve seen, you can create a category whenever you need one, right from the Add New Post or Edit Post page. However, the WordPress dashboard also includes a page for managing categories. To get there, choose Posts→Categories, and you’ll see a split page that lets you add to or edit your categories (Figure 4-21).
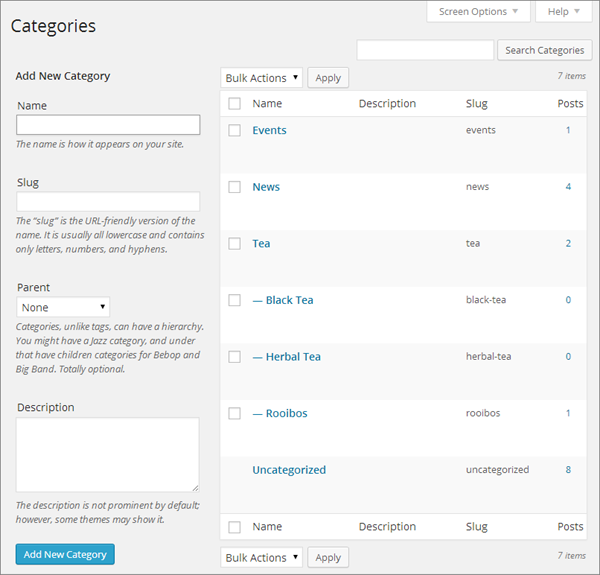
Figure 4-21. The Categories page includes a section on the left for adding new categories and a detailed list of all your categories on the right. The categories list works in much the same way as the list of posts on the Posts page. Point to a category without clicking, and you get the chance to edit or delete it.
The Categories page lets you perform a few tasks that aren’t possible from the lowly Categories box:
Delete categories you don’t use. When you take this step, WordPress reassigns any posts in the category to the default category, which is Uncategorized (unless you changed the default in the Settings→Writing page).
Edit a category. For example, you might want to take an existing category and rename it, or make it a subcategory by giving it a parent.
Enter extra category information. You already know that every category has a name and, optionally, a parent. In addition, categories have room for two pieces of information that you haven’t used yet: a slug and a description. The slug is a simplified version of the category name that appears in the web address when you use pretty permalinks (“How to Get High-Quality Web Addresses”). The description explains what the category is all about. Some themes display category descriptions in their category-browsing pages.
Understanding Tags
Like categories, tags are text labels that add bits of information to a post. But unlike categories, a post can (and should) have multiple tags. For that reason, the process of applying tags is less strict than the process of putting your post in the right category.
Tags are often more specific than categories. For example, if you write a review of a movie, you might use Movie Reviews as your category and the movie and director’s name as tags.
Follow these guidelines when you use tags:
Don’t over-tag. Instead, choose the best five to 10 tags for your content. If you use WordPress.com and you create a post with 15 tags or more, it’s much less likely to appear in the WordPress.com tag cloud (“Exploring the WordPress.com Community”), which means new visitors are less likely to stumble across your blog.
Keep your tags short and precise. Pick “Grateful Dead” over “Grateful Dead Concerts.”
Reuse your tags on different posts. Once you pick a good tag, put it to work wherever it applies. After all, tags are designed to help people find related posts. And never create a similarly named tag for the same topic. For example, if you decide to add the tag “New York Condos,” and then you use the tags “NY Condos” and “Condo Market,” you’ve created three completely separate tags that won’t share the same posts.
Consider using popular tags. If you’re on WordPress.com, check out popularly used tags (“Exploring the WordPress.com Community”) and consider using them in your posts, when they apply. If you’re trying to attract search engine traffic, you might consider using hot search keywords for your tags (“Strategy 3. Play Well with Search Engines”).
Don’t duplicate your category with a tag of the same name. That’s because WordPress treats categories and tags in a similar way, as bits of information that describe a post. Duplicating a category with a tag is just a waste of a tag.
Tip
Here’s some advice to help you get straight about categories and tags. Think of the category as the fundamental grouping that tells WordPress how a post fits into the structure of your site. Think of a tag as a searching convenience that helps readers hunt for content or find a related post.
Tagging Posts
Adding a tag to a post is even easier than assigning it to a category. When you create a post (in the Add New Post page) or edit a post (in the Edit Post page), look for the Tags box, which appears just under the Categories box.
The Tags box gives you three ways to add tags:
Type a tag into the text box, and then click the Add button. Repeat.
Type all your tags into the text box at once. Make sure you place a comma between each tag, as shown in Figure 4-22.
Click the “Choose from the most used tags” link and pick from the tags you used for other posts.
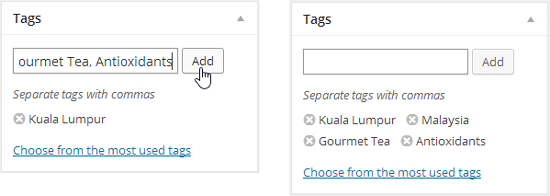
Figure 4-22. Left: Right now, this post has one tag, Kuala Lumpur. It’s about to get three more. Right: Now the post has four tags. If you change your mind, you can remove a tag by clicking the  icon that appears next to it.
When you publish a post, the byline will list the post’s category and all its tags (Figure 4-23). You can follow these links to browse similarly tagged posts. Many blogs also use a tag cloud, a cluster of tag links, sized in proportion to how often you use them (in other words, in proportion to how many posts feature that tag). The default WordPress site layout doesn’t use a tag cloud, but you can add one easily using the Tag Cloud widget. You learn how on “The Tag Cloud Widget”.
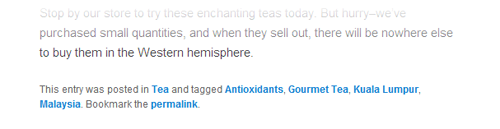
Figure 4-23. The exact look of a post byline depends on your theme, but most list the categories and tags you added to a post.
As with categories, tags have their own management page, which you can see by choosing Posts→Tags. There you can add tags, remove tags, and edit the tag slugs, which appear in the web addresses when you use pretty permalinks (“Permalinks on a Self-Hosted Site”).
How to Get High-Quality Web Addresses
Every post you put on a WordPress site has its own unique web address, or URL. So far, you haven’t really thought about what those URLs look like. After all, nobody needs to type in a web address to read a post. Instead, people can simply visit the front page of your site and click through to whatever content interests them.
However, seasoned web designers know that web addresses matter—not just for the front page of your site, but for each distinct bit of content. One reason is that search engines pay attention to the keywords in a URL, so they treat something like http://wastedminutes.com/best_time_wasters differently from http://wastedminutes.com/post/viewer.php?postid=3980&cat=83. All other factors being equal, if someone searches for “time wasters” in Google, the search engine is more likely to suggest the first page than the second.
Another important detail is the lifetime of your URLs. Ideally, a good web address never changes. Think of an address as a contract between you and your readers. The promise is that if they bookmark a post, the web address will still work when they return to read it, even months or years later (assuming your entire site hasn’t gone belly-up in the interim). WordPress takes this principle to heart. In fact, it calls the unique web address that’s assigned to every post a permalink, emphasizing its permanent nature.
As you’ll soon see, WordPress will happily give your posts meaningful web addresses that last forever, but you might need to help it out a bit. Before you can do that, you need to understand a bit more about how the WordPress permalink system works. The details differ depending on whether you’re using WordPress.com or you’ve installed WordPress on your web host. The following sections lay out the essentials.
Permalinks in WordPress.com
On a WordPress.com site, permalinks always follow this structure:
http://site/year/month/day/post-nameFor example, if you create a blog named lazyfather.wordpress.com on November 27, 2014, WordPress will automatically create a post named “Hello world!” that has a permalink like this:
http://lazyfather.wordpress.com/2014/11/27/hello-world
The year, month, and day numbers are set when you create the post. The last part—the post name—is based on the title of the post. WordPress changes spaces to hyphens and ignores funky characters (like @, #, and $). If you create two posts with the same name on the same day, WordPress adds a number to the end of the second post title. (If you create a post with the same name but on a different day, no problem, because the first part of the web address is already different.)
WordPress’s URL-generating strategy is a pretty good starting point. However, you can change the address for any post when you create it. This is a great feature if you think your post title is ridiculously long or if you have an idea for an address that’s more likely to net you some serious search engine traffic. “Changing a Post’s Permalink” explains how to change a post’s permalink.
Permalinks on a Self-Hosted Site
Here’s the good news: If you use the self-hosted version of WordPress, you can choose the permalink style. And here’s the bad news: If you don’t change it yourself, you’ll be stuck with distinctly old-fashioned web addresses.
With the default permalink style, WordPress creates short but rather cryptic web addresses that use the post ID. They follow this structure:
http://site/?p=id
For example, if you create a WordPress blog at lazyfather.com/blog, the first “Hello world!” post gets a permalink like this:
http://lazyfather.com/blog/?p=1
The post ID is a unique, sequential number that WordPress gives to every new post. So it’s no surprise that the first post has a post ID of 1.
This permalink style is short, but it has no other benefits. The permalinks are meaningless to other people and search engines, because it’s impossible to tell what a given post is about. Can you tell the difference between http://lazyfather.com/blog/?p=13 (a post about cute family pets) and http://lazyfather.com/blog/?p=26 (a post about the coming Mayan apocalypse)? The post ID is essentially a secret code that doesn’t mean anything to anyone except the web server database that holds the collection of correspondingly numbered posts.
Even if you love the convenience of short web addresses (and who doesn’t?), you almost certainly want to use a more descriptive permalink style. Fortunately, WordPress makes it easy. Just follow these steps:
In the dashboard, choose Settings→Permalinks.
The Permalinks Setting page appears.
Choose a new permalink style.
Your choices are listed under Common Settings:
Default. This is the WordPress.org standard: brief but obscure permalinks that use the post ID, like http://magicteahouse.net/?p=13.
Day and name. This style is the same as the WordPress.com standard. Permalinks include several pieces of information, including the year, month, and date, separated by slashes. At the end is the much more descriptive post name (a simplified version of the post title), as in http://magicteahouse.net/2014/07/28/announcing-teas-from-kuala-lumpur.
Month and name. This style is similar to “Day and name,” except that it leaves out the date number, giving you a slightly more concise permalink, like http://magicteahouse.net/2014/07/announcing-teas-from-kuala-lumpur.
Numeric. This is a nicer looking version of the default style. It uses the post ID, but without including the ?p= characters. Instead, it adds the text /archives, as in http://magicteahouse.net/archives/13. However, this type of permalink is still as clear as mud.
Post name. This style omits all the date information, using just the post name, as in http://magicteahouse.net/announcing-teas-from-kuala-lumpur. The advantages of this system are that the permalinks it creates are concise and easy to remember and understand. They don’t emphasize the date the content was created, which is important if you have timeless content that you want to refer to months or years later. One disadvantage is that if you give more than one post the same name, WordPress needs to tack a number onto the end of the permalink to make it unique.
Custom structure. This is an advanced option that lets you tell WordPress exactly how it should cook up permalinks. The most common reason to use a custom structure is because you want the post category to appear in your permalink (as explained in the box on “Create Permalinks That Include the Category”).
Tip
If you don’t want to emphasize dates and you’re willing to put in a bit of extra work to avoid duplicate titles, the “Post name” style is a great choice. If you’re concerned about clashing titles, “Month and name” is safer, and if you want to emphasize the exact date of your posts—for example, if you write time-sensitive or news-like content—“Day and name” is a good choice.
Click Save Changes.
WordPress applies the permalink change to your entire site. That means that WordPress updates any posts you already published to the new style. If you’re switching from the standard style to another style, this never causes a problem, because the ID-based links continue to work. (That’s because no matter what permalink style you use, WordPress continues to give each post a unique post ID, which it stores in its database.) However, if you switch to a second permalink style (for example, “Day and name”) and then to a third style (say, “Month and name”), the outlook isn’t so rosy. Anyone who bookmarked a “Day and name”-style URL will find that it no longer works.
Tip
If you want to tweak the way your WordPress site generates permalinks (and if you’re using the self-hosted version of WordPress, you almost certainly do), it’s best to make that change as soon as possible. Otherwise, changing the permalink style can break the web addresses for old posts, frustrating readers who have bookmarked them. Think twice before tampering with the URL structure of an established site.
Changing a Post’s Permalink
Most WordPress fans prefer pretty permalinks—web addresses that include the post title. If you use WordPress.com, your posts always use pretty permalinks. If you use a self-hosted WordPress site, you get pretty permalinks in every permalink style except Default and Numeric.
However, pretty permalinks aren’t always as pretty as they should be. The problem is that a post title doesn’t necessarily fit well into a web address. Often, it’s overly long or includes special characters. In this situation, you can help WordPress out by explicitly editing the slug—the version of the post name that WordPress uses in your permalinks.
You can change the slug when you add or edit a post. Here’s how:
Find the permalink line, which appears just under the post title text box.
WordPress creates the slug automatically, once you type in the post title and start entering the post content. After that point, the slug doesn’t change, even if you edit the title, unless you edit it explicitly.
Click the Edit button next to the permalink line (Figure 4-24).
WordPress converts the portion of the permalink that holds the slug into a text box. You can then edit to your heart’s content, so long as you stay away from spaces and special characters, which aren’t allowed in URLs. The best permalinks are short, specific, and unlikely to be duplicated by other posts. (Although WordPress is smart enough to refuse to use a slug you assigned to another post.)
Note
If you see a Change Permalinks button next to the permalink where the Edit button should be, you don’t have pretty permalinks turned on. To fix the problem, follow the steps on “Permalinks on a Self-Hosted Site”.
Click OK to make your change official.
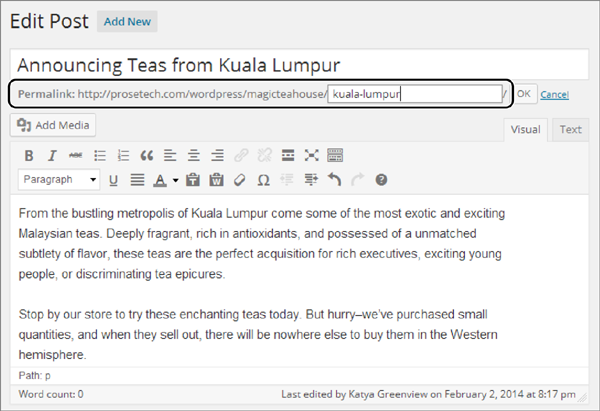
Figure 4-24. Here, you’re cutting the unwieldy slug “announcing-teas-from-kuala-lumpur” down to size.
Note
WordPress is very conscientious about dealing with old permalinks. If visitors try to find a post using an old permalink that has since changed, WordPress automatically forwards them to the right post and correct web address. This trick makes sure that old bookmarks and search engines that link to your site keep working.
Getting a Shorter Version of Your Web Address
Pretty permalinks are memorable and, if you don’t include the date information, fairly simple. However, they can still be inconveniently long for certain situations. Sometimes, you might need a shorter address that points to a post—one that’s easier to jot down or fit in the confines of a Twitter message. And although you can cut a permalink down to size when you create a post, it still might not be short enough.
WordPress is ready to help. It gives you two ways to reach every post you create: a permalink (like the ones you’ve been using so far), and a leaner URL called a short-link. Shortlinks work just as well as permalinks, and you can use both types of link at once, depending on what you need, without confusing WordPress.
Shortlinks look different depending on whether you’re using a self-hosted WordPress site or WordPress.com. In a self-hosted site, the shortlink uses the Default permalink style. It’s your site address, with the numeric post ID:
http://magicteahouse.net/?p=13
WordPress.com takes a different approach. It uses its own URL-shortening service, called WP.me, to ensure that you get a micro web address like this:
http://wp.me/p21m89-1a
Even though it points to what seems like a completely different website, this shortlink redirects visitors to the right blog post on the right WordPress.com site. Best of all, the entire shortlink requires a mere 22 characters, which is just about as short as they come.
WordPress doesn’t offer the shortlink option until you publish your post. In fact, to get it, you need to start editing your post (“Editing a Post”). Once you’re there, click the Get Shortlink button that appears in the permalink line (or just underneath it, depending on how much room WordPress has). WordPress pops open a new window with the shortlink for your post (Figure 4-25).
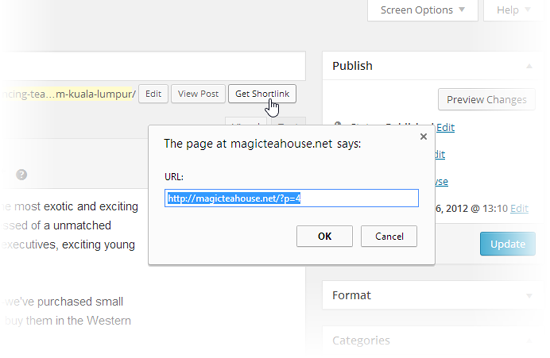
Figure 4-25. Here’s the post’s shortlink, ready for copying.
Browsing Categories and Tags Using a Web Address
Earlier, you saw how the Categories widget lets you retrieve a list of posts for any category. For example, click the Herbal Tea link and—presto!—you see the posts about brewing your favorite dried leaves.
WordPress works this category-browsing magic using a specific form of web address. If you understand it, then you can use category web addresses yourself, wherever you need them. First, you start with the site address:
http://magicteahouse.net
Then, you add /category/ to the end of the address, like this:
http://magicteahouse.net/category/
Finally, you add the bit that identifies the category you want to use. If you use the default permalink style on a self-hosted site, you get awkward category web addresses that incorporate the category ID:
http://magicteahouse.net/category/?cat=6
But if you use pretty permalinks, life is much better. Then, instead of embedding the category ID, category web addresses use the much more readable category slug, like this:
http://magicteahouse.net/category/herbal-tea
WordPress cooks up the slug based on your category name, using the same process it follows to pick the slug for a new post. First, WordPress replaces every uppercase letter with a lowercase one. Next, it replaces spaces with hyphens (-). Lastly, it strips out forbidden special characters, if you used them. As a result, the category Herbal Tea gets the slug herbal-tea.
Remember, you can modify the slug for every category using the Categories page (Figure 4-21). For example, you can shorten the address shown above by replacing herbal-tea with the simpler slug herbal.
Tags work the same way as categories, except the /category/ portion of the web address becomes /tag/. So, to browse the posts that use a specific tag, you need an address like this:
http://magicteahouse.net/tags/kuala-lumpur
You can tweak tag slugs in the Tags page. However, it’s far less common to tailor tag slugs than it is to edit post and category slugs.
Dashboard Tricks to Save Time and Effort
As you’ve learned, the dashboard is the key to unlocking your WordPress site. So far you’ve used it to work with posts: creating them, changing them, and deleting them. You also managed categories and tags, and tweaked a variety of WordPress settings. But you’re far from exhausting the dashboard—in fact, you’ll spend the better part of this book exploring its nooks and crannies.
Now, here are a few tips that can improve your dashboard skills. You’ll learn to customize the dashboard display, get help, and work with lists—basics that will prepare you for the administrative tasks to come.
Customizing a Dashboard Page
When you navigate to a dashboard page, you don’t always see all the settings you can adjust. WordPress tries hard to offer you real power and flexibility without overloading your brain with features and settings.
However, you’ll sometimes need to adjust one of WordPress’s hidden settings. (Or you’ll want to hide some of the settings WordPress does show, just to clear away the visual clutter.) Either way, the secret is the Screen Options button, which controls exactly what WordPress displays on the page.
If you haven’t noticed the Screen Options button yet, that’s because it’s carefully tucked away in the top-right corner of the dashboard (circled in Figure 4-26). However, you’ll see it on nearly every dashboard page. When you click Screen Options, a new panel pops into existence at the top of the page (Figure 4-27). To collapse the panel, click the Screen Options button again.
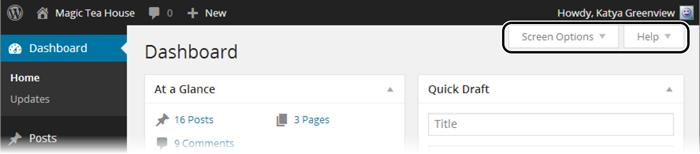
Figure 4-26. Almost every dashboard page sports the Screen Options and Help buttons shown here. They’re the key to unearthing WordPress’s hidden options—and figuring out how they work.
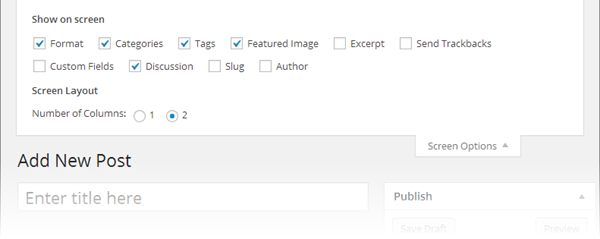
Figure 4-27. Here are the screen options for the Add New Post page. Using them, you can manage two things: the controls WordPress displays on the page (using the checkboxes under “Show on screen”), and the way WordPress presents those controls (using the settings under Screen Layout).
To understand how the Screen Options box works, you need to understand that every checkbox in it corresponds to a gray panel that WordPress can either show or hide. For example, in Figure 4-27, the Format, Categories, Tags, and Featured Image checkboxes are turned on, and so the Format, Categories, Tags, and Featured Image panels appear on the page. (So does the Publish panel, which doesn’t have a corresponding checkbox, because WordPress won’t let you hide it.)
But the Screen Options box in Figure 4-27 also includes several unchecked boxes, such as Excerpt, Send Trackbacks, Custom Fields, and so on. Many of these correspond to panels with less commonly adjusted settings. They’re hidden (by default), because WordPress assumes you don’t need them and don’t want to be distracted with more details. But if you turn on one (or more) of these checkboxes, the corresponding panels appear on the page.
Note
As you work through this book, you’ll find that you sometimes do need to dip into the screen options to display panels that WordPress ordinarily hides. Now that you know how the Screen Options button works, you’ll be ready.
Not only can you show and hide the panels in a dashboard page, but you can also move them around. Just click a title at the top of the panel (like “Categories”) and drag it to a new place on the page. WordPress automatically rearranges the other panels to make room. This is a great way to make sure that the options you use most often are right at your fingertips. (Watch out, though: If you click the title of a panel and don’t drag it somewhere else, WordPress collapses that panel so that only the title remains visible. Click the title again to expand it.)
Finally, there’s one really useful dashboard customization trick that can help when you create or edit a huge post. If you click the bottom-right corner of the post editor and drag down (Figure 4-28), you can make the editing box as big as you want.
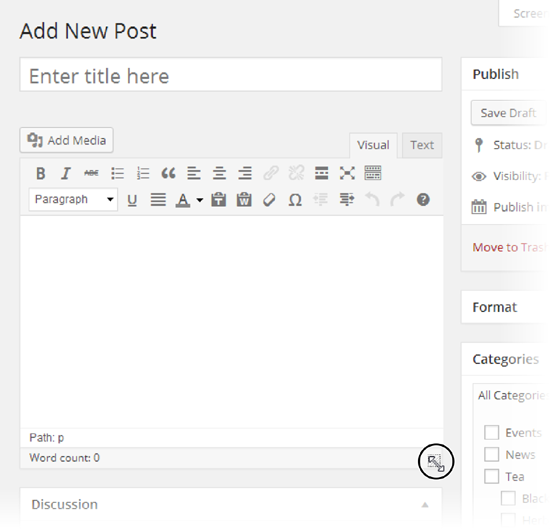
Figure 4-28. Need more space to edit a long post without scrolling? Click here and drag down.
Getting Help
Soon you’ll be a WordPress administration guru. But in the meantime, you’ll occasionally face perplexing settings in the WordPress dashboard. The Help button isn’t perfect, but it can be useful sometimes.
You’ll find the Help button right next to the Screen Options button, in the top-right corner of nearly every dashboard page. When you click it, a small panel with help information drops into view. To collapse the panel, click the Help button again. Figure 4-29 shows the help for the Add New Post page.

Figure 4-29. WordPress’s help box is packed with terse but potentially helpful information. Click a link on the left side to choose your topic. (This example shows Publish Settings.) On the right are additional links that can take you to WordPress’s official documentation (be warned, it’s sometimes out of date) or the forums (where you can ask friendly strangers for help).
Taking Charge of the List of Posts
You’ve already seen the Posts page, which lists the posts on your site. However, as your site grows larger, it becomes increasingly difficult to manage everything on one page, and in a single table. To get control of your posts, you need to develop your searching and filtering skills.
First, it’s important to realize that the Posts page doesn’t list everything at once. Instead, it shows up to 20 posts at a time—to get more, you need to click the arrow buttons that show up in the bottom-right corner of the list. Or you can adjust the 20-post limit: just click the Screen Options button, change the number in the Posts box, and then click Apply.
Note
If you allow more posts on your Posts page, you’ll get a slower-to-load page and a longer list to scroll through. Of course, there’s nothing wrong with bumping up the limit for certain tasks (say, to 100), and then changing it back when you finish.
Changing the number of posts is one way to fit more posts into your list, but it isn’t much help if you want to home in on a specific batch of posts that might be scattered throughout your site. In this situation, WordPress has another set of tools to help you out: its filtering controls. Using the drop-down lists at the top of the table of posts (Figure 4-30), you can choose to show only posts that were made during a specific month (for example, “June 2014”) or that belong to a specific category (say, “Green Tea”).
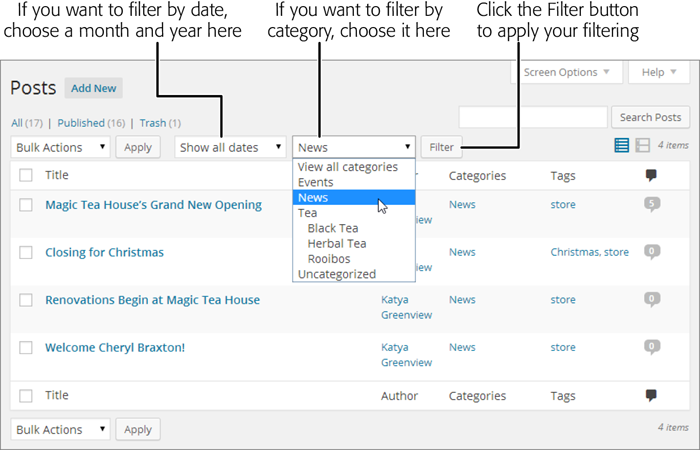
Figure 4-30. To filter a list of posts, choose a specific month or category (or both), and then click Filter. Here, the list shows the posts in the News category.
Ordinarily, WordPress displays posts in the same reverse-chronological order that they appear on your site. But you can change that by clicking one of the column headings. Click Title to sort alphabetically by headline, or Author to sort alphabetically by writer. If you click the column heading a second time, WordPress reverses the sort order. So if you sort a list of posts by Title, clicking Title a second time shows the posts in reverse-alphabetical order. And if you sort posts by Date, so that the newest posts appear first, clicking Date again displays the posts with the oldest ones on top.
The last trick that the Posts window offers is the search box in the top-right corner, above the posts list. You can search for all the posts that have specific keywords in their titles or text. For example, to show posts that talk about veal broth, you would type in “veal broth” (using quotation marks if you want to turn both words into a single search term), and then click Search Posts.
Performing Bulk Actions
So far, you’ve worked on one post at a time. If you plan to change a post’s title or edit its text, this is the only way to go. But if you want to manipulate several posts in the same way—for example, change their category, add a keyword, or delete them—the Posts page lets you carry out your work in bulk.
The easiest bulk action is deleting. To send a batch of posts to the trash, follow these simple steps:
Choose Posts→All Posts on the dashboard.
That takes you to the familiar All Posts page.
Find the posts you want.
If you don’t see all the posts you want to remove, then use the search or filtering techniques described on “Performing Bulk Actions”.
Turn on the checkbox next to each post you want to remove.
In the Bulk Actions list, choose Move to Trash.
The Bulk Actions list appears in two places: just above the list of posts and just underneath it. That way, it’s easily accessible no matter where you are.
Click Apply.
WordPress moves all the selected posts to the trash.
You can also use a bulk action to make certain post changes. For example, you can add tags to your post, change the author, or simultaneously publish a group of drafts. The steps are similar but slightly more involved. Here’s what to do:
Choose Posts→All Posts on the dashboard.
Find the posts you want (search or filter the posts if needed).
Turn on the checkbox next to each post you want to edit.
In the Bulk Actions list, choose Edit and then click Apply.
WordPress opens a panel at the top of the post list with editing options (Figure 4-31).
Manipulate the details you want to change.
Using the Bulk Edit panel, you can add tags (type them in) or apply a category. However, you can’t remove tags or change the category. That means that if you apply a new category, your posts will actually have two categories, which probably isn’t what you want. (Sadly, you have to remove the category you don’t want individually, post by post.)
The Bulk Edit panel also lets you change the post’s author (if your site has more than one), its status (for example, turning a draft into a published post), and a few other settings that you’ll explore in the coming chapters.
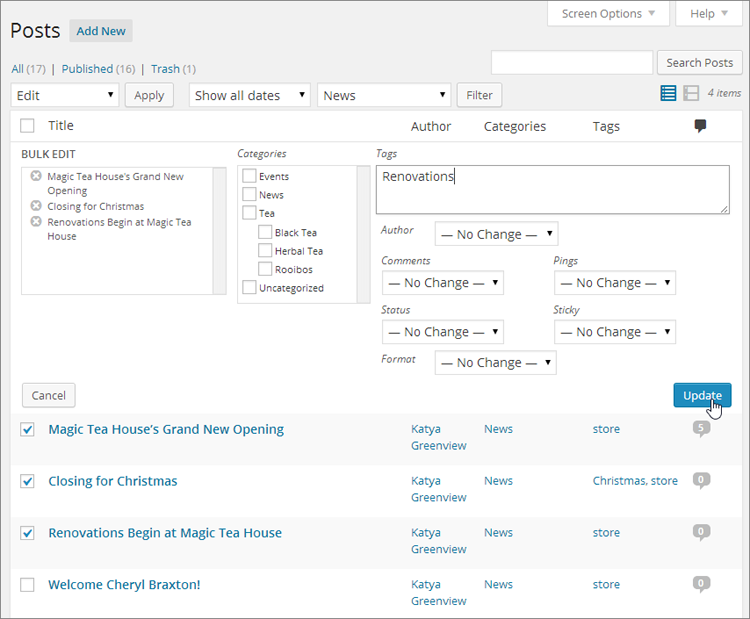
Figure 4-31. The Bulk Edit panel lists posts you’re editing en masse (in this example, there are three), and provides a limited number of editing options. Here, you’re adding a new tag to the three posts.
Click Update in the Bulk Edit panel.
Or back out by clicking Cancel.
Tip
Here’s a dashboard double-trick that combines filtering and bulk actions. Say you decide to change all the posts in a category. First choose the category in the filter list (above the list of posts) and then click Filter. You’ll see a list that includes only the posts in that category. To select all these posts, turn on the checkbox that appears in the top-left corner of the post list, next to the word “Title.” Now you can pick your universal action from the Bulk Actions box and carry on.
Get WordPress: The Missing Manual, 2nd Edition now with the O’Reilly learning platform.
O’Reilly members experience books, live events, courses curated by job role, and more from O’Reilly and nearly 200 top publishers.

