Chapter 7. Working with the Text Editor
In Lesson 6 you learned the basics of using the WordPress Text Editor — now it's time to examine its capabilities in detail. You learn the functions of each of the buttons on the button bar, including plenty of little tricks to help make it easier to use this powerful tool. Mostly you'll be working Visual mode, but this lesson also covers a bit of HTML mode.
Anatomy of the Text Editor
As you've seen, the Visual Text Editor has two rows of buttons. By default, only the first row is displayed and you have to access the second row by clicking the Kitchen Sink button (the very last button on the default row). I've created a visual directory of each row, so let's begin with the default one.
You may have more buttons on your Text Editor if you have plugins installed on WordPress. If you install the TinyMCE Advanced plugin, you'll also have more rows of buttons and the ability to move buttons around. Some plugins give you a different text box altogether. For the purposes of this lesson, however, I'm only covering the default Text Editor.
Figure 7-1 shows the functions of the primary button bar
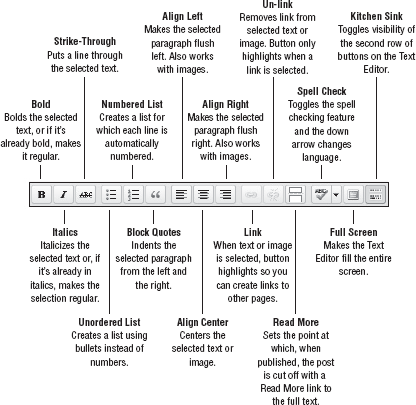
Figure 7-1. Figure 7-1
Figure 7-2 shows the secondary button bar.

Figure 7-2. Figure 7-2
Finally, Figure 7-3 shows the single row of buttons for HTML mode.
Figure 7-3. Figure ...
Get WordPress® 24-Hour Trainer now with the O’Reilly learning platform.
O’Reilly members experience books, live events, courses curated by job role, and more from O’Reilly and nearly 200 top publishers.

