To get the most out of Windows with the least frustration, it helps to become familiar with the following concepts and terms. You’ll encounter these words and phrases over and over again—in the built-in Windows help, in computer magazines, and in this book.
One of the most important features of Windows isn’t on the screen—it’s under your hand. The standard mouse has two mouse buttons. You use the left one to click buttons, highlight text, and drag things around on the screen.
When you click the right button, however, a shortcut menu appears onscreen, like the ones shown in Figure 1-2. Get into the habit of right-clicking things—icons, folders, disks, text in your word processor, buttons on your menu bar, pictures on a Web page, and so on. The commands that appear on the shortcut menu will make you much more productive and lead you to discover handy functions you never knew existed.
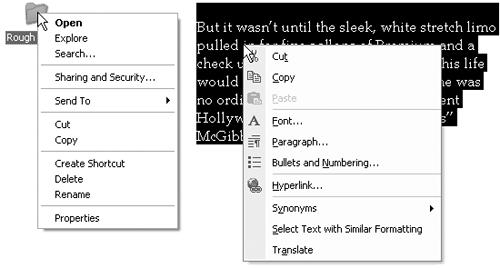
Figure 1-2. Shortcut menus (sometimes called context menus) sometimes list commands that aren’t in the menus at the top of the window. Here, for example, are the commands that appear when you right-click a folder (left) and some highlighted text in a word processor (right). Once the shortcut menu has appeared, left-click the command you want.
This is a big deal: Microsoft’s research suggests that nearly 75 percent of Windows users don’t use the right mouse button, and therefore miss hundreds of timesaving shortcuts. Part of the rationale behind Windows XP’s redesign is putting these functions out in the open. Even so, many more shortcuts remain hidden under your right mouse button.
Tip
Microsoft doesn’t discriminate against left-handers…much. You can swap the functions of the right and left mouse buttons easily enough.
In the Control Panel window (Chapter 9), open the Mouse icon. When the Mouse Properties dialog box opens, click the Buttons tab, and turn on the “Switch primary and secondary buttons” checkbox. Then click OK. Windows now assumes that you want to use the left mouse button as the one that produces shortcut menus.
A wizard is a series of screens that walks you through the task you’re trying to complete. Wizards make configuration and installation tasks easier by breaking them down into smaller, more easily digested steps. Figure 1-3 offers an example.
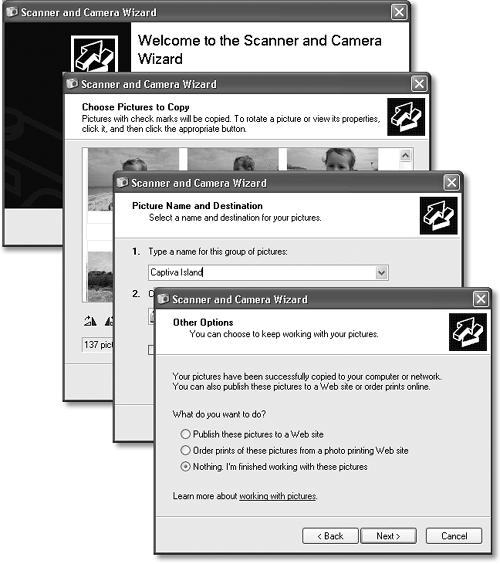
Figure 1-3. Wizards (interview screens) are everywhere in Windows. On each of the screens, you’re supposed to answer a question about your computer or your preferences, and then click a Next button. When you click the Finish button on the final screen, Windows whirls into action, automatically completing the installation or setup.
No matter what setting you want to adjust, no matter what program you want to open, Microsoft has provided five or six different ways to do it. For example, here are the various ways to delete a file: press the Delete key, choose Delete from the File menu at the top of a window, drag the file icon onto the Recycle Bin, or right-click the file name and choose Delete from the shortcut menu.
Pessimists grumble that there are too many paths to every destination, making it much more difficult to learn Windows. Optimists point out that this abundance of approaches means that almost everyone will find, and settle on, a satisfying method for each task. Whenever you find a task irksome, remember you have other options.
In earlier versions of Windows, underlined letters appeared in the names of menus and dialog boxes. These underlines were clues for people who found it faster to do something by pressing keys than by using the mouse.
The underlines are hidden in Windows XP, at least in disk and folder windows (they still appear in your individual software programs). If you miss them, you have two options:
Make them come back full-time, using the control panel’s Display program (see Section 9.7).
Make them reappear only when you summon them—by pressing the Alt key, Tab key, or an arrow key whenever the menu bar is visible. (When operating menus, you can release the Alt key immediately after pressing it.) In this book, in help screens, and computer magazines, you’ll see key combinations indicated like this: Alt+S (or Alt+ whatever the letter key is).
Tip
Pressing the Windows logo key (next to the Alt key on recent keyboards) opens the Start menu and turns on its little underlines. Microsoft assumed, logically enough, that if you’re enough of a keyboard lover to have opened the Start menu from the keyboard, you’re probably going to want to use the keyboard to trigger the commands in the Start menu, too.
Once the underlines are visible, you can open a menu by pressing the underlined letter (F for the File menu, for example). Once the menu is open, press the underlined letter key that corresponds to the menu command you want. Or press Esc to close the menu without doing anything. (In Windows, the Esc key always means cancel or stop.)
If choosing a menu command opens a dialog box (see Figure 1-4), you can trigger its options, too, by pressing Alt along with the underlined letters. (Within dialog boxes, you can’t press and release Alt; you have to hold it down while typing the underlined letter.)

Figure 1-4. Here’s how you might print two copies of a document without using the mouse at all. First, press Alt+F, which opens the File menu (left). Then type the letter P, which represents the Print command. Now the Print dialog box appears (right). Press Alt+C to highlight the Copies box, type the number of copies you want, and then press Enter to “click” the Print button. (The Enter key always means, “Click the default button in the dialog box—the one with a shadowed border.”)
As shown in Figure 1-4, it’s a rare task indeed that you can’t perform entirely from the keyboard.
You can’t write an operating system that’s all things to all people, but Microsoft has sure tried. You can change almost every aspect of the way Windows looks and works. You can replace the gray backdrop of the screen (the wallpaper) with your favorite photograph, change the typeface used for the names of your icons, or set up a particular program to launch automatically every time you turn on the PC.
When you want to change some general behavior of your computer, such as how it connects to the Internet, how soon the screen goes black to save power, and how quickly a letter repeats on the screen when you hold down a key, you use the Control Panel window (see Chapter 9).
Many other times, however, you may want to adjust the settings of only one particular element of the machine, such as the hard drive, the Recycle Bin, or a particular application. In those cases, simply right-click the corresponding icon. In the resulting shortcut menu, you’ll often find a command called Properties. When you click it, a dialog box appears containing settings or information about that object, as shown in Figure 1-5.
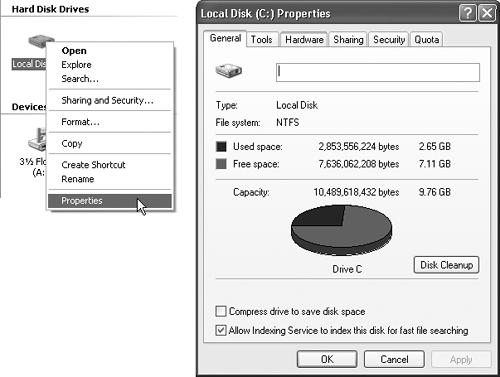
Figure 1-5. One quick way to find out how much space is left on your hard drive is to right-click the corresponding icon and choose the Properties command (left). The Properties dialog box appears (right), featuring a handy disk-space graph.
It’s also worth getting to know how to operate tabbed dialog boxes, like the one shown in Figure 1-5. These are windows that contain so many options, Microsoft has had to split them up into separate panels, or tabs. To reveal a new set of options, just click a different tab (called General, Tools, Hardware, Sharing, Security, and Quota in Figure 1-5). These tabs are designed to resemble the tabs at the top of file folders.
You can’t walk six feet into the room at a computer user group meeting without hearing people talk about their drivers. They’re not talking about their chauffeurs (unless they’re Bill Gates); they’re talking about the controlling software required by every hardware component of a PC.
The driver is the translator between your PC’s brain and the equipment attached to it. Windows requires a driver for anything you might attach to, or install inside, your computer—mouse, keyboard, screen, CD-ROM drive, scanner, digital camera, palmtop, and so on. Without the correct driver software, the corresponding piece of equipment doesn’t work at all.
When you buy one of these gadgets, you receive a CD containing the driver software. If the included driver software works fine, then great. If your gadget acts up, however, remember that equipment manufacturers regularly release improved (read: less buggy) versions of these software chunks. (You generally find such updates on the manufacturers’ Web sites.)
Fortunately, Windows XP comes with drivers for over 12,000 components, saving you the trouble of scavenging for them on a disk or on the Internet. (That’s one of XP’s big advantages over Windows 2000, which was driver-poor by comparison.) This gigantic library is the heart of Microsoft’s heavily advertised Plug and Play feature (Chapter 14), which lets you connect a new gadget to your PC without even thinking about the driver software.
Windows has an absolutely staggering array of features. You can burrow six levels down, dialog box through dialog box, and never come to the end of it. There are enough programs, commands, and help screens to keep you studying the rest of your life.
It’s crucial to remember that Microsoft’s programmers created Windows in modules—the digital-photography team here, the networking team there—with different audiences in mind. The idea, of course, was to make sure that no subset of potential customers would find a feature lacking.
But if you don’t have a digital camera, a network, or whatever, there’s absolutely nothing wrong with ignoring everything you encounter on the screen that isn’t relevant to your setup and work routine. Even Bill Gates doesn’t use every single feature of Windows XP.
Get Windows XP Professional: The Missing Manual now with the O’Reilly learning platform.
O’Reilly members experience books, live events, courses curated by job role, and more from O’Reilly and nearly 200 top publishers.

