When you turn on a Windows XP Pro computer for the first time, you may think that you’re simply seeing the traditional Windows startup process as redesigned by a West Coast graphic designer. If it’s a new computer, you may also receive a big hello from the company that sold it to you.
If you’ve just performed a clean installation of Windows XP (Appendix A), or if it’s a brand-new PC, you may now be treated to a series of blue “Welcome to Microsoft Windows” setup screens. This Setup Wizard guides you through setting up an Internet account, activating your copy of Windows (Introduction), setting up accounts for different people who will be sharing this computer (Chapter 17), and so on. Appendix A has a complete description of this process.
What happens next in the startup process depends on which of XP Pro’s two “personalities” you’re seeing, which is determined by what kind of network you’re connected to.
Eager though you may be to dive in, taking a minute to learn the difference is essential if you hope to understand what appears on screen when you log in and why it may not match the examples you see online and in magazines and books.
Unlike Windows XP Home Edition, which was designed primarily for individuals to use, well, at home, Windows XP Pro serves two masters. Although it works very well for home PCs, it’s also designed to thrive in massively networked corporations.
As a result, Windows XP Pro has two distinct personalities, each of which presents different features, a different logon sequence, and different levels of security. What you get when you log in depends on what kind of network your PC is connected to:
A domain network is a group of computers and other network gear that’s centrally maintained by an administrator, thanks to a special, master computer called a domain controller. That highly paid professional can set up and troubleshoot all files and security settings on all domain PCs without having to visit each one in person.
You, the employee, can generally sit down at any computer in the domain and log on with your user name and password. At that point, you find the same files, folders, and disks available to you as you did at your own computer. For more information on domains, see Chapter 19.
A workgroup is the kind of network in most homes and small offices: a small cluster of machines connected via network cables or wireless cards, as described in Chapter 18. Instead of enjoying central administration, as in a domain, you have to configure all settings for accounts and shared folders independently on each computer. If you have five PCs, and you’d like to be able to access all of their files from across the network, you must set up an account for yourself (a name and password) five times. (Clearly, workgroups get to be a real hassle as they grow larger than about ten machines.)
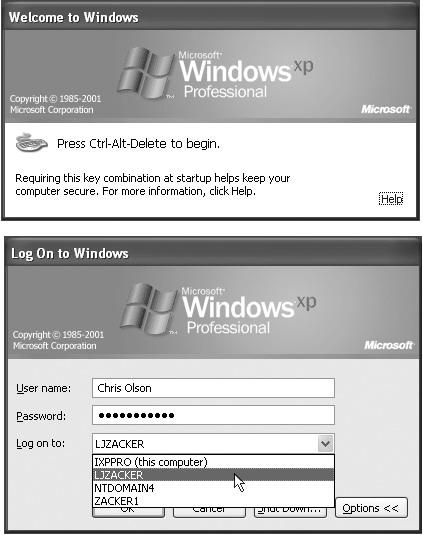
Figure 1-1. Top: When your computer is a member of a network domain, you’re probably greeted by this message when you start up the PC. To proceed, press Ctrl+Alt+Del (a ritual that may be familiar if you’ve used Windows 2000). Bottom: This is the Classic Logon dialog box, which appears next. Type your name and password and then click OK or press Enter.
As you read this book, this is the category you’re interested in if your PC is at home, sits in a small office, or isn’t part of any network at all.
Now that you know which XP Pro personality your computer has adopted, you can see why the login process isn’t the same for everybody.
If your PC connects to a corporate domain, you encounter the startup box shown in Figure 1-1. Press Ctrl+Alt+Del to proceed to the “Classic” Logon dialog box. Type your name in the User Name text box, type your password in the Password text box, and then click OK (or press Enter). You arrive at the desktop.
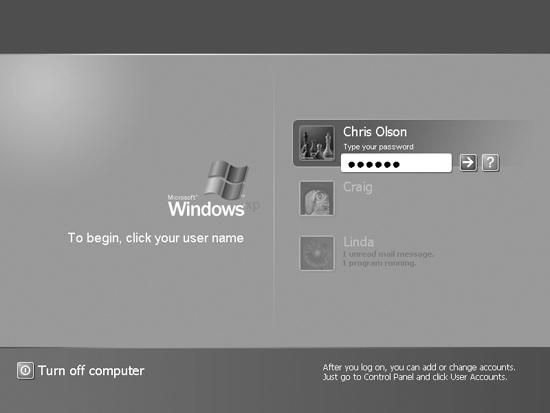
If your PC is part of a workgroup (or no network at all), you may encounter the Welcome dialog box shown in Figure 1-2. Click your name in the list, type your password if you’re asked for it, and click the little right-pointing arrow button (or press Enter). You arrive at the desktop.
Figure 1-2. If there are several accounts on a standalone or workgroup PC—that is, if more than one person uses it, each with his own account—the machine presents this screen each time you turn it on. See Chapter 17 for much more on this business of user accounts and logging in.
If it’s a standalone PC that nobody else uses, no big deal. You arrive at the Windows XP desktop.
Tip
Rather go straight to the desktop without clicking your name? TweakUI can make it so; see Appendix C.
Get Windows XP Pro: The Missing Manual, Second Edition now with the O’Reilly learning platform.
O’Reilly members experience books, live events, courses curated by job role, and more from O’Reilly and nearly 200 top publishers.

