Chapter 4. Installing, Uninstalling, and Working with Applications
Introduction
An operating system is only as useful as the applications that run on top of it, and that’s as true of XP as it is of any operating system. One of XP’s greatest benefits is the astonishingly wide array of software that can run on it.
But the thousands of applications written to run on XP and on XP’s Windows predecessors as well as on DOS are also the cause of problems and frustrations. There is no certification process an application has to go through when it’s written for XP, and so there are quite a few applications that can cause problems with XP. (However if companies want to use the Designed for Windows logo on their packaging or advertising, they do have to go through a certification process. For more information, see http://www.microsoft.com/windowsserver2003/partners/isvs/cfwfaq.mspx#EBAAA.) In particular, when you install some applications, they leave bits of themselves behind, cause system conflicts, and take up precious resources and memory. In addition, you may have programs written for earlier versions of Windows, or for DOS, and have problems running them in XP.
In this chapter, you’ll find recipes for troubleshooting applications, as well as for getting more out of your applications. So, for example, you’ll learn how you can change the default installation location for all programs, as well as learning keyboard shortcuts that will help you use XP more effectively. In addition, you’ll learn how to transfer application settings from an old computer to a new one and much more.
4.1. Uninstalling “Unremovable” Components
Problem
You have standard utilities on your PC, such as WordPad or Windows Messenger, that you want to uninstall because you never use them and you want to free up disk space. You can’t remove them using the Control Panel’s normal Add or Remove Programs applet because the utilities don’t show up in the applet.
Solution
Using a graphical user interface
To remove built-in utilities and components, you normally choose Control Panel→ Add or Remove Programs→ Add/Remove Windows Components to get to the W indows Component Wizard, shown in Figure 4-1. To remove a component, click the checkbox, click Next, and follow the wizard’s instructions for removing the component.
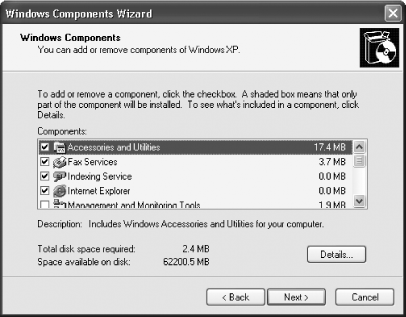
But a number of Windows utilities and components, such as Windows Messenger and WordPad, don’t show in the Windows Component Wizard, so there’s no apparent way to uninstall them.
But you can, in fact, remove these components. To do it, you’ll have to make the components show up in the Windows Component Wizard. Then you can remove them as you can any other file.
To force them to show up in the Windows Component Wizard, you edit the Setup Information file that controls what appears in the Windows Component Wizard:
Use Notepad or another text editor to open the Setup Information file, sysoc.inf, which is generally found in the C:\WINDOWS\INF folder. For safety’s sake, make a backup of the file before editing it, so you can revert to it if you need to. And you should also set up a System Restore point before making the changes as well. To set up a System Restore point, see Recipe 19.5.
When you open the file, look for the line describing the program that you want to uninstall. Lines in the file have the format:
program=program.dll,OcEntry,program.inf,,numeral
Programs that are uninstallable all have the word
hideorHIDEembedded in the string. When the word is included in the string, the program won’t show up in the Windows Component Wizard. So the Pinball game entry, which doesn’t show up in the wizard, looks like this:Pinball=ocgen.dll,OcEntry,pinball.inf,HIDE,7
To force the component to show up in the Windows Component Wizard, remove the word
hidefrom the entry that refers to the component you want to remove. For example, if you wanted to remove Pinball, you’d edit its entry to this:Pinball=ocgen.dll,OcEntry,pinball.inf,,7
Save the sysoc.inf file, then run the Windows Component Wizard. The component will now show up in the Windows Component Wizard. Remove it as you would any other component.
Keep in mind that not all of the entries in sysoc.inf are as easy to understand as Pinball and WordPad. For example, if you want to remove Windows Messenger, look for the entry that starts with the text
msmsgs, and if you want to remove the Accessibility Wizard, look for the entry forAccessOpt. Table 4-1 lists the “uninstallable” programs and what their entries are in the sysoc.inf file.
Discussion
You can use this same technique in reverse to hide components
you don’t want to be accidentally uninstalled. Simply put the word
HIDE in the proper place in the
entry that you don’t want to show up in the Windows Component Wizard.
That way, the entry can’t be accidentally deleted. For example, if you
wanted to hide the uninstall entry for the fax utility, you’d edit its
entry by changing:
Fax=fxsocm.dll,FaxOcmSetupProc,fxsocm.inf,,7
to:
Fax=fxsocm.dll,FaxOcmSetupProc,fxsocm.inf,HIDE,7
Also, you may run into a few problems when trying to remove “uninstallable” components. On some systems, you won’t be able to remove Windows Messenger—Windows Messenger won’t show up on the Windows Component Wizard even after you edit the sysoc.inf file. And some components, such as Terminal Server, will show up in the wizard if you edit the sysoc.inf file, but the wizard still won’t let you uninstall them.
See Also
Recipe 4.2 for information about how to remove applications that leave bits of themselves behind even after uninstallation
4.2. Removing Unruly Applications
Problem
You want to uninstall an unruly application and make sure no remnants of the application are left behind.
Solution
Using a graphical user interface
Before uninstalling the application, look through your hard disk to see where the program stores its files and folders. Then choose Start → Control Panel → Add or Remove Programs, scroll to the program you want to uninstall, and click Change/Remove and follow the instructions. After you run the uninstallation routine, look for those files and folders, and delete them if they haven’t been deleted. Often, this is in C:\Program Files\<Publisher>\<Program Name>.
Also, before you install the program, create a restore point so that you can restore your system to the state it was in before installation. That way, if you run the program and decide you don’t want to use it any more, you can immediately revert to your system’s pre-installation state. To set up a system restore point, see Recipe 19.5. Then, after you’ve installed the application and decided not to use it, revert to that restore point instead of using the uninstallation routine—it’s more thorough.
Tip
The restore point solution will only work if you use it directly after using the application for the first time, and if you make no other system changes. If you make system changes, after you install the software, and then revert to the restore point, you’ll not only uninstall the program, but you’ll also wipe out all the system changes that you made.
Using the Registry
After you’ve run the uninstallation routine, run the Registry Editor, search through the
Registry for any keys and values the program left behind, and then
delete them. Frequently, you can find the settings for the program
at \HKEY_LOCAL_MACHINE\SOFTWARE\
<Publisher> \ <Program
Name> where
<Publisher> is the name of the
software company that made the program and <Program
Name> is the name of the software package (in the
case of companies with multiple products like Symantec or
Adobe).
You should also make sure that no parts of the program are still being run at startup. To do that, check the following two keys and delete any relevant entries:
HKEY_LOCAL_MACHINE\SOFTWARE\Microsoft\Windows\CurrentVersion\Run
HKEY_CURRENT_USER\Software\Microsoft\Windows\CurrentVersion\Run
Using downloadable software
RegSpy is shareware available from http://www.utils32.com/regspy.htm that tracks changes made to the Registry whenever a program installs and runs, and lets you roll back the changes the program makes. So run the program, and use the program’s ability to build rollback scripts, which will let you review all Registry changes a program makes, step-by-step, and then roll them back. After you uninstall a program, run RegSpy and roll back any Registry changes the uninstallation program missed. RegSpy is shareware, and free to try, but costs $19.95 if you continue to use it.
Discussion
Unruly applications can cause a variety of problems. They might leave behind DLLs that load every time you start Windows, even though the original program is gone, which takes up memory and can cause system conflicts. They may also leave behind Registry entries, which cause similar problems. In both instances, your system performance takes a hit loading resources for programs that no longer exist. The programs also might leave behind unnecessary files and folders, which takes up hard disk space.
See Also
Registry First Aid is an excellent tool for checking for Registry entries that have been left behind by unruly programs. It will also check for other Registry problems, such as incorrect and outdated entries. You can get it from http://www.rosecitysoftware.com/reg1aid/. It’s shareware and if you continue to use it after 30 days, you’re required to pay a $21 registration fee.
4.3. Removing Stubborn Uninstall Entries from Already Uninstalled Programs
Problem
You’ve uninstalled a program, but its entry still remains listed in the Add or Remove Programs dialog box. You want to remove the entry.
Solution
Using the Registry
Run the Registry Editor and open \HKEY_LOCAL_MACHINE\SOFTWARE\Microsoft\Windows\CurrentVersion\Uninstall.
Look for the entry of the uninstalled program (it will be the
program name) and delete it. In some instances, instead of the
program name, you’ll see an entry like this: {3075C5C3-0807-4924-AF8F-FF27052C12AE}. In
that case, open the DisplayName
subkey in that entry; it should have the name of the program: in
this instance, Norton Antivirus 2002. When you find the proper
entry, delete it.
Discussion
It’s a good idea, before using the Registry Editor, to use the entry in the Add or Remove Programs dialog box as if the program were still installed on your PC. In some instances, pieces of the program were left behind, fooling Windows into thinking that the entire program is still there, and the Add or Remove Programs dialog box will uninstall those pieces. After it does that, the uninstall entry will be removed as well. However, this often doesn’t work, and if it doesn’t, you’ll have to use the Registry to solve the problem.
See Also
Recipe 4.2 for information on how to remove applications that leave bits of themselves behind even after uninstallation
4.4. Changing the Default Location for Installing Applications
Problem
You want to change the default directory that programs are installed to—from the directory C:\Program Files to another directory or drive.
Solution
Using the Registry
Run the Registry Editor and go to HKEY_LOCAL_MACHINE\SOFTWARE\Microsoft\Windows\CurrentVersion\ProgramFilesDir.
By default, the value will be C:\Program
Files. Edit the value to any valid drive or folder, and
Windows will use that new location as the default installation
directory for new programs. You’ll have to reboot for the change to
take effect.
Discussion
Changing the default location for installing applications will
change the default location selected when you install an application
and it prompts for the destination folder. Make sure that you have a
good reason for changing the default location of the default
installation folder, because many programs expect to be in the
Program Files folder. If you have a second or third
drive on your PC and want programs to be installed into that drive,
consider creating a Program Files
folder on that drive, and using that as the default installation
folder.
See Also
MS KB 175037, “How to Change the Default Location of Mail and News Folders”
4.5. Launching Applications with Keyboard Shortcuts
Problem
You want to launch an application quickly using a keyboard shortcut rather than having to hunt down icons and click them.
Solution
Using a graphical user interface
Right-click on the desktop and choose New→ Shortcut.
Enter or browse to the filename of the application for which you want to create a shortcut, including its path, and surrounding it by quotation marks, such as "C:\Program Files\MusicMatch\MusicMatch Jukebox\mmjb.exe".
Click Next, then select a name for the shortcut box, type in the name of your new shortcut, and click Finish. You’ve now created a shortcut for launching the application. But you still need to create a keyboard shortcut that will launch the application.
Right-click on the shortcut you just created and choose Properties. In the Shortcut tab, pictured in Figure 4-2, put your cursor in the Shortcut keys box and press the key combination you want to use to start the program. It has to be a combination of Ctrl-Alt, Shift-Alt, or Shift-Ctrl, plus a letter key, such as Ctrl-Alt-A or Shift-Alt-A, or Shift-Ctrl-A. (Note: Any quick key combo that you use will overshadow any local application use of the combo.)
Click OK. The program will now launch whenever you press the shortcut key combination.

Discussion
Note that there are entries on the Shortcut tab that let you customize how the program launches when you use the shortcut. The Run drop-down list lets you start the program minimized, maximized, or in a normal window. The Start in box lets you determine the start location for the application. And you can even customize the ScreenTip that appears when you hover the mouse over the shortcut. In the Comment box, type in the text that you want to appear as a ScreenTip. Figure 4-3 shows how such a customized ScreenTip looks like when a mouse hovers over it.

Also, make sure you choose a unique shortcut key sequence that isn’t used to launch another application or that you use inside another application. Otherwise either or both of the shortcut keys might not work.
See Also
Recipe 4.6 shows you how you can use keyboard shortcuts in concert with command-line switches and parameters.
4.6. Customizing the Way Applications Open Using Switches and Parameters
Problem
You want to customize the way you open an application. For example, you might want Microsoft Word to run a specific macro when it first starts.
Solution
Using a graphical user interface
When you use a shortcut to launch a program, as outlined in Recipe Recipe 4.5, you can use parameters and switches that let you customize the way it runs. These switches and parameters are usually specific to each individual program, although some work on many or all programs.
For example, you can launch any Microsoft Office application and have it automatically open a specific document by using the right syntax in the Target box. For example, if you wanted to launch Microsoft Word and have it automatically open a file called Chapter 9.doc in the C:\Power Tools Book directory, you’d put this in the Target box (make sure to include the quotes):
"C:\Program Files\Microsoft Office\Office11\WINWORD.EXE" "c:\Power
Tools Book\Chapter 9.doc"
In addition to launching individual files, you can use a
variety of switches. For example, if you wanted to open Word without
opening a document and not have previously opened documents show up
in the Word File menu, you’d use the switch /n in the Target box:
"C:\Program Files\Microsoft Office\Office10\WINWORD.EXE" /n
And you can combine switches with opening individual files. So if you wanted to run Word and have it open a file called Chapter 9.doc in the C:\Power Tools Book directory, and have Word run a specific macro but not run any Autoexec macros, you’d use this syntax:
"C:\Program Files\Microsoft Office\Office11\WINWORD.EXE" /m "c:\Power
Tools Book\Chapter 9.doc"
Tables 4-2 through 4-5 list switches for Microsoft applications Word, Excel, PowerPoint and Outlook.
Switch | What it does |
/safe:1 | Starts Outlook with the Reading Pane off. (Only works with Outlook 2003.) |
/safe:2 | Starts Outlook without checking mail at start. (Only works with Outlook 2003.) |
/select | Opens the specified folder in a new window when Outlook starts. |
/autorun | Opens Outlook and runs the macro specified in macroname. |
Using a command-line interface
You can use the same syntax, switches, and parameters at the command line as you can in the Target box when you create a shortcut. So you can launch applications using those parameters and switches straight from the command line.
Warning
When you use the command line to launch programs, make sure
you get to the command line by typing cmd.exe at the Run box, not command.exe. The command.exe command line doesn’t support
long folder names.
To launch a program at the command line, type in its full path and filename, then press Enter, like this. (Note that you won’t have to type in the path, if the file can be found in your PATH.)
C:\Program Files\Microsoft Office\Office11\WINWORD.EXE
Add switches and parameters as outlined earlier in this recipe. For example:
C:\Program Files\Microsoft Office\Office11\WINWORD.EXE /n
Discussion
The true power of using switches and parameters for launching programs comes into play when you use them with shortcuts. If you have a particular customized way that you generally like to launch an application, create a shortcut for it with the right switches and parameter, and normally run it that way. But then, when you vary from your normal way of launching it—if you want to launch a specific file, for example —it’ll be easier to use the command line.
Also, consider creating multiple shortcuts for each of your applications, so that you can launch different customized versions.
Remember when you use the command line that the command you type in doesn’t include quotes around it, but when you use the Target box for creating shortcuts, you need to include the quotes. (On the command line, though, if you’re using a path with any spaces, you need to include quotes.) Finally, keep in mind that many applications, not just Microsoft Office applications, include switches and parameters you can use to launch them, so check your documentation or the web site of the software make to find them.
See Also
Recipe 4.5 for help in creating keyboard shortcuts; MS KB 130510, “Command-Line Switches for Windows Explorer,” and MS KB 296192, “OL2002: Additional Command-Line Switches”
4.7. Running Older Applications
Problem
You want to run applications written for versions of Windows previous to XP, but they don’t run at all or have problems running in XP.
Solution
Using a graphical user interface
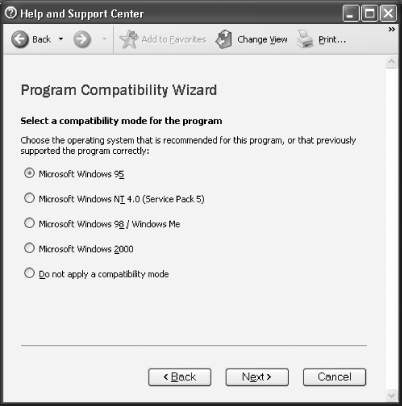
The Application Compatibility Wizard will fix most problems with running software written for older versions of Windows. To run the Compatibility Wizard, choose Start→ Help and Support→ Fixing a Problem→ Application and software problems→ Fix a problem→ Getting older programs to run on XP, then scroll down and click Program Compatibility Wizard. (Note: You can also get to the Help and Support area by pressing F1 when you’re on the desktop.)
You’ll be prompted to choose the software you want to fix, and then asked a series of questions, including the operating system for which the software was written, or on which it last ran properly; and the screen resolutions recommended for the program. You can see the wizard in action in Figure 4-4. The wizard then applies those settings and tries to run the program. If the settings work, tell the wizard to always run the program using them. If they don’t, try different settings until you get it working properly.
If you’re not a fan of wizards, there’s an easier way to set the program’s compatibility settings. Right-click on the program’s shortcut icon and choose Properties→ Compatibility. You can then manually configure compatibility settings, as shown in Figure 4-5. You can change the same settings as you can using the wizard. You may have to try several different settings before you find one that works.
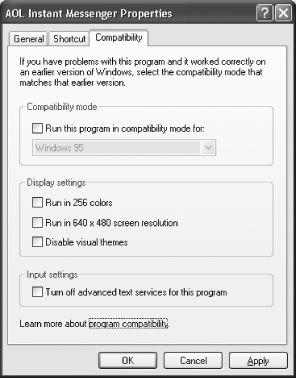
At the bottom of the Compatibility dialog box, you’ll notice a setting that lets you turn off “advanced text services.” That setting is applicable if you use speech recognition and text services. If you use these services, try turning them off to see whether that helps.
Discussion
If the Compatibility Wizard doesn’t fix the problem, try these steps:
Check the software manufacturer’s web site to see whether an update, patch, or fix is available.
Use Windows Update to see whether a fix is available. Get to Windows Update by choosing Start→ Control Panel→ Windows Update.
Update your sound card and video card drivers by checking the manufacturer sites.
If the problem program is a game that uses DirectX, upgrade to the newest version of DirectX at http://www.microsoft.com/windows/directx/downloads.
There may be some instances in which a program won’t even install on your system. In those instances, run the Compatibility Wizard on the installation or setup program, commonly Setup.exe or a similar filename.
See Also
Recipe 4.8 and Recipe 4.9 for more steps you can take to get older programs to run properly
4.8. Using the Application Compatibility Toolkit to Solve Compatibility Problems
Problem
You’ve used the Application Compatibility Wizard to try to get an older program to run under XP, but it still won’t run, or it runs and has problems. You want to be able to run the program without problems.
Solution
Using downloadable software
A little-known downloadable program, the Application Compatibility Toolkit, free from Microsoft, can help you fine-tune the application environment for troublesome programs. Download it from http://www.microsoft.com/windows/appexperience. (Note: The latest version of the Appliation Compatibility Toolkit may not have the QFixApp program required for this recipe. Previous versions should have it, however.)
Most of the applications on the Toolkit are debugger tools aimed at developers. However, you can use the QFixApp program to ensure that problem programs run properly on XP. There are over 200 fixes in the application, and there is no room to cover them all here, but follow these steps for the best way to use the tool to fine-tune your problem program’s application environment so that it runs properly:
Run Qfixapp.exe. Click on the Browse button to find the program you want.
In the Layers tab, choose the layer to apply to your application. A layer is a set of fixes that work best to fix certain problems, such as for programs that run in 256 colors, or were written for Windows 95, Windows 98, or Windows 2000.
After you choose the layer, click on the Fixes tab. You’ll see that many fixes have already been chosen, depending on the layer that you’ve applied to your application. Figure 4-6 shows several of the fixes applied to a program written for Windows 95.
Add or remove fixes by checking or unchecking the box next to them. To learn more about any single fix, highlight it, and a description of the fix will appear in the lower pane.
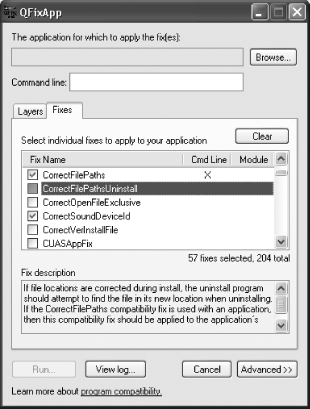
You can use another component of the Application Compatibility Toolkit to help decide which fixes to apply. Run the Compatibility Administrator tool and choose System Database→ Applications. You’ll find a database of thousands of applications and specific fixes that should be applied to them, shown in Figure 4-7. Search through the database for your program, and when you find the fixes it requires, apply them using the QFixApp program, as outlined above. If your program isn’t on the list, look for a program that is similar to it, and try applying its specific fixes to your program.
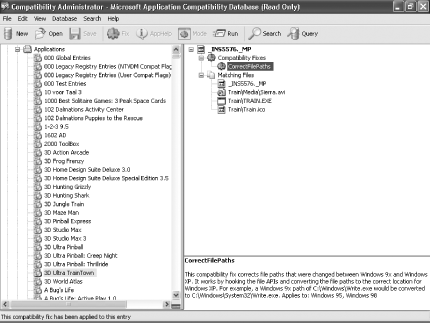
Discussion
The Application Compatibility Toolkit can also be found it the \Support\Tools directory of the Windows XP CD. New versions of the toolkit are always being released, so you are better off downloading it from the Microsoft site.
See Also
MS KB 294895, “How to Obtain the Windows Application Compatibility Toolkit,” and MS KB 285909, “How to troubleshoot program compatibility issues in Windows XP”
4.9. Troubleshooting Application Compatibility
Problem
You want to run a legacy application, you’ve run the Application Compatibility Wizard, and you’ve tried the Application Compatibility Toolkit, but the program still is causing problems.
Solution
Try this series of troubleshooting tasks:
Check the software maker’s web site for fixes. The maker may have posted patches that will solve the problem. Additionally, check the Microsoft Windows Update site at http://windowsupdate.microsoft.com to see whether Microsoft has issued a patch that fixes the problem
Uninstall the program and reinstall it using an administrator account. Older programs for Microsoft Windows 95, Microsoft Windows 98, Microsoft Windows 98 Second Edition, or Microsoft Windows Millennium Edition were written without recognizing that different types of accounts, including administrator’s accounts and limited user accounts, might exist. Reinstalling the application using an administrator account may solve the problem. When doing this, make sure that you first log off all accounts except for the administrator account that will install the program.
Games may have a variety of problems and can require a variety of fixes. Try running the game with an administrator account rather than another type of account. Update your video driver by going to the web site of your video card manufacturer. If the game uses DirectX, you should get the newest version of DirectX from http://www.microsoft.com/windows/directx.
Discussion
Some older applications claim that they are compatible with Windows XP, and in most instances, they should run with no problem. However, you may you come across an application that doesn’t run on your system even after you follow the steps in this and previous recipes. In that case, one problem might be that after you uninstalled the application before reinstalling it, it didn’t completely uninstall. It could have left behind Registry keys or files and folders on your hard disk. Follow the advice in Recipe 4.2 after you uninstall the program to make sure that you’ve removed all its traces. Then reinstall the application.
See Also
MS KB 285909, “How to troubleshoot program compatibility issues in Windows XP”
4.10. Running DOS Programs in Their Own Optimized Environments
Problem
You have an older DOS-based application that you want to run, but it requires its own customized Autoexec.bat and Config.sys files.
Solution
The operating environment for DOS programs are set by the Config.sys and Autoexec.bat files. Windows lets you create fine-tuned, customized environments for each separate DOS program by building individual Config.sys and Autoexec.bat files for each. To do so:
Copy Config.nt and Autoexec.nt files to the directory of the DOS program you plan to run. Typically, the files are found in the C:\Windows\System32 folder.
Rename the files and edit them to reflect the specific conditions that are best suited for the DOS program you’re going to run.
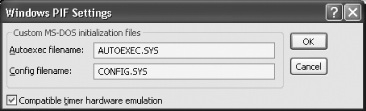
Right-click on the icon of the DOS program, and select Properties→ Program→ Advanced. Fill in the names of the Autoexec and Config files, as shown in Figure 4-8. If they’re outside your PATH, include the path names.
If the program performs actions based on the speed of the processor (such as certain games), check the Compatible timer hardware emulation box.
Click on OK. The DOS program will now run in its own customized environment.
Discussion
Config.sys and Autoexec.bat files are used to create customized environments for DOS programs to run. Typically, an Autoexec.bat file automatically runs a series of commands, while Config.sys sets environment variables, defines path, and contains other, similar settings, such as how to handle memory. For example, a Config.sys file might look like this:
DEVICE=C:\WINDOWS\HIMEM.SYS
DOS=HIGH,UMB
DEVICE=C:\WINDOWS\EMM386.EXE NOEMS
FILES=30
STACKS=0,0
BUFFERS=20
DEVICEHIGH=C:\WINDOWS\COMMAND\ANSI.SYS
DEVICEHIGH=C:\MTMCDAI.SYS /D:123
See Also
MS KB 314106, “Troubleshooting MS-DOS-based programs in Windows XP.” For help in running DOS-based games on Windows XP, see http://www.longhighway.com/sandbox/xp.html.
4.11. Forcing Older Programs to Use Windows XP Common Controls
Problem
You want programs written for earlier versions of Windows to use the rounded, XP-type common graphical controls for things such as checkboxes and buttons. Normally, when you run an older program in XP, the operating system applies an XP-type frame around it, with rounded title bars. But the older program itself still uses its older style interface.
Solution
To force older programs to use XP-type common controls, you have to create a manifest file—a specifically formatted XML file—and place it in the same folder as the older program.
The manifest file should be almost exactly the same for each older program that you want to use XP common controls, changing only the name and description of the program itself.
Following is the code to put in your manifest file. Note that for “Description of Program” you should enter a description for the program, and for “Program Name” you should enter the name of the program.
To create the file, open Notepad, type the following text into it, and save it to the same folder as the executable file of the program you want to force to use XP common controls. Give it the same name as the program’s executable file, but with an extension of .manifest. So, for example, if the program’s executable file were named oldprogram.exe, you’d give the manifest file the name oldprogram.exe.manifest.
Use the following code to create a .manifest file to force an older program to use XP common controls:
<?xml version="1.0" encoding="UTF-8" standalone="yes"?>
<assembly xmlns="urn:schemas-microsoft-com:asm.v1" manifestVersion="1.0">
<assemblyIdentity
    version="1.0.0.0"
    processorArchitecture="X86"
    name="Program Name"
    type="win32"
/>
<description>Description of Program</description>
<dependency>
    <dependentAssembly>
        <assemblyIdentity
            type="win32"
            name="Microsoft.Windows.Common-Controls"
            version="6.0.0.0"
            processorArchitecture="X86"
            publicKeyToken="6595b64144ccf1df"
            language="*"
        />
    </dependentAssembly>
</dependency>
</assembly>
Discussion
When you create the manifest file, the program will not only use XP common controls in the older Windows application, but will also apply whatever current XP theme you’re using. If you don’t want to use the XP common controls any longer, delete the manifest file or rename it. Also, keep in mind that the manifest file will not necessarily work with every older Windows application, such as old versions of Microsoft Money.
See Also
If you want to force an older Windows program to use XP’s common controls, but don’t want to have to go through the trouble of creating a manifest file, you can download XPME for Windows from http://www.tlhouse.co.uk/XPME.shtml. Run it and select the program that you want to use common controls. The program automatically creates a manifest file for you. XPME is freeware.
4.12. Using Keyboard Application Shortcuts
Problem
You want to perform common t asks such as opening, closing, or printing a document, more quickly than you can by using the mouse and clicking menu items and dialog boxes.
Solution
List of keyboard shortcuts
Every application has its own set of keyboard shortcuts for performing common tasks,. But there are some shortcuts that tend to work for many different applications, not just one.
Table 4-6 lists the most common and useful keyboard shortcuts. Keep in mind that not all work with every application.
Key combination | What the combination does |
Alt-F4 | Closes the current window or file. |
Ctrl-A | Selects the whole document. |
Ctrl-B | Turns text bold. |
Ctrl-C | Copies highlighted data to the Clipboard. |
Ctrl-D | Displays a font dialog box, or switches between monospaced and proportional fonts. |
Ctrl-E | Centers text or an object in the document. |
Ctrl-F | Displays a Find or Search dialog box. |
Ctrl-G | Displays a GoTo dialog box. |
Ctrl-H | Displays a Replace dialog box. |
Ctrl-I | Turns text italic. |
Ctrl-J | Justifies text in the document. |
Ctrl-L | Moves the text or object to the left part of the document. |
Ctrl-N | Creates a new document. |
Ctrl-O | Displays the Open dialog box. |
Ctrl-P | Displays the Print dialog box. |
Ctrl-Q | Exits the application. |
Ctrl-R | Moves the text or object to the right part of the document. |
Ctrl-S | Saves the document or opens a Save dialog box. |
Ctrl-U | Underlines text. |
Ctrl-V | Pastes highlighted data from the Clipboard into the document. |
Ctrl-X | Cuts the highlighted data and places it in the Clipboard. |
Ctrl-Z | Undoes the last action. |
Ctrl-Insert | Copies highlighted data to the Clipboard. |
Shift-Insert | Pastes highlighted data from the Clipboard into the document. |
Tab | Moves to the next cell in a table. |
Shift-Tab | Moves to the previous cell in a table. |
Ctrl-Arrow | Moves the cursor forward one word or object. |
Ctrl-Back Arrow | Moves the cursor backwards one word or object. |
Alt-Hyphen | Opens a menu that lets you restore, move, size, minimize, maximize, or close the current window. |
Ctrl-Space Bar | Opens a menu that lets you restore, move, size, minimize, maximize, or close the current window. |
Ctrl-End | Moves to the end of the document. |
Ctrl-Home | Moves to the beginning of the document. |
Ctrl-F6 | Switches between documents. |
Ctrl-F4 | Closes the current window or file. |
Discussion
Don’t expect every one of these standard shortcuts to work for every Windows application, because they won’t. But as a general rule, they’ll work with most, especially with Microsoft Office applications. But even in Office, there are anomalies, and they can sometimes get you into trouble. In Outlook, for example, if you’re reading an email, and use the Ctrl-F keyboard shortcut to find text in the email, you’ll instead create a new email message, one that includes the existing email in it already. In Outlook, you use F4 to find text in an email message.
See Also
MS KB 301583, “List of the keyboard shortcuts that are available in Windows XP”; list of shortcuts for many Microsoft applications at http://www.microsoft.com/enable/products/keyboard.aspx; MSDN information about keyboard shortcuts at http://msdn.microsoft.com/library/default.asp?url=/library/en-us/csui/html/csconKeyboardShortcuts.asp; list of the Elder Geek’s shortcuts for XP at http://www.theeldergeek.com/keyboard_shortcuts_for_xp.htm
4.13. Moving a New Microsoft Application to Another Windows XP System
Problem
You want to move a Microsoft application from one Windows XP system to another because you want to be able to reuse your settings on the new system. If you merely installed the application on the new system, you would lose all of your settings.
Solution
Using a graphical user interface
Connect the old and the new PC, either over a network, or via a null modem serial cable, which you can find at computer stores or online retailers.
On the PC that has the settings you want to transfer, run the Files and Settings Transfer Wizard by choosing Start→ All Programs→ Accessories→ System Tools→ Files and Settings Transfer Wizard.
Click Next on the introductory screen, then from the following screen choose Old computer, and click Next.
On the Select a transfer method screen that appears, choose the method you’re using to connect the two computers (direct cable, network, etc.). If you choose a network, or Other, select the folder location on your new PC where you want to transfer the settings. Click Next.
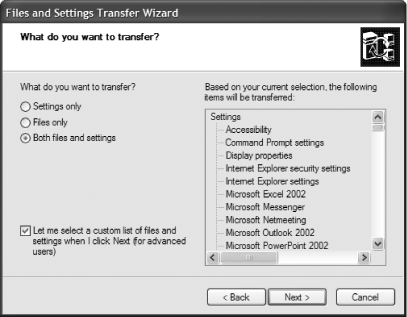
The “What do you want to transfer” screen appears next, as shown in Figure 4-9. You can choose to transfer settings, files, or both files and settings. Make your choice.
You now have to choose what settings to transfer. The default is settings for applications and Windows such as taskbar options and Outlook Express, specific folders such as Desktop, Fonts, My Documents, and My Pictures, and file type associations (what files open with what programs). To add or remove settings, select the “Let me select a custom of files and settings” checkbox, and then click Next.
From the screen that appears, add new files and settings, or remove existing ones. Click Next when you’re done.
The wizard will gather the files and settings, and save them in the location you’ve chosen. Click Finish when you’re done.
Go to the computer onto which you’re going to transfer the settings. If you’ve copied the settings to a removable disk, put the removable disk in its drive.
Run the run the Files and Settings Transfer Wizard on the computer onto which you’re transferring settings.
Click Next on the introductory screen, then from the following screen choose New computer, and click Next.
From the screen that appears, choose “I don’t need the Wizard Disk. I have already collected my files and settings from my old computer.” Click Next and Next again from the screen that appears.
From the screen that appears, choose the location where the wizard should look for your settings, for example, direct cable connection, floppy drive, or other. Use other if you’ve saved it to a removable drive, network drive, or to a location on your new PC. If you choose other, browse to the location of where you saved your settings. Select the folder where the data is stored.
Click Next. The wizard will gather your settings and apply them. When it’s done, click Next and then Finish. Your settings are now transferred to your new computer.
Discussion
The wizard only transfers settings, not the application itself. So you have to remember to first install the application on the new computer before running the wizard. Simply copying the program’s folders, files, and executables from your old computer to your new computer won’t work, because there may be Registry settings the program requires, as well as DLLs and other files that it may have installed in folders that you don’t know about.
Keep in mind that the File and Settings Transfer Wizard works with Microsoft applications, but with only a very few non-Microsoft applications. So don’t count on using it if you want to transfer settings for any applications other than those written by Microsoft.
See Also
For more details about using the Files and Settings Transfer Wizard, see http://www.microsoft.com/windowsxp/using/setup/expert/crawford_november12.mspx
PCmover from LapLink (http://www.laplink.com/products/pcmover/overview.asp) will move entire applications and settings from one PC to another, as will Alohabob PC Relocator (http://www.alohabob.com).
4.14. Remotely Installing a Microsoft Application Using Group Policy
Problem
You want to remotely install a Microsoft application to users from a central server, using Group Policy.
Solution
Create a Group Policy Object (GPO)
Once you’ve created a distribution point, you need to create a Group Policy Object (GPO), which will be used to distribute the software:
Run the Active Directory Users and Computers snap-in by choosing Start→ Programs→ Administrative Tools, and then choose Active Directory Users and Computers.
In the console tree, right-click your domain, choose Properties, click the Group Policy tab, and click New.
Type in the name that you’ll call the policy and press Enter.
Click Properties and then click the Security tab.
Clear the Apply Group Policy checkbox for the security groups that you want to prevent from having this policy applied.
Select the Apply Group Policy checkbox for the groups to which you want to apply this policy.
Click OK.
Assign a package
Now you can install the software to the PCs, what’s called “assigning” the package:
Run the Active Directory Users and Computers snap-in by choosing Start→ Programs→ Administrative Tools, and then choose Active Directory Users and Computers.
In the console tree, right-click your domain, choose Properties, click the Group Policy tab, select the Group Policy Object you’ve created for installing the software, and click Edit.
In Computer Configuration, expand Software Settings.
Right-click Software installation and choose New→ Package.
In the Open dialog box enter full Universal Naming Convention (UNC) path to the shared folder that contains the MSI package that you’re going to install, for example, \\file server\share\filename.msi. Make sure that you don’t browse to the location. Instead, type in the UNC path to the shared folder.
Click Open, then click assigned and click OK. You’ll see the package listed in the right pane of the Group Policy window.
Close the Group Policy snap-in, click OK, and then quit the Active Directory Users and Computers snap-in. When the computer onto which you’ve assigned the software starts, the software will be automatically installed.
Discussion
This technique is best used when you’re installing Microsoft software to multiple machines, and you want to manage them from a central server. The technique is called assigning software. When you assign software with Group Policy, the software is installed when the user of the computer logs on. When the user runs the software for the first time, the installation is finalized.
You can, however, also “publish” software with Group Policy. When you do this, the software is not automatically installed when the user logs on. Instead, the software will be displayed in the Add/Remove Programs dialog box when the user first logs on. The user can then install the software from there. This choice gives the user the option of installing the software or not, while when you assign software, it is automatically installed. For details on how to publish software using Group Policy, see MS KB 314934.
See Also
Recipe 4.16 for remotely uninstalling a Microsoft application using Group Policy; Recipe 4.15 for remotely redeploying a Microsoft application using Group Policy; MS KB 314934, “Use Group Policy to Remotely Install Software in Windows 2000,” and MS KB 304953, “How to deploy Office XP over a network”
4.15. Remotely Redeploying a Microsoft Application Using Group Policy
Problem
You want to remotely redeploy a Microsoft application using Group Policy, for example, if the application has been upgraded.
Solution
Using a graphical user interface
Run the Active Directory Users and Computers snap-in by choosing Start→ All Programs→ Administrative Tools, and then choose Active Directory Users and Computers.
In the console tree, right-click your domain, choose Properties, click the Group Policy tab, select the GPO you’ve created for installing the software, and click Edit.
Expand the Software Settings container that contains the software installation item that you used to deploy the package. Click the Software installation container that contains the package.
In the right pane of the Group Policy window, right-click the program, choose All Tasks, and click Redeploy application.
You’ll see this message: “Redeploying this application will reinstall the application everywhere it is already installed. Do you want to continue?” Click Yes.
Quit the Group Policy snap-in, click OK, and then quit the Active Directory Users and Computers snap-in. The application will be redeployed.
Discussion
Use this recipe when a Microsoft application has been upgraded and you want to upgrade it on user machines. Before redeploying, you’ll have to update the distribution point with the upgraded software.
See Also
Recipe 4.14 for installing a Microsoft application using Group Policy; Recipe 4.16 for uninstalling a Microsoft application using Group Policy; and MS KB 314934, “Use Group Policy to Remotely Install Software in Windows 2000”
4.16. Remotely Uninstalling a Microsoft Application Using Group Policy
You want to remotely uninstall a Microsoft application that you’ve installed to users from a central server, using Group Policy.
Solution
Using a graphical user interface
Run the Active Directory Users and Computers snap-in by choosing Start→ All Programs→ Administrative Tools, and then choose Active Directory Users and Computers.
In the console tree, right-click your domain, choose Properties, click the Group Policy tab, select the Group Policy Object you’ve created for installing the software, and click Edit.
Expand the Software Settings container that contains the software installation item that you used to deploy the package. Click the Software installation container that contains the package.
In the right pane of the Group Policy window, right-click the program, choose All Tasks, and then click Remove.
Select “Immediately uninstall the software from users and computers,” and click OK.
Quit the Group Policy snap-in, click OK, and then quit the Active Directory Users and Computers snap-in. The application will be uninstalled on all users’ machines.
Discussion
If you want, you can choose to allow users to keep using the software, but not allow any new users to install it. To do that, in step 5, choose “Allow users to continue to use the software, but prevent new installations,” and then click OK.
See Also
Recipe 4.14 for installing a Microsoft application using Group Policy; Recipe 4.15 for redeploying a Microsoft application using Group Policy; and MS KB 314934, “Use Group Policy to Remotely Install Software in Windows 2000”
Get Windows XP Cookbook now with the O’Reilly learning platform.
O’Reilly members experience books, live events, courses curated by job role, and more from O’Reilly and nearly 200 top publishers.

