Installing and Configuring the DHCP Relay Agent
You install the DHCP Relay Agent, like other Windows NT services, from the Services pages of the Control Panel Network dialog. To install it, right-click the Network Neighborhood icon on your desktop to display the context-sensitive menu and choose Properties to display the Network dialog. Display the Services page and choose Add. Windows NT builds a list of available network services and displays the Select Network Service dialog. Highlight DHCP Relay Agent and then choose OK to install it. As usual, you need to restart the server before the changes take effect.
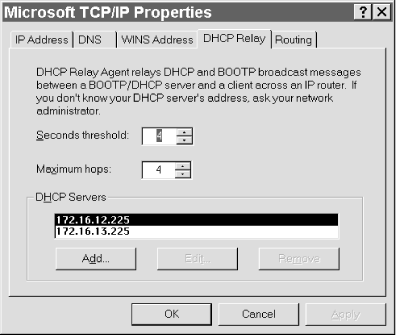
Once the DHCP Relay Agent is installed, you can configure it from the DHCP Relay page of the Microsoft TCP/IP Properties dialog, shown in Figure 6-2. To view this page, display the Network dialog, click the Protocols tab, highlight TCP/IP Protocol, and choose Properties to display the Microsoft TCP/IP Properties dialog.

Figure 6-2. The DHCP Relay page of the Microsoft TCP/IP Properties dialog
To enable DHCP Relay, you must enter the IP address of at least one DHCP Server. To do so, choose Add to display the DHCP Relay Agent dialog, enter the IP address, and choose Add. Windows NT copies the address to the DHCP Servers pane. To edit or remove the IP address for a DHCP server, highlight it in the DHCP Servers pane and choose Edit or Remove.
The only remaining configuration steps ...
Get Windows NT TCP/IP Network Administration now with the O’Reilly learning platform.
O’Reilly members experience books, live events, courses curated by job role, and more from O’Reilly and nearly 200 top publishers.

