Probably the most important customization of files and folders is discussed in Section 4.2.2, where you’ll learn about one of the best features of the pseudo-object-oriented interface design in Windows Me.[43] Examine the topics in this section to learn more and to improve your working experience with Windows.
Love it or hate it, the Web View is part of Windows Me. While the Web View primarily allows you to customize the superficial look of your folders, there are ways to put it to good use. See Chapter 8 for more information.
The default Windows Me installation occupies tons of hard-disk space and has a myriad of files scattered in more than 230 different folders. Although the sheer number and size of these files aren’t necessarily problems with today’s large, cheap hard drives, the amount of clutter that results can make finding documents, resolving conflicts, and performing other housekeeping very difficult.
One of my personal pet peeves about Windows is the dozen or so
folders that accomplish the same thing. For example,
Program Files, Common
Files, Microsoft Shared, and
MSApps all contain installed applications and
their components. The My Documents,
Favorites, Personal,
Received Files, My
Pictures, and My Files folders all
are designated places to store documents and other personal files.
Most users have enough trouble keeping track of documents without
having to worry about all these extraneous folders. So, why do we
have a dozen places to put things when we only need two or three?
As Windows has evolved, the various committees at Microsoft have repeatedly changed their minds about what the various “system” folders have been called and what they should contain. Had Microsoft’s designers been more careful, the entire Windows system would be much simpler and more stable, and there would be far less confusion and irritation among developers and users alike. The good news is that there is something you can do to help clean up the mess.
The following solutions allow you to reassign most of Windows’ system folders; of course, which folders you wish to customize and where you wish to move them is entirely up to you. Solutions 1 and 2 show how to move or rename some folders only. To effectively delete a folder, you must consolidate it with another, as described in Solution 3.
Double-click on the TweakUI icon (see Appendix A) in Control Panel, and choose the General tab.
Choose the folder you wish to change from the Special Folders section, and click Change Location. Note that you’ll have to open up Explorer first and create any folders you wish to use that don’t already exist; otherwise TweakUI won’t let you do it.
The drawback to this solution is that TweakUI only lets you configure a few folders. If the one you want to change is not listed, you’ll have to use one of the other solutions, listed later in this section.
When you’re done, you’ll have to manually copy the contents of the old folder to the new location.
Open Explorer, and navigate to the folder you wish to rename or move.
Simply rename the folder or drag it to a new location, just as you would any other folder. Most of the time, if you rename or move a system folder, Windows will keep track of it, changing Registry settings on the fly. It is usually obvious that a folder change is being tracked because of the slight delay in increased disk access immediately following the change.
The drawback to this solution is that it doesn’t work for all system folders, and in the cases where it does work, it can cause problems. After you make a change, it is best to search the Registry for the old folder name or location and manually change any references to the neglected entries. See Solution 3 for more information.
This solution should let you relocate any folder that is relocatable. Obviously, it’s best to back up not only your data, but your Registry settings as well. I also don’t need to tell you to proceed with caution and to investigate the contents of any folder you wish to change before you actually make the change:
Open the Registry Editor (if you’re not familiar with the Registry Editor, see Chapter 3).
Most of the system folders that can be reassigned are stored in one or more of the following Registry paths. Each key is intended to store certain folders—although, in practice, you may see some folders scattered from place to place. You’ll have to look through each of these to find the particular folder you want to change:
The shell folders for the currently logged-in user are specified in:
HKEY_CURRENT_USER\Software\Microsoft\Windows\CurrentVersion\ Explorer\Shell FoldersAdditional shell folders for the currently logged-in user are specified in:
HKEY_CURRENT_USER\Software\Microsoft\Windows\CurrentVersion\ Explorer\User Shell FoldersThe common shell folders, used by all users, are specified in:
HKEY_LOCAL_MACHINE\Software\Microsoft\Windows\CurrentVersion\ Explorer\Shell FoldersAdditional common shell folders, used by all users, are specified in:
HKEY_LOCAL_MACHINE\Software\Microsoft\Windows\CurrentVersion\ Explorer\User Shell FoldersThe
Program FilesandCommon Filesfolders (shared by all users) are both defined in:HKEY_LOCAL_MACHINE\SOFTWARE\Microsoft\Windows\CurrentVersion
For
Program Files, you’ll need to change both theProgramFilesDirandProgramFilesPathvalues; forCommon Files, just change theCommonFilesDirvalue.[44]The
Application Datafolder for the current user is defined by theDefaultDirvalue in:HKEY_CURRENT_USER\Software\Microsoft\Windows\CurrentVersion\ ProfileReconciliation\AppData.
To change a folder location, you must first find the corresponding entry in any of the Registry keys listed in step 2. Just double-click the appropriate value (or values) and edit the entry as you please. If there is more than one occurrence of the item you wish to change, you must change them all.
Ideally, you should only have to specify the location of the Desktop folder once, and every application should simply look it up there before accessing it. In practice, you may find that some folders will be referenced in other places in the Registry as well, so to fully implement the desired change, you must change every reference accordingly.
There can be hundreds of references to some of these folders, especially
Program FilesandCommon Files, so you’ll probably need to use a program like Registry Search and Replace (download it from http://www.annoyances.org ). Another killer is that some references may contain the short filename version of a folder, while others may contain the long filename version (i.e.,C:\PROGRA~1forc:\Program Files). Make sure to get them all.Close the Registry Editor when finished. You’ll most likely have to restart Windows for the desired change to take effect.
If you redirect the location of a folder like
Program FilesorCommon Files, make sure you move the actual files located in these folders to the new locations as well. Otherwise, several programs that rely on these folders won’t be able to find their files.Also, in some cases, if you’ve relocated a folder in the Registry without creating it in Explorer, Windows will do it for you. However, it’s good practice to make sure that any folders specified in the Registry also exist on your hard disk.
To effectively remove a system folder, the best thing to do is simply to consolidate it with another system folder. The benefits of doing this are substantial.
For example, Windows Me comes with the My
Documents folder, which helps to enforce a valuable
strategy for keeping track of personal documents by providing a
single root for all documents, regardless of the application that
created them. This allows you, for example, to sort your documents by
project rather than by program. The problem is that this design is
seriously undermined by the existence of other system folders with
similar uses, such as My Pictures,
Favorites, Personal,
Received Files, and My
Files.
[45] Consolidating all
of these system folders so that they all point to the same place,
such as c:\Documents or
c:\Projects, causes several positive things to
happen. Not only does it provide a common root for all personal
documents, making your stuff much easier to find and keep track of,
it also allows you to open any document quickly by using the
Favorites menu in the Start Menu.
Here’s how to consolidate two
folders
into one, using My Pictures as an example:
Using the previous solution, relocate the
My Picturesfolder (specified in:HKEY_CURRENT_USER\Software\Microsoft\Windows\CurrentVersion\Explorer\ Shell Folders)so that it is using the same folder as your
My Documentsfolder.Restart Windows for the change to take effect.
Copy all the files and folders contained in
My PicturesintoMy Documents.Delete the
My Picturesfolder.
Note that this should also stop Windows from automatically creating
the My Pictures folder when you try to delete
it.
Nearly
all
applications in Windows use the Temp folder to
store working files, which are created temporarily while an
application is running and are deleted when the application closes.
By default, the location of this folder is
\Windows\Temp, but it can be easily and safely
moved to a different location.
There are several reasons why you might want to do this. As any
experienced Windows user knows, crashing is, unfortunately, a daily
experience. When an application crashes, it doesn’t get a
chance to delete any temporary files it had created, which means that
the Temp folder can quickly fill up with
hundreds of files that look something like
~DF13F4.TMP.
Not only can this consume lots of disk
space, but if any files were open when the application that created
them crashes, they become corrupted, which can degrade system
performance and cause other problems. If you have more than one hard
disk or hard-disk partition, it can be beneficial to relocate the
Temp folder to a drive other than the one on
which Windows is installed.
The Temp folder isn’t specified in the
Registry like the others. Instead, it’s an
environment
variable
(actually it’s two). Environment variables are settings that,
like Registry settings, are available to all running applications and
are kept in memory from Windows startup until you shut down.
Environment variables also have the advantage of being accessible
from the command prompt (DOS). The system path,
another environment variable, is discussed in Section 6.3.6 in Chapter 6.
Start the System Configuration Utility (
Msconfig.exe),[46] and choose the Environment tab.There are two variables we care about here:
TEMPandTMP. Both are used (as opposed to just one), in order to support an inconsistency in older applications. Double-click on each entry to change its value. Chose any existing folder on your system (create it in Explorer if you haven’t yet), and then specify the full path here (e.g.,c:\temp).In some cases, each of these variables may point to different folders; even if you don’t necessarily want to relocate this folder, I recommend changing both entries so that they all point to the same place. The check marks to the left of the variable names allow you to disable variables without deleting them.
Click OK to close the System Configuration Utility.
Although the files in your Temp folder (or
folders) are intended to be used only while some applications are
running, these files are often left behind even after the
applications that created the files are closed. Subsequently, this
folder can become quite large, full of files that aren’t being
used. And any files left over from a crash may be corrupted, even
causing problems when Windows starts. I recommend writing a startup
script, as described in Chapter 9, that
automatically clears the Temp folder every time
Windows
starts.
Occasionally, an older installation program may write one or more
files to the Windows Temp folder to be processed when the system is
rebooted. If you were to write a startup script (see Chapter 9) that cleared the temp folder
automatically and specified it to load from the
StartUp folder in the Start Menu, then this
script would be run after said files are processed. In other words,
you should be safe.
A Context menu is the short menu[47] that appears when you use the right mouse button to click on a file, folder, application titlebar, or nearly any other object on the screen. Most of the time, this menu includes a list of actions appropriate to the object on which you’ve clicked. In other words, the options available depend on the context.
The context menu for files, the most commonly used and customized
context menu, depends upon the type of file selected, which is
determined by the filename extension. For example, all text
files (with the .txt extension) will have the
same context menu, regardless of what they contain or which
application was used to create them.[48]
In addition to the standard context menu items, such as Copy, Paste,
Delete, Rename, and Properties, you’ll usually see Open, Print,
and Print To (at the top of the
list), which represent customizable actions that
can be performed with the selected file. Each of these actions is
linked to an application: if you right-click on a
.txt file and select Open, Windows will launch Notepad (by default)
and instruct it to open the selected file. This
association is what this topic is about.
The default
action—the action that is
carried out when a file of a given type is
double-clicked—will appear in
bold text. If a file type is not
registered with Windows, double-clicking on a file of that type will
open the Open
With
dialog box, allowing you to choose an
associated application on the spot. The exception to this occurs when
a file type has been registered, yet has no
actions associated with it (useful if you want to identify a file
type, but not necessarily open it ).[49] In this case, nothing will happen when the file is
double-clicked.
The default action is also what can cause the most controversy. Say
you have grown accustomed to double-clicking on
.html files on your hard disk and having them
opened in Netscape Navigator (in other words, Netscape is the default
application for that file type). One day, out of necessity or
obligation or whatever, you install one of Microsoft’s updates
to Windows, which happens to contain a new version of Internet
Explorer. Unless you’re careful to choose the correct advanced
options, suddenly, and without warning, all of your
.html associations are changed, making Internet
Explorer the default application.
Although the most obvious reason to customize a file’s context
menu is to control the default action, what makes context menus so
powerful is that you can assign as many different actions as you like
to any given file type. In the case of .html
files, for example, you could add an Edit action to open your favorite text editor,
a View with Netscape action, and a
View with Internet Explorer
action—all in addition to the default action.
It’s possible to add, remove, or modify context menu items for nearly any file type. The File Types window, shown in Figure 4-4, is the only dedicated tool provided by Microsoft to manage file associations in Windows; it has been somewhat improved in Windows Me from previous versions. Some thought has been given to both experienced and novice users, although it still lacks the streamlining such an important feature deserves.
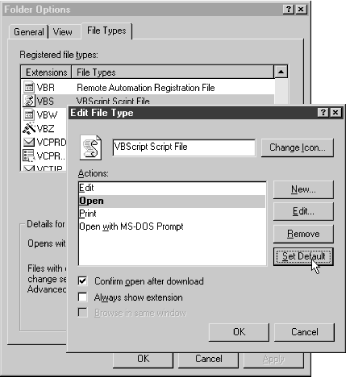
Figure 4-4. The File Types tool has been significantly improved in Windows Me from previous versions, although it could benefit from some additional streamlining and automation
For the most flexibility in customizing context menus, you’ll want to see how file associations are actually stored in the Registry, as described in Section 3.11 in Chapter 3.
Select Folder Options from Explorer’s View menu (or double-click the Folder Options icon in Control Panel), and choose the File Types tab.
Select the desired file type from the list, and click Advanced. You can sort the entries by filename extension or file-type description to make any given file type easier to find.[50] (The Change button only displays the limited Open With dialog box.)
Keep in mind that some file types may be claiming more than one extension. For example, the
.htmand.htmlextensions are most likely associated with the same file type. If you are editing such a file type, it won’t matter which extension you select. See Section 4.2.2.2 later in this chapter for more information.The Actions list box contains a list of the customizable context menu items. Each one has a name and a command line (the application filename followed by command-line parameters, if applicable). Some actions have DDE commands, which are used only by certain applications—you probably won’t have to bother with this setting.[51]
The bold item is the default action, also shown in bold at the top of the context menu. If there’s no bold item, and therefore no default, double-clicking a file of that type will do nothing. To make no action the default, you’ll have to delete the current default (bold) action. If you don’t want to remove any actions, just add a new, temporary action, make it the default, and then delete it.
Press OK. The changes should take effect immediately; your desktop and any open Explorer or single-folder windows will automatically refresh within a few seconds.
Sometimes two filename extensions share the same file type—that
way, you don’t have to go to the trouble of creating and
modifying a separate set of actions for each extension. In cases
where two file formats are similar enough to warrant file-type
sharing, such as .jpg and
.gif files, follow the upcoming steps.
To see a list of all the extensions owned by a given file type, sort the Registered file types list by file-type description. Note that two different file types can have the same description and would therefore be different yet indistinguishable in this view:
In the File Types window (see earlier in this section), configure a single file type as desired.
Click New, and type the filename extension without the dot (e.g.,
txt) in the File Extension field. If the extension is currently associated with another file type, that link will be broken, then replaced with the one you choose here.Click Advanced >> to show a second list of existing file types, and choose any desired file type to claim ownership of the new extension.
If, instead, you want to create a new file type, either choose <New> or make no choice at all. A new file type will be created and named for the extension; if you type
xyz, the new file type will be named “XYZ File.”You can then proceed to edit the new entry. If you’ve linked the new extension with a new file type, all of that file type’s properties (e.g., actions, icon, description) will appear in the new entry as well.
If you have double-clicked on a file with an extension that has not yet been registered, you might’ve seen the Open With dialog box and been presented with a list of applications currently associated with other file types. From that point, you can select an application, type a name for the new type, and continue.
This is the same box that appears if you open the File Types window, select a file type from the list, and click Change. To get this window for an already registered file type without going through this hassle, follow these steps:
Hold the Shift key while right-clicking on any file of the given type.
Select Open With from the menu. This menu item won’t be visible unless you press the Shift key.
The Always use this program to open these files option will be turned off by default, allowing you to choose an application without affecting your current associations. Unfortunately, there’s no way to add a nondefault context-menu item with this method.
To configure your file types so that you don’t have to hold the Shift key, follow these steps:
Open the Registry Editor (if you’re not familiar with the Registry Editor, see Chapter 3).
Expand the branches to
HKEY_CLASSES_ROOT/*/. On this branch, you can place context menu actions that will appear on files of all types, even those that have not yet been registered.Select New from the Edit menu, select Key, then type
shell. Select the newshellkey, and repeat the process to create anopenaskey, and again to create acommandkey.You should then be able to navigate to
HKEY_CLASSES_ROOT/*/shell/openas/command. Double-click on the(Default)value, and type the following:rundll32.exe shell32.dll,OpenAs_RunDLL %1
Press OK, and close the Registry Editor when you’re finished. Right-click on any file and select Open With to use this feature.
Another way to get to the Open With dialog box is to right-click on any file, select Properties, and then click Change.
Folders, drives, and desktop icons also have customizable context menus, but the File Types window (described earlier) has limitations on what can actually be changed. Refer to Section 3.11 in Chapter 3 for more information on the Registry structure involved in this solution:
Open the Registry Editor (if you’re not familiar with the Registry Editor, see Chapter 3).
For folder context menus, expand the branches to
HKEY_CLASSES_ROOT\Directory\shell\. For drive context menus (visible in Explorer and the My Computer window), expand the branches toHKEY_CLASSES_ROOT\Drive\shell\. For the context menus of any system objects, such as My Network Places, expand the branches toHKEY_CLASSES_ROOT\CLSID\{classid}\shell\, where{classid}matches one of the codes listed in Appendix C, including the braces.Select New from the Edit menu, select Key, type the name of the new item you want added to the list, such as
OpenorEdit, and press Enter.Highlight the new key, select New from the Edit menu, and then select Key again.
Type
commandfor the name of this new key, and press Enter.Double-click on the
(Default)value in the right pane, and type the full command line (path and filename of the application executable, followed by any applicable command-line parameters) you want associated with this entry.Close the Registry Editor when you’re finished. These changes should take effect immediately.
Once you’ve set up your file types the way you want them, see the next solution, Section 4.2.3, to prevent other applications from changing your file types without asking.
One of the most irritating aspects of using Windows is when the settings you’ve spent time customizing are overwritten or forgotten. A common practice employed by some software developers is to jerryrig an application so that it overwrites your file associations, either when it’s installed or, even worse, every time the program is run. That way, their program becomes the default.
For some proprietary file types, such as Excel Files
(.xls), this isn’t much of a problem,
because there aren’t any other programs that use these files.
The impact is greater on more general file types, such as the large
quantity of graphics formats (.gif,
.jpg, .tif,
.bmp, and .png ), where
there are literally hundreds of applications that use these files.
It’s not unusual for several of these applications to be
installed simultaneously on a single system, all competing for the
dubious distinction of being the default. Probably the most
high-profile example of this competition is that between competing
web browsers. Not only are file associations in play, but URL
associations as well—every time you click a link in any
application, the URL association is what’s used to decide which
web browser application to use. See Chapter 8 for details on URL associations.
Ideally, only you should be in the position to decide which program you use for each task. Unfortunately, it’s essentially impossible to write-protect (prevent the overwriting of ) any Registry settings—including file types—in Windows Me. Although Windows NT and Windows 2000 have the ability to set user permissions in the Registry, Windows Me simply does not have that functionality.
Probably the most effective protection against overwritting file types is to back up the portions of the Registry that are at risk, allowing you to easily restore them should the need arise. This is accomplished with Registry patches; see Section 3.5 and Section 3.11, both in Chapter 3, before continuing.
The procedure outlined later would be a good one to follow, for example, before installing an application you believe might overwrite an existing file type. Repeat these steps for each file type you wish to protect:
Open the Registry Editor (if you’re not familiar with the Registry Editor or Registry patches, see Chapter 3).
Expand the
HKEY_CLASSES_ROOT\branch, and locate the keys that you wish to protect.Any given file type is stored as one or more extension keys and a file-type key. For example, the extensions
.txtand.logmay both be linked with thetxtfilefile type. So, to save the entire file type, you’ll need to save each of the following Registry branches:HKEY_CLASSES_ROOT\.txt HKEY_CLASSES_ROOT\.log HKEY_CLASSES_ROOT\txtfile
If you only save the extension keys or the file-type key, the Registry patch will be incomplete. You can only select one key at a time, so start with one and repeat step 3 for each remaining key.
To see a list of all the extensions owned by a given file type, open the File Types window (see Section 4.2.2 earlier in this chapter), and sort the Registered file types list by file-type description. Note that two different file types can have the same description and, therefore, would be indistinguishable in this view.[52]
When you’ve highlighted a Registry key you want to export, select Export Registry File from the Registry menu, and specify a filename for the patch. Because you’ll be exporting at least two patches, don’t worry too much about the names just yet. Make sure not to export two branches to the same file, however; one will simply overwrite the other.
Also, don’t try to export the entire
HKEY_CLASSES_ROOTbranch, because it contains much more information than we need for this purpose, and restoration of a patch will have unpredictable effects.Once you’ve exported all the keys you’re interested in, close the Registry Editor.
You should have at least two Registry patches from this exercise, perhaps more. Because they’re just plain text files, we can easily merge them together into a single file with Notepad. Choose one file to be the main patch, and then cut and paste the contents of the other patches into it. The only editing you’ll have to do is to remove the
REGEDIT4line from all but the main patch, so that it only appears once—at the top of the file.If you’re exporting multiple complete file types, you might want to merge the individual patches into several separate Registry patches—one for each file type.
Save your changes to the main patch, and then delete all the other patches.
Whenever a particular file type that you’ve backed up becomes overwritten by an errant application, just double-click on the patch you made to restore it.
In most cases, when you apply a Registry patch, it will simply overwrite the information that’s there with whatever is in the patch. However, in some circumstances, there may be leftover context-menu items from any newly installed applications.
To apply the patch automatically whenever you start Windows, place a shortcut to the patch in your Startup folder (usually
\Windows\Start Menu\Programs\Startup). Type the following into the shortcut’s command line:regedit /s c:\filetypes\text.reg
where
c:\filetypes\text.regis the full path and filename of the Registry patch you wish to apply. Note the/sswitch, which runs the Registry Editor in silent mode, skipping the two prompts that normally appear when Registry patches are applied.
Although there’s only so much you can do to prevent your file types from being overwritten, other work commands do exist. Try adding a context menu item for each program installed on your system, such as “Open with Notepad” and “Open with WordPerfect” for text files. That way, whatever the default is, you’ll always have your preferred applications handy.
One sticking point you may encounter when trying to reconfigure file types is that some actions use Dynamic Data Exchange (DDE). DDE is a method of communication between applications, sometimes used by Windows to communicate with the applications it launches.[53] If a particular file type for an application stops working for some reason, it could be that the DDE information has changed or been erased altogether. If this is the case, you’ll usually have to reinstall the application to restore the DDE-enabled file types, because there’s little standardization with DDE.
If you right-click on the desktop or an open folder (or open Explorer’s File menu) and choose New, you will be presented with a special list of registered file types that can be created on the spot. Choose one, and Explorer will create a new, empty file with the appropriate extension in that location.[54]
This list is maintained by certain Registry entries, and since most of us will not need to create new Ami Pro documents on the fly, there is a way to remove these unwanted entries. Having an extra entry here and there is not necessarily a big deal, but it can be quite frustrating if you’re forced to wade through a long list of file types every time you want to create a new file. The following solutions should allow you to overcome this annoyance.
Double-click on the TweakUI icon (see Appendix A) in Control Panel, and choose the New tab.
Uncheck any unwanted items, or click Remove for those items you know you’ll never want again.
Note that this doesn’t prevent applications from adding subsequent items, either when they’re installed or the next time they’re run.
Open the Registry Editor (if you’re not familiar with the Registry Editor, see Chapter 3).
Select Find from the Edit menu, type
ShellNew, and press OK.Every
ShellNewkey that is found will be a branch of a particular key named for a file extension (see Section 3.11 in Chapter 3). If you don’t want that file type in your New menu, delete the entireShellNewbranch.Repeat this for every unwanted file type, and close the Registry Editor when finished. The changes will take effect immediately.
If either of the previous solutions is ineffective for removing a particularly stubborn entry, you have a last resort. For example, some applications actually replace this entry every time they’re started, completely ignoring your preferences. Two popular programs known for this annoying behavior are Adobe Photoshop v4.0 or later (http://www.adobe.com) and JASC’s Paint Shop Pro v4.0 or later (http://www.jasc.com). The following solution works on both of those applications and should work on any other program that does this as well.
You’ll need a good hex editor, such as UltraEdit-32 (http://www.ultraedit.com), which we’ll use to actually change the program executable.
Warning
If this is done incorrectly, it can damage an application. But if you back up any files before altering them, you eliminate this possibility.
The following example assumes you’re using UltraEdit-32 v5.0 or later to fix this problem in Paint Shop Pro v4.0. Although the specifics may change for later versions of these programs or for a different editor and “patient,” the technique is the same:
First, follow the instructions in the previous Solution 1 or Solution 2 to get rid of any existing entries.
Because Paint Shop Pro automatically adds the
ShellNewbranch (explained earlier in Solution 2) every time it starts, we’ll start by assuming that this happens in the main executable. Make sure that Paint Shop Pro is not running before you start messing around with the files.Make a backup of the
Psp.exefile in the Paint Shop Pro installation directory. See Section 2.1.4 in Chapter 2 for more information.In UltraEdit-32, select File and then Open, and select
Psp.exefrom the Paint Shop Pro installation directory.Because this editor is used to edit ASCII (plain text) files as well as binary (hex mode) files, make sure it’s in hex mode (make sure the Hex Edit option is checked in the Edit menu).
Select Find from the Search menu, type
shellnewin the Find What field, check the Find ASCII option, and click Find Next. When UltraEdit-32 finds the first occurrence of ShellNew, close the Find box, and change the text so it readsShellNix—a change that small (like the “ix”) isn’t likely to disrupt anything in the program, but it’s enough for Explorer not to include it in the New menu.Repeat the process for all additional occurrences of ShellNew. When you’re finished, select Save from the File menu and close UltraEdit-32. The change should take effect the next time you start Paint Shop Pro.
If you can’t find the ShellNew text in the application you’re editing or if replacing it as described earlier doesn’t do the trick, there are other places to look. For example, many programs have several
.DLLfiles in the same directory. Use Explorer’s Find feature to look through all the files in the application’s directory for the text ShellNew. Repeat the previous steps in any file in which it’s found.
If you use Solution 1 and then look in the Registry, you’ll see
that TweakUI has simply renamed the ShellNew
branch as ShellNew- for those branches
you’ve chosen to disable. Only if you click Remove in TweakUI are the branches actually
removed.
Admittedly, Solution 3 is extreme, but sometimes the programmers have been so stubborn that it’s your last resort. Also, if you get a hankering for some tinkering, learning this type of customization can come in very handy.
Photoshop and Paint Shop Pro are both mentioned in Solution 3 for example only. Although they both exhibit this design flaw, they are otherwise good programs. In fact, the figures in this book were created with both programs.
If you select Search from the Start Menu , you’ll see several different search options. The two built-in entries, For Files or Folders and On the Internet, are pretty self-explanatory, and neither can be removed. However, the additional entries are specified in the Registry and can be easily removed:
Open the Registry Editor (if you’re not familiar with the Registry Editor, see Chapter 3).
Expand the branches to:
HKEY_LOCAL_MACHINE\Software\Micro-soft\Windows\CurrentVersion\explorer\FindExtensions.In this branch, you’ll find several keys and subkeys, most of which represent entries in the Search menu. You should be able to ascertain which keys correspond to which menu items. If you run into a key without an intuitive name or descriptive value contained therein, at the very least, you’ll find a class ID (described in Appendix C). A quick search through the Registry will locate another instance of said class ID, which should provide a clue as to its purpose.
It’s generally safe to delete any keys from this branch, although it’s advisable to first back up the entire
FindExtensionsbranch by creating a Registry patch (see Section 3.5 in Chapter 3).If, for example, you wanted to get rid of the On the Internet entry, you’d delete the
WebSearchkey, located in thestaticbranch.
Although it’s easy to delete unwanted Search menu entries, you can’t add a new entry simply by creating links here—that’s something that must be done programmatically.
Windows Shortcuts are tiny files that link to applications, documents, drives, folders, and some system objects. They’re convenient in that they behave the same as the objects to which they’re linked when you double-click them or drag-drop other objects on them. If you drag a file into a folder’s shortcut, for example, it’s the same as dragging the file into the folder.
The inherent problem with Window Shortcuts is that they are files,
and as such, have the same limitations as files. They are sorted in
Explorer with the rest of the files; shortcuts to folders are not
grouped with folders as you might expect. Furthermore, shortcuts to
folders cannot be specified in a path. For example, if you create a
shortcut to the folder d:\Cletus and place that
shortcut in c:\Brandine, then you can’t
reference objects stored in d:\Cletus by typing
c:\Brandine\Cletus.
Enter Folder Shortcuts , a new undocumented feature in Windows Me (and Windows 2000). Folder shortcuts behave exactly like folders because they are folders. With a little tweaking, any empty folder can be turned into a Folder Shortcut, a mirror of any other drive or folder on your system, on your network, or even on the Internet!
Warning
If you create a Folder Shortcut and then try to delete it, you will be deleting the target folder and all of its contents. Folder Shortcuts must be dismantled before they can be removed. See later in this chapter for details.
Folder Shortcuts, once in place, are indistinguishable from the
folders to which they link. If you create a Folder Shortcut to
d:\Cletus and place it in
c:\Brandine, then it will appear as though
there’s a folder called Cletus located in
c:\Brandine ; in other words,
c:\Brandine\Cletus will be a valid
path.[55]
Here’s how to make a Folder Shortcut to an existing folder on your hard disk or on your local network (see later in this chapter for details on creating a Folder Shortcut to an FTP folder):
Choose an existing folder in Explorer—it can be located on any drive, including your network. Create a standard Windows Shortcut to that folder on your desktop, and name the new shortcut
target. (The shortcut filename will actually betarget.lnk, although the.lnkfilename extension will be hidden in Explorer.)The easiest way is to drag-drop the folder icon using your right mouse button, and then select Create Shortcut(s) Here from the menu that appears. See Section 2.1.2 and Figure 2-2 in Chapter 2 for more information on this process.
Next, make a new folder on your desktop, and call it Dingus.[56] To help protect a Folder Shortcut from accidental deletion, make the folder read-only. Right-click on the folder icon, and select Properties. Turn on the Read-only option, and click OK.
Drag-drop the
targetshortcut you made into the new folder.Open a plain-text editor, such as Notepad, and type the following four lines:
[.ShellClassInfo] CLSID2={0AFACED1-E828-11D1-9187-B532F1E9575D} Flags=2 ConfirmFileOp=0Save this into the new folder, and call it
desktop.ini.Open an MS-DOS command prompt (
Command.com), and change the active directory to the new folder by typingCDc:\windows\desktop\dingus, replacingc:\windows\desktop\dinguswith the actual path of the new folder.[57]If you’re successful, the DOS prompt will look like
C:\Windows\Desktop\dingus>.Next, type
ATTRIB+h+sdesktop.ini—this will turn on the Hidden and System attributes for thedesktop.inifile, which you can’t do from within Windows. Typeexitwhen you’re done.See Appendix B, for more details on the
CDandATTRIBcommands.If the new folder is open, close it now. The next time you open the folder, you’ll see the contents of the target folder, rather than the two files,
desktop.iniandtarget.
The new Folder Shortcut can now be copied or moved anywhere you like.
For the sake of safety, you should take certain steps to mark this
new folder as a Folder Shortcut. Although it will be described as a
“Folder Shortcut” in Explorer’s Type column, as
well as in the folder’s Properties dialog box, it will be
otherwise indistinguishable. In addition to naming it something like
Shortcut to Dingus, you can also
change the icon of the Folder
Shortcut—see Section 4.1.5
earlier in this chapter for details. If you don’t choose an
icon, the Folder Shortcut will assume the icon of the folder to which
it’s linked.
I strongly recommend using an empty folder to transform into a Folder Shortcut. If there are any objects stored in said folder, they will become inaccessible in Windows; they will be visible only in DOS or after you dismantle the Folder Shortcut, as explained later. There should be no effect on the contents of the target folder, however.
If you find the need to create Folder Shortcuts more easily, see Section 9.15.7 in Chapter 9 for a Windows Script Host (WSH) script that automates this process.
A Folder Shortcut can also be used to mirror an FTP site, effectively allowing you to transfer files across the Internet using Explorer. See Section 7.4.3 in Chapter 7 for details.
It’s important to realize that once you create a Folder Shortcut, you can’t remove it using traditional methods. If you try to delete a Folder Shortcut by dragging it into the Recycle Bin, for example, Windows will simply delete all the contents of the target folder. To remove a Folder Shortcut, you must first dismantle it. Because DOS doesn’t recognize Folder Shortcuts, we can use DOS to delete the two files we created earlier:
Open an MS-DOS command prompt (
Command.com), and change the active directory to the new folder by typingCDc:\windows\desktop\dingus, replacingc:\windows\desktop\dinguswith the actual path of the new folder.[58]If you’re successful, the DOS prompt will look like
C:\Windows\Desktop\dingus>.Next, type
ATTRIB-h-sdesktop.ini—this will turn off the Hidden and System attributes for thedesktop.inifile, which you can’t do from within Windows.Type
DEL*.*to remove the filesdesktop.iniandtarget.lnk. TypeEXITwhen you’re done.See Appendix B for more details on the
CD,ATTRIB, andDELcommands.If the new folder is open, close it now. The next time you open the folder, you’ll see the contents of the target folder, rather than the two files
desktop.iniandtarget. The folder can now be safely deleted.
What would seem to be a simple function, the ability to print out a list of files in any given directory, does not exist in Windows Me. However, there are a few ways, using folders’ context menus, to add this functionality to Windows.
One of the nice things about context menus (and also one of their
limitations) is that they are implemented in a way that is compatible
with the way DOS programs have worked for nearly 20 years. For
example, if you right-click on a .txt file and
select Open, and the Open action is
associated with Notepad, Windows simply launches Notepad with the
text file specified in the command line, like this:
C:\windows\notepad.exe somefile.txt
Using this simple syntax, we can add an action associated with a simple DOS batch file to the context menus for folders:
Open a text editor, such as Notepad, and type the following two lines into a new document:
CD %1 DIR >LPT1
The
DIRcommand is what actually generates the directory listing, and the>character instructs Windows to redirect the output from the command to the printer port (LPT1; useLPT2instead, if applicable).You can use any of the
DIRcommand’s options to further customize this feature. To specify the desired sort order, change the pervious line to the following:DIR /O:xxx >LPT1
where
xxxcan be any or all of the following letters, in order by preference:Nto sort by name,Efor extension,Sfor size,Dfor date,Gto group directories first,Aby last access date (earliest first). See Appendix B for more information on theDIRcommand.Save the two-line file into your
Windows\Commandfolder, and call itPrintdir.bat.Right-click on the file in Explorer, select Properties, and choose the Program tab. Turn on the Close on Exit option, choose Minimized from the Run list box, and click OK.
Next, Open the Registry Editor (if you’re not familiar with the Registry Editor, see Chapter 3).
Expand the branches to
HKEY_CLASSES_ROOT\Directory\shell.Select New from the Edit menu, and then select Key.
Type
PrintContentsfor the name of this new key, and press Enter.Highlight the new
PrintContentskey, select New from the Edit menu, and then select Key again.Type
commandfor the name of this new key, and press Enter.Double-click on the
(Default)value in the right pane, and type the following:C:\Windows\Command\PRINTDIR.BAT
assuming that
C:\Windows\is your Windows folder.To use the new feature, just right-click on any folder icon, and select the Print Contents option to print its contents.
Creative Element Power Tools (http://www.creativelement.com) comes with a context-menu add-on, allowing you to print or copy a folder’s contents to the clipboard, among other things.
Windows tries hard to be as graphical as possible, which can sometimes be its downfall. Case in point: when was the last time you found the icon for an application or associated document to be the least bit helpful in determining what was inside?
In Explorer, when you view a folder containing icons
(.ico files), cursors (.cur
files), or animated cursors (.ani files), their
file icons are previews of their contents
instead of simply generic icons for the application with which
they’re associated. Now, Windows has the capability to generate
these types of thumbnail previews for other kinds of files as well,
and a new feature in Windows Me takes it even further.
Before using either of these solutions, double-click on the Display icon in Control Panel, choose the Effects tab, and turn on the Show icons using all possible colors option.
The advantage to this solution
is that once the change has been made, it will be enabled
automatically for all folders on your system. The disadvantages are
that this solution works only for .bmp files,
and the thumbnail previews will never be larger than the rest of your
system icons (usually 32 x 32 pixels):
Open the Registry Editor. (If you’re not familiar with the Registry Editor, see Chapter 3.)
Expand the branches to
HKEY_CLASSES_ROOT\Paint.Picture\DefaultIcon, and change the(Default)value to%1. If the.bmpfile type is no longer associated with MS Paint, the correct Registry location will be somewhere other than inPaint.Picture. Try looking in the(Default)value ofHKEY_CLASSES_ROOT\.BMPfor the current file type (see Section 3.11 in Chapter 3 for more information).Close the Registry Editor and press F5 to refresh any open windows to reread the icons for bitmap files. You might have to log out and then log back in for the change to take effect.
To increase the size of
icons, double-click on the Display icon in Control Panel, choose the
Appearance tab. Select Icon from the Item menu, and type in a larger value for the
size, such as 48 or 64.
Note that this will make all icons on your system (those on the
desktop, and in the Large Icons
display in Explorer) larger.
The advantages of this solution are that it
works for more file types, including .bmp,
.jpg
, and
.gif
files, and that the previews can be larger
than normal icons. The disadvantages include that the option needs to
be enabled for each folder you view (you wouldn’t want to set
it as the default). Also, it’s fairly limited: there’s no
way to change the size of the previews, and any image files that it
doesn’t understand are shown simply with their standard file
icons rather than being hidden. If you are viewing a folder with more
than just a few images in it, the display is less than ideal.
Open Explorer, and locate any folder that contains at least one
graphic image file (.jpg,
.gif, or .bmp). Select
Thumbnails from the View menu (this option may not be available if
you have Internet Explorer integration disabled—see Chapter 8). Select one of the other view modes
(such as Details or Large Icons) to restore the display to normal.
If you’ve configured Explorer to display hidden files,
you’ll notice a new hidden file, thumbs.db
(which contains the thumbnail data), in any folder you view. This
file can be deleted safely.
If you need a better thumbnail preview, try a third-party
application, such as Acdsee-32 (http://www.acdsee.com). It not only has a
superior thumbnail viewer, but is a much better and faster image
viewer than Internet Explorer (the only thing Microsoft provides for
viewing .jpg and .gif
files).
The Places Bar is the gray bar along the left edge of the File → Open and File-Save dialog boxes in Windows Me. The Places Bar made its debut in Microsoft Office 2000 and is now standard in Windows Me and Windows 2000. If you don’t see the Places Bar on your system, it may not be enabled—see the following Solution 1 for details.
This bar has a maximum of five buttons, each of which points to a different folder on your system. By default, these places are History, Documents, Desktop, Favorites, and Web Folders. (How many of us really use Web Folders?) It’s best to close all running applications, especially Office 2000 applications, to prevent them from interfering with your selections.
There are two solutions that allow you to customize the Places Bar. TweakUI (Solution 1) is the easier solution, but it doesn’t apply to all file dialog boxes (such as those in older applications or Microsoft Office). Solution 2 is only for Microsoft Office 2000 dialog boxes but involves editing the Registry. Perhaps a subsequent Windows or Office update will resolve the discrepancies.
Double-click on the TweakUI icon (see Appendix A) in Control Panel, and choose the Open tab.
Select Custom places bar, and then choose the desired system folders from each of the lists. Your selections will appear in the Places Bar in the same order as you choose them here. You can also type the full path of any existing local or network folder here; the folder’s actual name and icon will appear on the corresponding button.
You can also choose either Show default places or Hide places bar at this point, both of which should be self-explanatory.
Click OK.
Open the Registry Editor. (If you’re not familiar with the Registry Editor, see Chapter 3.)
Expand the branches to
HKEY_CURRENT_USER\Software\Microsoft\Office\9.0\Common\OpenFind\Places. You should see two subkeys here:StandardPlacesandUserDefinedPlaces.First, you’ll have to disable the existing items; otherwise, your custom items won’t be shown. One by one, highlight each key under
StandardPlaces(e.g.,Desktop,Recent), and select New and then DWORD Value from the Edit menu.Name the new value
Show, and leave the value of0unchanged. Don’t worry if you want to keep one or more of the defaults; it’s easier in the long run to disable them all here and then recreate the five you want to keep. Also, make sure the values you add areDWORDvalues; otherwise, this won’t work.Next, highlight the
UserDefinedPlaceskey, and add five new keys. Name themPlace1,Place2,Place3,Place4, andPlace5.In each of these new keys, you’ll want to create the following values, filling in the appropriate information in each value:
- A String value called
Name This contains the caption that will appear under this place (example:
Desktop).- A String value called
Path This contains the full folder path for the place (example:
c:\windows\desktop).- A
DWORDvalue calledIndex This allows you to choose how your places are sorted. Enter
0for the first place,1for the second,2for the third, and so on. The key names typed in the previous step (Place1,Place2, etc.) do not determine the sort order.
- A String value called
After you’ve entered all the new places, open any Office 2000 application to try it out. This may require some trial and error to get it right.
One of the things that make this difficult is that Office tends to indiscriminately add new keys and values, which can clutter up what you’re working on. If you’ve done it right, however, the seemingly random keys and values that appear will have no effect on what actually appears in the dialog boxes.
To allow more than five buttons on the Places Bar, expand the Registry branches to
HKEY_CURRENT_USER\Software\Microsoft\Office\9.0\Common\OpenFind\Places. Select New and then DWORD Value from the Edit menu. Name the new valueItemSize, and leave the value of0unchanged.When you’re done, you’ll want to make a Registry patch to back up your settings, just in case a subsequent Office update overwrites them. See Section 3.5 in Chapter 3 for more information.
You can also get the Office PlaceBar Customizer from Microsoft’s Office Update web site (http://office.microsoft.com/), which will enable you to make these changes more easily from within Office.
[43] True object-oriented design dictates that objects (in this case, files and folders) be aware of their own traits. This design is only mimicked in Windows Me. Instead of each file’s knowing which application is used to edit it, Windows determines how to handle a file based solely on the filename extension. This design has advantages and disadvantages, but Microsoft’s decision to hide filename extensions, the basis for file associations, only makes the whole system more difficult to understand and master.
[44]
Common Files is a
subfolder under Program Files, which contains
more application-specific folders. In fact, you may see some
duplication in the contents of Program Files and
Common Files; consolidating these folders may
reclaim more free disk space and reduce the possibility of version
conflicts.
[45]
My
Files
is the counterpart to My
Documents, which is used by some versions of WordPerfect
and other non-Microsoft application suites. The
Personal folder was used by Office 95, but not
enforced in subsequent releases. Depending on which programs
you’ve installed or have used in the past, these folders may or
may not appear on your system.
[46] In previous
versions of Windows, environment variables were set with one or more
lines in the Autoexec.bat file, which is now
obsolete.
[47] Microsoft sometimes calls this a “Shortcut Menu,” which is somewhat misleading.
[48] This is why Windows gives you a stern warning when you try to change a file’s extension.
[49] An example is the way DLL files are registered with Windows by default.
[50] The ability to sort the entries is a new and
sorely needed feature in Windows Me. Previously, finding file types
in this window has been difficult: for example, the entry for the
.xls extension was listed under “Microsoft
Excel Spreadsheet,” putting it alphabetically under
“M” instead of “E” for Excel or
“X” for XLS.
[51] DDEs are poorly documented
commands used by Windows to communicate with applications that are
already open; for example, when using the Print context menu command for
.doc (Microsoft Word) files, Windows simply
communicates with Word and instructs it to open the file.
[52] Keep in mind that file-type descriptions will not necessarily be the same as the key names that contain the file types. See Section 3.11 in Chapter 3 for details.
[53] For example, when you right-click on a
.doc file and select Print, Windows opens the file in Wordpad (or
Word, if installed) and then sends a DDE message to the application
to print the document. This is opposed to opening separate copies of
the associated application for each selected document to be
printed.
[54] In some cases, Windows duplicates a special template to make the file, rather than creating a new, empty file.
[55] For those of you familiar with Unix, Folder Shortcuts are very similar to symbolic links.
[56] The name actually doesn’t matter, but to make things easy on us, use fewer than eight letters right now. You can always rename it later.
[57] A handy shortcut is to simply type
CD, followed by a space, and then drag-drop
the icon for the new folder onto the MS-DOS Prompt window.
[58] A handy shortcut is to simply type
CD, followed by a space, and then drag-drop
the icon for the new folder onto the MS-DOS Prompt window.
Get Windows Me Annoyances now with the O’Reilly learning platform.
O’Reilly members experience books, live events, courses curated by job role, and more from O’Reilly and nearly 200 top publishers.

