Assemblies may be changed many times throughout the life of a project due to the addition, removal, or modification of functionality. It is common to avoid upgrading to newer versions of an assembly when the code is shared within a company or throughout a community due to the fear of breaking changes.
With LibCheck, a team can compare the public interfaces of two assemblies to determine whether any interfaces have been removed, added, or modified. Viewing the differences between two versions can alert a development team to unintended consequences of their changes and alert the consumers of an upgraded assembly if there is potential for modifications to have an impact on their code.
Tool | LibCheck |
Version covered | 1.0 |
Home page | |
Power Tools page | |
Summary | Quickly get a picture of potentially breaking changes between assembly versions |
License type | Microsoft EULA |
Online resources | Blog |
Supported Frameworks | .NET 1.0, 1.1, 2.0 |
Related tools in this book | Reflector.Diff, Reflector |

LibCheck is available as a free download from Microsoft. The tool is distributed with the binaries, source code (C#), and tool-specification document. LibCheck is geared toward viewing breaking changes between versions of the .NET Framework, but it can be used to view breaking changes between any two assemblies.
To set up LibCheck, download the file from Microsoft and run the self-extracting executable to unzip it to the location you specify. You will find three files: EULA.rtf, LibCheck Tool Specification.doc, and libcheckfiles.zip. Unzip libcheckfiles.zip to find the Visual Studio 2003 solution, the projects and their accompanying source files, and the other files that are required to build the LibCheck solution. LibCheck’s executable has already been built, so you don’t need to build the tool unless you plan to make modifications.
The libcheck.sln file was built with Visual Studio 2003, but it is possible to open the solution with Visual Studio 2005 and allow the conversion wizard to convert the Visual Studio 2003 solution and projects to the new Visual Studio 2005 format.
If you are interested in running the 2003 version of LibCheck, you can simply copy the contents of the Debug\bin or Release\bin directories, or run LibCheck from the extracted bin directory.
LibCheck is a command-line executable, so it can easily be integrated into a NAnt or MSBuild project. To add LibCheck to an automated build process, simply call out to the LibCheck.exe executable with the appropriate arguments. The churn report generation process also generates an accompanying XML file with the results of the comparison. You can easily navigate this document with an XMLReader or via XPath to determine whether there are any breaking changes.
The documentation provided with LibCheck is geared toward running LibCheck against the .NET Framework assemblies and does not provide any examples of running against other assemblies. For the examples that are provided here, LibCheck will be executed against xcopied assemblies that are not part of the .NET Framework.
Comparing two versions of an assembly requires multiple steps. The first step is to generate store files (to store metadata about the assemblies) for each version of the assembly you want to compare. The second step is to compare the store files and create the “churn report” (a report showing the API differences).
Store files are serialized metadata about an analyzed assembly. The store file contains a list of types and members. These files are generally used for generating the difference between two versions of an assembly. In the following example, we will generate store files for the NUnit 2.2.4 release and the NUnit 2.2.7 release. LibCheck has a nonconfigurable output location that is relative to the location of the application. This is rather odd, but it’s how the tool works, so we have to live with it. This folder structure is used in the following examples:
C:\LibCheckExample
│─LibCheck

│            │─2.2.4
│            │─2.2.7
│─Nunit
                  │─2.2.4
                  │─2.2.7
The Nunit directory is the input directory, and the LibCheck directory contains the xcopied libcheck library and its dependencies. The LibCheck directory is where the application lives, so that will be the base directory for the output.
To generate the store files, run LibCheck.exe with the –store full switch, the output path for the store files, the –full switch, and the path to the assemblies that you would like to analyze.
The NUnit assemblies have been xcopied to directories under a common folder, C:\LibCheckExample. To start, create store files for NUnit 2.2.4 and write them into the C:\LibCheckExample\LibCheck\2.2.4 folder:
libcheck.exe –store full C:\LibCheckExample\Nunit\2.2.4 –full ^
C:\LibCheckExample\Nunit\2.2.4
Tip
The preceding command extends over more than one line. The Windows line continuation character ^ lets you wrap commands onto following lines. Subsequent examples will follow the same format where needed.
This command will generate the store files from the assemblies in the C:\LibCheckExample\Nunit\2.2.4 directory and output the store files to the C:\LibCheckExample\LibCheck\2.2.4 directory.
After the command has finished building the store files for the first folder of assemblies, you’ll need to generate store files for the assemblies to compare against.
The next command generates store files from the assemblies in the C:\LibCheckExample\Nunit\2.2.7 directory, outputting them to the C:\LibCheckExample\LibCheck\2.2.7 directory:
libcheck.exe –store full C:\LibCheckExample\Nunit\2.2.7 –full ^
C:\LibCheckExample\Nunit\2.2.7
After store files have been generated, the next step is to compare the two assembly versions and generate a report that highlights the differences between them.
To generate the churn report, run LibCheck.exe with the –compare switch and the paths to the two folders that were generated when the store files were created:
libcheck.exe –compare C:\LibCheckExample\Nunit\2.2.4 ^
C:\LibCheckExample\Nunit\2.2.7
After the command has completed, a directory containing the results of the comparison and the churn report will be created. The default location will be under the directory that contains the store directories, in a subdirectory named <folder1>to<folder2> (2.2.4to2.2.7 in our example). The generated directory will contain an .html file named APIChanges<folder1>to<folder2>.html (APIChanges2.2.4to2.2.7.html in our example).
The churn report provides a summary page for viewing the assembly name, members added, members removed, breaking changes, and churn percentage for each respective assembly (see Figure 4-7).
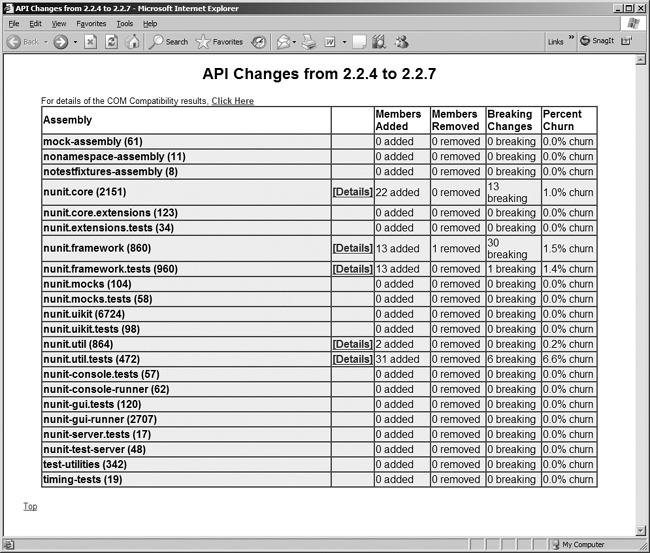
The summary page provides links to detailed reports for any assemblies that have had members added or removed. To view one of these reports, click the [Details] link in the column beside the assembly name.
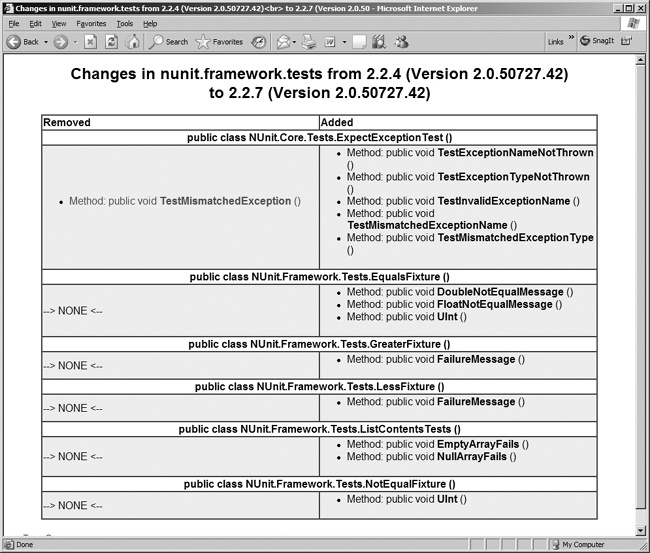
The detail page indicates the members that have been added and removed for each type. Color-coding is used to help differentiate the changes for each type in the assembly (see Figure 4-8).
LibCheck contains multiple options that allow you to alter its functionality through accompanying text files. Some of the supported modifications include designating the report header HTML, specifying files to ignore, and identifying assemblies to be loaded from the GAC instead of the specified directory. The LibCheck Tool Specification document outlines the use of the text files associated with the modifications and gives guidance on their usage.
In addition to the modifications possible through the text files, it is also possible to control the behavior of LibCheck through a variety of command-line parameters. For a complete list of command-line parameters and usage information, run libcheck.exe from the command line without any parameters, or refer to the tool-specification document.
LibCheck is a product of Microsoft’s Base Class Library team. For support, email them directly at bclpub@microsoft.com or visit their blog at http://blogs.msdn.com/bclteam/default.aspx.
Get Windows Developer Power Tools now with the O’Reilly learning platform.
O’Reilly members experience books, live events, courses curated by job role, and more from O’Reilly and nearly 200 top publishers.

