Saved Searches
Once you’ve performed an Explorer-window search, you may notice a little button on the Ribbon’s Search Tools/Search tab called “Save search.”
This button generates a saved search. Whenever you click it, you get an instantaneous update of the search you originally set up. (Behind the scenes, it’s a special document with the filename extension .search-ms.)
To create a saved search, open an Explorer window and perform a search. By all means, use the search filters described earlier for more exactitude.
Now, as you survey the search results, click “Save search” (Figure 7-4, top). You’re asked to name and save your search. Windows proposes stashing it in your Saved Searches folder (which is in your Personal folder), but you can expand the Save As box and choose any location you like—including the desktop.
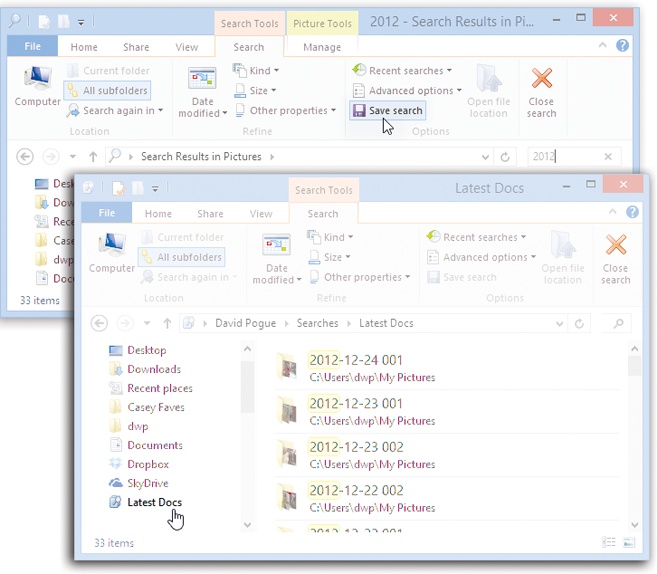
Figure 7-4. Windows can preserve your search as a saved search that does its duties instantly every time you click it. Top: First, do the search using the usual controls. Click “Save search,” shown here. Save the search folder wherever you like; give it a good name. Bottom: Your saved search is ready to use! Its icon (here called Latest Docs) appears in the Favorite Links list at the left side of every window.
Either way, you also wind up with an icon for your saved search. Unless you changed the location manually, it shows up as an icon in the Favorites section of the Navigation ...
Get Windows 8.1: The Missing Manual now with the O’Reilly learning platform.
O’Reilly members experience books, live events, courses curated by job role, and more from O’Reilly and nearly 200 top publishers.

