The Windows Store is meant to be the TileWorld Mall of America. That’s where you’ll find the real gems: thousands of apps that work great on tablets and touchscreens of every ilk. The basics are all there—Netflix, Skype, New York Times, Wikipedia, Evernote, Angry Birds, Fruit Ninja—and the catalog grows all the time.
In the meantime, though, Microsoft starts you out with about 20 TileWorld apps of its own. Here they are: miniature missing manuals for each one. (They’re listed here alphabetically, since their specific order on your screen might be different.)
This “app” is nothing more than a link to Bing.com, Microsoft’s version of Google. It’s a good starting place when you want to search the Web.
Tip
The background photo changes every day. If you tap or click, small highlighted squares appear. Select one to view a fun fact about that part of the photo.
When you tap or click in the search box, a set of Popular Now buttons appears. And at the bottom of the screen, you’ll see a handful of tappable phrases.
All these buttons and links represent what the rest of the world is searching for most today: “presidential election,” “Bieber marriage,” or whatever. That single row of words usually offers a fairly decent indication of what’s on the public’s mind today—and a quick way for you to catch up on very current events.
If you tap the More button (lower right), you wind up at Bing’s breaking-news page, filled with tappable headlines.
Anyway, you know the drill: Type a search phrase into the box
and then press Enter (or tap the ![]() button). In the TileWorld version of Bing, you
don’t get a long list of text results—you get, of course,
tiles of results (Figure 4-1).
button). In the TileWorld version of Bing, you
don’t get a long list of text results—you get, of course,
tiles of results (Figure 4-1).
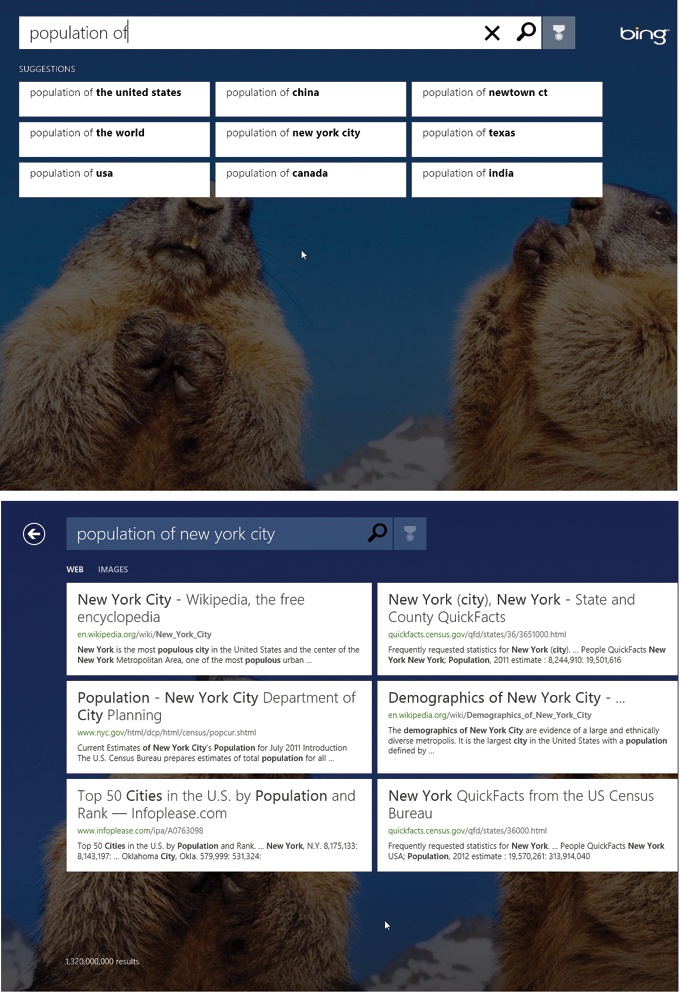
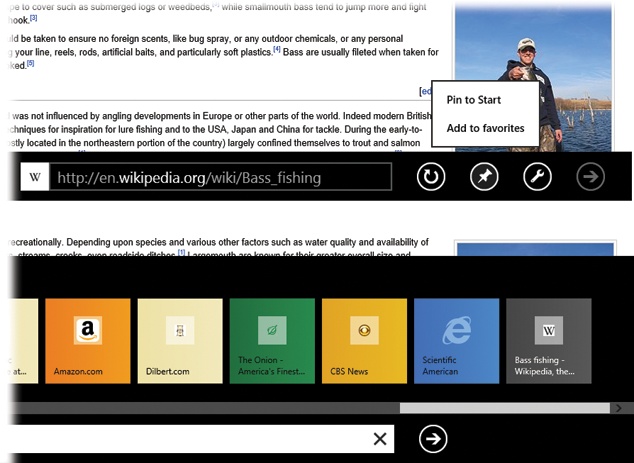
Figure 4-1. The Bing app is really just a link to Microsoft’s search page (top). The results, though, are presented as (what else?) a series of tappable tiles. Scroll horizontally to see more.
Tip
It’s a little bit annoying: You search with one app (Bing), but when you tap a search result, you’re sent into a different app (Internet Explorer).
But there’s a workaround. Pin the Bing.com (or Google.com) Web site to your Start screen. (Call up Bing.com; open the App bar; tap “Pin this site”; select “Pin to Start.”) From now on, use that pinned site instead of the Bing app, and you won’t experience the jarring handoff between apps.
Calendar is not so different from those “Hunks of the Midwest Police Stations” paper calendars that people leave hanging on the walls for months past their natural life span.
But Calendar offers several advantages over paper calendars. For example:
It can automate the process of entering repeating events, such as weekly staff meetings or gym workouts.
Calendar can give you a gentle nudge (with a sound and a message) when an important appointment is approaching.
Calendar can subscribe to online calendars from Google, Outlook, Hotmail, or even your company’s Exchange calendar, so you have all your life’s agendas in one place.
Note
There may already be stuff on your calendar the first time you open it—if, elsewhere in Windows, you’ve already entered account information for an online account. For example, if you’ve entered your Facebook details, all your friends’ birthdays appear in Calendar automatically. You can, of course, turn off one account or another; read on.
That said, you may find that Calendar is among the simplest, most bare-bones calendar programs ever written. At least it won’t overwhelm you.
When you open Calendar, you see something like Figure 4-2. On the App bar (Last Open Program), you can switch among these views:
Day looks exactly like a day-at-a-time desk calendar. On the left “page,” you get a simple list of appointments for today; on the right, tomorrow. Scroll up and down to see the rest of the day.
Week fills the main display area with seven columns, reflecting the current week.
Month shows the entire month that contains today’s date. Double-click a date number to open the Day view for that date.
If a Month-view square is too small to show everything you’ve got scheduled that day, you’ll see a notation at the top of the square like “5 events.” It’s letting you know that there may be more events than you can currently see. Switch to Day or Week view to see what they all are.
Tip
If you have a keyboard, you can also hit Ctrl+1, 2, and 3 for Day, Week, and Month views. And while you’re at it: Ctrl+N makes a new appointment.
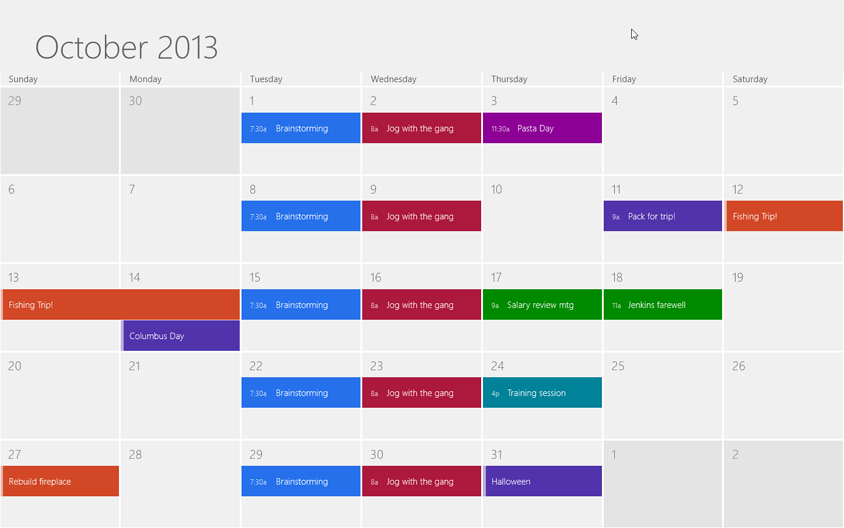
Figure 4-2. The Windows 8 calendar is very, very simple. In any of the views, just tap or click an appointment to open its information screen (Figure 4-3). If you want to make changes, well, here’s your chance.
Moving among the days, weeks, or months is easy and fun for the whole family:
You can jump back to today’s date in two steps. Open the App bar, and then hit Today. Or, if you have a keyboard, press Ctrl+T.
The basic calendar is easy to figure out. After all, with the exception of one unfortunate Gregorian incident, we’ve been using calendars successfully for centuries.
You can record a new appointment using the Details screen. It opens when any of these things happen:
You tap an empty spot on a day, week, or month square.
You open the App bar and select the New button.
You press Ctrl+N.
In any case, the Details screen now appears (Figure 4-3). Here’s where you can specify everything about the new appointment:
Account. At the upper-left corner of the screen, the account name you see here is actually a pop-up menu. Use it to specify which account or category gets this appointment: your Live.com account, Gmail, Exchange, or whatever.
Add a title. That’s the large type at the top right—the name of your appointment.
Figure 4-3. Here’s where you both create a new appointment and edit an old one. The bottom set of controls appears only when you tap “Show more.”
For example, you might type Fly to Phoenix.
Add a message. Here’s your chance to customize your calendar event. You can type or paste any text you like in the note area—driving directions, contact phone numbers, a call history, or whatever.
When. Separate pop-up boxes offer a choice of month, date/day of week, and year. You can scroll through these lists with your finger, scroll wheel, mouse, or Page Up/Page Down keys.
Start. Here you enter the starting time for the appointment.
How long. Your choices are 0 minutes, 30 minutes, 1 hour, 90 minutes, 2 hours, All day, or Custom.
An “All day” event, of course, refers to something that has no specific time of day associated with it: a holiday, a birthday, a book deadline. When you turn on this box, you see the name of the appointment jump to the top of the day/week/month square, in the area reserved for this kind of thing.
You’ll probably use the Custom option a lot. It makes a set of “End” controls appear. This is the only way to specify an appointment that (a) has a duration not listed, like “45 minutes” or “3 hours,” or (b) lasts more than a day, like a 3-day trip.
Where. This field makes a lot of sense; if you think about it, almost everyone needs to record where a meeting is to take place. You might type a reminder for yourself like My place, a specific address like 212 East 23, or some other helpful information, like a contact phone number or a flight number.
Calendar. This pop-up menu lets you specify which online account gets the new appointment.
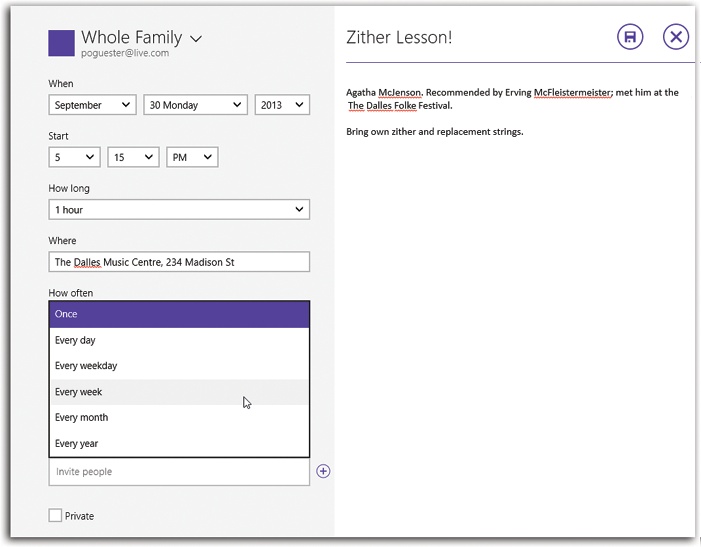
For each appointment, you can also hit “Show more” to expand the options. Now you can also indicate:
How often. The pop-up menu here contains common options for recurring events: every day, every week, and so on. It starts out saying Once.
Unfortunately, there’s no way to specify any more complicated repeating pattern, like “Tuesdays and Thursdays” or “First Monday of every month.” (If you’ve subscribed to an online calendar like Google, though, oddball repetitions you’ve set up there work just fine.)
Reminder. This pop-up menu tells Calendar when to notify you when a certain appointment is about to begin. You can specify how much advance notice you want for this particular appointment. If it’s a TV show, a reminder 5 minutes before airtime is probably fine. If it’s a birthday, you might set up a warning a week in advance, so there’s time to buy a present.
Status. This little item communicates to your colleagues when you might be available for meetings. The menu’s options are Free, Busy, Out of office, and so on.
You might think: “Well, duh—if I’ve got something on the calendar, then I’m obviously busy!” But not necessarily. Some Calendar entries might just be placeholders, reminders to self, TV shows you wanted to watch, appointments you’d be willing to change—not things that would necessarily render you unavailable if a better invitation should come along.
Who. If the appointment is a meeting or some other gathering, you can type the participants’ names here. If a name is already in your People app, Calendar proposes autocompleting the name for you. Or you can hit the
 button and choose from your People
list.
button and choose from your People
list.Once you’ve added a person’s name, you can add another, and then another. When you’re finished, tap the
 icon at the top-right corner of the
screen; your lucky recipients have just been invited by email.
Each message comes with an iCal.ics
attachment: a calendar-program invitation file. In many mail and
calendar programs, opening this attachment automatically
presents your invitation; the recipients can respond (by
choosing the Accept, Maybe, or Decline buttons that appear in
their calendar programs).
icon at the top-right corner of the
screen; your lucky recipients have just been invited by email.
Each message comes with an iCal.ics
attachment: a calendar-program invitation file. In many mail and
calendar programs, opening this attachment automatically
presents your invitation; the recipients can respond (by
choosing the Accept, Maybe, or Decline buttons that appear in
their calendar programs).
When you’re finished setting up the appointment, tap the Save
button (![]() ) at the top right (or press Ctrl+S). Your
newly scheduled event now shows up on your calendar, complete with
the color coding that corresponds to the calendar category you’ve
assigned.
) at the top right (or press Ctrl+S). Your
newly scheduled event now shows up on your calendar, complete with
the color coding that corresponds to the calendar category you’ve
assigned.
To edit an event, just tap it. You return to the screen shown in Figure 4-3, where you can make any changes you like.
Sometimes things change. In Calendar, alas, you can’t drag an appointment block to another time or date. You have to open its Details screen and change its scheduled time or date manually.
To delete an appointment, just select it to open it. (If you’re opening a recurring event, like a weekly meeting, Calendar asks whether you want to operate on only that particular instance of the event or on the whole series from that point forward.)
Then, on the Details screen, tap the Trash icon
(![]() ), or press Ctrl+D. (If other people have been
invited, then Calendar asks if you want to email them to let them
know about the change.)
), or press Ctrl+D. (If other people have been
invited, then Calendar asks if you want to email them to let them
know about the change.)
In most calendar programs, you can set up different categories, which are often called calendars. They can be anything you like. One person might have calendars called Home, Work, and TV Reminders. Another might have Me, Spouse ’n’ Me, and Whole Family. A small business could have categories called Deductible Travel, R&D, and R&R.
Alas, the TileWorld Calendar doesn’t let you create categories.
It does, however, let you subscribe to online calendars from Hotmail, Google, and Outlook (meaning Microsoft Exchange, Office 365, or Outlook.com). Or, rather, it lets you subscribe to one calendar from each account. If your Google Calendar has Home, Work, and Family categories, only one of them will show up in Calendar.
To subscribe to an account, see Figure 4-4.
When you create an appointment, you can use the Calendar pop-up menu to specify which account it belongs to, as shown in Figure 4-3.
Tip
You can choose a color for each account. To do that, open the Options panel shown in Figure 4-5.
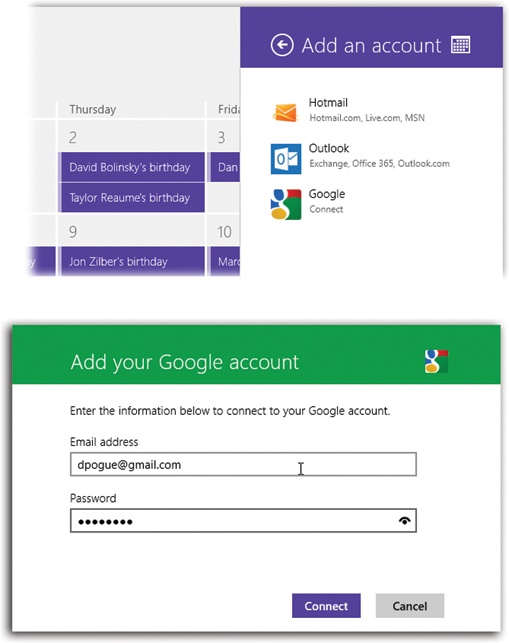
Figure 4-4. To add a Google, Hotmail, or Microsoft calendar account, open the Charms bar. Select Settings, then Accounts, then “Add an account” (top). Enter the name and password for the account (bottom); hit Connect. Each account’s events show up in a different color, for your confusion-reducing pleasure.
Once you’ve got a bunch of calendars (accounts) bubbling away in Calendar, each in its own color coding, you may feel a little overwhelmed—or at least crowded, since only a couple of them fit on each calendar square in Month view.
Fortunately, you can hide or show an entire category of appointments at once—a handy trick when you’re trying to wade through it all.
To do that, see Figure 4-5. When you’re finished tweaking, just tap anywhere on the calendar itself.
Almost every tablet and laptop these days has a camera—sometimes two (front and back). Even some desktop PCs have Webcams built in. Nobody is going to take professional portraits with these cameras, but they’re just fine for video chats and Facebook snaps. Camera (Figure 4-6) is the app you use for taking pictures and videos.
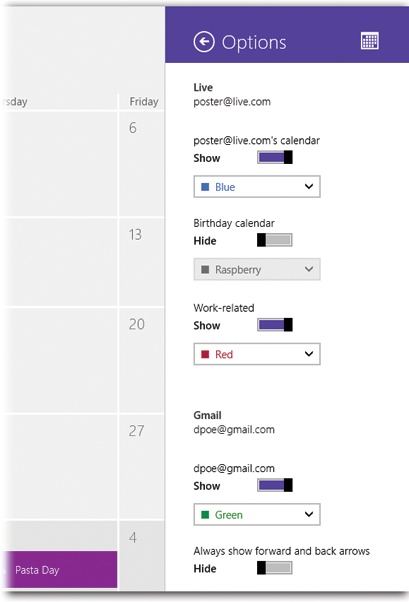
Figure 4-5. To hide a certain account, open the Charms bar. Tap Settings, then Options. You’ll see individual Hide switches for each account. Some, like your Microsoft account, even have sub-switches for things like birthdays and holidays.
Note
The first time you open this app, Microsoft’s privacy team has your back. “Can Camera use your webcam and microphone?” it asks. It’s just making sure that the camera isn’t opening on behalf of some nasty piece of spyware.
For many people, the biggest mystery of the Camera app is this: How do you take a picture? There’s no Take Picture button anywhere.
Sherlock says: Tap or click the screen. (If you’re in Video mode, tap or click the screen to start and stop recording.)
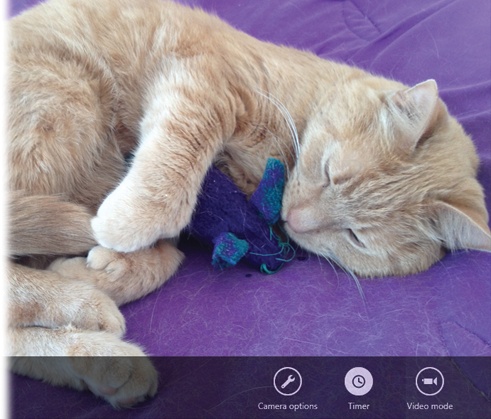
Figure 4-6. If you’re used to the three-inch screen on the back of a digital camera, discovering that your new preview screen is the entire size of your tablet or laptop comes as quite a shock. In essence, you’re seeing the finished photo before you even take it.
At the bottom of the screen, you see a few icons:
Change camera. This button appears only if your computer has cameras on both the front and the back—a common arrangement on tablets. (Back camera for photography, front camera for video chats, since it’s aimed at you.) Each time you tap this button, your view switches to the other camera.
Camera options. This opens a panel containing a few controls, which vary wildly from computer to computer. You may also see different controls in Camera mode and Video mode.
In camera mode: “Photo resolution” specifies the size and shape of the photo you’re about to take, in megapixels (represented here as “MP”). As you’re probably aware, higher resolution photos print better but take up more storage space and take more time to send. And remember: The resolution you need for a photo that will be displayed on a screen can be far lower than what you’d need to print.
Note
On most tablets, the front camera has a very low resolution, maxing out at maybe 1 megapixel. That’s because it’s intended for video chats—not for real photos that you intend to print out. The back camera usually has much higher resolution.
The ratio in parentheses here indicates the shape of the photo. “4:3” is roughly square; “16:9” is rectangular and wide, like an HDTV set.
In video mode: The “Video resolution” control adjusts—you guessed it—the resolution of the video that will be captured. (For reference, 240p is small and cruddy, suitable for attaching to an email; 480p is standard old TV resolution; 720p and higher are high-resolution, rectangular, very sharp videos that take up a lot of storage space.)
You might also see an on/off option here for video stabilization, on machines that offer it.
In both modes: “Audio device” lets you switch among your various microphones. Of course, you probably have only one.
The More link brings up sliders that adjust the video image. Which settings you have depend on your gadget, but Brightness, Contrast, Focus, and Exposure are commonly found here. (For Focus and Exposure, turn off Auto if you’d like to adjust the slider yourself.)
Timer. Yes, kids, your Windows 8 machine has a self-timer. It works in both photo and video modes. It’s great for getting a self-portrait or a self-video when you don’t want to be right at the machine.
When you tap this button, it turns white. Now tap the screen to begin the “3…2…1” countdown.
Video mode. When you tap this button, it turns white. Now, when you tap the screen, your camera starts recording video instead of snapping a photo. Tap again to stop recording.
Once you’ve captured your shot, it lands in a special album called the Camera Roll. (That’s to distinguish photos you took with the computer from photos you’ve rounded up from other sources.) Unfortunately, there’s no way to jump to the Camera Roll from within the Camera app. (You’d have to jump back to the Start screen, open Photos, open “Pictures library,” and open “Camera roll.”)
Fortunately, there’s a simpler way to review your latest shot: just swipe to the right with your finger.
Note
If you don’t have a touchscreen, a small left-pointing arrow button appears automatically at the left edge of the screen. Clicking it serves the same purpose as swiping.
Here, as you review your shot, the app offers the two buttons Microsoft thinks you’ll need most desperately: Delete and Crop. (If you hit the Crop button, you’re offered four corner controls that you can use to enclose the piece of the photo you deem worth keeping. Tap OK to finish the job.)
At any point, you can turn the camera back into a live viewfinder by swiping right to left.
This tile takes you to the Windows desktop world, the glorious
land of the taskbar, folders, and menus. Tap here (or press
![]() +D) whenever you want to work with disks,
folders, and files. And see Chapter 6 whenever you want to
know how to use the desktop.
+D) whenever you want to work with disks,
folders, and files. And see Chapter 6 whenever you want to
know how to use the desktop.
What “Finance” really means is “Financial News.” When you open it, you arrive at what looks like a glorious, beautifully designed financial magazine. Swipe horizontally to see stock-market graphs; tiles for the day’s winners and losers; article blurbs and headlines; videos; and stats for bonds, rates, currencies, and commodities (Figure 4-7).
Read this chapter’s writeup about the News app for a complete
understanding of how these apps work. But for now, don’t miss the App
bar, shown at top in Figure 4-7. (Swipe inward
from the top or bottom edge of the screen, right-click any blank spot,
or press ![]() +Z.) It offers tiles like these:
+Z.) It offers tiles like these:
Today. Brings you back to the opening collection of news and stats.
Watchlist. Your own portfolio (or just stocks you want to watch). Tap the
button to specify each company name, or
stock symbol, that you want this page to track.Market, Rates. Huge rows of financial tables representing today’s financial-market activity in every conceivable category, or today’s interest rates for various mortgages, bank accounts, and credit cards.
News, Videos. A direct link to the financial-news and videos sections of this “magazine.”
Best of Web. A display of tiles for Web sites Microsoft thinks you might like—or learn from—on topics like investing, spending, donating, or borrowing.

Figure 4-7. This book would have to be 32 feet wide to show you all the financial goodies that appear in this massively complete, horizontally scrolling financial app. You can tap or click just about anything to drill down for more information.
A ▾ button next to an App bar tile means, “Click or tap here to open a second row of buttons, providing quicker access to the categories within.”
This tile opens the Xbox Games app (Figure 4-8).
Now, try not to get confused. The word “Xbox” here has nothing to do with Microsoft’s Xbox game console. Your Windows 8 machine can’t play your Xbox games, although that would certainly be nice.
Instead, this app is a store for “Xbox Games on Windows,” which is Microsoft code for “TileWorld games.” Like all TileWorld apps, these games are available exclusively from the Windows Store—and you’re looking at it.
Note
Xbox and Windows 8 games aren’t completely separate. Some game companies offer both Xbox and Windows 8 versions—and they sometimes let you sync across machines. Maybe the weapons you’ve acquired on the console show up in the Windows 8 version of the game, or maybe you can resume your place on the Xbox after pausing on the Windows 8 machine. And your achievements, friends lists, avatars, leaderboards, and in-game rewards may show up on all your different machines, too. It’s all up to the game companies.
If you scroll to the left, you’ll find your own gamer profile (Gamertag): your name, score, and so on. Links here let you edit your avatar (onscreen cartoon representation), view your game achievements, view incoming friend requests, and so on.
That Achievements screen also shows your game accomplishments from other Microsoft gadgets—Xbox 360, Windows Phone, and so on—as well as Windows 8 games.
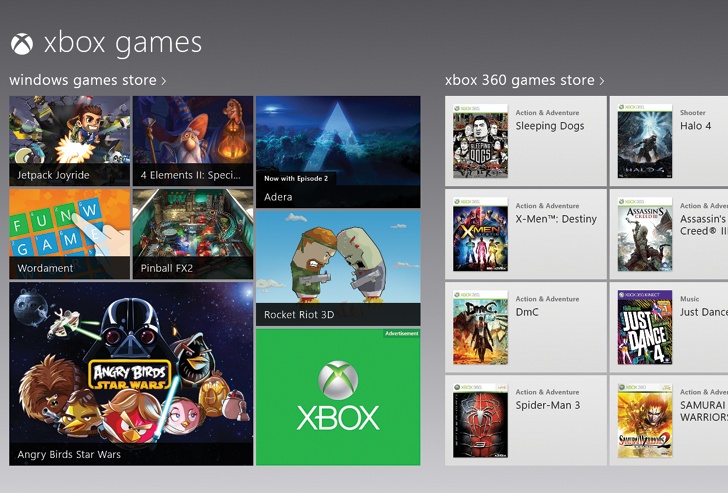
Figure 4-8. As you scroll horizontally to the right, you’ll find ads for new games; the tiles for games you’ve recently played (on your computer or Xbox); a link to the Games section of the Windows Store; and a link to the Games section of the Xbox Store.
All of them appear in one place.
If you choose the art or the Game Details button, you get a full-screen page for a particular game, where you can read (and buy) all about it.
Scroll far enough to the right, and you’ll find the Game Activity group of tiles. They represent all the games you’ve played on all Xbox Games machines. Select a tile to read all about it—and, if it’s a TileWorld game, play it.
Your copy of Windows 8 actually comes with two versions of Internet Explorer 10. There’s the TileWorld version, described here, and the desktop version, described in Chapter 15.
By now, you’re probably familiar with the concept of a Web browser. It’s the program you use to visit Web sites, of course. The TileWorld version of Microsoft’s browser, Internet Explorer (IE for short) has many of the features of a desktop Web browser: bookmarks, autocomplete (for Web addresses), scrolling shortcuts, cookies, a pop-up ad blocker, password memorization, and so on.
At the outset, though, the TileWorld IE doesn’t like to show anything except the Web, from edge to edge of your screen; it wants to dedicate as much screen space as possible to the Web’s glory. The following pages show you how to make those bells and whistles appear.
Note
You can’t designate a Home page (start page) in TileWorld IE. But if you set up a Home page in the desktop version, the TileWorld version will also open to that page.
Like any Web browser, this one offers several tools for navigating the Web: the address bar, bookmarks, and good old link tapping.
The address bar is the strip at the bottom of the screen where you enter the URL (Web address) for a page you want to visit. (URL is short for the even-less-self-explanatory uniform resource locator.) See Figure 4-9.
GEM IN THE ROUGH: Xbox SmartGlass
SmartGlass is an app that lets you control your Xbox with your phone or tablet. Impressively enough, this app is available not just for Windows phones, but also for iPhones, iPads, and Android phones and tablets.
It’s a touchscreen remote control, which is something every TV ought to have anyway. Using the touchscreen as a trackpad, you can navigate the features at the Xbox Dashboard or the Web, play and pause your Xbox movies, browse Web pages, and so on. (Drag your finger to move the cursor; tap to “click.” The B button in the corner of your phone or tablet means Back, just as on a real controller.)
And when you have to enter text—oh, wow. It’s a lot faster tapping letters on your touchscreen gadget than having to move the cursor around an onscreen letter grid on your TV.
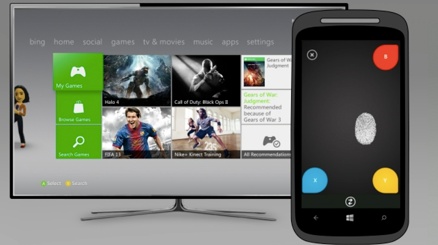
During music and video playback, the touchscreen offers playback controls. Some movies have been upgraded so that they supply the app with details about what you’re watching: cast and crew lists, for example, and scene-selection menus.
In some games, extra information appears on the touchscreen in your hands—a map of the game area, for example. In Halo 4, you can keep your game statistics on the phone or tablet as you play on the TV—if you can figure out how to hold your phone and the Xbox controller simultaneously.
If you have a keyboard, the most efficient way to open the address bar is to press Alt+D, just as in IE versions of old. The address bar appears with the current page’s address already typed in—and highlighted, meaning that you don’t have to delete it before typing. Just begin typing the new address.
Windows tries to save you typing and hunting with three automatic suggestion mechanisms:

Figure 4-9. Top: When you select the address bar, this scrolling band of tiles appears. It offers one-tap access to sites you’ve visited often, that you’ve pinned to your Start screen, or that you’ve designated as favorites. You can scroll horizontally through them in the usual ways: with your finger (touchscreen), with the mouse, or with the Page Up and Page Down keys. Bottom: As you type into the address bar, you see instead a batch of Web sites whose names match what you’re typing.
Frequent, Pinned, Favorites. When the address bar is highlighted, but before you’ve started to type, a batch of thumbnail icons appears just above it (Figure 4-9, bottom). These represent three labeled groups of sites: Frequent (sites you visit often), Pinned (sites whose icons you’ve installed on your Start screen, as described below), and Favorites (bookmarks).
Search suggestions. As you start typing into the address bar, the Frequent/Pinned/Favorites thumbnails get replaced by a batch of even tinier Web-site icons. They represent big-name Web sites that IE thinks you might want to visit, along with sites you’ve visited recently. As you continue to type, the suggestions change (Figure 4-9, top).
For example, when you type n into the address bar, you see options like nbcnews.com and Netflix.com. If you continue with a y, the choices now include nypost.com and nydailynews.com. Add a t, and you see sites like nytimes.com. At any point, of course, you can tap or click one to open it.
Autocomplete. As you type, you see, highlighted in blue, a proposed completion of the Web address you’re typing, right there in the address bar. This is the closest thing TileWorld offers to a History list. IE is autocompleting the same sorts of pages: frequently visited ones, pinned ones, and favorites.
If you see the address you’re trying to type, then by all
means hit Enter (or the ![]() button) instead of typing out the rest of the
URL. The time you save could be your own.
button) instead of typing out the rest of the
URL. The time you save could be your own.
Unless you’re reading sites like “A Complete History of Congress’s Brilliance and Efficiency,” most Web pages are taller than your screen. You’ll have to scroll down to read them.
As a result, scrolling is a constant activity.
Fortunately, TileWorld gives you about 11,339 different ways to do it.
Touchscreen: Swipe up the screen.
Trackpad: You can use the regular scroll gesture on your laptop—often, that’s dragging two fingers up or down on the trackpad.
UP TO SPEED: How Scroll Bars Work
These days, swiping with your finger, or tapping the space bar, are the most efficient ways to move down a Web page.
But if you’re a mouse addict, you can still operate the vertical scroll bar that appears at the right edge of the window when you move the mouse or touch the trackpad.
In case this whole scrollbar thing is new to you, here’s the drill: The scroll bar is a map of your entire document or page. In the middle, there’s a sliding darker rectangle; its height represents how much of the page you’re already seeing. For example, if the differently-colored handle is one-third the height or width of the whole screen, then you’re already seeing one third of the page.
You can drag the handle manually to move around the page. You can also click or tap in the scroll bar track on either side of the handle to make the window scroll by one screenful.
Mouse: Use the scroll bar that appears as soon as you move the mouse (see the box below). If your mouse has a scroll wheel, it works, too. (Hold Shift while you’re rolling the wheel to scroll horizontally.)
Keyboard: You can press your
 and
and  keys to scroll one line at a time. Page
Up and Page Down scroll in full-screen increments, while Home and End whisk
you to the top or bottom of the current Web page.
keys to scroll one line at a time. Page
Up and Page Down scroll in full-screen increments, while Home and End whisk
you to the top or bottom of the current Web page.But maybe the best way of all is to tap the space bar each time you want to see more. Press Shift+space to scroll up. (The space bar serves its traditional space-making function only when the insertion point is blinking in a text box or in the address bar.)
If you have a touchscreen, you’ll get hours of pleasure from the built-in techniques for magnifying a page:
Rotate the gadget. Turn the device 90 degrees in either direction. IE rotates and magnifies the image to fill the wider view.
Do the two-finger spread. Put two fingers on the glass and drag them apart. The Web page stretches before your very eyes, growing larger. Then you can pinch to shrink the page back down again. Great when the type is a little too small. (Most people do several spreads or several pinches in a row to achieve the degree of zoom they want.)
Magnify with a double-tap. You can also double-tap a particular spot on a Web page to magnify it by one level; double-tap again to return to the standard size.
Once you’ve zoomed out to the proper degree, you can then scroll around the page by dragging or flicking with a finger. You don’t have to worry about “clicking a link” by accident; if your finger is in motion, IE ignores the tapping action, even if you happen to land on a link.
Like any other self-respecting browser, TileWorld IE can keep multiple pages open at once, making it easy for you to switch among them. In browsers like the desktop IE, Firefox, Chrome, and Safari, these multiple windows can show up as tabs—like filing-folder tabs—at the top of the screen. In TileWorld, the same feature is at work, but the tabs are hidden.
Tip
One handy payoff of this arrangement is that you can start reading one Web page while the others load into their own tabs in the background.
The key to revealing them is to open the App bar. Remember that?
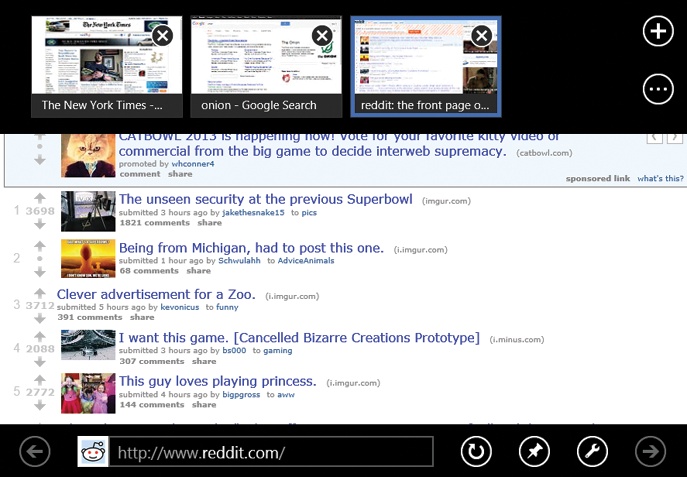
As you can see in Figure 4-10, in TileWorld, the tabs appear as (what else?) tiles.
To open a new tab, tap the
button in the upper right. The screen
goes blank. The address bar (accompanied by its row of
frequents, favorites, and so on) appears at the bottom of the
screen so that you can specify which Web
site you want to visit in the new window.Figure 4-10. This is TileWorld’s version of tabbed browsing. The thumbnails at the top of the screen represent all the Web pages you have open at the moment. Tap a tile to jump to that already-open window. Close a tab by tapping its —
 button.
GEM IN THE ROUGH: inPrivate Browsing
IE’s inPrivate browsing feature lets you surf without adding any pages to your History list, searches to your Bing search suggestions, passwords to IE’s saved password list, or autofill entries to IE’s memory. You might want to turn on inPrivate Browsing before you start visiting Web sites that would, you know, raise interesting questions with your spouse, parents, or boss.
The trick is to tap the
 button and then tap “New inPrivate
tab.” From this point on, Internet Explorer records nothing
while you surf.
button and then tap “New inPrivate
tab.” From this point on, Internet Explorer records nothing
while you surf.When you’re ready to browse “publicly” again, close the tab. IE again begins taking note of the pages you visit—but it never remembers the earlier ones.
In other words, what happens inPrivate Browsing stays inPrivate Browsing.
You can open a third window, and a fourth, and so on, and jump among them, using these techniques.
To close one tab, open the App bar. Tap the
button in the corner of the tile whose
tab you want to close. Or, if you have a keyboard, press
Ctrl+W.To close all tabs, tap the
button; from the shortcut menu, choose
“Close tabs.”
Tip
You might notice that IE for TileWorld is, ahem, somewhat more stripped down than the “real” IE. Not only is there no real History list, but there’s also no way to erase your History if you’ve been up to no good. Or is there?
There is. Open the Charms bar. Hit Settings, then Internet Options, then (under Delete Browsing History), Delete. You’ve just erased all the tracks you’ve left so far in your online travels: your history, saved passwords, temporary files, and cookies.
But that’s how you get rid of your tracks after you’ve left them. Next time, don’t leave any tracks to begin with, using inPrivate Browsing (see the box on the previous page).
Tap ![]() to interrupt the downloading of a Web page
you’ve just requested (if you’ve made a mistake, for instance, or if
it’s taking too long).
to interrupt the downloading of a Web page
you’ve just requested (if you’ve made a mistake, for instance, or if
it’s taking too long).
Once a page has finished loading, the ![]() button turns into a
button turns into a ![]() (Reload) button. Hit it if a page doesn’t
look or work quite right. IE re-downloads the Web page and
reinterprets its text and graphics.
(Reload) button. Hit it if a page doesn’t
look or work quite right. IE re-downloads the Web page and
reinterprets its text and graphics.
Surfing the Web, of course, is a sequence. Often, you start on one page, you tap a link to open a second one, and you tap a link there to move to a third one.
Fortunately, there are Back and Forward buttons and keystrokes in TileWorld IE. (“Back” means “revisit the page I was just on,” and “Forward” means “return to the page you were on before I went Back.”)
Touchscreen: Swipe from the left or right edge of the screen in toward the center (for Back and Forward).
Tip
Begin your swipe within the screen. If your finger starts from off the screen, as you know from Chapter 1, you’ll open the Charms bar or the app switcher.
Here’s a smart new IE feature that ought to be everywhere.
Often, an article you’re reading online is continued on another Web page; you’re supposed to select a Next Page button at the bottom of the screen. (And why divide a story up into “pages” in a medium that can scroll forever, like a computer screen? So that the publisher can sell different ads on each page.)
In Windows 8, a new feature called Flip Ahead saves you from having to hunt around for
the Next Page button. You just swipe, right to left—or click the
![]() button—and, magically, IE brings the next
page onto the screen. It uses crowdsourcing to figure out what link
you’re likely to want next; that is, it tracks what link was chosen
next by the thousands of people who came before you.
button—and, magically, IE brings the next
page onto the screen. It uses crowdsourcing to figure out what link
you’re likely to want next; that is, it tracks what link was chosen
next by the thousands of people who came before you.
So that you won’t be taken aback, Microsoft requires that you turn on the Flip Ahead feature, as shown in Figure 4-11.
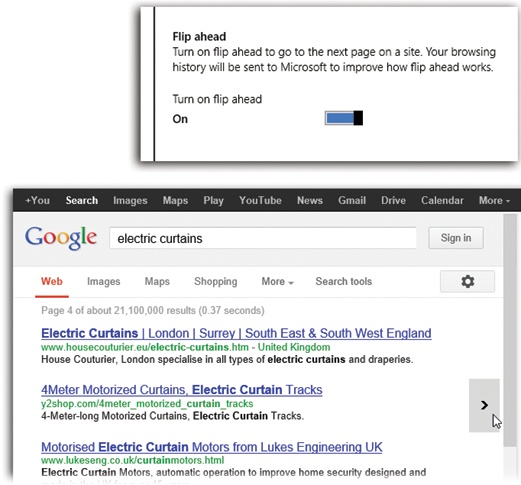
Figure 4-11. Top: To turn on Flip Ahead, open the Charms bar. Choose Internet Options, and then turn on “Flip ahead.” From now on, the Forward button (and swipe gesture) will be available anytime there’s an obvious next page. Bottom: You’ll know when IE is intelligently guessing what page you want next, because the “Next page” image appears briefly.
Now, Flip Ahead isn’t always available. (You’ll know if you
can use it, because the ![]() button is available even when you haven’t
backtracked from a page.) It’s almost always available when you’re
reading a multipage article. You can also use it when you’ve
performed a search (using Bing or Google, for example); it takes you
to the next page of search results.
button is available even when you haven’t
backtracked from a page.) It’s almost always available when you’re
reading a multipage article. You can also use it when you’ve
performed a search (using Bing or Google, for example); it takes you
to the next page of search results.
It doesn’t work when IE can’t possibly guess where you want to go next—for example, when you pull up the nytimes.com home page, filled with hundreds of article headlines.
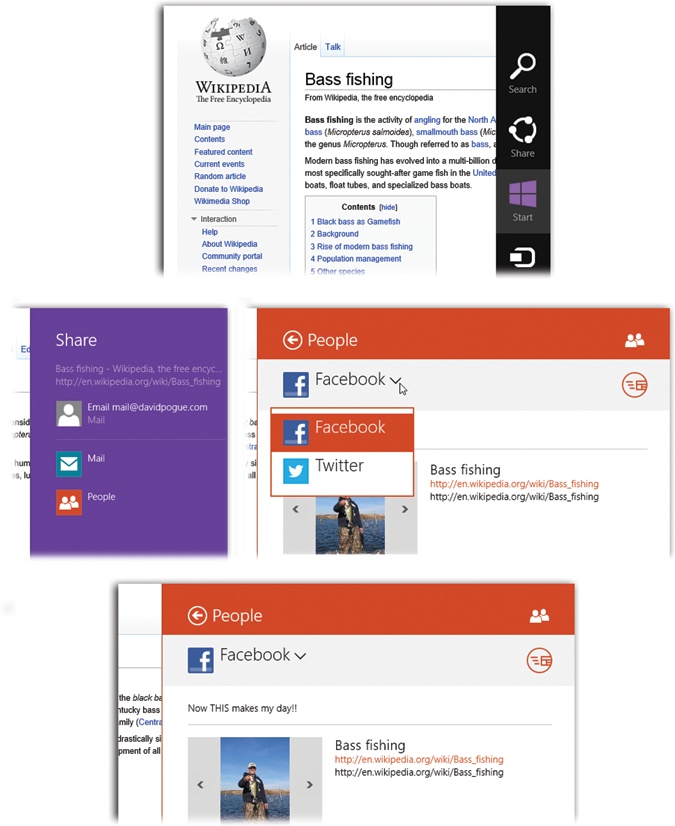
Figure 4-12. Wow—a fascinating site! Worth sharing on your Facebook
page, isn’t it? Top: Open the Charms bar. Tap Share. Middle
left: Tap People. Middle right: Using this pop-up menu, tap
Facebook. Bottom: Hit “Add a message” to type your own
remarks. When you tap the Send icon (![]() ), you’ve just posted your message on your
Facebook wall.
), you’ve just posted your message on your
Facebook wall.
When you’re on an especially useful page, you can pass it along to other interested parties.
The technique begins, of course, with a visit to the Share button. Open the Charms bar (Corners and Swipes); select Share.
Now you’re offered choices like these:
Mail. Windows prepares for you an outgoing email message containing a link to the page you’re sharing, and even a little preview of what’s on it. Your job is to address the message, add a little comment (“Hey, Mom—here is written proof that the Great Wall of China is not visible from the moon”), and then hit Send.
People. This link offers a new panel that lets you broadcast your discovery on your Facebook wall or Twitter feed; see Figure 4-12.
You may have other options on the Share panel, too, depending on what apps you’ve installed.
In TileWorld, there are three ways to identify Web sites you might want to visit again without having to remember and type their URLs. You can create traditional bookmarks (what Microsoft calls favorites); you can create a tile on the Start screen for a certain site; or you can rely on IE’s own memory to autocomplete an address you start typing. Here’s the drill.
Here’s how you create a favorite.
When you find a Web page you might like to visit again, open
the App bar (Last Open Program) and tap the Pin
button (![]() ). As you can see in Figure 4-13, “Add to
favorites” is one of the choices here. Select it.
). As you can see in Figure 4-13, “Add to
favorites” is one of the choices here. Select it.
The next time you highlight the address bar, you’ll see a new tile, all the way at the far-right end, that represents the favorite you just designated (Figure 4-12). It bears the name of the site—and, often, an icon of that site’s logo.
Here’s how you use favorites:
Open a favorite page by tapping or clicking its tile.
Open a favorite into a new tab by choosing “Open in new tab” from its shortcut menu. (To see the shortcut menu, hold your finger down on the tile for a couple of seconds. Or right-click the tile, if you have a mouse.)
Delete a favorite by choosing Remove from its shortcut menu.
Lower expectations for favorites. In TileWorld, you can’t rearrange your favorites, rename them, or put them into folders.
Note
The TileWorld and desktop versions of IE use the same favorites. If you add one in TileWorld, it will also show up in the desktop version, and vice versa.
But although you can rearrange, rename, and enfolder favorites in the desktop version, those changes don’t show up in TileWorld. Any bookmark you put into a favorites folder in the desktop version shows up in TileWorld as a “loose” icon, nestled among all the others.
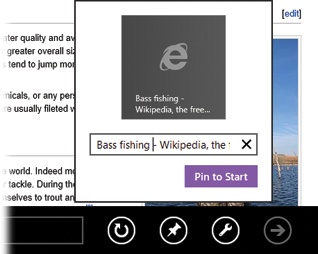
If you begin your day with a visit to a few very important sites, you might want to install their tiles on your Start screen. That way, you can jump directly to them without having to open IE first.
Open the page you want to pin. Open the App bar (Last Open Program) and choose Pin (![]() ). From the shortcut menu, choose Pin to
Start. Rename the tile if you like (Figure 4-14), and then
select Pin to Start.
). From the shortcut menu, choose Pin to
Start. Rename the tile if you like (Figure 4-14), and then
select Pin to Start.
Next time you check out your Start screen, you’ll see a tile for your newly pinned Web site. Like all new tiles, it appears at the far-right end of the screen, ready to open with a single tap or click. (See Chapter 2 for details on renaming, moving, and deleting Start screen tiles.)
Behind the scenes, all Web browsers keep track of the Web sites you’ve visited in the past week or so, usually organized into subfolders like Earlier Today and Yesterday. It’s a great feature when you can’t recall the address for a Web site you visited recently—or when you remember it had a long, complicated address.
In TileWorld, there’s no History list. There is, however, autocomplete based on your history. When you start typing into the address bar, the names and icons of recently visited sites appear just above what you’re typing, based on what you’ve typed so far. They represent your history—it’s just that you can’t see when you visited those sites, and if you don’t remember the name of a site, there’s no way to view a list of all your recent travels.
If you find a picture online that you wish you could keep forever, you have two choices. You could stare at it until you’ve memorized it, or you could save it.
To do that, just touch the image, or hold down the mouse button on it, for about a second. A shortcut menu appears, offering two options: Copy and “Save to picture library.”
If you choose Copy, then you nab that graphic and can now paste it into another program. If you choose “Save to picture library,” your computer thoughtfully deposits a copy of the image in your Pictures library (Adding a Folder to an Existing Library).
The Web is a big place. Heck, there are probably dozens of Web sites by now.
So it should come as no surprise that searching the Web is an important function of a Web browser. In TileWorld’s IE, the search box is exactly where it is in every other app: in the Charms bar.
To search, then, open the Charms bar (Corners and Swipes) and tap Search.
Type what you’re looking for into the search box. Enjoy the
suggestions IE proposes to save you typing time. And if you don’t
see what you’re looking for there, then tap the orange
![]() —or press Enter—to begin the search.
—or press Enter—to begin the search.
The main part of your screen, on the left, fills with Bing search results.
As you now know, Windows 8 includes two versions of Internet Explorer: the TileWorld version (address bar at the bottom) and the desktop version (address bar at the top). The TileWorld version is greatly simplified, with far fewer features and a design that favors touchscreens.
They’re not two completely different Web browsers, however. They’re connected in some sneaky ways:
Home page. The starting page you set in one browser also becomes your start page in the other, even if you specify a set of home-page tabs. (You can set up your startup page/pages only at the desktop, however, as described in Chapter 15.)
Favorites, frequent sites, history, and typed addresses. All of this is shared between the browsers, too. If you designate nytimes.com as a favorite in TileWorld, it shows up in the desktop IE as a favorite, too.
Tip
In fact, your favorites, frequent sites, history, and typed addresses are synced across all your Windows 8 computers—at least all the ones you sign into using your Microsoft account (Local Accounts vs. Microsoft Accounts). That’s pretty handy; sit down at any Windows 8 computer in the world, and boom—your Web bookmarks are there.
Choice of search page. Your choice of search site (Bing, Google, or Yahoo) is also shared between the two Internet Explorer faces. You must make this choice at the desktop, however, as described on Adding Google.
The two versions of the browser are also disconnected in some interesting ways:
History list. The TileWorld version of IE keeps track of Web sites you’ve visited—for the purpose of autocompleting what you type, for example, and determining what to put into your Frequent Sites list—but you can’t see a list of them.
RSS feeds. The desktop version of IE lets you subscribe to RSS feeds, which are like news streams published by Web sites that get updated frequently. There’s no way to see them in the TileWorld IE.
Flash and plug-ins. In TileWorld, you can’t install plug-ins into IE (you still can in the desktop version).
Unfortunately, that means that most Flash video Web sites don’t play in TileWorld. Microsoft permits Flash videos and animations to work only on a specified list of Web sites—big-name ones, usually—whose Flash behavior Microsoft has approved in advance. (Flash still works fine on all sites in the desktop version of IE, although you have to install it yourself at adobe.com.)
TileWorld comes with its own email program—called Mail. In fact, it’s the only email program that comes with Windows 8.
Mail is fairly stripped down. At least in its first version, it doesn’t offer a unified Inbox for multiple accounts, multiple windows, or any way to flag messages for later. If you want something fancier, you’ll have to download or buy it yourself. (Of course, then you’ll miss out on some of Mail’s nice integration with the rest of Windows 8.)
But it’s certainly easy to use, it’s beautiful, and especially if you have a touchscreen, it offers a fast, fluid way to work.
Before you read another syllable, you need to confront one big piece of what could be bad news: Mail requires an IMAP account. It doesn’t work with POP accounts, which means you may not be able to use Mail at all. Read on.
There are three kinds of email accounts:
Web-based mail. Some email accounts are designed to be accessed on a Web site, like the free accounts offered by Gmail, Hotmail, or Outlook.com.
IMAP accounts (Internet message access protocol) are the latest type, and they’re surging in popularity. IMAP servers keep all your mail online, rather than storing it solely on your computer; as a result, you can access the same mail from any computer (or phone), and you’ll always see the same lists of mail. IMAP servers remember which messages you’ve read and sent, and they even keep track of how you’ve filed messages into mail folders. (Those free Yahoo email accounts are IMAP accounts, and so are Apple’s iCloud accounts and corporate Exchange accounts. Gmail and Outlook.com accounts can be IMAP, too.)
Windows 8 Mail works fine with IMAP accounts.
Note
Gmail no longer works with Exchange accounts (you’d know if you had one). There is, however, a workaround that involves signing up for a free Outlook.com account. Instructions are here: http://j.mp/V8hF9s.)
POP accounts are the oldest, most compatible, and most common type on the Internet. (POP stands for Post Office Protocol, but this won’t be on the test.) The big difference: A POP server transfers incoming mail to your computer before you read it. Once it’s on your computer, it’s no longer on the Internet. (If you try to check your email on your phone, you won’t see whatever new messages were downloaded by your computer back at home since you last checked.)
Are you sitting down? Windows 8 Mail doesn’t work with POP accounts.
How do you know if yours is a POP account? You’ll have to ask the company that provides it to you. Internet providers like Time Warner and Comcast usually provide email addresses as POP accounts.
Now, if you do have a POP account and don’t want to ditch it, you have some options. You can use a different email program, of course, although what’s nice about Mail is that it’s integrated nicely into several Windows features (like notifications).
Some POP accounts can be converted into IMAP accounts, the type Windows 8 recognizes; ask your email provider. (There may be a fee.) And most Web-based email systems, like Gmail and Outlook.com, can also supply your mail as an IMAP account.
Finally, you can use a Web-based IMAP account (like Gmail or Outlook.com) as an intermediary that connects your POP account to Windows 8 Mail; see the sidebar box on the facing page for instructions.
All right, then. You’ve accepted that you can’t use Mail with a POP account unless you do some work-arounding. You’re ready to set up your IMAP or Exchange account. Here’s how to proceed:
Bring up the “Add an account” screen.
To get there, see Figure 4-15.
Specify the kind of account you want to add.
You’re supposed to choose Hotmail if you have a Hotmail, Live.com, or MSN email account; Outlook if you have an Exchange, Office 365, or Outlook.com account; Google if you have a Gmail account; Yahoo or AOL if you have one of those free accounts; or Other Account if you have any other kind of IMAP mail account.
Enter your email address and password.
That’s generally all Windows needs to set up your account for the big-name email services. (For Other Account, you also have to select “Show more details” and specify your IMAP server address, SSL settings, authentication settings, and ports. This is all information you can get from whatever company provides your email service.)
Hit Connect.
If your settings were all correct, you get teleported directly into that account’s Inbox, ready to start processing email.
If you’ve set up more than one account, their names appear in the lower-left corner of the screen so that you can jump among them. The big number at the right end of each account’s name tells you how many new messages are waiting in that account. If you open the Charms bar and visit Settings→Accounts, you’ll see its name appear, a testimony to your technological account-setting-up prowess.
Tip
If you have multiple email accounts, you can switch among them by tapping their buttons at the lower-left corner of the Mail screen. But you can also pin one account’s Inbox—or any other mail folder—to your Start screen, for instant access and step-saving. For example, if you have a folder called Stuff to Do, or a folder called Reply to These, you might want them pinned on your Start screen.
To make this happen, tap the folder you want to pin. Then
open the App bar (swipe up from the bottom of the screen, or press
![]() +Z), and choose Pin to Start. A pop-up panel
offers you the chance to change the folder’s name; do that, or
not, and then hit Pin to Start. You’ll find the pinned folder at
the far-right end of your Start screen (you may have to scroll a
bit).
+Z), and choose Pin to Start. A pop-up panel
offers you the chance to change the folder’s name; do that, or
not, and then hit Pin to Start. You’ll find the pinned folder at
the far-right end of your Start screen (you may have to scroll a
bit).
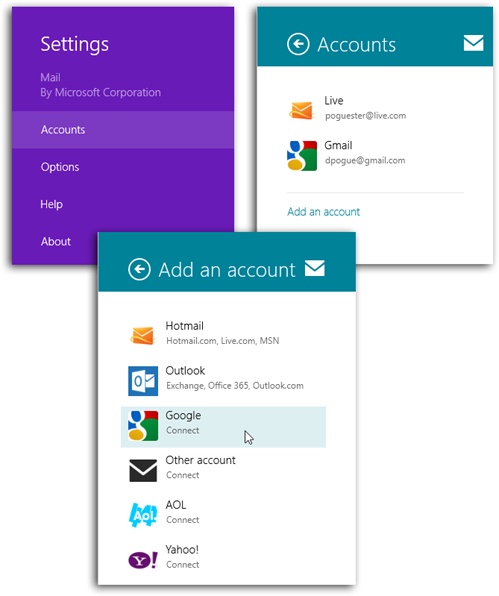
Figure 4-15. The first time you open Mail, a link to the panel shown at top right appears by itself. To call it up yourself, open the Charms bar, choose Settings (top left), choose Accounts, and choose “Add an account” (top right). The “Add an account” screen (bottom) offers a list of all the major Web-based and IMAP email services: Hotmail, Outlook, Google, AOL, Yahoo, and Other Account.
Each email account you set up offers some useful options that are worth a visit. To set up an account, follow the steps in Figure 4-16.
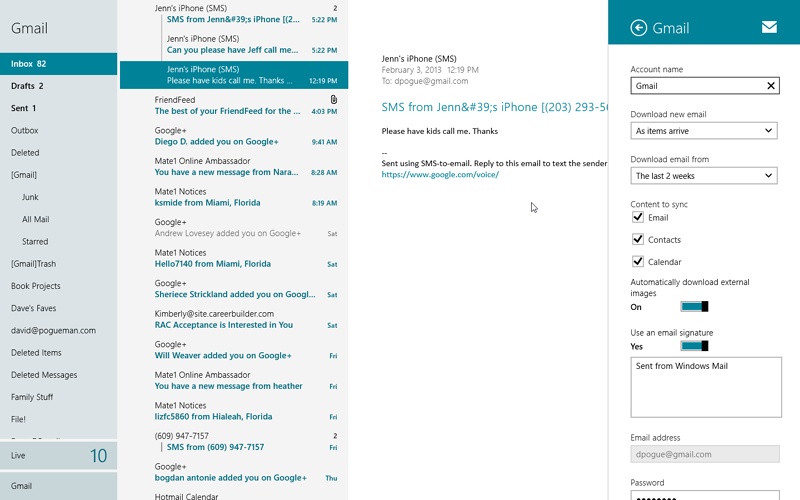
Figure 4-16. In the Charms bar, open Settings→Accounts (see Figure 4-15); select the email account you want to change. In this panel, you can edit the account in deliciously geeky ways.
Here are some of the options you find here:
Account name. It doesn’t have to say “Yahoo” or “Gmail” or whatever; you can change it to “Chris’s Work Mail,” “Robin’s Mail-O-Rama,” or whatever floats your boat.
Your name. Whatever name you type here is what will show up in other people’s Inboxes when you write to them.
Download new mail. How often do you want Mail to check for new messages? Usually, “As items arrive” is what you want. Some account types offer only “Every 15 minutes,” “Every 30 minutes,” and so on.
(If you choose Manual, Mail never checks unless you tap the Check Mail button.)
Content to sync. Some services, like Google and corporate Exchange servers, offer more than email; those account types also maintain online calendars and address books. Here, turn on the checkboxes of the data types you want your computer to display: Email, Contacts, and/or Calendar.
Automatically download external images. Spammers, the vile undercrust of low-life society, have a famous trick. When they send you email that includes a picture, they don’t actually paste the picture into the message. Instead, they include a “bug”—a piece of code that instructs your email program to fetch the missing graphic from the Internet. Why? Because that gives the spammer the ability to track who has actually opened the junk mail, making their email addresses much more valuable for reselling to other spammers.
That’s a long explanation for a simple feature: If you turn this option off, then Mail does not fetch “bug” image files at all. You’re not flagged as a sucker by the spammers. You’ll see empty squares in the email where the images ought to be. The actual pictures don’t appear until you manually select the “Download all images in this message” link.
Use an email signature. A signature is a bit of text that gets stamped at the bottom of your outgoing email messages. It can be your name, a postal address, or a pithy quote. Here’s where you enter the signature you want to use for outgoing messages from this account. (Also choose Yes for “Use an email signature,” of course.)
Email address, password. This information is here in case you want to change it.
Show email notifications for this account. As described on Notifications, Windows’ notifications are pieces of message “toast” that pop quietly into the upper-right corner of the screen to get your attention. Here’s where you specify whether or not messages from this account should trigger that kind of notification.
Remove account. Use this button if you decide to get rid of this email account.
If your email account offers “As they arrive” mail checking, as described above, then new messages show up on your computer as they arrive, around the clock.
If you have any other kind of account, or if you didn’t turn that option on, then Mail checks for new messages automatically on a schedule—every 15, 30, or 60 minutes. It also checks for new messages each time you open the Mail program.
Tip
You can also force Mail to check for new messages and send
waiting ones on command. Open the App bar (swipe up from the
bottom of the screen), and choose the Sync icon
(![]() ). Or, if you have a keyboard, press
F5.
). Or, if you have a keyboard, press
F5.
When new mail arrives, you’ll know it at a glance. Mail can notify you with a little alert box (Notifications), complete with a little chime, even when you’re working in another app. And, of course, the Mail tile on the Start screen updates itself to show you the latest messages (a rotating display of their senders/subjects/first lines). That tile also sprouts a bold number in the corner that tells you how many new messages are waiting.
The Mail screen has three columns, as shown in Figure 4-17. At the lower left: the names of your other accounts. (There’s no unified Inbox in Mail for the messages from multiple accounts.)
Tip
If you have a keyboard, you can hide or show the folder column by pressing Ctrl+Shift+F, or the Accounts pane by pressing Ctrl+Shift+A. Gets you a little extra reading space.
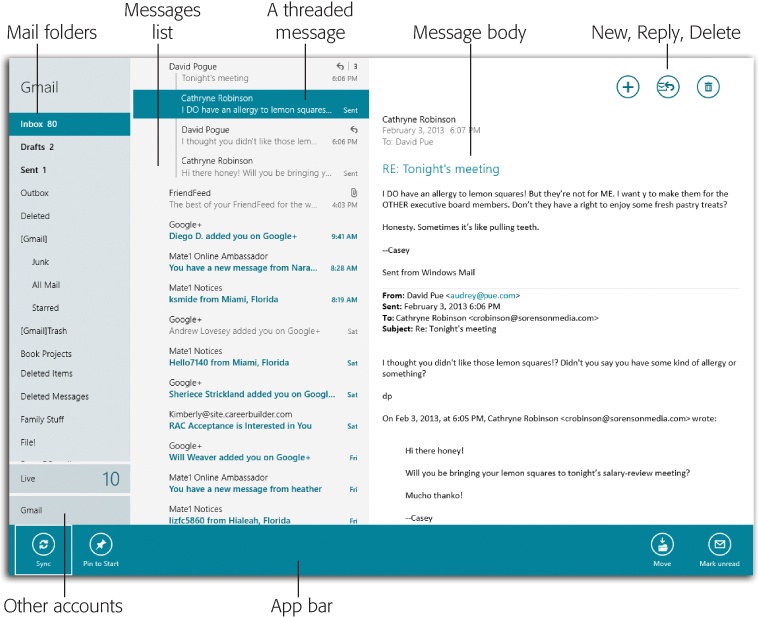
Figure 4-17. At far left, your mail folders like Inbox, Sent items, Deleted items, and any folders you’ve created yourself (Family, Little League, Old Stuff, whatever). In the middle, the list of messages inside whatever folder you’ve tapped. At right, the contents of that message.
To see all the new messages in the current account, tap Inbox; the new messages appear with bold subject lines.
Tip
Mail now offers message threading, in which back-and-forths on a particular subject appear clumped together in the list. It’s a feature you can turn off, if you find it confusing. (In the Charms bar, select Settings, then Options; there’s the “Group messages by conversation” on/off switch.
You can flick your finger to scroll the message list, if it’s long. Tap a message to read it in all its formatted glory.
Once you’ve read a message, you can respond to it, delete it, file it, and so on. Here’s the drill:
Read it. The type size in email messages can be pretty small. Fortunately, you have some great enlargement tricks at your disposal. For example, on a touchscreen, you can spread two fingers to enlarge the entire email message.
Next message. Once you’ve had a good look at a message and processed it to your satisfaction, you can move on to the next (or previous) message in the list. Touchscreen or mouse: Tap or click the message you want in the message list. Keyboard: Press the
or keys.Open an attachment. You’ll know when somebody has attached a file to a message you’ve received. A paper-clip icon (
 ) appears next to the message’s name in
the message list, and an icon for the attachment appears at the
top of the body.
) appears next to the message’s name in
the message list, and an icon for the attachment appears at the
top of the body.If a Download link appears under the icon, select it; Mail clearly hasn’t actually downloaded the file yet, and has only indicated its presence. (That’s a security feature—you should download files that you know are safe, so you won’t wind up infecting your computer with some nasty virus.)
Once that’s done, tapping the attachment icon offers three choices: Open (meaning “open with the usual app”); “Open with” (“open with a different program—I’ll choose”), and Save (“let me file this file somewhere on my computer”).
Reply to it. To answer a message, select the Reply/Forward icon (
 ) at the top of the message. Using the
shortcut menu, you can choose Reply. If the message was
originally addressed to multiple recipients, “Reply all” sends
your reply to everyone simultaneously.
) at the top of the message. Using the
shortcut menu, you can choose Reply. If the message was
originally addressed to multiple recipients, “Reply all” sends
your reply to everyone simultaneously.Tip
If you have a keyboard, you can save a couple of steps by pressing Ctrl+R for Reply, or Ctrl+Shift+R for Reply All.
A new message window opens, already addressed. As a courtesy to your correspondents, Mail places the original message at the bottom of the window. At this point, you can add or delete recipients, edit the subject line or the original message, and so on. When you’re finished, tap the Send icon (
 ) or press Ctrl+Enter.
Forward it. Instead of replying to the person who sent you a message, you may sometimes want to pass the note on to a third person. To do so, select the Reply/Forward icon (
) at the top of the message, and this
time, choose Forward in the shortcut menu. (Or just press
Ctrl+F.) A new message opens, looking a lot like the one that
appears when you reply; you’re expected to start by filling in
the To box. You may wish to precede the original message with a
comment of your own, like, “Frank: I thought you’d be interested
in this joke about your mom.”Delete it. Tap the Trash icon (
 ) at the top of the message. (There’s no
confirmation screen; on the other hand, you can recover the
message from the “Deleted items” folder if you change your
mind.)
) at the top of the message. (There’s no
confirmation screen; on the other hand, you can recover the
message from the “Deleted items” folder if you change your
mind.)File it. Some mail accounts let you create filing folders to help manage your messages. Once you’ve opened a message that’s worth keeping, you can move it into one of those folders.
To do that, open the App bar (swipe upward from the bottom edge of the screen, or right-click, or press
 +Z). See the Move icon? Tap or click it;
Mail dims everything on the screen except the folder list.
Choose the one you want.
+Z). See the Move icon? Tap or click it;
Mail dims everything on the screen except the folder list.
Choose the one you want.Mark as unread. In the Inbox, a bold subject line marks any message you haven’t yet read. Once you’ve opened the message, the boldness goes away. By opening the App bar and then choosing Mark as Unread (
 ), you make the boldface
reappear. It’s a great way to flag a
message for later, to call it to your own attention. The
boldface can mean not so much “unread” as “un–dealt
with.”
), you make the boldface
reappear. It’s a great way to flag a
message for later, to call it to your own attention. The
boldface can mean not so much “unread” as “un–dealt
with.”(This button changes to say “Mark as read” if you want to go the other way—to flag an unread message, or a bunch of them, as read; see below.)
You can also file or delete a bunch of messages at once. Here’s how to select them first, so that all remain highlighted:
Touchscreen: Swipe horizontally across each message in the message list.
Mouse: Right-click each message.
Keyboard: Walk down the list using the arrow keys; press Ctrl+Enter to add the checkmark to the currently highlighted message.

Each message turns dark and sprouts a checkmark to indicate that you’ve snagged it. You can tap as many messages as you like, scrolling as necessary. See Figure 4-18.
Praise be—there’s a search box in Mail. You get to it the way you get to Search in any app: by opening the Charms bar and choosing Search.
As you type into the search box, Mail hides all but the matching messages in the current mail folder; tap any one of the results to open it. (The title “Search results for:” appears above the message list so you don’t freak out and think that all your other messages are gone forever.)
Select any message in the list to read it.
When you’re finished, tap the X above the message list. Your full list is restored, and the Search adventure is complete.
To compose a new piece of outgoing mail, use the + button icon in the top-right corner. A blank new outgoing message appears (see Figure 4-19).
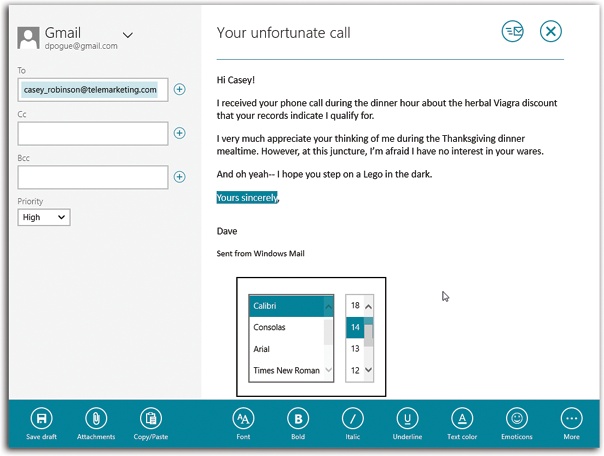
Figure 4-19. The controls you’d usually expect to find in an email
program—like bold, italic, and font controls—are lurking in the
App bar. Swipe up, or right-click, or press ![]() +Z, to see it. Here you’ve just selected the
Font button to get this pop-up control.
+Z, to see it. Here you’ve just selected the
Font button to get this pop-up control.
Here’s how you go about writing a message:
Change the email account you’re using, if you like.
If you have more than one email account, you can tap the
 next to the account name at the
upper-left to open up a list of your accounts. Tap the one you
want to use for sending this message.
next to the account name at the
upper-left to open up a list of your accounts. Tap the one you
want to use for sending this message.In the To field, type the recipient’s email address—or grab it from Contacts.
Often, you won’t have to type much more than the first couple of letters of the name or email address. As you type, Mail displays all matching names and addresses so you can choose one from the list instead of typing.
Alternatively, tap the
 button to open your People app; find the
person you want, either by scrolling or by using the Search
button in the Charms bar. Then hit the Add button (at the bottom
of the People screen).
button to open your People app; find the
person you want, either by scrolling or by using the Search
button in the Charms bar. Then hit the Add button (at the bottom
of the People screen).You can add as many addressees as you like; just repeat the procedure.
To send a copy to other recipients, enter the address(es) in the “Cc:” or “Bcc:” fields.
Cc stands for carbon copy. Getting an email message where your name is in the Cc line implies: “I sent you a copy because I thought you’d want to know about this correspondence, but I’m not expecting you to reply.”
If you choose “Show more,” the screen expands to reveal a new line beneath the “To:” line: “Bcc:”, which stands for blind carbon copy (you can see it in Figure 4-19). It’s a copy that goes to a third party secretly—the primary addressee never knows who else received it. For example, if you send your coworker a message that says, “Chris, it bothers me that you’ve been cheating the customers,” you could Bcc your supervisor to clue her in without getting into trouble with Chris.
Each of these lines behaves exactly like the “To:” line. You fill each one up with email addresses in the same way.
Tip
Also hiding in the “Show more” panel: a pop-up menu for Priority. It lets you specify how important your message is, on a three-tiered scale.
The good part about this system is that it lets your recipient see that an email you’ve sent is, for example, urgent. The bad part is that not every email program displays the priority of email—and even if your recipient’s email program does display your message’s priority, there’s no guarantee that it’ll make him respond any faster.
Type the topic of the message in the “Subject:” field.
It’s courteous to put some thought into the subject line. (Use “Change in plans for next week,” for instance, instead of “Yo.”) Leaving it blank only annoys your recipient. On the other hand, don’t put the entire message into the subject line, either.
Select “Add a message,” and then type your message in the message pane.
All the usual keyboard tricks apply (Chapter 3). Don’t forget that you can use Copy and Paste, within Mail or from other programs. Both text and graphics can appear in your message.
Attach a file, if you like.
Open the App bar (swipe up from the bottom edge of the screen, or right-click, or press
+Z). Choose the Attachments icon () to open the file chooser described on
The File Picker.Tap the file you want to send—or several (they all remain selected, with checkmarks)—and then choose Attach. You return to your message in progress, with the files neatly inserted as icons.
Format the text, if you like.
You can apply bold, italic, underlining, or colors to Mail text you’ve typed. You can change the typeface, add smileys, or insert numbered or bulleted lists.
The trick is to select the text first (With Your Finger). The App bar appears, with icons for Font, Bold, Italic, Underline, Text color, Emoticons, and More (which produces a shortcut menu offering “Bulleted list” and “Numbered list”). Some have an instantaneous effect on your text; the Font and Text color buttons open palettes that let you choose a font or a color.
(The Emoticons icon changes the entire left side of the screen into a huge gallery of smiley faces, hearts, facial features, heads, and other miniature graphics, ready for insertion into your message.)
To send the message, hit Send (
), or press
Ctrl+Enter. Or hit Cancel ( ) to back out of
it.If you tap
, Mail wants to know if you want to save
the unsent message—maybe because you want to finish it up later.
If you tap “Save draft,” then the message lands in your Drafts
folder. Later, you can open the Drafts folder, tap the aborted
message, finish it up, and send it.If you choose “Delete draft” instead, the message is either stuffed into the Deleted Items folder—or deleted forever, depending on the account type.
Windows never had a built-in Maps app before. But now that Windows is a tablet operating system, it’s more or less a must-have.
Maps (which is powered by Bing, which is powered by Nokia Maps, which is powered by NAVTEQ) lets you type in any address or point of interest in the United States or many other countries and see it plotted on a map, with turn-by-turn driving directions, just like a $300 windshield GPS unit. It also gives you a live national Yellow Pages business directory and real-time traffic-jam alerts, if you have an Internet connection. You have a choice of a street-map diagram or actual aerial photos, taken by satellite.
When you open the Maps app, you see—a map.
Note
You also see a question: Maps asks you if it’s allowed to use your current location, so that it can show you where you are on the map. The only reason to choose Block is if you think it’s creepy that Maps, and by extension Microsoft, knows where you are.
If Maps has an Internet connection and can figure out where you are, it displays a diamond to represent your current location. You can scroll in any direction. You can also zoom in or out, using any of the usual techniques (two-finger pinch or spread; turn the mouse’s scroll wheel while pressing Ctrl). You can also double-tap or double-click to zoom into a particular spot.
At any time, you can open the App bar to open a panel of options. You’ll be needing the App bar to make Maps perform its best stunts, so make sure you know how to open it:
So what’s on the App bar? These buttons:
Show Traffic. How’s this for a cool feature? Free, real-time traffic reporting—the same information you’d have to pay Sirius XM Satellite Radio $10 a month for. Just use the “Show traffic” button (
 ). Now color-coded lines appear on the
roadways, showing you the current traffic speed. Green for good
traffic flow, yellow for slower traffic, orange for even slower
traffic, and red for true traffic jams, for your stressing
pleasure.
). Now color-coded lines appear on the
roadways, showing you the current traffic speed. Green for good
traffic flow, yellow for slower traffic, orange for even slower
traffic, and red for true traffic jams, for your stressing
pleasure.If you don’t see any colored lines, it’s either because traffic is moving fine or because Microsoft doesn’t have any information for those roads. Usually, you get traffic info only for highways, and only in metropolitan areas.
Map Style. This icon (
 ) opens a shortcut menu with two options:
Road view and Aerial view. Road view, of course, is what most
maps look like: roads represented as lines. Aerial view,
however, superimposes the road lines and place names on top of
satellite photos of the real world. Zoom in far enough, and you
can find your house.
) opens a shortcut menu with two options:
Road view and Aerial view. Road view, of course, is what most
maps look like: roads represented as lines. Aerial view,
however, superimposes the road lines and place names on top of
satellite photos of the real world. Zoom in far enough, and you
can find your house.My Location. The My Location button (
 ) on the App bar makes the map scroll and
zoom until the “You are here” diamond is dead center on your
screen. That’s handy if you’ve scrolled or searched some other
part of the world.
) on the App bar makes the map scroll and
zoom until the “You are here” diamond is dead center on your
screen. That’s handy if you’ve scrolled or searched some other
part of the world.Directions. Yes, Maps’ best trick is getting you where you need to go. See below.
You’re not always interested in finding out where you are; often, you want to see where something else is.
To search Maps, open the Charms bar and select the Search button. Here’s what Maps can find for you:
An address. You can skip the periods (and usually the commas, too). And you can use abbreviations. Typing 710 w end ave nyc will find 710 West End Avenue, New York, New York. (In this and any of the other examples, you can type a Zip code instead of a city and a state.)
An intersection. Type 57th and lexington, ny ny. Maps will find the spot where East 57th Street crosses Lexington Avenue in New York City.
A city. Type chicago il to see that city. You can zoom in from there.
A Zip code or neighborhood. Type 10024 or greenwich village nyc.
A point of interest. Type washington monument or niagara falls.
When Maps finds a specific address, a black banner identifies the location by name.
You can use Maps as a glorified national Yellow Pages. If you type, for example, pharmacy 60609, blue numbered dots show you all the drugstores in that Chicago Zip code. It’s a great way to find a gas station, a cash machine, or a hospital in a pinch.
Select a dot to see the name of the corresponding business in the white, vertical “legend” at the left side of the screen.
Tip
You can tap or click either place. That is, you can tap a numbered circle to auto-scroll the info column to the corresponding description, or you can tap a description to auto-scroll the map to the corresponding numbered circle.
For most businesses and points of interest, a
![]() button appears within the black banner. You
can select the button to view, at the side of the screen, a full
dossier about that place (Figure 4-20).
button appears within the black banner. You
can select the button to view, at the side of the screen, a full
dossier about that place (Figure 4-20).
If you tap Directions (![]() ) in the App bar, you get
two search bars, labeled A and B. That’s right:
Microsoft is literally prepared to get you from
Point A to Point B.
) in the App bar, you get
two search bars, labeled A and B. That’s right:
Microsoft is literally prepared to get you from
Point A to Point B.
Plug in two addresses—the A address may already say “My
Location”—and then hit the ![]() button.
button.
Tip
The Swap button (![]() ) switches the A and B locations, which is
great when you want to find your way home again.
) switches the A and B locations, which is
great when you want to find your way home again.
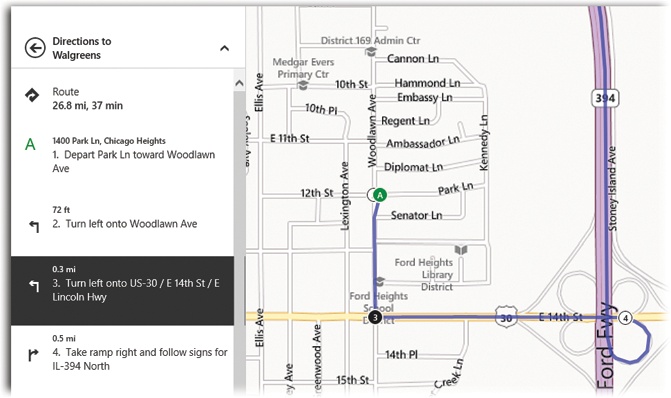
In just a moment, Maps displays an overview of the route you’re about to drive. The top of the screen lets you know the distance and the estimated time for that option and identifies the main roads you’ll be on.
Now, Maps is not really a GPS navigation app of the sort you’d find on a smartphone or a windshield unit. The map doesn’t actually know where you are as you drive. It doesn’t say anything (“Turn right in 500 feet” or whatever), and it doesn’t auto-scroll the map as you drive.
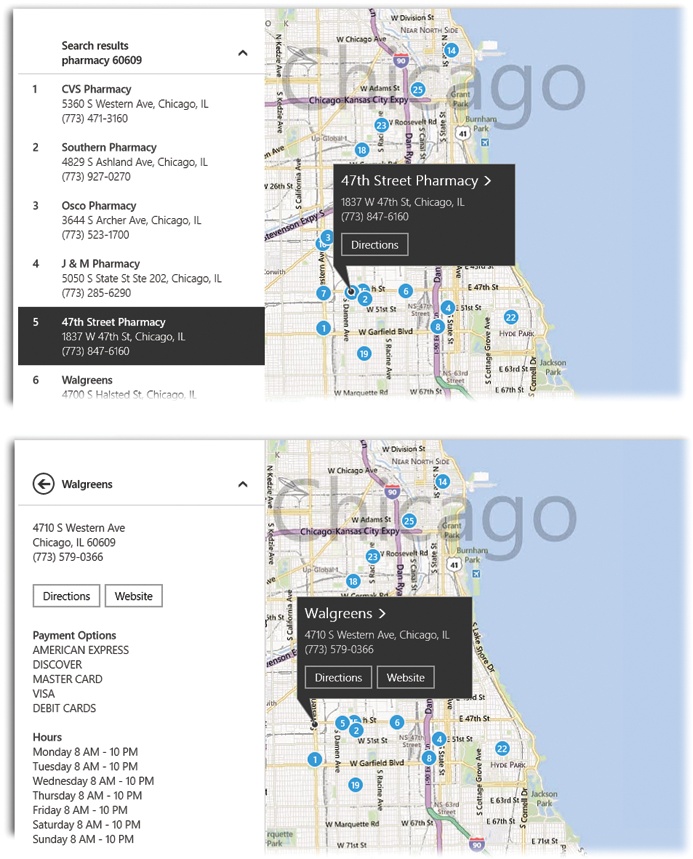
Figure 4-20. Top: When you search for something, Maps shows you all the results as blue dots, and as corresponding listings at left. Bottom: When you tap the > button on a search result, Maps turns into a full-blown Yellow Pages. It shows you the name, address, phone number, ratings, and other information about the business you’ve selected. Clearly labeled buttons take you to its Web site—or give you directions from your current location.
Instead, it’s more like MapQuest: It shows a written list of turn-by-turn instructions (in the scrolling list at left). And it’s more convenient than a paper map; it’s at least interactive (see Figure 4-21).
For your convenience, Windows 8 comes with a built-in chat program. With it, you can send typed messages to anyone on Facebook or Microsoft’s own Windows Live Messenger or Skype networks.
Tip
And what if your friends are on some other chat network—like AIM, GChat, ICQ, or Jabber? In that case, it’s time to visit the Windows Store and download the IM+ app. It’s free, and it works with Facebook and all of those other networks. Use it instead of Messaging.
Messaging doesn’t have its own buddy list or address book. Instead, it relies on the People app, Windows 8’s master contacts list. In other words, if there’s nobody in People, you won’t be able to start chatting.
To chat, select the ![]() button at the top left corner of the window.
Now you see the People Picker, which is a miniature version of the
People app described later in this chapter. At this point, it shows
you everyone in your People list with a Windows Messenger, Skype, or
Facebook account (Figure 4-22).
button at the top left corner of the window.
Now you see the People Picker, which is a miniature version of the
People app described later in this chapter. At this point, it shows
you everyone in your People list with a Windows Messenger, Skype, or
Facebook account (Figure 4-22).
Once you’ve specified your correspondent, type a message into the text box at bottom. Proceed as shown in Figure 4-23. (If that person isn’t online at the moment, he’ll get the message the next time he does log in.)
As you can see by the figure, it’s possible to keep conversations going with several people simultaneously; just tap the name of the person you want (and for goodness’ sake, don’t get confused about what you’re saying to whom). A colored dot next to somebody’s name indicates that a new message is waiting for you there.

Figure 4-22. The People Picker is a condensed version of your People app. You can scroll horizontally to find the person you want, or you can type the first letter of that person’s first name to jump to that spot in the list. Tap the person’s name to place a checkmark there, and then hit Choose.
In time, the theory goes, that list of names will give you quick access to people you text often. In other words, once you’ve had a chat with somebody once, you won’t have to go through the People Picker next time.
Hiding away on the App bar are three useful buttons:
Status. Tap this button to affect whether or not you are reachable. The shortcut menu offers two options: Available and Invisible. Usually, you’re Available—people can see that you’re online. But for some people, the juicier status option is Invisible. It’s like a Star Trek cloaking device for your onscreen presence. Great for stalkers!
Invite. Tap this button, and then tap “Add a new friend,” to invite one of your Facebook friends to sign up for a Messenger account, so you can start messaging.
Delete. Ordinarily, Windows preserves your witty repartee right there in Messaging. You can return a week later, a year later, and there’s the conversation you had today, ready to continue.
Delete means “Delete the selected chat I’ve had so far.” When you confirm your action by hitting the second Delete button, that transcript, and that person, disappear from the left side of the screen.
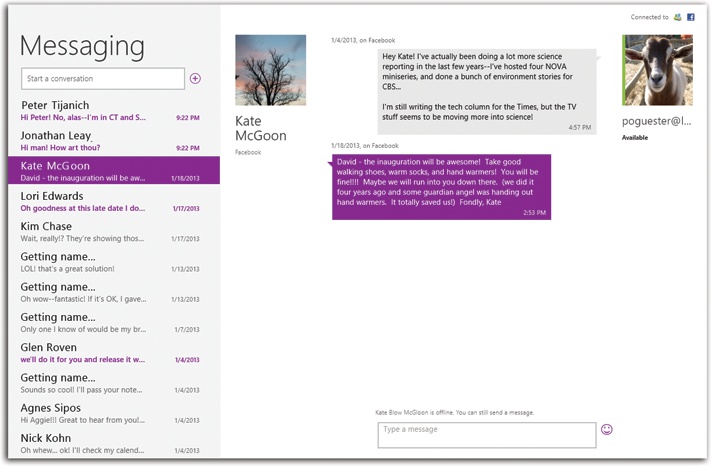
Hiding in Settings (open the Charms bar), you’ll find two useful Messaging morsels:
Accounts. Here’s where you can set up your Messenger and Facebook accounts.
Options. There’s only one option, actually: “Send/receive messages.” It’s the master on/off switch for your being online for chats. Turning this switch off is exactly the same as setting your status to Invisible, and turning it on is exactly the same as becoming Available.
Settings also contains a few not useful buttons, like a very sparse
option, About, Feedback, Permissions, and “Rate and review.”
Tip
Remember the feature that lets you park one app’s window side by side with another (Display Side-by-Side Apps)? It’s especially useful in Messaging. Chats lend themselves to living in a vertical strip down one-third of the screen while you do work in some other app.
It wouldn’t be a computer if it couldn’t play your tunes, right?
But this app is much more than a jukebox for songs you already own. It’s also the front end for one of Microsoft’s best-kept secrets: the Xbox Music service.
Tip
Don’t be thrown. When you open the app, you see that its official name is “xbox music,” and it lets you work with the Xbox Music service—but it has nothing at all to do with the Xbox game console. “Xbox” is simply the new word for “Microsoft.”
Within Microsoft’s collection of 30 million songs, Xbox Music combines elements of services like Pandora (it plays endless free music in a style you choose), Spotify (you can listen to any song or any album or any performer, on command, for free), and iTunes (you can buy songs to download). And it’s a Windows 8 exclusive; none of your Windows 7 friends can use it.
And it’s all free. (If you’ve signed in with your Microsoft account, that is.)
Note
OK, it’s free with occasional interruptions by audio/video ads. Music streaming is free and unlimited for your first six months; after that, you can listen free for 10 hours a month. If you’re willing to pay $10 a month (or $100 a year), you can get an Xbox Music Pass, which lets you (a) also listen on a Windows 8 phone and your Xbox 360 (provided you also have a Gold membership), (b) download songs for offline listening, (c) sync your playlists across multiple gadgets, and (d) eliminate the ads.
Figure 4-24. The complete list of your music. You can sort it by tapping
the criteria at left—albums, artists, songs, and so on. The
![]() icon marks a song that Microsoft sees you
own, and therefore it can offer its own online copy for playback on
any gadget; the WiFi icon means you’ve bookmarked a streaming song
that lives only in Microsoft’s collection online.
icon marks a song that Microsoft sees you
own, and therefore it can offer its own online copy for playback on
any gadget; the WiFi icon means you’ve bookmarked a streaming song
that lives only in Microsoft’s collection online.
Since the Music app is a combination music player/music store, things can get a little confusing. You open it up—and you’re looking at a store. Not your own music collection.
You can fix that. Scroll to the left, so that the “my music >” tiles appear. Even then, Music shows you the tiles for only a few of your songs, playlists, or albums. You can tap the “my music >” heading to see the complete list (Figure 4-24), including playlists and Smart DJs (described below).
(If there’s no music on your computer, you’ll know right away; the message “It’s lonely here” is trying to tell you there are no music files in your Music folder. (If you have none to put there, of course, Microsoft would love for you to go buy some; choose “Find music at the Xbox Music Store.”)
The Music app shows only songs that are actually in your Music library—no other drives or other folders are eligible (unless, of course, you’ve added them to your Music library).
Tip
You can set things up so that your master list of music (Figure 4-20) appears automatically when you open the Music app, saving you the swipe out of the music store. To do that, open the Charms bar. In Settings, choose Preferences and turn on “Startup view.” Now opening the app presents you with a list of your tunes.
Tap a song or album name to open its info screen, which displays the album art, song titles, a “Play album” button, “Explore artist” (bio and photo of the performer), “Play Smart DJ” (“play more songs like this one”), and, if you begin playback, an “Add to now playing” button (Figure 4-25).
UP TO SPEED: The App Bar in the Music App

In most TileWorld apps, the App bar contains useful options. In Music, it contains essential options.
As always, you make it appear by swiping into the screen
from the top or bottom, or by right-clicking, or by pressing
![]() +Z.
+Z.
The bar offers information and cover art for the currently selected song or album, plus Previous, Pause, and Next buttons. The “Playback options” button offers on/off switches for Repeat and Shuffle play, which makes more sense for an album or a playlist than it does for an individual song.
You may also see buttons that let you buy a song or an album, delete one from your “my music” collection, or add one to a playlist. Sometimes there’s a Properties button that reveals basic details of the selected song (album, year, length, record company).
But “my music” is only the first stop in Music. Back out of the song
list using the ![]() button at top left; you return to the main
Music screen.
button at top left; you return to the main
Music screen.
If you scroll this full-screen app far enough to the right, you’ll discover the rest of the headings.
If, indeed, you’ve selected a song or album to play, its album-cover art shows up here (Figure 4-26). Surrounding this major tile, you get options like these:
Play an artist. Microsoft isn’t kidding; you can immediately start listening to any band or singer, right now, for free. When you choose this tile, you get a pop-up box that lists many popular groups—and offers a search box at the top. Here, you can type in whatever you like: coldplay, electric light orchestra, london philharmonic, whatever. When you then hit the
 button, boom: You’re listening to free
streaming music by that performer. You’re welcome.
button, boom: You’re listening to free
streaming music by that performer. You’re welcome.New Smart DJ. This is Microsoft’s version of Pandora. When you select this tile, you’re asked to enter the name of a band or a singer you like. When you then hit the
 button, Music instantly starts playing
songs by that artist and songs that sound
similar. It’s a great way to discover new favorites
based on what you know you like, and also a great way to keep
the mood going when you find a style you like.
button, Music instantly starts playing
songs by that artist and songs that sound
similar. It’s a great way to discover new favorites
based on what you know you like, and also a great way to keep
the mood going when you find a style you like.When you create a Smart DJ, its tile gets added to your “my music” tiles (and to your main “my music” screen shown in Figure 4-24) so that you’ll be able to recall it instantly.
If you open the App bar, you get some controls for your Smart DJ. The Pause button does what it says. Hit Previous to hear the same song again. Use the Next button if the Smart DJ plays a song you don’t like; it skips to the next song.
Play a playlist. See Playlists, below.
[Performer tiles]. The right side of the “now playing” block offers three tiles for singers Microsoft thinks you might like. Tap one to start listening. And why not? It’s all free.
Scroll even farther to the right in Music, and you arrive at the “all music” block of tiles. You’ve scrolled further into Storeland here; these are ads for various bands Microsoft hopes you’ll try. The “top music” section, even farther to the right, reveals tiles for what’s popular right now.
If you tap the title “all music >” above the tiles, you go down a rabbit hole into Microsoft’s huge, huge catalog of music. Using the list of genres in the list at left, you’ll find classical music, stand-up comedy recordings, children’s albums, movie soundtracks, and more.
Note
As you burrow into Microsoft’s music store, you’ll eventually notice that not all songs, albums, and bands have given Xbox Music the same permissions. Sometimes, you’ll be able to see a song but not play it. Other times, you can play a song but not add it to a playlist. You take your chances, and you’re grateful for what it gives you.
Don’t forget that the old standby, the Search command, is
hiding in the Charms bar, ready to pluck some musical needle out of
Microsoft’s enormous haystack. (Press ![]() +Q if you have a keyboard.)
+Q if you have a keyboard.)
Type in the name of a song, an album, or a musician. Just
beneath the search box, the app offers some common suggestions to
save you typing. When you hit Enter or tap the ![]() icon, the main screen shows the search
results. You can choose “artists,” “albums,” “songs,” or “all
results” to filter out the findings.
icon, the main screen shows the search
results. You can choose “artists,” “albums,” “songs,” or “all
results” to filter out the findings.
It’s all available to play right now, on demand, for free.
Tip
You can’t shrink Music down to a tiny miniplayer, as you can most Windows music apps. But you can split the screen so that it huddles in a vertical strip while you do other work; see Display Side-by-Side Apps.
Sometimes it’s handy that Microsoft is a billion-dollar corporate giant; it can tackle large-scale projects like the Artist screen.
You can see it in Figure 4-27. It’s a full-screen display—actually, it’s even wider than a full screen (you have to scroll)—of information about a singer or band. You get a photo slideshow, a biography, and a list of albums. Just about everything is tappable.
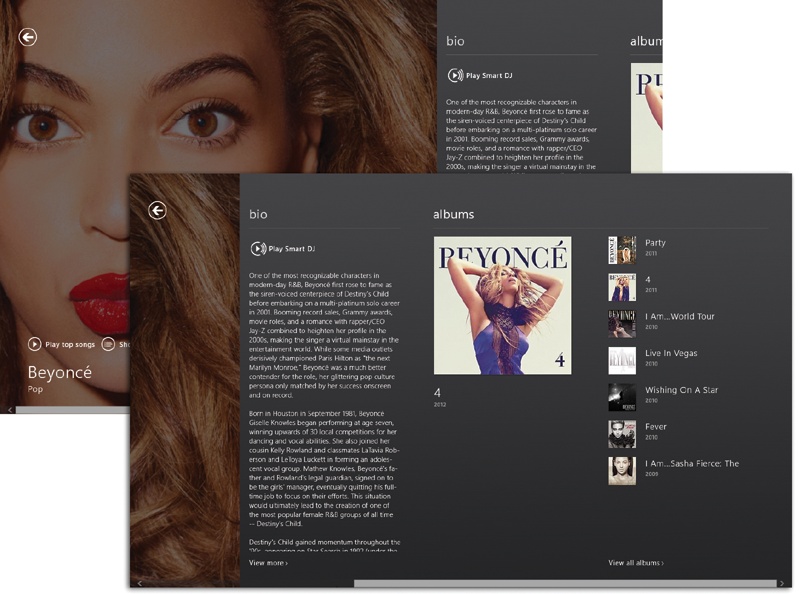
Figure 4-27. The Artist screen scrolls horizontally to reveal more information about this performer and related albums. The Play Smart DJ instantly starts playing songs by this artist, and songs that sound similar. “Play top songs” and “Show song list” do just what they say. It’s a complete database/jukebox, yours free.
To get to the Artist screen, select an album cover anywhere it appears, and then choose “Explore artist.”
The Artist screen also appears when you tap the words “now playing >” above the tiles.
A playlist is a group of songs you’ve placed together, in a sequence that makes sense to you. One might consist of party tunes; another might hold romantic dinnertime music; a third might be drum-heavy workout cuts.
Tip
If all you want to do is create a lineup of songs you want to hear right now, in a queue (list), you don’t have to muck with playlists. The Music app always maintains a temporary lineup of upcoming songs, called “now playing.” You can add a song to it wherever you see the “Add to now playing” button.
One easy place to find it: on the App bar (swipe up from the
bottom of the screen, or press ![]() +Z). Or add a song to “my music” first. That
is, you’ll see a button called “Add to my music”; after you tap
it, the same button changes to say “Add to now playing.”
+Z). Or add a song to “my music” first. That
is, you’ll see a button called “Add to my music”; after you tap
it, the same button changes to say “Add to now playing.”
To see the “now playing” list, choose the “now playing >” heading, and then select “Show song list” in the lower-left corner. You can’t make changes to it, but you can skip through it using the buttons on the App bar.
To create a new playlist, start by selecting (clicking or tapping) an album or a song; you can add either one to a playlist.
Now open the App bar. Tap “Add to playlist.” If this is the first time you’ve ever fooled around with playlists, a shortcut menu appears, offering only one command: “Create new playlist.” Choose it, type a name for the playlist (“Rockout Toonz,” “Makeout Music,” whatever), and hit Save.
The next time you open the App bar, you’ll see that the “Add to playlist” button has been joined by another button, labeled “Rockout Toonz” (or whatever you called your latest list). Now you can breeze through your music collection, or Microsoft’s online version, and add more songs and albums to that new playlist just by tapping that new button in the App bar.
GEM IN THE ROUGH: Universal Playback Controls
You can start music playing and then dive into other apps or programs; the music continues to play. You know—background music for your work session.
But what if you have to take a phone call or speak sternly to a child? Do you have to muddle all the way back to the Music app to pause playback?

Don’t be silly. Just tap one of your keyboard’s volume keys. Up pops this handy audio palette, containing Previous Song, Next Song, Pause, and volume controls. The album cover appears here, too—a very nice touch.
To create a second playlist, repeat these steps. But this time, when you hit “Add to playlist” in the App bar, you see the “Create new playlist” command and the names of all your existing playlists (Figure 4-28). In other words, that one button lets you add songs or albums to any playlist you’ve created so far.
The App bar may offer quick access to playlist creation buttons, but the real playlist hub is hiding in the “my music” area. If you tap the “my music >” heading, you’ll see the “playlists” heading (Figure 4-28, top). It reveals a list of all your playlists.

Figure 4-28. Top: This is Grand Central Playlist. Tap a playlist’s
name to see what songs are inside and how much time they’ll take
to play (bottom). Tap a song’s name to reveal the “Play” and
“Remove from playlist” buttons. You can also tap the little
![]() and
and ![]() buttons to slide the selected song up or
down within the playlist.
buttons to slide the selected song up or
down within the playlist.
To delete a selected playlist, open the App bar and use the Delete button. The Rename button is hiding in there, too.
In the Charms bar, the Settings icon opens a panel of useful options:
Account. Here’s where you can sign up for a paid Xbox Music account or change the settings for it (and your regular Xbox account, if you have one). The buttons here let you redeem free-music codes, change your credit-card information, add or remove new Windows phones/tablets/computers on your account, and so on.
Preferences. These on/off switches control a few miscellaneous Music options. “When the app opens, show my music” means that you’ll see your “my music” view when you open Music, instead of the music store. “Ask me to sign in” is good protection if young music lovers might buy music without your awareness.
“Xbox Music Cloud” stores your own, purchased music files online so that you can listen to them from any Windows device with an Xbox Music connection. If you do that, you’ll probably also want “When I add songs to my music on other devices, download them here too”; it ensures that buying a song or an album on one Windows device sends it to the Music app on all of them.
Finally, there’s no good reason to turn off “Automatically retrieve and update album art and metadata.” This handy feature is responsible for the art and information that appears for each song, album, or musician in your collection.

Figure 4-29. Microsoft doesn’t actually write these articles; it just
grabs them from other news sources, like The New York Times,
Reuters, and The Associated Press. Tap or click any story to read
it; tap the Back arrow (![]() ) to return to the opening “table of
contents” spread.
) to return to the opening “table of
contents” spread.
Tip
Like many of Microsoft’s TileWorld apps, Music is intended to be bare bones and simple. It offers the basic functions and no more; for example, it doesn’t let you rip your audio CDs to your computer, edit song information, or create “smart playlists.”
If you’d prefer something a little fuller fledged, don’t forget that Windows Media Player is waiting for you back at the Windows desktop. Or you could download a nicer, more complete free program like MusicBee. It’s available from this book’s “Missing CD” page at www.missingmanuals.com. (Both of these two alternatives are for the full Windows, not Windows RT, alas.)
The News app (technically called Bing News) is one of several free, daily, full-screen magazines that come preinstalled in TileWorld. (Sports, Finance, and Travel are the others.)
This is a fantastic feature. At its core, Bing is simply grabbing articles from over 300 different big-name news Web sites: The New York Times, The Wall Street Journal, The New Yorker, CNN, Huffington Post, and so on.
But it reformats everything into one uniform, attractive, screen-friendly layout (Figure 4-29). No hard-to-read color schemes or ugly fonts. No blinking ads, banners, or obnoxious animations. If the 300 publications presented here pique your interest at all, the News app is, for sure, the way to read them.
They all work essentially alike. You open the app (Internet connection required). You see a huge cover photo. Tap or click it to read the associated article.
Or scroll horizontally to see headlines and teaser blurbs for other articles.
As it turns out, News is more like a newspaper than you might think. It actually has sections, like a real newspaper.
If you swipe down from the top (or right-click, or press
![]() +Z), a bunch of tile buttons appear (Figure 4-30).
+Z), a bunch of tile buttons appear (Figure 4-30).
Bing Daily. Select this button to return to the opening spread.
See the ▾ button hugging the Bing Daily tile? It opens a second row of tiles, bearing the names of the “sections” of your “magazine”: U.S., World, Technology, Politics, Business, Entertainment, and Sports. Each button takes you directly to a similar spread of photos, headlines, and blurbs just for that section.
My News. It turns out that your Bing magazine is customizable. You can ask it to bring you stories about your favorite actor, your favorite toothpaste, or even you.
When you select My News, you see a new spread, showing only articles on subjects you’ve asked for. At the outset, of course, there’s nothing here at all except some Microsoft news, put there to give you the idea.
But if you use the “Add a section” button, you get to type in any topic you like. Justin Bieber. Electric cars. Seedless watermelon. Whatever you might like your customized newspaper to show you.
The instant you then hit the Add button, a new section of news blurbs appears automatically, shoving Microsoft (or whatever other topics you’ve got in there) off to the right. You can add as many new topics as you like.
Tip
To remove a topic you’ve added, open the App bar. Use the Remove button to summon a screen of sections. Tap the tile of the one you want to zap out of existence.
Once you’ve added some topics of your own, you’ll notice that the My News tile has a ▾ button. It opens a new row of tile buttons, representing the various topics you’ve set up for yourself. Use them to jump directly to one of your own pet topic pages.
Sources. This tile (Figure 4-30, bottom) reveals a huge screenful of logos—one for every publication Windows 8 uses as fodder for its magazine. The New Yorker, Fox News, The New York Times, CNN, BBC News, The Atlantic, NPR, Forbes, The Economist, CNET, Wired, Entertainment Weekly, and on and on.
Figure 4-30. In the News app, (top) the App bar appears at both the top and bottom of the screen. At top, you get four primary tiles that let you slice and dice Bing’s 300 news sources in different ways. If you select Sources, you get to choose which online news sources you want as your news suppliers (bottom).
The idea here is twofold: First, to marvel at the enormous range of material Microsoft culls every day. Second, to allow you to choose any of these icons to jump directly to a Bing-style layout of its current articles.
Video. This tile gives you direct access to videos from Bing’s multitude of sources. That’s something a typical printed magazine doesn’t usually offer.
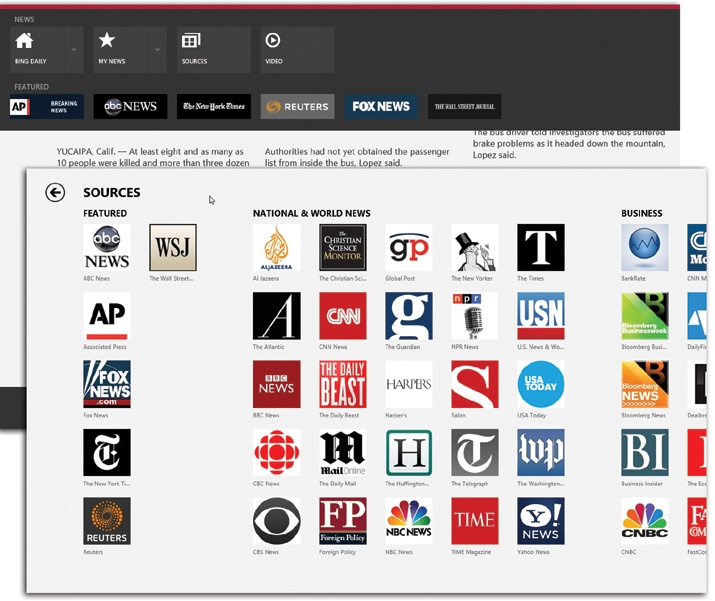
On a tablet, wow—News is one of the best things to come along since hyperlinks.
The People app is Windows 8’s address book. It’s a centralized database of everybody in your social circles: their email and mailing addresses, Twitter and Facebook handles, phone numbers, and so on (Figure 4-31).
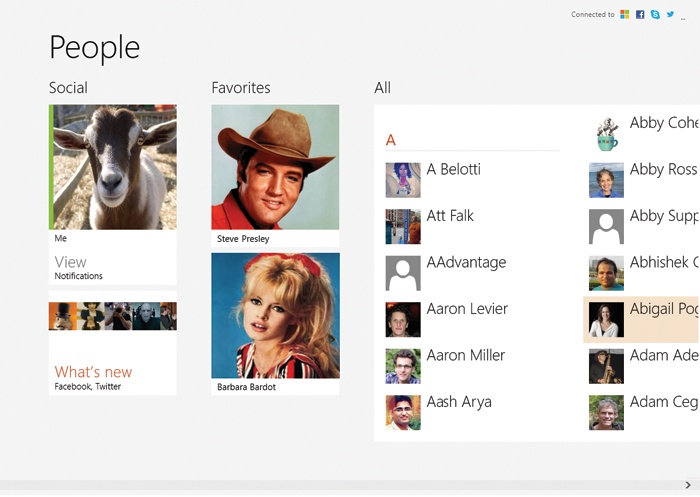
Figure 4-31. The People app scrolls horizontally. Its Home screen is shown here, complete with the App bar open. The “Unread notifications” link shows you all the Twitter posts that mention you, all the Facebook posts about you and things you’ve posted, and so on.
But it’s more than that. It’s also where you can see what your friends are saying on Twitter and Facebook.
Tip
This app has many screens that go many layers deep. Most of
the time, you can find your way back by tapping the
![]() at the top left of the screen. But there’s
also a Home button hiding at the left side of the App bar. Whenever
you’re feeling navigationally woozy, swipe up from the bottom of the
screen (or press
at the top left of the screen. But there’s
also a Home button hiding at the left side of the App bar. Whenever
you’re feeling navigationally woozy, swipe up from the bottom of the
screen (or press ![]() +Z) and then hit Home. You wind up back on the
screen shown in Figure 4-31.
+Z) and then hit Home. You wind up back on the
screen shown in Figure 4-31.
If you’ve signed up for a Microsoft ID and told it all about your Facebook, Twitter, or LinkedIn account, then the People app probably has people listed in it the very first time you open it. If not, it’s probably empty when you first open it.
You can add your contacts’ information either one person at a time, or en masse, by slurping in everybody you know from an online service like Gmail, Facebook, Twitter, or LinkedIn.
The People app can synchronize its contacts with online Rolodexes that may be very important to you: your Gmail (Google) contacts, Facebook contacts, Skype contacts, LinkedIn, Twitter, and various Microsoft email accounts.
To add an account, open the Charms bar and choose Settings, then Accounts. There, staring you in the face, are names of the accounts you’ve set up already.
To add a new one, use the “Add an account” link at the bottom. Tap the kind of account you want: Hotmail, Outlook, LinkedIn, Google, or whatever. Enter your account information, and boom—you’re done. The People app is now synced with your online accounts. Change information in one place and it’s also changed in the other.
You can repeat the process to add more accounts; in fact, you can even have multiple accounts for certain types (like Google and Microsoft email accounts).
Note
You can unsubscribe from one of your online accounts just as easily. In the Charms bar, hit Settings, then Accounts, then the account you want to dump, then “Remove account.” You’re not actually deleting any names or addresses from Facebook, Twitter, or whatever—just preventing them from showing up in People.
(Deleting your Microsoft account is different. If you do that, you really are deleting all your contacts—and your calendar, and your messages, and your mail.)
It’s important to understand that you’re actually linking those Internet services to your Microsoft account. You have to do that only once, and then all your TileWorld apps—Mail, Calendar, Messaging, People—can use their information. You’ve just woven Facebook, Twitter, or Gmail into your Windows world.
The big payoff comes when you sign into another Windows 8 machine (or a Windows 8 phone). To your delight and amazement, you’ll see that your address book is already filled in with all your contacts and accounts. Your Favorites list is even pre-filled with the favorites you’ve set up on other Microsoft products. Progress!
Each entry in People is like a paper Rolodex card, with predefined spaces to hold all the standard contact information.
To add a new person:
Touchscreen: Swipe up from the bottom of the screen to reveal the App bar. Tap “New contact.”
Mouse: Right-click the screen to open the App bar; click “New contact.”
Keyboard: Press Ctrl+N.
In each case, the “New contact” screen (Figure 4-32).
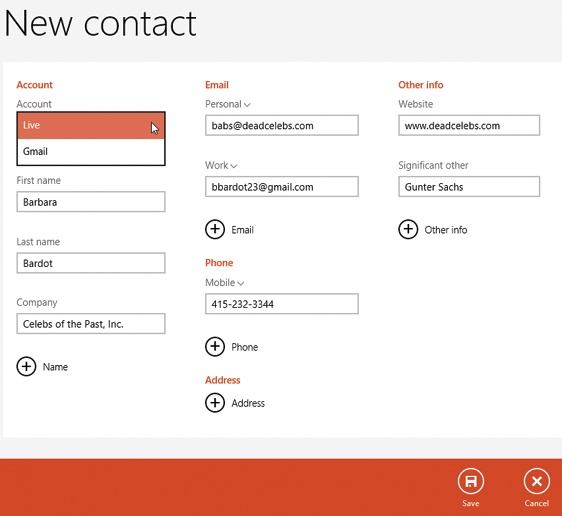
Figure 4-32. It shouldn’t take you very long to figure out how to fill
in this form: You tap in a box and type. Fill in this person’s
name, email address, phone number, and so on, pressing the Tab
key to move from field to field. To change the label for a
number (“mobile,” “home,” “work,” and so on), tap the
![]() button next to the current label.
button next to the current label.
The first box, Account, lets you specify what online email address book you want this name stored in: your Gmail account, Outlook account, or whatever. (This assumes you’ve actually set up some email accounts.)
Tip
If you have an Android phone, choose Gmail; Windows will thoughtfully add this person to your phone’s built-in address book automatically via your Google account.
Now, the trouble with people these days is that they often have more than
one phone number, more than one email address, and more than one
mailing address. Fortunately, all of these boxes are infinitely
expanding. Choose the ![]() button to add another blank box of the same
type: another phone-number field, for example.
button to add another blank box of the same
type: another phone-number field, for example.
Tip
You can also add fields for “Job title,” “Significant
other,” “Website,” or “Notes.” They’re hiding in the “Other
info” button. Select its ![]() button to see those choices.
button to see those choices.
Once you’ve added the complete dossier for this person, open the App bar and hit Save (or just press Ctrl+S). Both take you back to the main People screen.
People move, people quit, people switch cellphone carriers. To make changes to somebody’s card manually, open the App bar and choose Edit.
You return to the screen shown in Figure 4-32, where you can add, remove, and edit fields. Use the Save button (also on the App bar) when you’re finished.
If you’re like most of us, you care more about some people than others. You might have 10,000 people in your master database of contacts, but you might not be interested in seeing what all of them had for lunch.
Fortunately, People lets you promote certain people to VIP status, where you can find them, or follow them, apart from the crowd.
Open the card of your special friend. Open the App bar and choose Favorite (or press Ctrl+F).
From now on, you’ll see this person’s picture at the top of the list on the People home page. That way you have quick access to the links for emailing, calling, or messaging.
(To Un-favorite someone, open her card, open the App bar, and tap Favorite again so that the button is no longer white.)
You can also turn a person in People into a Start screen tile, where his latest Facebook and Twitter updates will stare you in the face all day. You should reserve this treatment for the really important handful of people in your life. Figure 4-33 has the instructions. (If you have a keyboard, Ctrl+Shift+1 does the trick.)
Next time you visit the Start screen, you’ll see that person’s photo, way off to the right side, where new tiles always appear. The tile alternates between showing the photo, this person’s latest Facebook post, and this person’s latest tweet.
Tap the tile to jump to the corresponding person’s page in People, for quick calling, emailing, or messaging.
(To un-pin someone, open the card, open the App bar, and tap Unpin from Start.)
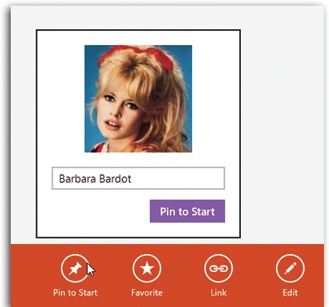
There are three ways to find someone in your digital Rolodex:
Scroll horizontally. Microsoft has decided to present your contacts alphabetically—not a bad notion—and the whole thing scrolls left to right. (Keyboard: PageUp and PageDown keys scroll; Home and End jump to the beginning or end of the list.)
Search. As usual, the Search button is hiding in the Charms bar. But you don’t have to expend precious calories opening the Charms bar; this search works just the way it does on the Start screen. When you’re on the main People screen, just type. The search box in the Charms bar opens automatically.
Once you’ve typed part of a person’s first or last name, press Enter (or hit the
 icon), and boom—the results screen
appears.
icon), and boom—the results screen
appears.Use the alphabetical index. You can zoom out of People, reducing your whole social circle to nothing but a screen full of alphabet blocks, the better to jump to a particular part of the alphabet. Figure 4-34 has details.
Figure 4-34. To get from the regular People screen to the alphabetical index, zoom out from the screen. Pinch with two fingers (or more), or turn your mouse’s scroll wheel down while pressing the Ctrl key, or press Ctrl+minus key (-). This is the feature Microsoft calls “semantic zoom,” but it really means you can now hop directly to any part of the alphabet with a tap or a click.
Once you’re viewing the index, tap or click a letter to jump into that part of the alphabet.
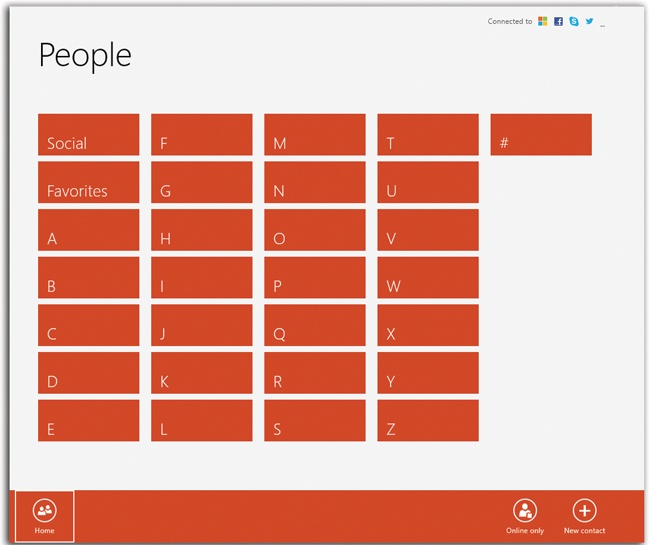
Once you’ve found the tile for the person you seek, tap or click to open up the Details screen shown in Figure 4-35. Here’s an amazing dossier on this friend, relative, or associate. If you scroll the screen horizontally, you’ll find the following screens full of information.
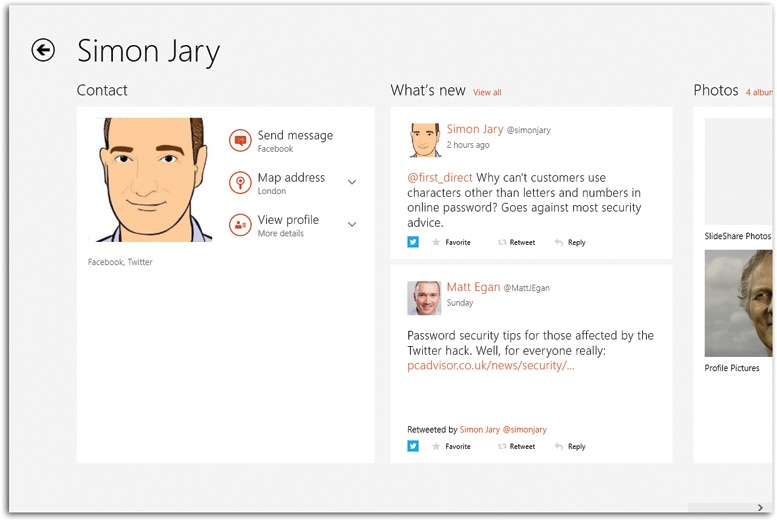
Figure 4-35. The Person screen offers contact information, followed immediately by this person’s latest Twitter and Facebook news. After that comes photos this person has posted to Facebook or Twitter, sorted by which camera or app took them.
Here are buttons for every conceivable way to reach this person. The exact buttons depend on what information you have for him, but these are some of the possibilities:
Send email. Use the pop-up menu to specify which email address you want to use. Then hit “Send email”; the Mail app opens a new, outgoing message, pre-addressed to the person you chose. Add a subject line and a message, and send away.
Send message. It means “Send a message via Facebook.”
Call mobile. (Use the pop-up menu to choose a Home number, Work number, or another number.) Of course, your computer is not a phone any more than your toaster is a VCR. But it can call phone numbers—using Skype, the famous texting/calling/videochatting app that Microsoft bought a few years ago.
It’s not free; you have to buy “Skype credit.” (You’ll get the chance when you try to make the call.) Once you connect via Skype, your computer’s mike and speakers will simulate a phone. You can use the pop-up menu to choose a different phone number—Home or Work, for example.
Map address. The Maps app opens and pinpoints this person’s address on a map. (If you’ve specified more than one address, then use the pop-up menu to choose the one you mean.)
View profile. “Profile,” in this case, refers to your person’s details screen. It’s an ever-expanding, horizontally scrolling presentation of every scrap of contact information you have for that person.
If you scroll rightward, past the Contact block, you may find a “What’s new” block of tiles. (“What’s new” is also a tile on your home screen.) It shows this person’s latest Facebook and Twitter posts, complete with the usual buttons at the bottom—Like, Retweet, Comment, Reply, and so on.
GEM IN THE ROUGH: Linking Contacts
As you know, the People app can sync up with different accounts. It might list three sets of names and numbers: one from Facebook, one from Twitter, and one from your corporate Exchange server at work. In the old days, therefore, certain names might have shown up in the list two or three times—not an optimal situation.
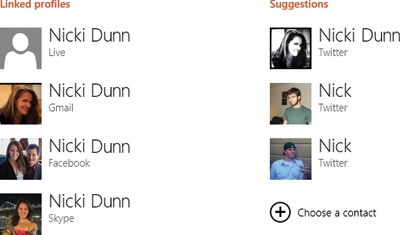
Now, as a favor to you, Windows displays each person’s name only once. If you tap that name, you open the unified information screen for that person. It includes all the details from all the underlying accounts for that person.
You can, however, link or unlink a unified “card.” (Unlinking means splitting it back into its original component “cards.”) You might do that if, for example, People has linked two cards incorrectly. (It can happen. There is, after all, more than one person on earth named John Smith.)
To unlink, open the unified card. Open the App bar (swipe
up from the bottom edge, right-click a blank spot, or press
![]() +Z).
+Z).
Select the Link button. (A tiny digit appears on this button, indicating how many cards have been consolidated.) The “Links for [this person’s name]” screen appears. Linked cards are represented (under the heading “Links for [this person]”) by thumbnails.
Select the thumbnail of the card you want to unlink. Presto: Its thumbnail pops over to the Suggestions column, no longer associated with this person.
You can use this same procedure to link to cards manually. Open a person’s card, open the App bar, and then choose Link. Now, if the Suggestions column correctly guesses the additional card you want to link, choose it. If not, use the “Choose a contact” option to go find the right one; hit Add.
The “View all” button expands that notion, filling the whole screen with a horizontally scrolling display of recent posts. You can tell by the little icon beneath each post which service it comes from (like Twitter, Facebook, or LinkedIn).
In other words, you can see all of each person’s online activities, from all their accounts, all in one place.
Tip
On this screen, you can also hide all the posts from one service or another. Open the App bar; the Filter button offers a list—Facebook, Twitter, All—that lets you control which posts you’re seeing.
To return to the main contact page, use the
![]() button at top left.
button at top left.
Finally, off to the right again, there may be a third block of tiles: photos this person has posted online. They’re rounded up from Facebook and Twitter.
Each tile represents an app (like Instagram or Hipstamatic), a program (like iPhone or Picasa), or a source (like the Facebook Timeline) for a group of photos. Tap or click one of these tiles to see the photos within.
When you see an especially compelling photo, select it. It fills the screen—all except for a panel at the right side where you can type a comment about it (“Great pic!!!” is typical) or express your approval with a click or a tap on the Like button.
You can work your way back to the person’s main card screen
using the ![]() button, or you can back all the way out to
People’s “front door” using the Home button on the
App bar.
button, or you can back all the way out to
People’s “front door” using the Home button on the
App bar.
You can hide all the people from a certain account—Facebook or Twitter, for example—so that they’re not cluttering up your People app. That’s handy if you use People mainly for looking up email addresses or phone numbers and don’t really care about their social-network posts right now.
Just open the Charms bar, hit Settings, and then choose Options. Boom: There they are, checkboxes for Facebook, Gmail, Twitter, Skype, Outlook, and whatever other accounts you’ve set up. Turn off the checkboxes for the accounts whose contacts you want to hide. (You can always bring them back by turning their checkboxes on again.)
There’s a lot of work involved in entering someone’s contact information. It would be thoughtful, therefore, if you could spare the next guy all that effort—by sending a fully formed electronic business card to him. It can be yours or that of anyone in your People list.
To do that, open the contact’s card. Open the Charms bar; choose Share; choose Mail, OneNote, or whatever sharing method you prefer. (In theory, as you install new programs, your list of options here may grow.)
If you chose Mail, you’re asked to address the outgoing email message; do so and then choose Send. You’ve just fired off an email containing the chosen contact info. The recipient, assuming he has a half-decent smartphone or address-book program on the receiving end, can install that person’s information with a single tap on the attachment.
You can also post to your social networks—Facebook, Twitter, whatever—right from the People app. See Figure 4-36 for the step-by-step.
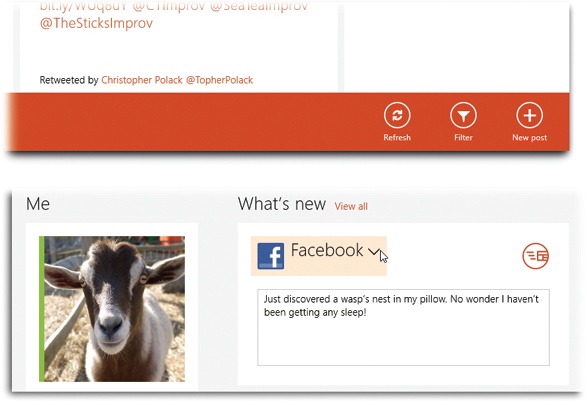
Figure 4-36. Top: To post to a service like Facebook or Twitter, start
from the What’s New screen. Open the App bar. At the right end,
select “New post.” Bottom: Now you get a box where you’re
free to share your brilliant musings with the world. If you’ve
signed up for more than one service, use the ![]() menu shown here. Use the cursor to specify
which one you’re posting to.
menu shown here. Use the cursor to specify
which one you’re posting to.
The old Photo Viewer of Windows 7 fame is gone. In its place: the TileWorld app called Photos. Its job is to grab photo albums from everywhere fine photos are stored—your own Pictures folder, other PCs on your network, Facebook, Flickr, your SkyDrive, and so on—and display them all in one place. Especially if you have a touchscreen, you’ll find Photos a graceful, fluid, lovely way to browse your shots.
Back at the desktop, behind the scenes of TileWorld, you have a Pictures folder. Any photos in this folder show up in the Photos app automatically.
Maybe there are pictures here already—perhaps because you upgraded a Windows 7 machine to Windows 8. If not, maybe now is the time to move your pictures into Pictures.
The Photos app can’t show you pictures that lie in any other folder on your PC. It’s the Pictures folder or nothing.
Tip
Well, actually, there’s one exception. If you keep pictures in another folder and don’t want to move them, you can add that folder to the Pictures library, as described on Adding a Folder to an Existing Library.
Before you can have much fun with Photos, you have to provide your account information for Facebook, Flickr, and/or SkyDrive. To do that one service at a time, select the appropriate tile at the bottom of the Photos screen: SkyDrive, Facebook, Flickr, or whatever.
You’re asked for your Microsoft ID, which is itself supposed to be linked to your Facebook and other online accounts.
Note
If you haven’t yet told Windows 8 to store your account info for these services, now is a good time. Opportunities to link those accounts to your Microsoft account are everywhere: in Messages, Mail, and People, for example. In any of these apps, open the Charms bar, choose Settings, and choose Accounts. There you’ll find the “Add an account” link.
Then, after a few heart-pounding moments, the magic begins: Photos fills up with photos it’s snagged from the Web (Figure 4-37).

Figure 4-37. In the Photos app, the various sources of photos are represented as big tiles; scroll horizontally to see them all. Meanwhile, the thumbnails of photos within each source occasionally perform micro-slideshows, just to tease you.
Tip
Once you’ve linked an account to your Microsoft account, its photos show up in Photos automatically—which you may not want. For example, you might enjoy having Facebook hooked up to the People app, but you may feel that seeing your Facebook account’s pictures in Photos isn’t really necessary.
Fortunately, you’re not condemned to looking at all of them. At any time, you can hide the photos from one account or another. Open the Charms bar; tap Settings; tap Options; tap “Show photos and videos from”; and then turn off the checkboxes of the sources you’d rather hide.
Not all photos originate online, thank heaven. Photos is also proud to display pictures you’ve taken yourself. It can import photos from a camera or memory card, too.
If you open the App bar (Last Open Program), you’ll find the Import button. It’s available at the Photos home screen or on any screen full of tiles or thumbnails—not when you’ve opened an individual photo.
The Import button brings in pictures from your camera, a USB flash drive, or some other drive. See Figure 4-38.
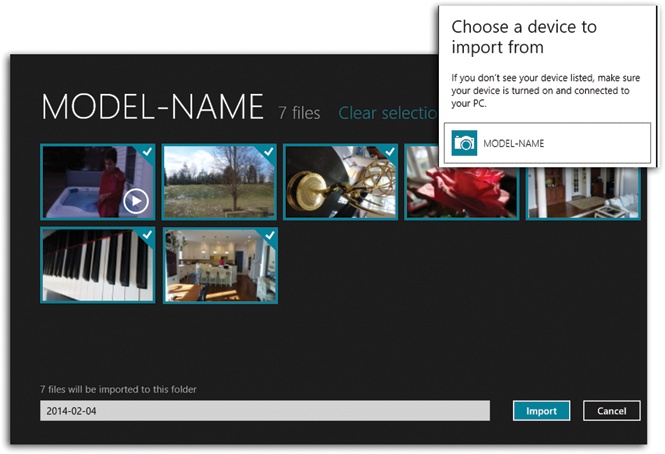
Figure 4-38. Inset: When you select Import, you’re first asked to choose the device you want to import from. Bottom: You see the photos and videos on it. All the new ones are selected and ready to import, but you can select or deselect them as you see fit. (Swipe down from a thumbnail if you have a touchscreen; right-click if you don’t.) Name the folder for the new arrivals; then hit Import.
When it’s all over, Windows offers you an “Open folder” button so you can see the newly imported goodies in the Photos app.
The rules of Photos are simple:
By tapping or clicking, select a source, then an album within it, and then a photo within it. When you’ve drilled down as far as you can go, the picture fills most of the screen.
To move through the photos, swipe horizontally (touchscreen), click the
 and
and  buttons at the edges of the screen
(mouse), or press the
buttons at the edges of the screen
(mouse), or press the  and
and  keys (keyboard).
The
button in the lower-left corner starts a
slideshow of all photos in this batch.Search for a photo by name (choose Search on the Charms bar).
Send a photo to somebody by email or text message (tap Share on the Charms bar; see The Charms Bar).
When you’ve opened an individual photo, you can enlarge or shrink it in the usual ways:
Touchscreen: Spread two fingers apart on the glass; pinch to zoom back out.
Mouse: Click the + and – buttons at the right edge of the horizontal scroll bar to zoom in or out. Or turn the scroll wheel while pressing the Ctrl key.
Keyboard: Press Ctrl and the + or – keys.
When zooming gets complicated is after you’ve restored a photo to its original fit-the-screen size. If you continue to zoom out, you backtrack into the album or other batch from which the photo came. If you zoom out more, you shrink the album’s thumbnails. You wind up with a mosaic view of your album that you can’t get to any other way, the better with which to survey your collection.
In theory, photographs are a record of your life—so when they were taken is a rather important tidbit. The Photos app offers a secret way to view your photos in chronological chunks; see Figure 4-39.
Also hiding on the App bar: the Set As button. Its shortcut menu lets you slap the current photo onto any of these billboards:
Lock screen. That’s a reference to the big photo that appears when you first wake up a Windows 8 machine, the one that bears the current time. Here’s one easy way to change it to a photo of your own.
App tile. Usually, the image that represents Photos on the Start screen changes every few seconds. It rotates through different pictures. But using this command, you can stamp the selected photo onto that tile for all time. (The tile no longer rotates through photos.)
App background. You may have noticed the handsome Ferris-wheel-at-night photo that fills the Photos screen the first time you open it. And you may also have grown tired of it.
You can replace this image, too, with one of your own. That’s the purpose of this shortcut menu command.
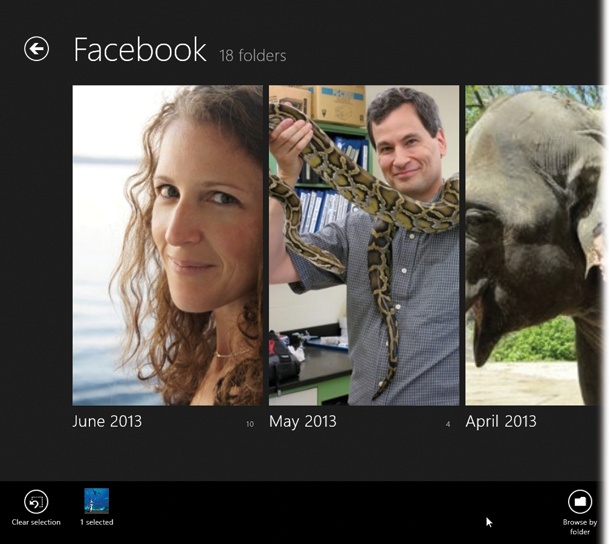
Photos wouldn’t be much fun if your screen were the only place you could see them. Fortunately, the Photos app is happy to zap them away to your adoring fans electronically.
The first step is telling Photos which pictures you want to send. To do that, drill down until you’re looking at the thumbnails of some batch. Then, for each photo you want to include, do this:
In each case, the thumbnail sprouts a colored outline, and a checkmark appears in its top-right corner. You can repeat the procedure for another photo, and another, until all the ones you want are checkmarked.
Note
You can’t select photos from two different sources at once—your Pictures folder and a Facebook album, for example. In fact, if you try to select photos from one source while some others are still selected in another, Windows complains and asks that you de-select the earlier group.
To do that, you don’t have to revisit the earlier thumbnails. Instead, just open the App bar and use the “Clear selection” button. Now no photos are selected in any album.
Once you’ve chosen the photos you want to share, open the Charms bar (Corners and Swipes). Hit Share.
The options here vary, but a couple of them are sure things:
Mail. That’s right—you can send photos by email, directly from Photos. If you choose Mail, a new panel appears, showing an outgoing message; the photos are attached. Address it, type a subject line and maybe a message, and then hit the
button to send it.SkyDrive. Your free online SkyDrive disk is a handy intermediary for photos that shuttle between computers (see the box on Photos from Other PCs). So it’s no surprise that Microsoft made it easy to send photos from Photos to your online SkyDrive—if nothing else, it’s a great way to back them up.
You’re asked to enter your Microsoft ID and password (or to sign up for a Microsoft account, if you don’t have one). Then you see a list of the folders on your SkyDrive; choose the one you want to receive the new photos. (The one called Pictures is usually a good bet.) When you’re finished, choose Upload.
You can, of course, print out photos so that you can hang them handsomely on the wall or hand them proudly to admirers.
Start by opening the Pictures tile in Photos. (You can’t print pictures from online accounts or ones that live on other computers—only ones that are actually on your computer.)
Open the first photo you want to print so that it’s filling your screen. Open the Charms bar (Corners and Swipes); choose Devices; choose your printer.
Photos shows you a preview of the printout-to-be. On this screen, you can specify how many copies you want and how you want the photo printed—upright (portrait orientation) or sideways (landscape). The “More settings” button reveals additional options specific to your printer, like paper type and print quality.
When everything looks good, hit the Print button.
The SkyDrive is one of Microsoft’s great unsung offerings. It’s a free, 7-gigabyte online hard drive on the Internet, accessible from any computer. How is it handy? Let us count the ways:
It’s a trustworthy “disk” for backing up important files.
It’s a central online location for files you want to access from any machine that can get online.
It’s a perfect pit stop for files you want to shuttle from one computer to another.
It’s an intermediary for sharing big files with other people far away.
It’s integrated into the latest versions of Microsoft Office (for Mac and Windows). That is, you can save a document directly onto your SkyDrive from Word, Excel, or PowerPoint—or open a SkyDrive document directly from within those programs.
It’s also integrated into Microsoft’s email services like Hotmail and Outlook.com. For example, if someone sends you a Microsoft Office attachment, you can open and edit it right online and save it to your SkyDrive.
You can pull the SkyDrive onto almost any gadget’s screen, wherever you go, saving you the trouble of carrying around a physical disk to transport files. Microsoft offers free SkyDrive apps for Windows; Xbox; Mac OS X; iPhone/iPad; Windows Phone; and Android phones. These apps let you see and organize what’s on your SkyDrive and even synchronize files across all your machines.
The SkyDrive is part of your free Microsoft account (Local Accounts vs. Microsoft Accounts).
The purpose of this app is to show you what’s on your SkyDrive and give you the chance to organize, download, add, or delete files on it.
Like almost everything else in TileWorld, the contents of your SkyDrive are represented by big rectangular tiles (Figure 4-40). In the first block, each one represents a folder. Microsoft starts you off with folders like Public (everyone in the world can see the contents) and Documents, but you can create your own folders, too, as described below.
If you didn’t know about the App bar, you’d never make new
folders, delete any files, or add anything new to your SkyDrive.
Fortunately, you do know about it (swipe up
from the bottom of the screen, or right-click, or press
![]() +Z). Here are the options that appear:
+Z). Here are the options that appear:
Refresh. Remember, various computers all over the world can access your SkyDrive simultaneously. The Refresh button is here for those occasions when you’re collaborating with someone at another location and want to be sure you’re seeing the latest versions of the files. It means “update the list.”
New folder. Creates a new folder (after you name it and hit the “Create folder” button).
Upload. How do you put new files into your SkyDrive from TileWorld? Clearly, you can’t drag and drop from the desktop; there is no desktop in TileWorld.
Answer: Use this button. You’re shown the File Picker (The File Picker) so that you can choose a file to copy to your SkyDrive.
Details. Most of the time, the SkyDrive app prefers to display your files as tiles. But there’s something to be said for a traditional list view, where you can see your files’ or folders’ sizes, modification dates, and (for folders) number of items inside. The Details button produces just such a view.
Figure 4-40. Tap or click to open a folder and see what’s inside. If it’s a Microsoft Office document, a picture, a text file, or some other common file type, you can open it with one more tap or click. Use the
 button to return to the previous
folder.
button to return to the previous
folder.In Details view, the same button changes to say “Thumbnails” so that you can return to Tiles view if you get all detailed out.
Select all, Clear selection. In the SkyDrive, you can’t share, delete, or download files until you first select them. You do that in the usual TileWorld way.
Touchscreen: Swipe down from an icon to make a checkmark appear in its corner. Mouse: Right-click. Keyboard: Use the arrow keys to highlight a tile, and then press the
 key.
key.Of course, if you want to select everything in the current folder, the “Select all” button is just the ticket. And “Clear selection” deselects everything.
Delete. This button appears only when you’ve selected some tiles or icons. After you confirm your intention, Windows removes the selected files or folders from the SkyDrive.
Download. This button copies the selected files or folders to the machine you’re using right now.
Open with. When a single document icon is selected, you can use this button to specify which Windows program or app you want to open it (Figure 4-41).
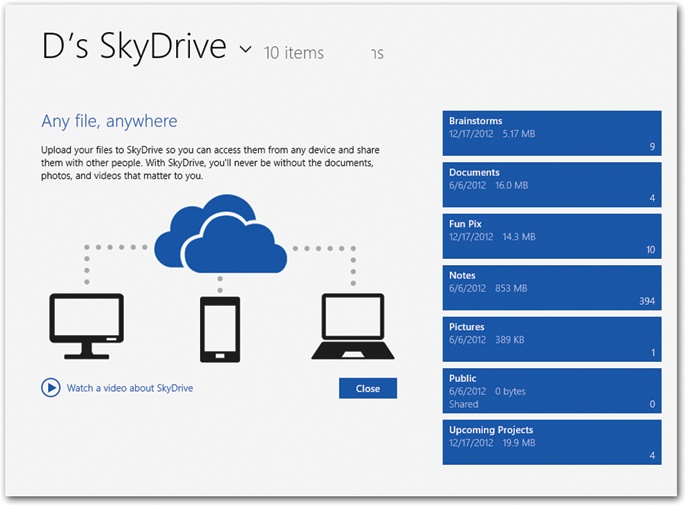
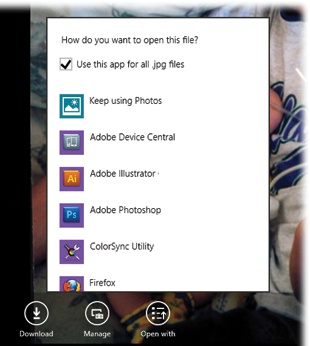
As always in TileWorld, the Share button is a powerful tool that’s only one tap or click away—in the Charms bar (Corners and Swipes). In other words, you can fire off a link to some SkyDrive file by email, or you can slap a post on Facebook or a tweet on Twitter, incorporating a link to one of your SkyDrive files.
Note
The gotcha: The SkyDrive app can send only one file at a time. The Share button isn’t available if you’ve selected two or more.
Select the file’s tile or thumbnail, as described above. Open the Charms bar, hit Share, and then choose your weapon:
Mail. You’re asked to address an outgoing message, add a subject line, and select the Send (
) button. Once your colleagues receive
your email, they have but to select the link in the message to
visit your folder and download the file immediately. They can do
it even if they don’t have Windows Live accounts and even if
they’re on a Mac or whatever.Facebook or Twitter. You might not immediately understand that the People button here means “Facebook or Twitter,” but there you have it. Once you’ve selected People, a panel opens with a pop-up menu at the top, which lets you choose either Facebook or Twitter.
The “Add a message” area lets you type your Facebook post or tweet; hit the Send icon (
) to blast a link to your attachment to
that social network.
As always, other apps, in time, may add additional icons to the Share panel.
Here’s another online magazine, composed of attractively laid out articles that Microsoft swipes from 300 big-name online news sources.
The app works exactly like the News app (News), with a few exceptions:
It’s all about sports.
If you scroll horizontally, you’ll find pages and pages of scores, statistics, and schedules, along with news.
Open the App bar. See the various league buttons (NFL, NBA, MLB, Golf, and so on)? There are lots of them. You may actually have to scroll the App bar—that’s something you probably haven’t seen before—to view them all. Each league button offers a ▾ button that opens a second row of “section” heads: Top Stories, Videos, Preview Articles, Recap Articles, Standings, Player Stats, and Team Stats, for example (Figure 4-42).
The App bar contains a Favorite Teams tile. It lets you create a new “section” that displays news of only the teams you like. (Hit the
button to add one.) You can start typing
the team name, like dolphins, or the city,
like miami; the app displays a list of
matches that narrows down as you type.You’ll find a similar Favorite Teams block off to the scrollable right of any sports “section,” like NFL, NBA, or whatever.
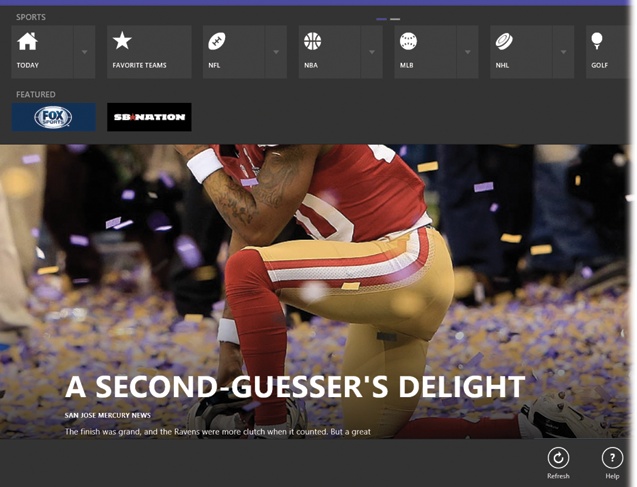
This is it: the Windows Store, source of all TileWorld apps and many regular Windows desktop apps. You can read all about it in Chapter 3.
Here’s yet another Bing magazine family member. Like News, Finance, and Sports, it’s an attractive, horizontally scrolling “magazine.”
As you’d guess, the theme of Bing Travel is getting away. As you scroll to the right, the various blocks include Featured Destinations (profiles of various vacation spots), Panoramas (cool 360-degree photos that let you “turn your head” inside the scene), and Magazine Articles (drawn from various travel Web sites).
As usual, the most interesting stuff is hiding in the App bar:
Destinations. It’s vacation porn: page after page of photo tiles, each depicting a glamorous tourist destination. Select one for details.
Flights, Hotels. Yep, Microsoft’s mighty Expedia travel Web site is built right in. Search and book flights and hotel rooms, right from inside the app.
Best of Web. An excellent motley assortment of travel-related Web sites and tools. The various blocks of tiles feature sites dedicated to Road Trips, Food and Wine, Sustainable Travel, Family Travel, and Frequent Travel. Select any tile to open that site in Internet Explorer.
Don’t miss the Tools section, which includes links to currency converters, time/distance/cost calculators, language translators, and, perhaps most important of all, TheBathroomDiaries.com, a global directory of public restrooms.
This “app” is a lot like the Music app described earlier. It serves two purposes:
It’s a gateway to Microsoft’s TV and movie stores. Scroll off to the right, and you see tiles representing the latest rentable or buyable movies and TV episodes (Figure 4-43, top).
It’s a player for your own videos. The Video app opens up to Microsoft’s store. But if you scroll to the left, you find tiles that represent your own video collection—whatever files you’ve added to the Videos library folder at the desktop (Adding a Folder to an Existing Library). See Figure 4-43 (bottom).
Figure 4-43. Exactly as in the Xbox Music app, the Xbox Video app is basically a billboard for stuff Microsoft thinks you might want to buy; the Search command is, as always, waiting in the Charms bar if you want to find some particular movie or show to watch. When you choose one of your videos, it opens full screen and begins to play. The only controls are the huge Play/Pause button and the scrollbar; both fade away after a couple of seconds. Move the mouse to bring them back. You can also use the space bar to start or stop playback.
This app opens into a lovely, colorful weather report. Right off the bat, you see the current weather (as though the full-screen background photo didn’t give it away). There’s the five-day forecast. In a panel on the right, you see the hour-by-hour forecast for today, so you can see exactly what time your softball game will get rained out.
Most people probably never bother drilling past this screen, but
there’s much more to do here. For example, you can choose the right
arrow (![]() ) to check out the next
five days’ forecast. Or you can choose the expand-o-triangle
(
) to check out the next
five days’ forecast. Or you can choose the expand-o-triangle
(![]() ) to open up a new row of details—wind speed,
visibility, humidity, barometer, and the predicted highs and lows. You
pilots know who you are.
) to open up a new row of details—wind speed,
visibility, humidity, barometer, and the predicted highs and lows. You
pilots know who you are.
But the most surprising part of the Weather app is the more complete weather station that lurks beyond this opening screen. If you scroll to the right, you’ll discover additional blocks like these:
Hourly forecast. The Hourly column that appears on the main screen is actually only the left end of a wider Hourly display.
Maps are cool visual representations of current meteorological data for the whole country: radar, regional temperature, precipitation, cloud cover, severe weather alerts, and so on.
Historical weather. This handy graph shows you a snapshot of your current location’s weather history. The big graph shows temperature, rainfall, and snowfall (depending on which of the three round icons you select beneath it). The little table at the right gives you stats like the average high and low for today’s date, the record high and low for today’s date, and monthly averages for rainfall, snowy days, and rainy days.
Advertisement. There’s also an ad at the far right. Thank goodness you have to go out of your way to find it.
There is, by the way, a table of contents for these different data blocks (Figure 4-44). You might never even find it if you didn’t zoom out:
Touchscreen: Pinch two fingers on the screen or trackpad.
Mouse: Move the mouse so that the horizontal scrollbar appears. Hit the tiny – button at lower right.
Keyboard: Press Ctrl+minus key (hyphen).
In each case, the Weather app “shrinks” down into five stacked rectangular bars, representing the main weather screen (Bing Weather), the Hourly Forecast, Maps, Historical Weather, and Advertisement. Each takes you directly to the corresponding block of tiles without your having to scroll.
Get Windows 8: The Missing Manual now with the O’Reilly learning platform.
O’Reilly members experience books, live events, courses curated by job role, and more from O’Reilly and nearly 200 top publishers.

