Chapter 4. STOMP over WebSocket
In previous chapters you built simple applications using the WebSocket API both on the server side and on the client. You built a multiclient chat application with WebSocket as the communication layer. Chapter 2 briefly discussed using subprotocols with WebSocket. Now you’ll take everything learned thus far and layer another protocol on top of WebSocket.
STOMP, an acronym for Simple Text Oriented Messaging Protocol, is a simple HTTP-like protocol for interacting with any STOMP message broker. Any STOMP client can interact with the message broker and be interoperable among languages and platforms.
In this chapter you’ll create a client and server that communicate using the STOMP protocol over WebSocket rather than TCP. You will learn how to connect to RabbitMQ by using the Web-Stomp plug-in, which uses WebSocket as its underlying wire protocol.
As in previous chapters, you’ll create a new project folder for Chapter 4 examples with the abbreviated name ch4. The examples in this chapter again use a stock ticker, and use messaging to subscribe for stock updates. In addition, there are two examples in this chapter, so create a subdirectory named proxy. You’ll create several files to build a real working table of stock prices powered by STOMP over WebSocket. Here are the files that you will use:
- client.html
-
The frontend code base; as before, copy the template used in Chapter 1.
- server.js
-
The WebSocket proxy that talks to RabbitMQ using AMQP while listening for STOMP over WebSocket.
- stomp_helper.js
-
A convenience library you’ll build for sending and receiving STOMP requests.
- daemon.js
-
A daemon that pulls stocks from Yahoo Finance by using YQL and pulls and pushes messages to RabbitMQ.
Implementing STOMP
STOMP is a simple text protocol that is similar to the HTTP convention of an uppercase command such as CONNECT, followed by a list of header key/value pairs, and then optional content, which in the case of STOMP is null-terminated. It is also possible and highly recommended to pass content-length as a parameter to any commands, and the server will use that value instead as the length of passed content.
Getting Connected
As you saw in Chapter 2, the native browser API for connecting to a WebSocket server takes two parameters: URL and protocol. Of those two parameters, only the URL is required, but now you will be making use of the second. If you research registered protocols in the WebSocket Subprotocol Name Registry, you’ll find an entry for STOMP 1.0, which uses the identifier v10.stomp. As we’ll discuss in Chapter 8, you are not required to use a registered subprotocol with WebSocket. The subprotocol does need to be supported by the client and the server. In your client, then, open a connection the following way:
varws;varconnect=function(){if(!ws||ws.readyState!==1){ws=newWebSocket("ws://localhost:8181","v10.stomp");ws.addEventListener('message',onMessageHandler);ws.addEventListener('open',onOpenHandler);ws.addEventListener('close',onCloseHandler);}}connect();
As with the previous examples, you open a connection to a WebSocket server on port 8181. But in addition, you pass a second parameter in the constructor, which can either be a string or an array of strings identifying requested subprotocols from the server. Notice also that a connect function adds the event listeners for open, message, and close by using the addEventListener method. This is the essential method of connecting. If you need to reconnect upon a lost connection, the event handlers will not automatically reattach if you’re using the ws.on<eventname> method.
After opening the WebSocket connection, an open event is fired, and you can officially send and receive messages from the server. If you reference the STOMP 1.0 protocol doc, the following will be shown as the method of initial connection to a STOMP-capable server:
CONNECT
login: <username>
passcode: <passcode>

^@
For our example, you’ll use websockets as the username and rabbitmq as the password for all authentication with the STOMP server and RabbitMQ. So within your code, pass the following with the WebSocket send function:
varframe="CONNECT\n"+"login: websockets\n";+"passcode: rabbitmq\n";+"nickname: anonymous\n";+"\n\n\0";ws.send(frame);
You can see in the STOMP 1.0 protocol doc that every frame sent ends with the null terminator ^@, or if the content-length header is passed, it will be used instead. Because of the simplicity of WebSocket, you’re carefully mapping STOMP frames on top of WebSocket frames in these examples. If the server accepts the connection and authentication information, it passes back the following to the client, which includes a session-id to be used in later calls to the server:
CONNECTED
session: <session-id>

^@
The chapter introduction mentioned stomp_helper.js, and before you get to the server code, let’s review the library that will assist in sending and receiving STOMP-compatible frames (Example 4-1).
Example 4-1. STOMP library code
(function(exports){exports.process_frame=function(data){varlines=data.split("\n");varframe={};frame['headers']={};if(lines.length>1){frame['command']=lines[0];varx=1;while(lines[x].length>0){varheader_split=lines[x].split(':');varkey=header_split[0].trim();varval=header_split[1].trim();frame['headers'][key]=val;x+=1;}frame['content']=lines.splice(x+1,lines.length-x).join("\n");frame['content']=frame['content'].substring(0,frame['content'].length-1);}returnframe;};exports.send_frame=function(ws,frame){vardata=frame['command']+"\n";varheader_content="";for(varkeyinframe['headers']){if(frame['headers'].hasOwnProperty(key)){header_content+=key+": "+frame['headers'][key]+"\n";}}data+=header_content;data+="\n\n";data+=frame['content'];data+="\n\0";ws.send(data);};exports.send_error=function(ws,message,detail){headers={};if(message)headers['message']=message;elseheaders['message']="No error message given";exports.send_frame(ws,{"command":"ERROR","headers":headers,"content":detail});};})(typeofexports==='undefined'?this['Stomp']={}:exports);
The ceremonial items preceding and following the functions in this library allow this to be used within the browser, and on the server side with Node.js in a require statement.
The first function to describe is process_frame, which takes a STOMP frame as a parameter called data and creates a JavaScript object containing everything parsed out for use within your application. As described in Table 4-1, it splits out the command, all the headers, and any content within the frame and returns an object fully parsed.
| Key | Description |
|---|---|
|
STOMP command passed by the frame |
|
A JavaScript object with key/values for the passed-in headers |
|
Any content sent in the frame that was null-terminated or adheres to the |
Next up and equally important is the send_frame function, which accepts a WebSocket object and a STOMP frame in the form of a JavaScript object exactly as you send back from the process_frame function. The send_frame function takes each of the values passed in, creates a valid STOMP frame, and sends it off over the passed-in WebSocket parameter.
The remaining function is send_error, which takes the parameters shown in Table 4-2.
| Name | Description |
|---|---|
|
The active WebSocket connection |
|
Error message explaining what went wrong |
|
Optional detail message passed in the body |
You’ll be able to use the aforementioned set of functions to send and receive STOMP frames without any string parsing within your client or server code.
Connecting via the Server
On the server side, upon receiving a connection event, your initial task to get connected is to parse what is received in the message frame (using the stomp_helper.js library), and send back a CONNECTED command or an ERROR if it failed:
wss.on('connection',function(ws){varsessionid=uuid.v4();ws.on('message',function(message){varframe=Stomp.process_frame(message);varheaders=frame['headers'];switch(frame['command']){case"CONNECT":Stomp.send_frame(ws,{command:"CONNECTED",headers:{session:sessionid,},content:""});break;default:Stomp.send_error(ws,"No valid command frame");break;}});...});
As you’ve seen in previous examples, the connection event is received, and work begins. There exists an extra layer thanks to STOMP, which is handled somewhat by your library. After assigning a sessionid to a UUID, and upon receiving a message event from the client, you run it through the process_frame function to get a JavaScript object representing the received frame. To process whatever command was sent, the program uses a case statement, and upon receiving the CONNECT command, you send back a STOMP frame letting the client know the connection was received and is accepted along with the sessionid for this session.
Take a quick look at Figure 4-1, which shows a completed connection event.
Looking at the screen grab, you’ll see a new header for the HTTP request and response: Sec-WebSocket-Protocol. In Chapter 8 you can read a more in-depth discussion about the various headers and dive deep into the protocol nitty-gritty. Here in the stocks example, the request sent along includes the subprotocol v10.stomp. If the server accepts this subprotocol, it will, in turn, respond with that subprotocol name, and the client can continue sending and receiving frames to the server. If the server does not speak v10.stomp, you will receive an error.
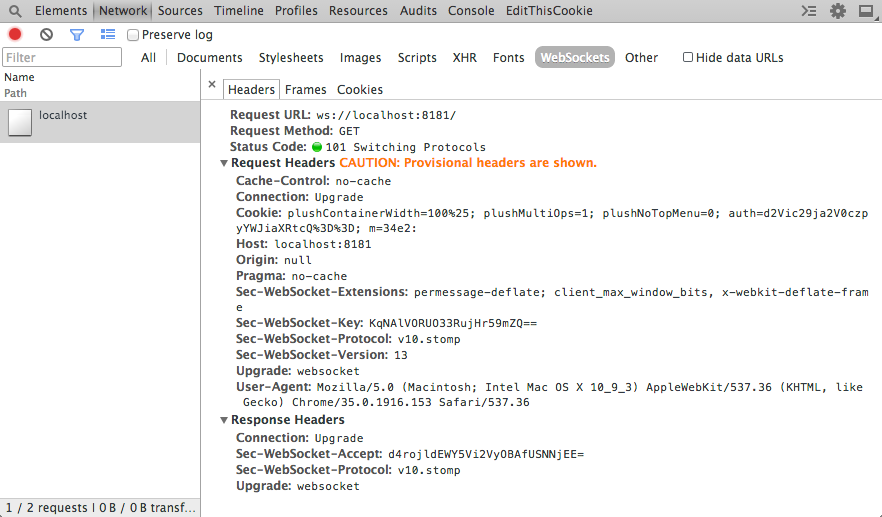
Figure 4-1. Successful WebSocket connection with subprotocol
The default implementation of the ws library will accept any subprotocol that is sent along. Let’s write some extra code to ensure that only the v10.stomp protocol gets accepted here. To do this, you’ll write a special handler when initializing the WebSocketServer object:
varWebSocketServer=require('ws').Server,wss=newWebSocketServer({port:8181,handleProtocols:function(protocol,cb){varv10_stomp=protocol[protocol.indexOf("v10.stomp")];if(v10_stomp){cb(true,v10_stomp);return;}cb(false);}});
In Chapter 2 the overview of the WebSocket API showed that you could pass in more than one subprotocol. In your handler code, you’ll have to unpack an array of subprotocols that includes the one the client is after. Because you’re using Node.js, you can use conventions like Array.indexOf without worrying about things like Internet Explorer not supporting it. With the preceding code, you’ve successfully performed a handshake accepting a new subprotocol.
As noted earlier, your first example implementing STOMP will be the stocks app. You’ll send requests over STOMP from the client to the server, and the server will send and receive messages with RabbitMQ while the stocks daemon spits out intermittent updates to prices. To get started, get a RabbitMQ server in place to queue your messages for the server.
Setting Up RabbitMQ
You’ll need to get a RabbitMQ node running for your WebSocket server to proxy the requests to. To do that, you’ll need to have Vagrant set up on your development machine. Vagrant is a handy tool for creating portable and lightweight development virtual machines. Installing it is as easy as grabbing the proper install binary for your operating system on the download page for Vagrant.
Note
Vagrant is a lightweight tool to create and configure reproducible and portable development environments. It uses VirtualBox or VMWare under the hood for the virtualized instances, and allows for several providers including Puppet, Chef, Ansible, and even simple shell scripts.
After you have Vagrant installed successfully, create a new file in your project folder called Vagrantfile and include the following:
Vagrant.configure("2")do|config|config.vm.hostname="websockets-mq"config.vm.box="precise64"config.vm.box_url="http://bit.ly/ubuntu-vagrant-precise-box-amd64"config.vm.network:forwarded_port,guest:5672,host:5672config.vm.network:forwarded_port,guest:15672,host:15672config.vm.provision"shell",path:"setup_rabbitmq.sh"config.vm.provider:virtualboxdo|v|v.name="websockets-mq"endend
The configuration file will be used to create a new Vagrant instance using the image at config.vm.box_url. It forwards ports 5672 and 15672 to the local machine, and specifies a shell-based provisioning to be run upon vagrant up, which is included in the following code:
#!/bin/bashcat >> /etc/apt/sources.list<<EOTdeb http://www.rabbitmq.com/debian/ testing mainEOTwget http://www.rabbitmq.com/rabbitmq-signing-key-public.asc apt-key add rabbitmq-signing-key-public.asc apt-get update apt-get install -q -y screen htop vim curl wget apt-get install -q -y rabbitmq-server# RabbitMQ Pluginsservice rabbitmq-server stop rabbitmq-pluginsenablerabbitmq_management service rabbitmq-server start# Create our websockets user and remove guestrabbitmqctl delete_user guest rabbitmqctl add_user websockets rabbitmq rabbitmqctl set_user_tags websockets administrator rabbitmqctl set_permissions -p / websockets".*"".*"".*"rabbitmq-plugins list
The shell provisioning script does the following:
-
Adds a new source for the latest RabbitMQ install
-
Installs a few dependencies along with the RabbitMQ server
-
Enables the
rabbitmq_managementplug-in -
Removes the guest user and creates your new default user
rabbitmq:websockets -
Gives that user administrator privileges
Now from the command line, initialize and provision the new Vagrant instance with the following:
vagrant up
This command reads the Vagrantfile and runs the provisioning script to install the RabbitMQ server on an Ubuntu 12.04 amd64 instance for use in the examples. The following code shows a printout similar to what you should see after you complete the command. Immediately after this output, Vagrant will run the provisioning shell script that sets up RabbitMQ:
Bringing machine'default'up with'virtualbox'provider...==> default: Importing base box'precise64'...==> default: Matching MAC addressforNAT networking...==> default: Setting the name of the VM: websockets-mq==> default: Clearing any previouslysetforwarded ports...==> default: Clearing any previouslysetnetwork interfaces...==> default: Preparing network interfaces based on configuration... default: Adapter 1:nat==> default: Forwarding ports... default:5672=>5672(adapter 1)default:15672=>15672(adapter 1)default:22=>2222(adapter 1)==> default: Booting VM...==> default: Waitingformachine to boot. This may take a few minutes... default: SSH address: 127.0.0.1:2222 default: SSH username: vagrant default: SSH auth method: private key
The included Vagrantfile, which provides the configuration for Vagrant, opens the following ports:
- tcp/5672
-
The default port for amqp
- tcp/15672
-
The web management interface
Connecting the Server to RabbitMQ
After you have the proper dependencies installed, it’s time to circle back and get the server talking to RabbitMQ. The connection to RabbitMQ can happen independently of the WebSocket work. Upon execution of the server, you’ll open a connection to RabbitMQ and perform two actions with the connection:
-
Listen to the
stocks.resultqueue for updates on pricing -
Publish stock requests at a set interval to the
stocks.workqueue
To do that with your server, you’ll need to talk AMQP with RabbitMQ. There are many libraries out there for Node.js to talk AMQP, and the simplest one I’ve found is node-amqp. Use the command npm to install the library in your project folder:
npm install amqp
Your initial actions will be upon a valid CONNECT request initiated from the client to the server. You’ll create a connection to the running RabbitMQ instance, using the authentication information passed in from the client.
Here’s how you’ll connect to the RabbitMQ instance you installed:
amqp=require('amqp');varconnection=amqp.createConnection({host:'localhost',login:'websockets',password:'rabbitmq'});
The library being used (amqp) fires events that can be listened for using callbacks. In the following snippet, it listens for the ready event and runs the callback function provided. Upon ensuring the connection is ready, you start listening to the stocks.result queue and subscribe to receive updates to messages that get passed back through it. These messages will contain updated pricing for stocks that have been requested. You’ll notice that within the blocks, the stomp_helper.js library is being used to send MESSAGE frames back to the clients that have asked for updates on particular stocks:
connection.on('ready',function(){connection.queue('stocks.result',{autoDelete:false,durable:true},function(q){q.subscribe(function(message){vardata;try{data=JSON.parse(message.data.toString('utf8'));}catch(err){console.log(err);}for(vari=0;i<data.length;i++){for(varclientinstocks){if(stocks.hasOwnProperty(client)){varws=stocks[client].ws;for(varsymbolinstocks[client]){if(stocks[client].hasOwnProperty(symbol)&&symbol===data[i]['symbol']){stocks[client][symbol]=data[i]['price'];varprice=parseFloat(stocks[client][symbol]);Stomp.send_frame(ws,{"command":"MESSAGE","headers":{"destination":"/queue/stocks."+symbol},content:JSON.stringify({price:price})});}}}}}});});});
The payload being received from the stocks.result message queue looks like the following:
[{"symbol":"AAPL","price":149.34},{"symbol":"GOOG","price":593.2600000000037}]
After parsing the payload, the block of code iterates over the result, and over a master list of stocks being stored across all connected clients. In the process of iterating over a JavaScript object, you must check to ensure that the value being passed during the iteration is part of the object by using myObject.hasOwnProperty(myIteratorValue). It maps the updated price with the price being stored and sends a message back to the connected client using STOMP over that specific destination.
When the client makes a request for a new stock, it gets added to the master list of stocks. A separate block of code runs at an interval to send the master list to a stocks.work queue, which gets picked up by the daemon.js to find the updated price and send it back over the stocks.result queue. One of the prime reasons you do this is that it is easier to scale and the system can process more requests if needed by adding more daemons, without any adverse effect. The following code shows the updater method. It creates a string array of stock symbols, and publishes that to the stocks.work queue:
varupdater=setInterval(function(){varst=[];for(varclientinstocks){for(varsymbolinstocks[client]){if(symbol!=='ws'){st.push(symbol);}}}if(st.length>0){connection.publish('stocks.work',JSON.stringify({"stocks":st}),{deliveryMode:2});}},10000);
The Stock Price Daemon
The following code is for the daemon, which takes in an array of stock symbols, and spits out a JSON object with the up-to-date values using Yahoo YQL. Create a new file called daemon.js and insert the following snippet:
#!/usr/bin/env nodevarrequest=require('request'),amqp=require('amqp');module.exports=Stocks;functionStocks(){varself=this;}Stocks.prototype.lookupByArray=function(stocks,cb){varcsv_stocks='"'+stocks.join('","')+'"';varenv_url='&env=http%3A%2F%2Fdatatables.org%2Falltables.env&format=json';varurl='https://query.yahooapis.com/v1/public/yql';vardata=encodeURIComponent('select * from yahoo.finance.quotes where symbol in ('+csv_stocks+')');vardata_url=url+'?q='+data+env_url;request.get({url:data_url,json:true},function(error,response,body){varstocksResult=[];if(!error&&response.statusCode==200){vartotalReturned=body.query.count;for(vari=0;i<totalReturned;++i){varstock=body.query.results.quote[i];varstockReturn={'symbol':stock.symbol,'price':stock.Ask};stocksResult.push(stockReturn);}cb(stocksResult);}else{console.log(error);}});};varmain=function(){varconnection=amqp.createConnection({host:'localhost',login:'websockets',password:'rabbitmq'});varstocks=newStocks();connection.on('ready',function(){connection.queue('stocks.work',{autoDelete:false,durable:true},function(q){q.subscribe(function(message){varjson_data=message.data.toString('utf8');vardata;console.log(json_data);try{data=JSON.parse(json_data);}catch(err){console.log(err);}stocks.lookupByArray(data.stocks,function(stocks_ret){vardata_str=JSON.stringify(stocks_ret);connection.publish('stocks.result',data_str,{deliveryMode:2});});});});});};if(require.main===module){main();}
This daemon can be executed using node daemon.js, and will connect to RabbitMQ and process the work it pulls from the RabbitMQ message queue. Several conventions should be noticeable from the WebSocket STOMP server, including the method of connection, and processing the ready event. The daemon will listen to the stocks.work queue, however, to get a list of stocks to look up, and in the end push the result back into the stocks.result queue. If you take a look at the Stocks.prototype.lookupByArray function, it’s issuing a Yahoo YQL call for the stocks requested and returning the JSON payload, as seen earlier.
Processing STOMP Requests
Previous to diving into the server interaction with RabbitMQ, you saw how to achieve connection with STOMP over WebSocket by using your library. Let’s continue on and flesh out the rest of the commands necessary to interact with the frontend:
wss.on('connection',function(ws){varsessionid=uuid.v4();stocks[sessionid]={};connected_sessions.push(ws);stocks[sessionid]['ws']=ws;ws.on('message',function(message){varframe=Stomp.process_frame(message);varheaders=frame['headers'];switch(frame['command']){case"CONNECT":Stomp.send_frame(ws,{command:"CONNECTED",headers:{session:sessionid},content:""});break;case"SUBSCRIBE":varsubscribeSymbol=symbolFromDestination(frame['headers']['destination']);stocks[sessionid][subscribeSymbol]=0;break;case"UNSUBSCRIBE":varunsubscribeSymbol=symbolFromDestination(frame['headers']['destination']);deletestocks[sessionid][unsubscribeSymbol];break;case"DISCONNECT":console.log("Disconnecting");closeSocket();break;default:Stomp.send_error(ws,"No valid command frame");break;}});varsymbolFromDestination=function(destination){returndestination.substring(destination.indexOf('.')+1,destination.length);};varcloseSocket=function(){ws.close();if(stocks[sessionid]&&stocks[sessionid]['ws']){stocks[sessionid]['ws']=null;}deletestocks[sessionid];};ws.on('close',function(){closeSocket();});process.on('SIGINT',function(){console.log("Closing via break");closeSocket();process.exit();});
As with previous examples, upon a successful connection a UUID is generated that will act as your sessionid for passing back and forth in the STOMP frame. The frame will get parsed and placed in the JavaScript object. From there you perform different actions based on the frame command passed. You’ve already seen the code for CONNECT, and so we’ll focus on SUBSCRIBE, UNSUBSCRIBE, and DISCONNECT.
Both subscribing and unsubscribing modify your stocks object. With subscribing, you’re adding a new symbol to the existing list of stocks for that sessionid. Unsubscribing is met by just removing that symbol from the list so it won’t be passed back to the client. Receiving a DISCONNECT command from the client is met with closing the WebSocket and cleaning up any references to that and the client in the stocks object. Because this is an app to be run from the console, there is a chance of receiving a Ctrl-C, which would break the connection. To handle this, hook into the SIGINT event that gets fired, so you can close the socket gracefully and on your own terms.
Client
The client is a simple interface with stocks that vary in price based on data returned from the server. The form at the top takes a stock symbol as input, and attempts to SUBSCRIBE over STOMP to get updates from the server. While the subscribe request is being sent, a table row gets added for the new symbol as well as a placeholder of “Retrieving…” while waiting for data to return.
Figure 4-2 shows a working example of the stock-ticker application.
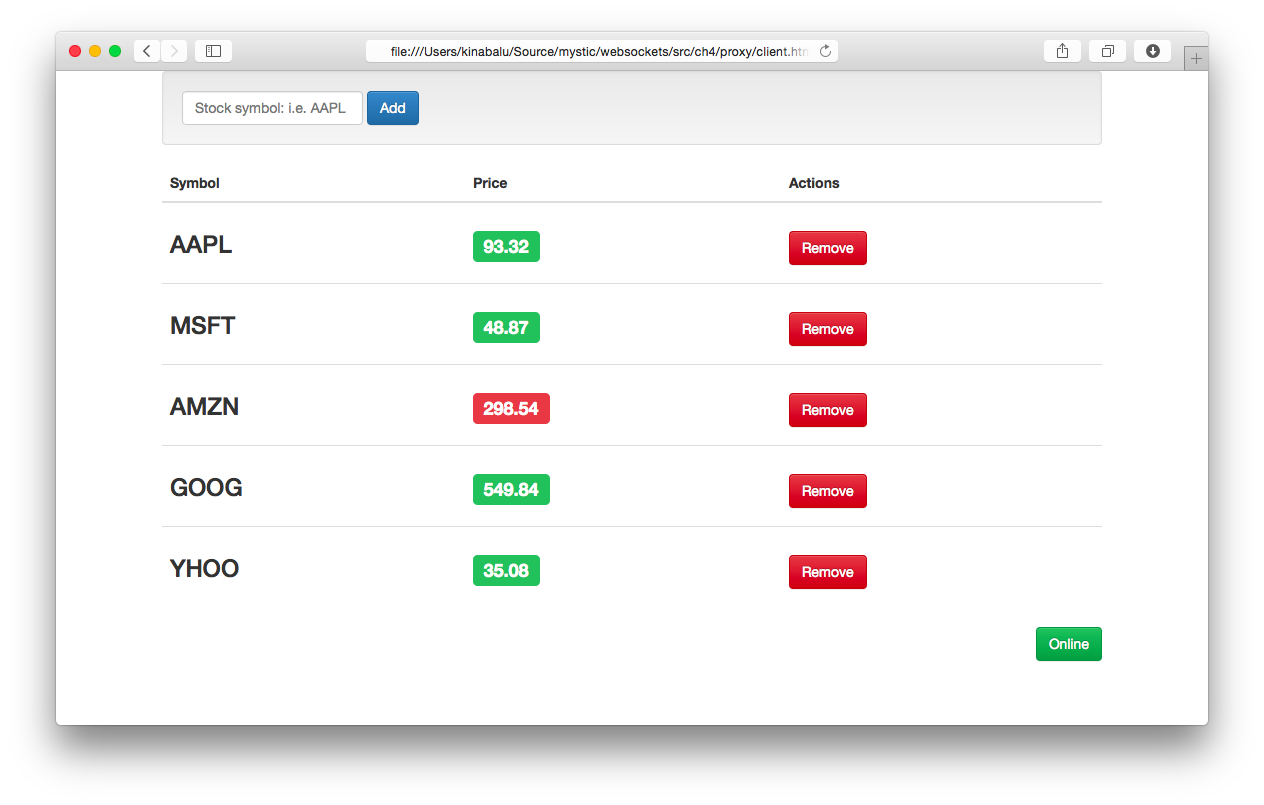
Figure 4-2. Stocks example of STOMP over WebSocket
The markup for the example is shown in the following code. It outlines a simple form that calls the subscribe method (which is described next), and the table containing the stock symbols, the up-to-date pricing from the service, and a Remove button. In addition, a status indicator of connection to the WebSocket server has been added:
<divclass="vertical-center"><divclass="container"><divclass="well"><formrole="form"class="form-inline"id="add_form"onsubmit="subscribe($('#symbol').val()); return false;"><divclass="form-group"><inputclass="form-control"type="text"id="symbol"name="symbol"placeholder="Stock symbol: i.e. AAPL"value=""autofocus/></div><buttontype="submit"class="btn btn-primary">Add</button></form></div><tableclass="table"id="stockTable"><thead><tr><th>Symbol</th><th>Price</th><th>Actions</th></tr></thead><tbodyid="stockRows"><trid="norows"><tdcolspan="3">No stocks found, add one above</td></tr></tbody></table><divclass="text-right"><p><aid="connection"class="btn btn-danger"href="#"onclick="connect();">Offline</a></p></div></div></div>
Several functions make up your client app, and they will be described separately in the order they are executed. The first function is subscribe, which adds a new symbol to the interface and communicates that to the server:
varsubscribe=function(symbol){if(stocks.hasOwnProperty(symbol)){alert('You already added the '+symbol+' symbol');return;}stocks[symbol]=0.0;Stomp.send_frame(ws,{"command":"SUBSCRIBE","headers":{"destination":"/queue/stocks."+symbol,},content:""});vartbody=document.getElementById('stockRows');varnewRow=tbody.insertRow(tbody.rows.length);newRow.id=symbol+'_row';newRow.innerHTML='<td><h3>'+symbol+'</h3></td>'+'<td id="'+symbol+'">'+'<h3>'+'<span class="label label-default">Retrieving..</span>'+'</h3>'+'</td>'+'<td>'+'<a href="#" onclick="unsubscribe(\''+symbol+'\');" class="btn btn-danger">Remove</a></td>';if(!$('#norows').hasClass('hidden')){$('#norows').addClass('hidden');}$('#symbol').val('');$('#symbol').focus();}
The first thing to do whenever receiving user input is to perform validation, which is done to check whether you already have that symbol in your list and return an error if found. If all is fine, you initialize the symbol to your list of stocks and send a new SUBSCRIBE frame to the server. The rest of the code is for the user interface, and adds a table row with default values while waiting for a legitimate value from the server.
If a client can subscribe to a stock update, it should be able to unsubscribe as well. This next snippet does exactly that, and is referenced in the previous code for remove:
Object.size=function(obj){varsize=0,key;for(keyinobj){if(obj.hasOwnProperty(key))size++;}returnsize;};varunsubscribe=function(symbol){Stomp.send_frame(ws,{"command":"UNSUBSCRIBE","headers":{"destination":"/queue/stocks."+symbol,},content:""});$('#'+symbol+'_row').remove();deletestocks[symbol];if(Object.size(stocks)===0){$('#norows').removeClass('hidden');}}
To unsubscribe, you perform the following tasks:
-
Send the
UNSUBSCRIBEcommand in a STOMP frame with the symbol as part of the destination. -
Remove the table row in the user interface.
-
Remove the entry in the
stocksobject. -
Check whether there are any more symbols in the
stocksobject, and if not, unhide the#norowsHTML block.
The functions in the previous two code snippets represent all the actions a user can take with your interface: subscribe and unsubscribe. Now let’s circle back to the connect() function, shown previously, without details about its handlers. The first is the more elaborate form using the stomp_helper.js library for handling open events:
varonOpenHandler=function(e){Stomp.send_frame(ws,{"command":"CONNECT","headers":{login:"websockets",passcode:"rabbitmq"},content:""});}
In short, upon getting a connection to your WebSocket server, you send your CONNECT command with authentication information over the STOMP frame. In order to close the connection, you follow a similar path, and provide notification for the user interface:
varonline=false;varstatusChange=function(newStatus){$('#connection').html((newStatus?'Online':'Offline'));$('#connection').addClass((newStatus?'btn-success':'btn-danger'));$('#connection').removeClass((newStatus?'btn-danger':'btn-success'));online=newStatus;}varswitchOnlineStatus=function(){if(online)logoff();elseconnect();}varlogoff=function(){statusChange(false);Stomp.send_frame(ws,{"command":"DISCONNECT"});returnfalse;}
The HTML code contains a status button that when clicked will run the switchOnlineStatus function. This will either disconnect you from the server, or reconnect you as seen earlier. The logoff function sends your DISCONNECT command using a STOMP frame to tell the server to perform its own disconnection routines.
All of the work done on the server end to retrieve stocks through RabbitMQ is put into action in the following code. As you’ll see, your onMessageHandler takes data from the server and updates the frontend with the new values:
varupdateStockPrice=function(symbol,originalValue,newValue){varvalElem=$('#'+symbol+' span');valElem.html(newValue.toFixed(2));varlostValue=(newValue<originalValue);valElem.addClass((lostValue?'label-danger':'label-success'))valElem.removeClass((lostValue?'label-success':'label-danger'))}varonMessageHandler=function(e){frame=Stomp.process_frame(e.data);switch(frame['command']){case"CONNECTED":statusChange(true);break;case"MESSAGE":vardestination=frame['headers']['destination'];varcontent;try{content=JSON.parse(frame['content']);}catch(ex){console.log("exception:",ex);}varsub_stock=destination.substring(destination.indexOf('.')+1,destination.length);updateStockPrice(sub_stock,stocks[sub_stock],content.price);stocks[sub_stock]=content.price;break;}}
When a new message event is passed, the code will process that data as a STOMP frame. The process will be to check for either the CONNECTED or MESSAGE commands from the frame. Commands that will be processed include the following:
CONNECTED-
Call the
statusChange(true)to change the button status to be “Online” MESSAGE-
Retrieve the destination header, parse the content, and update the stock price in the interface
The client has active portions with the subscribe/unsubscribe/disconnect portion, and the passive portions that cater to receiving data from the server. The MESSAGE events being fired will be tied to a STOMP destination, and the stocks will be updated accordingly based on the data retrieved.
You’ve successfully implemented the most basic functions available in the STOMP 1.0 protocol. The mapping between STOMP and WebSocket can be simple, and there are a few more commands that we have left unimplemented in your node-based proxy: BEGIN, COMMIT, ACK, and on the server side RECEIPT.
Mapping STOMP over WebSocket achieves two things: it shows you how to layer a different protocol over WebSocket by using the subprotocol portion of the spec, and enables talking to an AMQP server without specifically needing a server component written. In the next section, you’ll learn how to connect to RabbitMQ with SockJS by using the Web-Stomp plugin with RabbitMQ. You’ll learn more about using SockJS in Chapter 5, which covers compatibility with older browsers. Several options are available for messaging, including these popular ones:
Using RabbitMQ with Web-Stomp
Throughout this chapter you’ve been writing a server implementation of STOMP to effectively proxy commands to RabbitMQ by using AMQP. This hopefully has shown how easy it can be to layer another protocol on top of WebSocket. Now to round out the end of the chapter, you’ll learn how to set up RabbitMQ with Web-Stomp, a plug-in that allows RabbitMQ to accept STOMP. The plug-in exposes a SockJS-compatible bridge over HTTP, which is an alternative transport library (this is discussed in more detail in Chapter 5). It enhances compatibility for older browsers that don’t have native support for WebSocket.
STOMP Client for Web and Node.js
For a more complete implementation of your work in this chapter, download the STOMP Over WebSocket library. It provides a JavaScript client library for accessing servers using STOMP 1.0 and 1.1 over WebSocket, and a Node.js library for doing the same over WebSocket along with an option for TCP sockets via STOMP.
Installing the Web-Stomp Plug-in
Let’s edit that provisioning shell script used earlier in the chapter to set up RabbitMQ. In the script, after stopping the RabbitMQ server during installation, you’ll add the following line:
rabbitmq-plugins enable rabbitmq_web_stomp
In addition, your virtual machine needs editing, so forward port 15674, which is opened by the previously installed plug-in to listen for SockJS requests. You’ll modify the existing Vagrantfile and add the following line with all the other network config options:
config.vm.network :forwarded_port, guest: 15674, host: 15674
After doing so, if the original VirtualBox instance is still running, you can run vagrant halt or vagrant destroy, and then rerun vagrant up to re-create the instance. If you’ve destroyed, then you’re done, and it will open the new port and turn on the new plug-in. If you’ve halted, you can perform the following tasks:
vagrant ssh
sudo su -
rabbitmq-plugins enable rabbitmq_web_stomp
This enables a new plug-in called Web-Stomp and exposes port 15674. Rabbit has standardized on using SockJS for all WebSocket communication, and we will discuss that library further in Chapter 5. To continue, you’ll want to download the JavaScript STOMP library available at stomp.js. Then you can continue changing up your client code to use the Web-Stomp endpoint.
Echo Client for Web-Stomp
Let’s build a simple echo client that subscribes to a queue named /topic/echo and then sends and receives messages. At the top of your HTML file, include the following JavaScript statements:
<scriptsrc="http://cdn.sockjs.org/sockjs-0.3.min.js"></script><scriptsrc="stomp.min.js"></script>
You can choose to download the minimized version as referenced in this code, or the unminimized version if you prefer. In either case, you can download the stomp-websocket library on GitHub.
Your HTML will be nearly identical to the previous echo example, and you’ll modify the JavaScript to suit your needs by using the RabbitMQ Web-Stomp plug-in and the Stomp.js library:
<!DOCTYPE html><html><head><title>Echo Server</title></head><bodylang="en"><h1>Web Stomp Echo Server</h1><ulid="messages"></ul><formonsubmit="send_message(); return false;"><inputtype="text"name="message"style="width: 200px;"id="message"placeholder="Type text to echo in here"value=""autofocus/><inputtype="button"value="Send!"onclick="send_message();"/></form></body></html>
Your first task is to initialize the RabbitMQ SockJS endpoint, and then pass that to the STOMP JavaScript library. The Stomp.js library allows you to use native WebSocket, or anything that offers the same API such as SockJS. Because SockJS doesn’t offer heartbeat support, you’ll keep it turned off. The Stomp.js library offers several opportunities for callback and for performing whatever task you’d like on the data that comes back. Here, you’re just outputting the data to the console:
varws=newSockJS('http://localhost:15674/stomp');varclient=Stomp.over(ws);client.heartbeat.outgoing=0;client.heartbeat.incoming=0;client.debug=function(str){console.log(str);}
When you connect to a RabbitMQ queue, you’ll simply offer login details, and a few callbacks along with the host (or virtualhost in RabbitMQ terms). The append_log function will be identical to that shown previously, but implementing the callbacks required for connect, error, and a new send_message function is shown here:
client.connect('websockets','rabbitmq',connect_callback,error_callback.'/');varconnect_callback=function(x){id=client.subscribe("/topic/echo",function(message){append_log(message.body);console.log(JSON.stringify(message.body));});};varerror_callback=function(error){console.log(error.headers.message);};
In connect_callback you issue a subscribe command for the queue /topic/echo so any messages that show up in that bin will be appended to your UI text area. The implementation of error_callback simply outputs any error received to the console for debugging as needed.
You now have a client that will echo messages dumped into the queue to a text area. Next you will hook up the submission process to a new send_message function that looks very close to the WebSocket version:
varsend_message=function(data){client.send("/topic/echo",{},document.getElementById('message').value);};
The major difference here is that rather than just sending through WebSocket, you provide the queue (destination) and extra headers, of which you pass none in this example.
Summary
In this chapter you created a subprotocol over WebSocket for STOMP 1.0. As the server got built, the client evolved to support the commands needed along the wire to support the protocol. In the end, while the client you built doesn’t fully support all of STOMP 1.0, it allowed you to witness how easy it is to layer another protocol on top of WebSocket and connect it to a message broker like RabbitMQ.
As you saw in Chapter 2, implementing STOMP over WebSocket is one of the “Registered Protocols” (and also falls under an “Open Protocol”). Nothing is stopping you from using the information in this chapter to create your own protocol for communication, because the WebSocket spec fully supports this.
The next chapter explores the compatibility issues you face when choosing to implement WebSocket, and how to ensure that you can start using the power of WebSocket today.
Get WebSocket now with the O’Reilly learning platform.
O’Reilly members experience books, live events, courses curated by job role, and more from O’Reilly and nearly 200 top publishers.

