Chapter 6. Advanced Topics
This chapter covers topics that are very important, but slightly more complex than the rest of the book. We will dive into adding effects to sounds, generating synthetic sound effects without any audio buffers at all, simulating effects of different acoustic environments, and spatializing sound in 3D space.
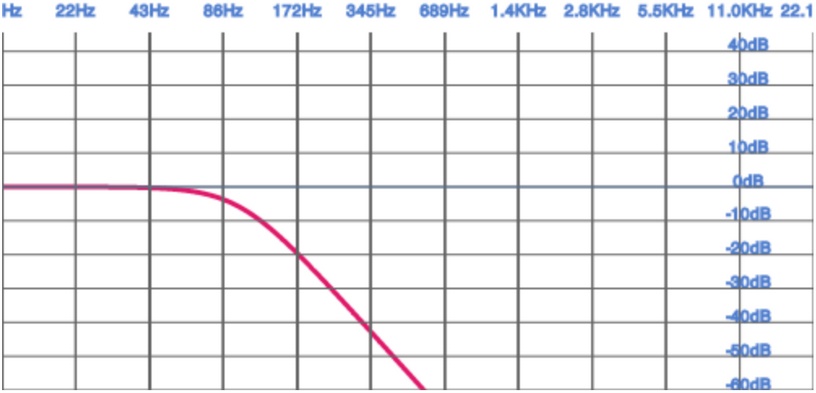
A filter can emphasize or de-emphasize certain parts of the frequency spectrum of a sound. Visually, it can be shown as a graph over the frequency domain called a frequency response graph (see Figure 6-1). For each frequency, the higher the value of the graph, the more emphasis is placed on that part of the frequency range. A graph sloping downward places more emphasis on low frequencies and less on high frequencies.
Web Audio filters can be configured with three parameters: gain, frequency, and a quality factor (also known as Q). These parameters all affect the frequency response graph differently.
There are many kinds of filters that can be used to achieve certain kinds of effects:
- Low-pass filter
Makes sounds more muffled
- High-pass filter
Makes sounds more tinny
- Band-pass filter
Cuts off lows and highs (e.g., telephone filter)
- Low-shelf filter
Affects the amount of bass in a sound (like the bass knob on a stereo)
- High-shelf filter
Affects the amount of treble in a sound (like the treble knob on a stereo)
- Peaking filter
Affects the amount of midrange in a sound (like the mid knob on a stereo)
- Notch filter
Removes unwanted sounds in a narrow frequency range
- All-pass filter
Creates phaser effects
All of these biquad filters stem from a common mathematical model and can all be graphed like the low-pass filter in Figure 6-1. More details about these filters can be found in more mathematically demanding books such as Real Sound Synthesis for Interactive Applications by Perry R. Cook (A K Peters, 2002), which I highly recommend reading if you are interested in audio fundamentals.
Adding Effects via Filters
Using the Web Audio API, we can apply the filters discussed above
using BiquadFilterNodes. This type of audio node is very
commonly used to build equalizers and manipulate sounds in interesting
ways. Let’s set up a simple low-pass filter to eliminate low frequency
noise from a sound sample:
// Create a filtervarfilter=context.createBiquadFilter();// Note: the Web Audio spec is moving from constants to strings.// filter.type = 'lowpass';filter.type=filter.LOWPASS;filter.frequency.value=100;// Connect the source to it, and the filter to the destination.
Demo: to listen to a filter effect, visit http://webaudioapi.com/samples/filter/.
The BiquadFilterNode has support for all of the
commonly used second-order filter types. We can configure these nodes with
the same parameters as discussed in the previous section, and also
visualize the frequency response graphs by using the
getFrequencyResponse method on the node. Given an array of
frequencies, this function returns an array of magnitudes of responses
corresponding to each frequency.
Chris Wilson and Chris Rogers put together a great visualizer sample (Figure 6-2) that shows the frequency responses of all of the filter types available in the Web Audio API.
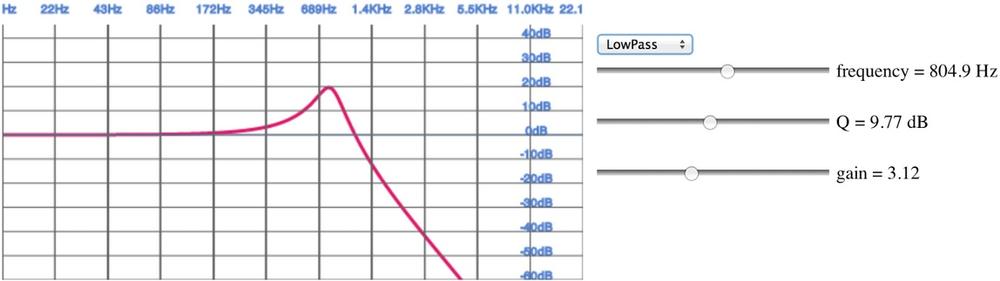
Demo: to plot frequency responses for various filter configurations using this tool, visit http://webaudioapi.com/samples/frequency-response/.
Procedurally Generated Sound
Up to now, we have been assuming that your game’s sound sources are static. An audio designer creates a bunch of assets and hands them over to you. Then, you play them back with some parameterization depending on local conditions (for example, the room ambiance and relative positions of sources and listeners). This approach has a few disadvantages:
Sound assets will be very large. This is especially bad on the Web, where instead of loading from a hard drive, you load from a network (at least the first time), which is roughly an order of magnitude slower.
Even with many assets and tweaks to each, there is limited variety.
You need to find assets by scouring sound effects libraries, and then maybe worry about royalties. Plus, chances are, any given sound effect is already being used in other applications, so your users have unintended associations.
We can use the Web Audio API to fully generate sound procedurally.
For example, let’s simulate a gun firing. We begin with a buffer of white
noise, which we can generate with a ScriptProcessorNode as
follows:
functionWhiteNoiseScript(){this.node=context.createScriptProcessor(1024,1,2);this.node.onaudioprocess=this.process;}WhiteNoiseScript.prototype.process=function(e){varL=e.outputBuffer.getChannelData(0);varR=e.outputBuffer.getChannelData(1);for(vari=0;i<L.length;i++){L[i]=((Math.random()*2)-1);R[i]=L[i];}};
For more information on ScriptProcessorNodes, see
Audio Processing with JavaScript.
This code is not an efficient implementation because JavaScript is
required to constantly and dynamically create a stream of white noise. To
increase efficiency, we can programmatically generate a mono AudioBuffer of white noise as follows:
functionWhiteNoiseGenerated(callback){// Generate a 5 second white noise buffer.varlengthInSamples=5*context.sampleRate;varbuffer=context.createBuffer(1,lengthInSamples,context.sampleRate);vardata=buffer.getChannelData(0);for(vari=0;i<lengthInSamples;i++){data[i]=((Math.random()*2)-1);}// Create a source node from the buffer.this.node=context.createBufferSource();this.node.buffer=buffer;this.node.loop=true;this.node.start(0);}
Next, we can simulate various phases of the gun firing—attack, decay, and release—in an envelope:
functionEnvelope(){this.node=context.createGain()this.node.gain.value=0;}Envelope.prototype.addEventToQueue=function(){this.node.gain.linearRampToValueAtTime(0,context.currentTime);this.node.gain.linearRampToValueAtTime(1,context.currentTime+0.001);this.node.gain.linearRampToValueAtTime(0.3,context.currentTime+0.101);this.node.gain.linearRampToValueAtTime(0,context.currentTime+0.500);};
Finally, we can connect the voice outputs to a filter to allow a simulation of distance:
this.voices=[];this.voiceIndex=0;varnoise=newWhiteNoise();varfilter=context.createBiquadFilter();filter.type=0;filter.Q.value=1;filter.frequency.value=800;// Initialize multiple voices.for(vari=0;i<VOICE_COUNT;i++){varvoice=newEnvelope();noise.connect(voice.node);voice.connect(filter);this.voices.push(voice);}vargainMaster=context.createGainNode();gainMaster.gain.value=5;filter.connect(gainMaster);gainMaster.connect(context.destination);
This example is borrowed from BBC’s gunfire effects page with small modifications, including a port to JavaScript.
Demo: to hear a procedural gunshot effect, visit http://webaudioapi.com/samples/procedural/.
As you can see, this approach is very powerful but gets complicated pretty quickly, going beyond the scope of this book. For more information about procedural sound generation, take a look at Andy Farnell’s Practical Synthetic Sound Design tutorials and book.
Room Effects
Before sound gets from its source to our ears, it bounces off walls, buildings, furniture, carpets, and other objects. Every such collision changes properties of the sound. For example, clapping your hands outside sounds very different from clapping your hands inside a large cathedral, which can cause audible reverberations for several seconds. Games with high production value aim to imitate these effects. Creating a separate set of samples for each acoustic environment is often prohibitively expensive, since it requires a lot of effort from the audio designer, and a lot of assets, and thus a larger amount of game data.
The Web Audio API comes with a facility to simulate these various
acoustic environments called a ConvolverNode. Examples of effects that you can
get out of the convolution engine include chorus effects, reverberation,
and telephone-like speech.
The idea for producing room effects is to play back a reference sound in a room, record it, and then (metaphorically) take the difference between the original sound and the recorded one. The result of this is an impulse response that captures the effect that the room has on a sound. These impulse responses are painstakingly recorded in very specific studio settings, and doing this on your own requires serious dedication. Luckily, there are sites that host many of these pre-recorded impulse response files (stored as audio files) for your convenience.
The Web Audio API provides an easy way to apply these impulse
responses to your sounds using the ConvolverNode. This node takes an impulse
response buffer, which is a regular AudioBuffer with the impulse response file
loaded into it. The convolver is effectively a very complex filter (like
the BiquadFilterNode), but rather than
selecting from a set of effect types, it can be configured with an
arbitrary filter response:
varimpulseResponseBuffer=null;functionloadImpulseResponse(){loadBuffer('impulse.wav',function(buffer){impulseResponseBuffer=buffer;});}functionplay(){// Make a source node for the sample.varsource=context.createBufferSource();source.buffer=this.buffer;// Make a convolver node for the impulse response.varconvolver=context.createConvolver();// Set the impulse response buffer.convolver.buffer=impulseResponseBuffer;// Connect graph.source.connect(convolver);convolver.connect(context.destination);}
The convolver node “smushes” the input sound and its impulse response by computing a convolution, a mathematically intensive function. The result is something that sounds as if it was produced in the room where the impulse response was recorded. In practice, it often makes sense to mix the original sound (called the dry mix) with the convolved sound (called the wet mix), and use an equal-power crossfade to control how much of the effect you want to apply.
It’s also possible to generate these impulse responses synthetically, but this topic is outside of the scope of this book.
Demo: to toggle between multiple room effects, visit http://webaudioapi.com/samples/room-effects/.
Spatialized Sound
Games are often set in a world where objects have positions in space, either in 2D or in 3D. If this is the case, spatialized audio can greatly increase the immersiveness of the experience. Luckily, the Web Audio API comes with built-in positional audio features (stereo for now) that are quite straightforward to use.
As you experiment with spatialized sound, make sure that you are listening through stereo speakers (preferably headphones). This will give you a better idea of how the left and right channels are being transformed by your spatialization approach.
The Web Audio API model has three aspects of increasing complexity, with many concepts borrowed from OpenAL:
Position and orientation of sources and listeners
Parameters associated with the source audio cones
Relative velocities of sources and listeners
There is a single listener (AudioListener) attached to the Web Audio API
context that can be configured in space through position and orientation.
Each source can be passed through a panner node (AudioPannerNode), which spatializes the input
audio. Based on the relative position of the sources and the listener, the
Web Audio API computes the correct gain modifications.
There are a few things to know about the assumptions that the API makes. The first is that the listener is at the origin (0, 0, 0) by default. Positional API coordinates are unitless, so in practice, it takes some multiplier tweaking to make things sound the way you want. Secondly, orientations are specified as direction vectors (with a length of one). Finally, in this coordinate space, positive y points upward, which is the opposite of most computer graphics systems.
With these things in mind, here’s an example of how you can change
the position of a source node that is being spatialized in 2D via a panner
node (PannerNode):
// Position the listener at the origin (the default, just added for the sake of being explicit)context.listener.setPosition(0,0,0);// Position the panner node.// Assume X and Y are in screen coordinates and the listener is at screen center.varpanner=context.createPanner();varcenterX=WIDTH/2;varcenterY=HEIGHT/2;varx=(X-centerX)/WIDTH;// The y coordinate is flipped to match the canvas coordinate space.vary=(Y-centerY)/HEIGHT;// Place the z coordinate slightly in behind the listener.varz=-0.5;// Tweak multiplier as necessary.varscaleFactor=2;panner.setPosition(x*scaleFactor,y*scaleFactor,z);// Convert angle into a unit vector.panner.setOrientation(Math.cos(angle),-Math.sin(angle),1);// Connect the node you want to spatialize to a panner.source.connect(panner);
In addition to taking into account relative positions and orientations, each source has a configurable audio cone, as shown in Figure 6-3.
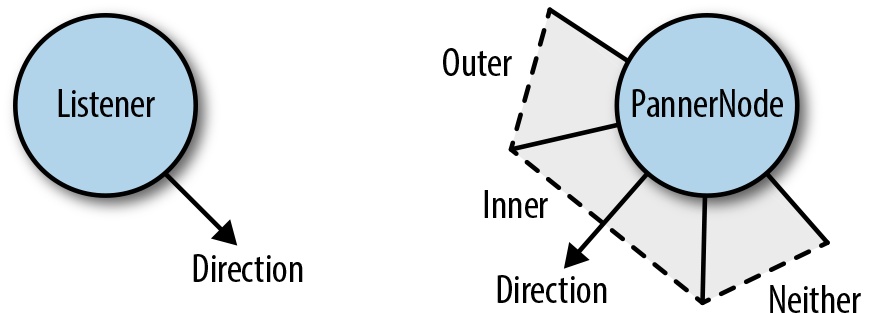
Once you have specified an inner and outer cone, you end up with a separation of space into three parts, as seen in Figure 6-3:
Inner cone
Outer cone
Neither cone
Each of these sub-spaces can have a gain multiplier associated with it as an extra hint for the positional model. For example, to emulate targeted sound, we might have the following configuration:
panner.coneInnerAngle=5;panner.coneOuterAngle=10;panner.coneGain=0.5;panner.coneOuterGain=0.2;
A dispersed sound can have a very different set of parameters. An omnidirectional source has a 360-degree inner cone, and its orientation makes no difference for spatialization:
panner.coneInnerAngle=180;panner.coneGain=0.5;
In addition to position, orientation, and sound cones, sources and listeners can also specify velocity. This value is important for simulating pitch changes as a result of the doppler effect.
Demo: to experiment with 2D spatialized sound, visit http://webaudioapi.com/samples/spatialized/.
Audio Processing with JavaScript
Generally speaking, the Web Audio API aims to provide enough primitives (mostly via audio nodes) to do most common audio tasks. The idea is that these modules are written in C++ and are much faster than the same code written in JavaScript.
However, the API also provides a ScriptProcessorNode
that lets web developers synthesize and process audio directly in
JavaScript. For example, you could prototype custom DSP effects using this
approach, or illustrate concepts for educational applications.
To get started, create a ScriptProcessorNode.
This node processes sound in chunks specified as a parameter to the node
(bufferSize), which must be a power of two. Err on the
side of using a larger buffer, since it gives you more of a safety margin
against glitches if the main thread is busy with other things, such as
page re-layout, garbage collection, or JavaScript callbacks:
// Create a ScriptProcessorNode.varprocessor=context.createScriptProcessor(2048);// Assign the onProcess function to be called for every buffer.processor.onaudioprocess=onProcess;// Assuming source exists, connect it to a script processor.source.connect(processor);
Once you have the audio data piping into a JavaScript function, you can analyze the stream by examining the input buffer, or directly change the output by modifying the output buffer. For example, we can easily swap the left and right channels by implementing the following script processor:
functiononProcess(e){varleftIn=e.inputBuffer.getChannelData(0);varrightIn=e.inputBuffer.getChannelData(1);varleftOut=e.outputBuffer.getChannelData(0);varrightOut=e.outputBuffer.getChannelData(1);for(vari=0;i<leftIn.length;i++){// Flip left and right channels.leftOut[i]=rightIn[i];rightOut[i]=leftIn[i];}}
Note that you should never do this channel swap in production, since
using a ChannelSplitterNode followed by
a ChannelMergerNode is far more
efficient. As another example, we can add a random noise to the mix. We do
this by simply adding a random offset to the signal. By making the signal
completely random, we can generate white noise, which is actually quite
useful in many applications [see Procedurally Generated Sound]:
functiononProcess(e){varleftOut=e.outputBuffer.getChannelData(0);varrightOut=e.outputBuffer.getChannelData(1);for(vari=0;i<leftOut.length;i++){// Add some noiseleftOut[i]+=(Math.random()-0.5)*NOISE_FACTOR;rightOut[i]+=(Math.random()-0.5)*NOISE_FACTOR;}}
The main issue with using script processing nodes is performance. Using JavaScript to implement these mathematically-intensive algorithms is significantly slower than implementing them directly in the native code of the browser.
Demo: for a full example of script processor nodes, visit http://webaudioapi.com/samples/script-processor/.
Get Web Audio API now with the O’Reilly learning platform.
O’Reilly members experience books, live events, courses curated by job role, and more from O’Reilly and nearly 200 top publishers.

