Chapter 4. Developing a Windows Application
Now that you’ve become familiar with the latest features of the VB 2005 language and the new productivity tools added to Visual Studio 2005, it’s time to build a complete application.
In this chapter, you will build a Windows application that you can use to create an online catalog of the books you own. The catalog stores details such as the ISBN (the book industry standard number used to uniquely identify a book), title, authors, publisher, and price of each volume in your collection. The application lets you search Amazon.com for information about particular titles by entering keywords in a search window. You can then store that information, including images of the book covers, in a personal database on your Windows workstation or PC.
Later in the chapter, you’ll add a second window to the application that lets users display the complete catalog of books stored in the local database and to display the details of any particular title.
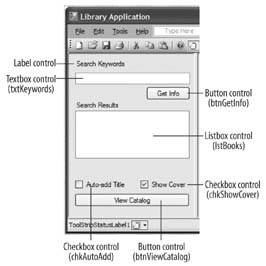
Figure 4-1 shows the main window of the finished application. The window includes two panels: a panel on the left for showing the results of Amazon.com keyword searches that you enter and a panel on the right for displaying the details of a particular book returned by the search. The main window contains the usual features you expect to find in a Windows application such as a menu, a toolbar, and a status bar. Figure 4-30 shows the finished application with both windows open.
You will build the application using several of the latest Visual Studio 2005 controls, including the SplitContainer, MenuStrip, ToolStrip, and StatusStrip controls. You will also work with data access controls and wizards that simplify the use of the ADO.NET classes for data access. You will use the Amazon.com web service to retrieve detailed information about your books and then save it for offline viewing, and you’ll see how easy it is to incorporate a web service in an application with Visual Studio 2005. Though multithreading has traditionally been seen as a black art, the new
BackgroundWorker control reduces its use to a drag-and-drop operation. You’ll use multithreading to keep the UI of your Windows application responsive while it’s accessing the Amazon.com web service.
Once the library application is complete, you will use ClickOnce, a new smart client deployment technique in the .NET Framework 2.0, to post it to an IIS host. ClickOnce is not only an easier way to deploy Windows applications that make use of the Internet, but ClickOnce also ensures that the user will be notified whenever an updated version of the application is posted to the server. You’ll use this feature to deploy an updated version of the library application at the end of this chapter.

Creating the Windows Application and Building the Main Window
The first step toward building the library application is to use Visual Studio 2005 to create a new Windows application project and then build the main window. You’ll use a variety of new controls that ship with Visual Basic 2005 to get the job done.
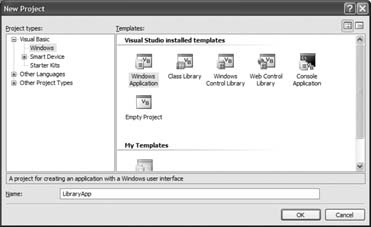
Launch Visual Studio 2005 and create a new Windows application by selecting File → New Project. Choose the Visual Basic/Windows project type in the Project types dialog panel and select the Windows Application template in the Templates panel, as shown in Figure 4-2. Name the project LibraryApp. Click OK. Visual Studio will create the project and display a blank form with the default name
Form1.vb[Design]. Project files are displayed in the Solution Explorer window to the right of the form design page. You can access the properties ofForm1in the Properties window, also to the right of the form design page. To give the application a public name, set the name ofForm1to “Library Application” by entering the string as itsTextproperty in the Properties window. When the main application window displays, this name will appear in its titlebar.Now you’re ready to construct the application main window. You’ll begin by adding an Office style menu to
Form1. Click on the Toolbox tab to the left of theForm1designer page and drag-and-drop aMenuStripcontrol from the Menus & Toolbars tab ontoForm1. The empty menu bar is automatically placed at the top of the page, and an icon for the control appears in a strip at the bottom of the designer page. You can display the Properties window for the control by clicking either the empty bar or the control icon.Click on the Insert Standard Items link in the
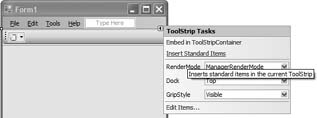
MenuStripTasks menu to insert the commonly used File, Edit, Tools, and Help menus, as shown in Figure 4-3.Next, add a toolbar to the window by dragging-and-dropping the
ToolStripcontrol from the Menus & Toolbars tab in the Toolbox ontoForm1. Click on the Insert Standard Items link to add the list of commonly used toolbar icons as shown in Figure 4-4.The design for the main window shown in Figure 4-1 calls for a status bar that we’ll use to show progress in gathering information from Amazon.com when a user initiates a search. You’ll build the bar by dragging-and-dropping a
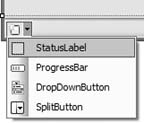
StatusStripcontrol ontoForm1, and then add aStatusLabelcontrol by selecting theStatusLabelitem from theStatusStripdrop-down listbox, as shown in Figure 4-5. TheStatusLabelcontrol works like anyLabelcontrol.To create the separate search and book details panels shown in Figure 4-1, drag-and-drop a
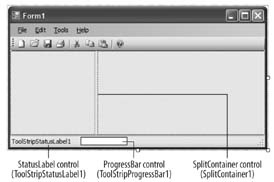
SplitContainercontrol from the Containers tab of the Toolbox ontoForm1. TheSplitContainercontrol represents a control consisting of a movable bar that divides a container’s display area into two resizable panels. Set theBorderStyleproperty of theSplitContainercontrol to “Fixed3D” so that it shows a three-dimensional border.At this point, your application window should look like the one shown in Figure 4-6.
Populate the left panel of the
SplitContainercontrol with the controls as shown in Figure 4-7 by dragging-and-dropping each control from the Toolbox onto the form. Name the controls as shown by clicking on each control and setting itsNameproperty in the Properties window.

Creating a Database to Store Books Information
The information about each book that a user acquires from Amazon.com needs to be saved to a local database on the PC or workstation. To provide this functionality, you need to add a database to your project. For this project, you’ll use a SQL database file to store your book data. Once you’ve created the database file, you’ll add a table to store the individual records for each book in your collection.
To add a database file to your project, first right-click on the project name,
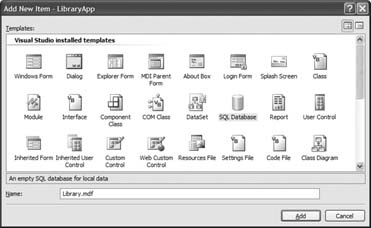
LibraryApp, in Solution Explorer and then select Add → New Item…. Now, in the Add New Item dialog box, select SQL Database and set the Name of the database file to Library.mdf, as shown in Figure 4-8. Click Add.The Library.mdf database file icon will now appear in the Solution Explorer window, and the Data Source Configuration Wizard will appear. As you won’t be using this wizard, click Cancel.
Now you’re ready to create the table to hold the records for the books in your library. Double-click the Library.mdf file icon to view it in more detail in the Database Explorer as shown in Figure 4-9.
Expand the Library.mdf file, right-click on the Tables subfolder icon, and select Add New Table. Visual Studio 2005 creates the table and displays a blank page (dbo: Table 1) that you’ll use to define its records.
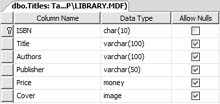
With a blank table in hand, you’ll now define its columns and fields. Enter the name of each field as shown in Figure 4-10. After entering a name, tab to the right to enter a data type. You can type in the data type shown in Figure 4-10, or select it from the drop-down menu provided by Visual Studio 2005. You’ll need to enter the Data Type for Title and Publisher manually to specify a 100 character length. Tab to the last column to specify whether null values are allowed. By default, they are. The ISBN field contains the primary key for each record. Select and right-click on the field and select Set Primary Key from the drop-down menu. Uncheck the Allow Nulls box for the field since it would be unacceptable to have a record in the database without a primary key. Figure 4-10 shows the completed page.
Save the table by selecting “Save Table 1” from the File menu. When prompted, name the table Titles.
Close the table window by right-clicking on its title tab and selecting Close.

Binding Library Data to the Form
You will now use the data-binding features of VB 2005 to bind the database that you have just created to the form. To do so, you need to add a data source to the Data Sources window.
Go to Data → Show Data Sources to display the Data Sources window.
Click on the Add New Data Source button at the top of the Data Sources window to add a new data source, as shown in Figure 4-11.
The Data Source Configuration Wizard will appear. Select Database as the Data Source type and click Next.
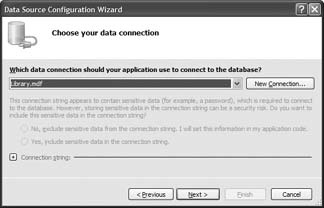
When the “Choose your data connection” dialog appears, you will notice that the Library.mdf file has already been selected, as shown in Figure 4-12). Click Next.
Now you have the option to save the connection string that the page will use to connect to the Library.mdf database in the application configuration file. This option allows you to change the database details easily without recompiling the application even after it has been deployed. This is the default, so leave the checkbox checked and click Next to go to the next step.
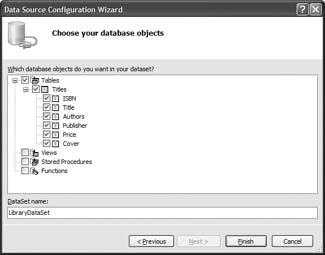
In the next window, the “Choose your database objects dialog,” you can select the table(s) you want to work with. For this project, check the Titles table, which contains the records for your stored books. This step is as shown in Figure 4-13.
That’s it! You’ve configured the Library.mdf database file as a data source without writing a line of code. Now click Finish.
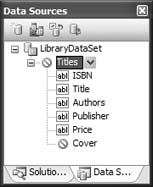
You should now see the Titles table displayed as a tree in the Data Sources window, as shown in Figure 4-14.
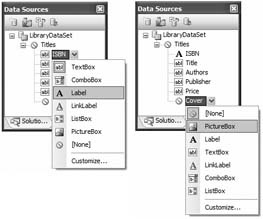
You will now change the binding of some of the fields in the table in the Data Sources window. Change the binding of the ISBN field from
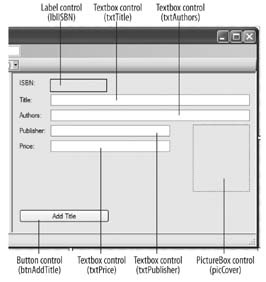
TextBoxtoLabelso that the ISBN of a book is displayed in a non-editableLabelcontrol (see Figure 4-15). Also, change the binding of the Cover field fromNonetoPictureBox. Doing so will display the data contained in the Cover field in aPictureBoxcontrol.Drag-and-drop the ISBN, Title, Authors, Publisher, Price, and Cover fields (individually) from the Titles table in the Data Sources window onto the right panel of the
SplitContainercontrol. Also, add in aButtoncontrol named Add Title. The form should now look like the one shown in Figure 4-16. Name the controls as shown in the figure callouts (the names appear in parentheses).You will notice that a couple of controls appeared at the bottom of the Form1.vb design page (see Figure 4-17). These controls perform all the magic of binding the data in your database to the controls on your form. Going into the details of what they do specifically is beyond the scope of this book.
You will also notice that a control known as the
BindingNavigatorcontrol is added to the form when you drag-and-drop the fields from the Data Sources window onto the form (see Figure 4-18). This control allows users to navigate through the records in the database. As we are not going to let the user view the list of books in this window, the control is not relevant in this case. So, set itsVisibleproperty toFalseso that it will not display on the form. Alternatively, you can just delete it.Once you’ve completed the Library Application form, you need to set a few of the properties of the newly added controls. First, you’ll want to set the
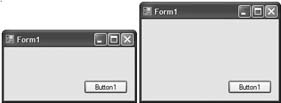
Anchorproperty of each control to ensure that each is correctly resized and positioned when a user resizes the form. TheAnchorproperty of a control determines where it should be positioned when the form is resized. For example, if a control’sAnchorproperty is set toTop, Left, the control’s position will be fixed. However, if itsAnchorproperty is set toBottom, Right, its position will be anchored to the bottom-right corner of the form (see Figure 4-19).


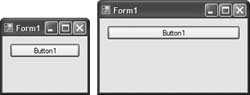
If the Anchor property is set to Top, Left, Right, the control will be resized horizontally when the form is resized (see Figure 4-20).
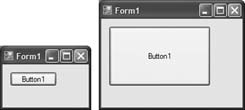
If the Anchor property is set to Top, Bottom, Left, Right, the control will be resized both vertically and horizontally when the form is resized (see Figure 4-21).
Set the Anchor property of each control on the main application window to the value shown in Table 4-1.
|
Control name |
Value |
|
| |
|
| |
|
| |
|
| |
|
|
|
|
| |
|
|
|
|
| |
|
| |
|
| |
|
| |
|
| |
|
|
While you’re at it, also set the properties of three other controls on the window to the values shown in Table 4-2.
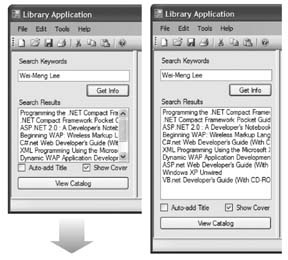
The resizing and reallocating of controls is much improved in VB 2005 compared to VB 6. By setting the Anchor property of each control, you can ensure that the controls are automatically resized or repositioned when the user resizes the form, as shown in Figure 4-22.
Adding a Web Reference to Amazon.com
The Library Application uses Amazon.com’s E-Commerce web service (ECS for short) to obtain detailed information about a book, such as its description, selling price, customers’ reviews, and cover image. To use the Amazon. com web service, you need to register as a user and use the subscription ID assigned to you by Amazon to access the service programmatically. You can register for the service at: www.amazon.com/gp/aws/landing.html. There is no charge for using the service. To continue with this example, you should register now.
Once you have registered with Amazon.com, you need to add a web reference to your project to use the service. Once you have added the web reference, Visual Studio 2005 can automatically generate a proxy class for you so that you can invoke the web service as if you were making calls to a normal object, as you will see in the next section, “Accessing the Amazon.com Web Services.”
To add a web reference to your project, right-click on the project name in Solution Explorer and then select Add Web Reference.
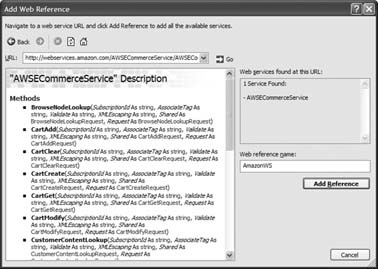
In the Add Web Reference window, enter the following URL and click Go: http://webservices.amazon.com/AWSECommerceService/AWSECommerceService.wsdl.
If the WSDL document is retrieved successfully, you can add it to your project by clicking the Add Reference button (see Figure 4-23). Name the web reference AmazonWS.
Accessing the Amazon.com Web Services
When a Library Application user enters search keywords for a book, the application needs to connect to Amazon.com’s web service to request a search and download the list of titles returned. While the user waits for the result, it’s always a good idea to report the status of the search in the StatusStrip control with some text as well as an hourglass cursor, as shown in Figure 4-24.
In this section, you’ll first program the controls that show status. You’ll use the
StatusLabel control on Form1 to display some status text while the search proceeds and change the cursor to an hourglass to provide a visual representation of work in progress. Once the status controls are coded, you’ll write the code that calls the Amazon.com web service and loads information retrieved by the keyword search into the ListBox control (lstBooks) that displays the result.

You will first define two global variables within the form to use the Amazon.com web service:
	Public Class Form1
		'---objects to store the response of the Web service
		Dim amazonResponse As AmazonWS.ItemSearchResponse = Nothing
		Dim amazonItems As AmazonWS.Item() = Nothing
To code the status control and change the default cursor to the hourglass, double-click on the Get Info button (
btnGetInfo) to switch to the code behind for itsClickevent handler. Enter the code shown in Example 4-1.Example 4-1. btnGetInfo Click event handlerPrivate Sub btnGetInfo_Click( _ ByVal sender As System.Object, _ ByVal e As System.EventArgs) _ Handles btnGetInfo.Click'---changes the cursor to an hourglass Me.Cursor = Cursors.WaitCursor ToolStripStatusLabel1.Text = "Retrieving book information…" GetBookInformation(Trim(txtKeywords.Text))End SubThe code in Example 4-1 displays status text (by setting the
Textproperty ofToolStripStatusLabel1) and changes the default cursor to use an hourglass (using theMe.Cursorproperty). Next, the event handler callsGetBookInformation, which calls the Amazon.com event handler and passes it the search keywords that the user has entered into thetxtKeywordtext box control.Now you need to code the
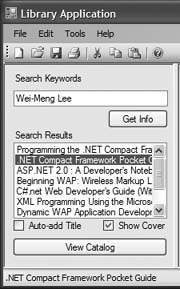
GetBookInformationsubroutine. TheGetBookInformationsubroutine takes a single parameter (keyword) and calls the Amazon.com web service. When the result is returned, display it in the Search Results window of the Library Application. Figure 4-25 shows the results you’ll get when you enter my name as the search string.
Add the GetBookInformation subroutine to the Form1 class on its codebehind page by entering the code shown in Example 4-2. Remember to assign the value of the subscription ID assigned you by Amazon.com to SubscriptionId.
Public Sub GetBookInformation(ByVal keyword As String)
	Dim itemSearchRequest As New AmazonWS.ItemSearchRequest
	Dim itemSearch As New AmazonWS.ItemSearch
	'---initialize objects
	With itemSearchRequest
        '---set the search keyword(s)
		.Keywords = keyword

		'---set the size of the response
		.ResponseGroup = New String() {"Medium"}

		'---set the SearchIndex or search mode
		.SearchIndex = "Books"
   End With

   With itemSearch
		'---set the Amazon.com SubscriptionId
		.SubscriptionId = "your_subscription_Id_here"
		.Request = New AmazonWS.ItemSearchRequest() _
           {itemSearchRequest}
   End With

   Try
		'---invoke the Amazon.com web service
		amazonResponse = _

		   My.WebServices.AWSECommerceService.ItemSearch(itemSearch)

        If amazonResponse IsNot Nothing Then
			amazonItems = amazonResponse.Items(0).Item
        End If
   Catch ex as Exception
      MsgBox(ex.ToString)
   Finally
	  '---change the cursor to default
	  Me.Cursor = Cursors.Default
	  ToolStripStatusLabel1.Text = ""
   End Try

   If amazonItems Is Nothing then Exit Sub

   lstBooks.Items.Clear()
   '---add the books to the listbox
   For i As Integer = 0 To amazonItems.Length - 1
       With amazonItems(i)
           lstBooks.Items.Add(.ItemAttributes.Title)
       End With
   Next
End SubDisplaying Book Information and Covers
With the results of a search now available in the Search Results window, you want to enable users to view the details of any title in the list by selecting its name.
When a title is selected, a number of actions need to occur. First, the application needs to display the book details in the righthand pane of the Library Application window. Book covers require special handling. Since most users will want to see the cover of a book they’ve chosen, the Show Cover checkbox in Figure 4-24 is set to True (checked) by default. Unless the user unchecks the box, the cover of a title is always retrieved along with its other information. However, the Amazon.com web service supplies a URL that points to the location of the image, not the image itself. So, you’ll need to write code to download the image onto the local computer before you can display it.
Finally, if the user has checked the Auto-add Title checkbox, the application needs to automatically add the selected title to the database.
The actions can all be carried out by the event handler for the SelectedIndexChanged event of the lstBook listbox control, which fires when a user clicks on any item in its list.
To generate a code stub for the
SelectedIndexChangedevent of thelstBookcontrol, double-click on the control onForm1. To code the event, enter the code shown in bold in Example 4-3.Example 4-3. 1stBooks SelectedIndexChanged event handlerPrivate Sub lstBooks_SelectedIndexChanged( _ ByVal sender As System.Object, _ ByVal e As System.EventArgs) _ Handles lstBooks.SelectedIndexChanged
If lstBooks.SelectedIndex < 0 Then Exit Sub Try '---display detailed book information With amazonItems(lstBooks.SelectedIndex) lblISBN.Text = .ASIN txtTitle.Text = .ItemAttributes.Title txtAuthors.Text = Join(.ItemAttributes.Author, ",") txtPublisher.Text = .ItemAttributes.Publisher txtPrice.Text = _ .ItemAttributes.ListPrice.FormattedPrice.ToString ToolStripStatusLabel1.Text = .ItemAttributes.Title '---downloads the cover of the book If chkShowCover.Checked Then '---download the cover image Dim webReq As Net.HttpWebRequest = _ Net.HttpWebRequest.Create( _ .MediumImage.URL.ToString) Dim webResp As Net.HttpWebResponse = _ webReq.GetResponse() '---displays the image picCover.Image = _ Image.FromStream(webResp.GetResponseStream()) End If '---auto-add a title If chkAutoAdd.Checked Then AddTitle() End If End With Catch ex As Exception DisplayError(ex.ToString) End TryEnd SubThe
DisplayErrormethod that you call in Example 4-4 simply sounds a beep and displays the error message in theStatusLabelcontrol in theStatusStripcontrol.Example 4-4. DisplayError subroutinePrivate Sub DisplayError(ByVal message As String)My.Computer.Audio.PlaySystemSound( _ System.Media.SystemSounds.Exclamation)ToolStripStatusLabel1.Text = "Error : " & message End SubYou can play different types of sounds by supplying the
PlaySystemSoundmethod with one of the following values from theSystem.Media.SystemSoundsenumeration:AsteriskBeepExclamationHandQuestion
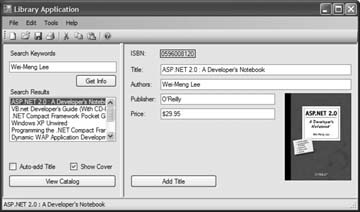
Figure 4-25, earlier in this chapter, shows the result of a search for the author Wei-Meng Lee. When you click on the title of one of the books in the results list (for example, ASP.NET 2.0: A Developer’s Notebook), the detailed information available for the selected book is displayed.
Saving Book Information
Now you need to write the routines that add book information to the user’s database either because “Auto-add Title box” is checked or because the user has clicked the Add Title button. While the detailed book information about a title is displayed on the form, you’ll also want to give the user the option to modify the data before saving it to the local database file.
First, you’ll code the Add Title button event handler. Double-click the Add Title button on
Form1and enter the code in Example 4-5.The event handler calls the
AddTitlesubroutine, where the heavy lifting is done.The
AddTitlesubroutine called by Example 4-6 is responsible for recording the details of a title you want stored in the local database file, Library.mdf. The subroutine first converts the image displayed in thePictureBoxcontrol into a byte array. The new record is then saved into the database using theTitlesTableAdaptercontrol that you added to the form earlier (see also Figure 4-17, earlier in this chapter).Example 4-6. AddTitle subroutinePublic Sub AddTitle() Try '---get the book cover image as a byte array--- Dim ms As New System.IO.MemoryStream() picCover.Image.Save(ms, picCover.Image.RawFormat) Dim coverimage() As Byte = ms.GetBuffer ms.Close() '---add the new title to the database--- TitlesTableAdapter.Insert(lblISBN.Text, _ txtTitle.Text, txtAuthors.Text, _ txtPublisher.Text, txtPrice.Text, coverimage) ToolStripStatusLabel1.Text += " - Added" Catch ex As Exception DisplayError("Error adding title.") End Try End Sub
Testing the Application
Now you are ready to take the application for a test drive. Start it up by pressing F5. Enter some keywords for a book, say, the author name, title, or ISBN. Click on the Get Info button to retrieve a list of titles matching your search criteria and list them on the
Listbox control. You’ll notice that the application hangs for a while when you submit the search request, and the form does not appear to repaint itself when overlapped by another window. We’ll deal with this problem in a future section, “Accessing the Web Services Asynchronously.” You can display the details of a book in the righthand pane of the application window by selecting an item in the ListBox control of the Search Results window, as shown in Figure 4-26.
Click the Add Title button to save the book information into the local database. If you check the “Auto-add Title” checkbox, book information is saved automatically just by selecting a title from the Search Results list.
Tip
If you were to include similar functionality in a production application, you would need to store the “freshness date” along with each book, display that date along with the other information, and offer the user the ability to refresh the data to make sure the price and other information is accurate. See the Amazon license agreement for details.
Viewing Book Information Offline
With the book information saved in the database, you will now add a second window to the project so that users can view their book catalogs offline. The Books Catalog window will be invoked by clicking on the View Catalog button that you’ve already added to the Library Application main window. By clicking on any title listed in the catalog, the user will be able to display its details, including an image of its cover.
You’ll build the Books Catalog window using the new Data Source Configuration Wizard and two new controls: DataGridView and BindingNavigator. With the exception of the event handler for the View Catalog button, you’ll accomplish this task without writing any code.
Create the Books Catalog Window
First you need to create the window that will display the book catalog and make it accessible from the Library Application main window.
To create the Books Catalog page, add another form to the project by right-clicking on the project name, LibraryApp, in Solution Explorer and then selecting Add → New Item… Select the Windows Form template and use the default name Form2.vb. Click Add and note the addition of the form to the LibraryApp project in the Solution Explorer.
Set the
Textproperty of Form2.vb to “Books Catalog,” which changes the title of the form to “Books Catalog.” Now the title reflects the purpose of the form in the application.Finally, you need to link the Books Catalog page to the main application window. On the Form1.vb design page, double-click on the View Catalog button and enter the single bold line of code in Example 4-7.
Private Sub btnViewCatalog_Click( _
   ByVal sender As System.Object, _
   ByVal e As System.EventArgs) _
   Handles btnViewCatalog.Click
    Form2.ShowDialog()
End Sub
When a user clicks the View Catalog button, the Books Catalog page (Form2.vb) will be displayed.
Binding Library Data to the Books Catalog Form
You will once again use the data-binding features of VB 2005 to display all the records in the database on the newly added form.
Go to Data → Show Data Sources to display the Data Sources window.
Change the binding of the Titles table to the
DataGridViewcontrol (see Figure 4-27).Drag-and-drop the Titles table from the Data Sources window onto Form2.vb. A
DataGridViewand aBindingNavigatorcontrol will be created automatically. In theDataGridViewTasks menu, check the Enable Column Reordering checkbox so that users can sort the rows of their catalog entries by field. TheDataGridViewTasks menu is shown in Figure 4-28.Since the list of titles shown in the Books Catalog window doesn’t have to include everything there is to know about each book, it makes sense to display the Title, Authors, and Publisher fields only. To remove the unwanted fields, go to the
DataGridViewTasks menu again, click on the Edit Columns link, and remove the following fields:ISBN
Price
Cover
The result is a list of books that displays only the title, authors, and the publisher.
You will now change the binding of the Titles table in the Data Sources window from
DataGridViewtoDetails. This will allow you to display individual records instead of multiple records on the form.Now drag-and-drop the Titles table from the Data Sources window onto Form2.vb.
Finally, you’ll want to add a Close button to the Books Catalog window so users can close the form when they’ve finished using it. To do that, add a
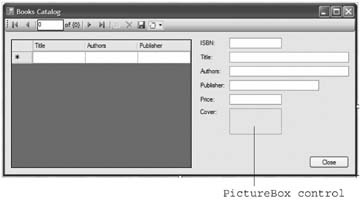
Buttoncontrol to Form2.vb and set itsTextproperty to “Close.” Name theButtoncontrolbtnClose. Form2.vb will now look like the version shown in Figure 4-29.To wire up the
Clickevent handler for the Close button, double-click on the Close button and enter the code shown in Example 4-8. It’s worth noting that this is the only code you’ve had to write to create this form.One last step remains. On
Form2, set thePictureBoxcontrol’sSizeModeproperty toAutoSizeso that the cover of a book can be displayed in its original downloaded size.


Testing the Application
You can now test the application by pressing F5. On Form1.vb, click on the View Catalog button to display Form2.vb, as shown in Figure 4-30.
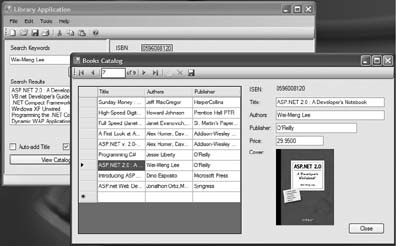
Try editing existing records by modifying the data in the
DataGridView control or the text boxes on the right of the window. To save changes to the database, you need to click the Save Data button, as shown in Figure 4-31. You can also delete records by clicking on the Delete button and then the Save Data button to effect the change.

Deploying the Application
Visual Studio 2005 makes the deployment of Windows applications to your users extremely easy and painless, all through a new feature known as Click-Once.
To illustrate how ClickOnce works, you will publish the Library Application (LibraryApp) that you have written and see how easy it is to deploy it using a web server. Furthermore, ClickOnce has the added benefit of ensuring that applications that you deploy will automatically check for the latest update (you can configure the application to check every time before it runs, or check at regular time intervals) on the server, if one is available, as you’ll see in “Automatic Updating,” later in this capter.
Publishing the Application
You can now publish (deploy) a Windows application through a disk, shared folder, FTP server, or web server, and automatically ensure that users are always using the latest version of the application.
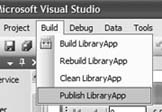
To run the ClickOnce Publish Wizard, go to Build → Publish LibraryApp on the Visual Studio menu, as shown in Figure 4-32. The “Where do you want to publish” dialog box will appear.
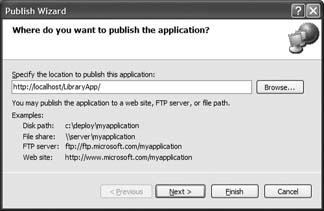
The “Where do you want to publish” dialog box gives you four options for where to publish the application: disk, shared folder, FTP server, or web server. For this project, you will publish the application through the IISweb server (see the sidebar “Installing IIS on Your Computer” on how to install IIS on your Windows XP computer).
In the “Specify the location to publish the application” text box, create a directory for the application by entering the following link: http://localhost/LibraryApp (see Figure 4-33). Click Next. The “Will the application be available offline?” dialog will appear.
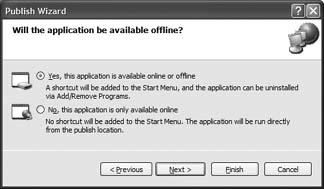
ClickOnce allows the user to install an application locally on the client, or to download every time it is needed. In the “Will the application be available offline?” dialog, select “Yes,” as shown in Figure 4-34, and then click Next. The “Ready to Publish!” dialog will appear.
That’s it! You are now ready to publish the application from your web server. In the “Ready to Publish!” dialog shown in Figure 4-35, click Finish to create the web page that users will link to in order to install the application.
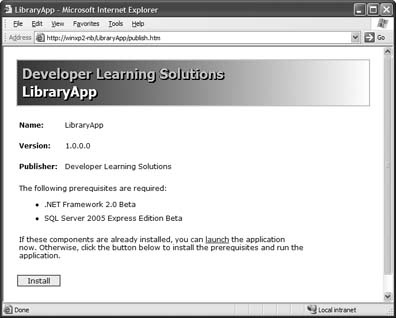
You should see the web page shown in Figure 4-36. Your users can now use the URL for that page to install the application on their own machines.
To install the application on your own machine, click the launch link in the page.
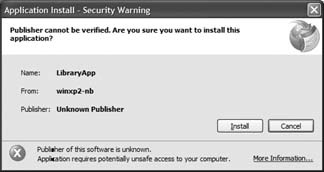
You will be prompted with a security warning such as the one shown in Figure 4-37. Click Install to install the application onto your machine.
Tip
You can eliminate this security warning by setting the relevant security policy. Refer to the MSDN Help Topic “Code Access Security for ClickOnce Applications” for more information. Also, check out the help topic “How to: Sign ClickOnce Application and Deployment Manifests” (http://msdn2.microsoft.com/library/che5h906(en-us,vs.80).aspx) for more information.
You will now see that the LibraryApp application is launched automatically. Alternatively, you can launch the LibraryApp application from Start → Programs → LibraryApp → LibraryApp.

Automatic Updating
The power of ClickOnce lies in its ability to automatically update applications after they have been deployed. Imagine that 1000 of your customers have downloaded your application and that you’ve decided you need to add some new features or fix a fatal bug. With VB 6, it would be a logistical nightmare to inform all these customers of the changes and then to update their machines. ClickOnce automatically ensures that all your users use the latest version of your application.
To demonstrate the power of ClickOnce, you’ll make a useful change to the Library Application—and learn something about the new
BackgroundWorker control in the process—and then use the automatic update feature of ClickOnce to get the new version into the hands of your users.
Accessing the Web Services Asynchronously
In testing the Library Application in an earlier section (see “Testing the Application), you saw that the application freezes when you request and download keyword search results from Amazon.com. Moreover, the window does not repaint itself when it is covered by some other windows. So, what is the problem? It turns out that accessing a web service is a blocking call, which means that the application will not continue its execution until the web service returns a value. In the real world, web services requests take a finite amount of time to complete and hence it is not acceptable that our application freezes while waiting for the results from Amazon.com.
To make the UI of your application responsive, you need to invoke the web service call in a separate thread of execution.
While this may sound intimidating (see the sidebar “VB Black Belt: Multithreading” for more information on threading), VB 2005 has made it easy to add this functionality to an application by providing a new BackgroundWorker control. To see how the BackgroundWorker control helps make your application more responsive, you will use it to access the Amazon.com web service in the background, and while so doing, the application can remain active. Here is a summary of the steps involved:
The user clicks the Get Info button, and the
BackgroundWorkercontrol kicks into action.The
BackgroundWorkercontrol runs theGetBookInformationsubroutine (which is defined by you) in a separate thread, with the main window remaining responsive.When the result is returned from Amazon.com, the
BackgroundWorkercontrol updates the controls on the window with the detailed book information.
Here are the steps:
First, you need to add the
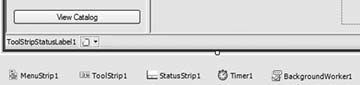
BackgroundWorkercontrol to your application. Drag-and-drop the control from the Components tab in the Toolbox onto Form1.vb of the LibraryApp project. Because theBackgroundWorkercontrol is not a visual control, you will see its icon at the bottom of the form, as shown in Figure 4-38.Switch to the code-behind page of
Form1and import theSystem.ComponentModelnamespace—which is needed in order to use the classes that theBackgroundWorkercontrol needs to do its work—by adding the following line of code (in bold) to the top of the code behind of Form1.vb.Imports System.ComponentModel Public Class Form1 …
When the Get Info button is clicked, you will use the
BackgroundWorkercontrol to call the web service in a separate thread using itsRunWorkerAsyncmethod, which starts the execution of a background operation. The method takes a single parameter, which in this case is the keyword(s) that the user has entered. To replace the currentClickevent handler for the Get Info button, double-click on the control onForm1and replace the existing code with that in Example 4-9.Example 4-9. Revised code for btn Click event handlerPrivate Sub btnGetInfo_Click( _ ByVal sender As System.Object, _ ByVal e As System.EventArgs) _ Handles btnGetInfo.Click '---retrieve the book info in the background BackgroundWorker1.RunWorkerAsync( _ Trim(txtKeywords.Text)) '---changes the cursor to an hourglass Me.Cursor = Cursors.WaitCursor ToolStripStatusLabel1.Text = _ "Retrieving book information…" End SubThe
DoWorkevent of theBackgroundWorkercontrol will invokeGetBookInformationsubroutine in a separate thread. TheDoWorkevent is fired when you call theRunWorkerAsyncmethod, as you did in the previous step. The argument passed to theRunWorkerAsyncmethod can be retrieved in theDoWorkevent via theSystem.ComponentModel. DoWorkEventArgsparameter. Add the event shown in Example 4-10 to theForm1class.Example 4-10. BackgroundWorker DoWork event handlerPrivate Sub BackgroundWorker1_DoWork( _ ByVal sender As System.Object, _ ByVal e As System.ComponentModel.DoWorkEventArgs) _ Handles BackgroundWorker1.DoWork 'This method will run on a thread other than the UI thread. 'Be sure not to manipulate any Windows Forms controls created 'on the UI thread from this method. Dim worker As BackgroundWorker = _ CType(sender, BackgroundWorker) GetBookInformation(e.Argument, worker, e) End SubThe
GetBookInformationsubroutine accesses the Amazon.com web service. Replace theGetBookInformationsubroutine you have defined earlier with that shown in Example 4-11.- Example 4-11. Revised GetBookInformation subroutine
Public Sub GetBookInformation( _
   ByVal keyword As String, _
   ByVal worker As BackgroundWorker, _
   ByVal e As DoWorkEventArgs)

    Dim itemSearchRequest As New AmazonWS.ItemSearchRequest
	Dim itemSearch As New AmazonWS.ItemSearch

	'---initialize objects
	With itemSearchRequest
	    '---set the search keyword(s)
		.Keywords = keyword

		'---set the size of the response
		.ResponseGroup = New String() {"Medium"}

		'---set the SearchIndex or search mode
		.SearchIndex = "Books"
    End With

    With itemSearch
        '---set the Amazon.com SubscriptionId
        .SubscriptionId = "your_subscription_Id_here"
        .Request = New AmazonWS.ItemSearchRequest() {itemSearchRequest}
    End With

    Try
        '---invoke the Amazon.com web service
		amazonResponse = _
           My.WebServices.AWSECommerceService.ItemSearch(itemSearch)

        If amazonResponse IsNot Nothing Then
            amazonItems = amazonResponse.Items(0).Item
        End If
    Catch ex as Exception
        '---an error has occured
    End Try
End Sub
Notice that in this subroutine, you need not worry about displaying the returned result in the
Listboxcontrol; you will do that in the next step. The
RunWorkerCompletedevent is fired when the thread (in this case,GetBookInformation) is completed. In Example 4-12, you will get the result returned from the web service and then add the items into theListboxcontrol.Example 4-12. BackgroundWorker1_RunWorkerCompleted event handlerPrivate Sub BackgroundWorker1_RunWorkerCompleted( _ ByVal sender As Object, _ ByVal e As System.ComponentModel.RunWorkerCompletedEventArgs) _ Handles BackgroundWorker1.RunWorkerCompleted '--change to cursor to default Me.Cursor = Cursors.Default ToolStripStatusLabel1.Text = "" If Not (e.Error Is Nothing) Then MessageBox.Show(e.Error.Message) Else If amazonItems Is Nothing then Exit Sub lstBooks.Items.Clear() '---add the books to the listbox For i As Integer = 0 To amazonItems.Length - 1 With amazonItems(i) lstBooks.Items.Add(.ItemAttributes.Title) End With Next End If End Sub
That’s it! You can now debug the application by pressing F5. You should find the UI of the application is still responsive while waiting for the result from the Amazon.com web service.
Republishing the Application
Now that you have modified your LibraryApp application, you should rebuild it and republish it so that users can be automatically updated through ClickOnce.
Rebuild the project by right-clicking on the project name (LibraryApp) in Solution Explorer and selecting Rebuild.
To ensure that your users can use the updated application, build and publish the application again, following the steps outlined earlier. That’s all you need to do.
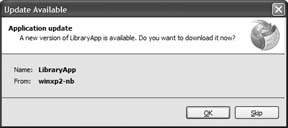
The next time your users launch the application from the Start menu, the application will automatically check the deployment server to see if there is a newer version available. If there is one, the Update Available window will be displayed (see Figure 4-39). Click OK to download, install, and use the newer version of the application.
What happens if, after installing the newer version, you decide that you want to use the older version? No worries; just go to Control Panel and click Add or Remove Programs, select the application, and click Change/Remove. You have the option to either restore the application to its previous state or remove the application.
Summary
In this chapter, you have seen how easily Visual Studio 2005 and the VB 2005 language can be used to create professional applications. In particular, you have seen how to create a database and bind its records to a data access form; how web services can be consumed in a Visual Studio 2005 project; and how data can be persisted in a SQL database for offline perusal. You have also learned how ClickOnce makes deployment and updating of smart clients easy and effortless and how you can painlessly add asynchronous calls to an application.
In the next chapter, you will learn how to use VB 2005 to develop web applications.
Get Visual Basic 2005 Jumpstart now with the O’Reilly learning platform.
O’Reilly members experience books, live events, courses curated by job role, and more from O’Reilly and nearly 200 top publishers.

