The ASP.NET 1.0 and 1.1 DataGrid control was tremendously popular, but
implementing some of its most desirable features often required writing
a lot of boilerplate code. For example, if you wanted to let users page
through rows of data, it was up you to query the database after every
postback, retrieve the requested page, and set the range of rows that
you wanted to display. With the new GridView control, these headaches are a thing
of the past.
Note
The new GridView control lets you create and display tables of data that users can sort, page through, and edit without requiring you to write a single line of code.
In preparing for ASP.NET 2.0, Microsoft architects chose not to
release a new version of the current DataGrid in order to simplify backward
compatibility. Instead, the new GridView control duplicates and extends the
functionality of the DataGrid, while
making its features available to developers through a much simpler
programming model.
To use the new GridView
control, drag it from the Data section of the Visual Studio toolbox
onto the design surface of a web page. For hassle-free data binding,
you can add a SqlDataSource
control (described in the lab "Bind to Data Without Writing Code") or
use an ObjectDataSource control in
conjunction with a custom data access object, as explained in "Bind
Web Controls to a Custom Class." In this case, we'll use a SqlDataSource control and the select query
shown here to retrieve all fields and records in the Customers table
of the Northwind database. Here's the final data source tag:
<asp:SqlDataSource ID="CusomtersList" Runat="server"
  SelectCommand="SELECT * FROM Customers"
  ConnectionString=
  "Data Source=127.0.0.1;Integrated Security=SSPI;Initial Catalog=Northwind">
</asp:SqlDataSource>
Now, set the GridView.DataSourceID property to the name
of the SqlDataSource (in this
example, CustomersList). This binds
the GridView to the SqlDataSource.
At this point, you can run your page and see a simple HTML table with a full list of customers. However, to make your table look respectable, there are a number of additional steps you'll want to take. These include:
Note
You should be able to see the columns of your grid at design time. If you don't, choose Refresh Schema on the SqlDataSource smart tag (to get the column information from the database) and then choose Refresh Schema on the GridView smart tag.
Setting the
Fontproperty to use a more attractive font. A common choice that's supported by most web browsers is Verdana (use a size of X-Small or XX-Small).Applying some formatting with styles. You can set colors, fonts, and sizes for the
FooterStyle,HeaderStyle,RowStyle, and more using the Properties window. Or, to change the complete look in a hurry, click theGridViewsmart tag and choose AutoFormat. When you choose one these presets, all theGridViewstyles are set automatically.
Making the GridView look
respectable is only part of the work. You can also switch on various
GridView features using options in
the GridView smart tag. Here are
some links you can click to get quick results:
- Enable Paging
This option sets the
AllowPagingproperty toTrue. TheGridViewwill then split long lists of records into separate pages (each with the number of rows designated in thePageSizeproperty). Users can move from page to page by clicking numbered links that appear at the bottom of theGridView.- Enable Sorting
This option sets
AllSortingtoTrue. TheGridViewwill then provide column hyperlinks. When the user clicks one, the whole table will be resorted in alphabetic order (or ascending numeric order) according to that column.- Enable Selection
This option adds a Select link in a new column at the left side of the grid. Users can click this link to select the row (at which point the
SelectedIndexproperty will be set accordingly).- Enable Deleting
This option adds a Delete link in a new column at the left side of the grid. Users can click this link to delete the row from the database. You'll only see this option if you've defined a
DeleteCommandfor the attached data source.- Enable Editing
This option adds an Edit link in a new column at the left side of the grid. Users can click this link to put a row in edit mode (at which point an Update and Cancel link will appear, allowing them to push the change to the database or roll it back). You'll only see this option if you've defined an
UpdateCommandfor the attached data source.
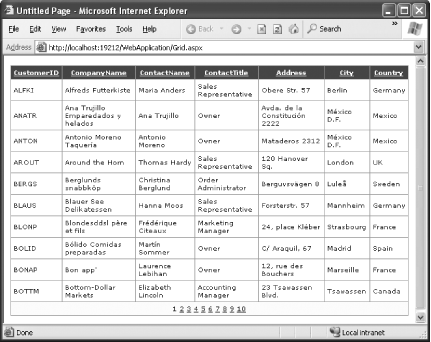
Figure 4-6 shows a
table that supports paging and sorting by column, which was generated
by GridView without using a single
line of custom code.
...fine-tuning the GridView
display? For example, you might want to tweak the sort order, the text
used for the selection and editing links, the column titles, or the
order of columns. You might also need to set default text and format
strings. To perform any of these tasks, you simply customize the
column objects that the GridView
generates based on the format of the data source records. The easiest
way to do so is to select Edit Columns link on the GridView smart tag and use the Fields dialog
to customize the properties of each column. Try it.
Get Visual Basic 2005: A Developer's Notebook now with the O’Reilly learning platform.
O’Reilly members experience books, live events, courses curated by job role, and more from O’Reilly and nearly 200 top publishers.

