The process for sharing calendars and connecting to the calendars is similar to that of sharing and connecting to Address Books. However, given that the iCal server has been around longer than the Address Book server, there are a few additional options. One such option is the ability to see calendars in Lion Serverâs web portal. Another is the ability to delegate calendars to other users, a must for collaborative calendaring. Calendaring is also more complicated because it involves locations, resources, and much more rapidly changing sets of data than contact data, which is fairly static and simple for most.
The iCal Service leverages CalDAV as a backend protocol, the big sister of the CardDAV protocol used for Address Book server. CalDAV is similar to CardDAV in that it uses files stored on a web server to manage contact events and each user has their own calendar. But given that resources can have calendars that are managed, CalDAV has a bit more logic bolted onto it and is a much more mature product offering.
Published calendars are really helpful for very specific environments (e.g., ones in which one person disseminates calendar information to others). As with Address Book, iCal also stores local calendars in flat files. You donât have to have an iCal server to share calendars. This isnât to say that you donât need a server. Instead of iCal server, a single user can publish a calendar that others are then able to subscribe to.
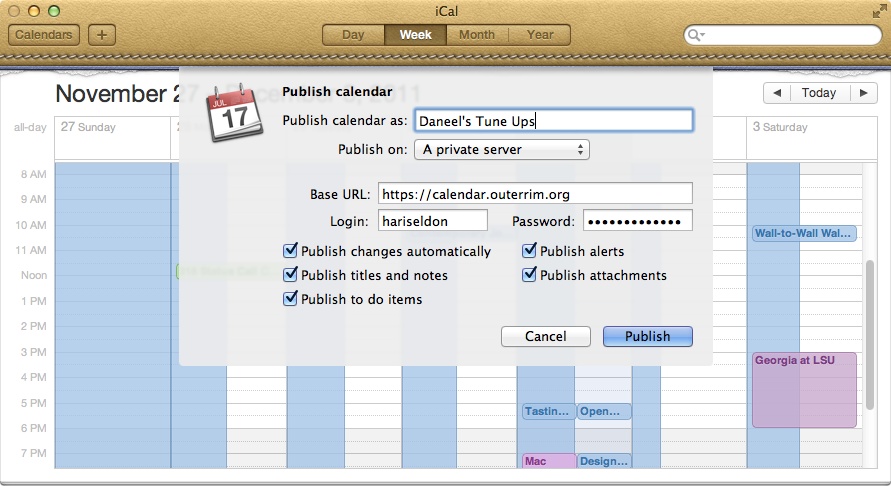
To publish a calendar, from within iCal, first create a calendar to publish. Once created, click on the Calendar menu and then click on Publish⦠The Publish Calendar screen will provide a number of options, initially defaulting to publishing calendars to a MobileMe account in the Publish On field. If publishing to an OS X Server (we assume you are if you are reading this book), then change that field to âA private server.â
When publishing to a private server, a share will need to be created. The share should be WebDAV and is indicated in the Base URL line as a standard path (for more information on WebDAV, see the section Configuring WebDAV Connections from iOS in Chapter 3). Other than login information, the other options at the âPublish calendarâ screen control the manner in which data is published to the calendar. These options, as seen in Figure 4-3, include the following:
- Publish calendar as
The name that will show on client computers that access the calendar
- Publish on
Whether the calendar is published to MobileMe or a private (WebDAV) server
- Base URL
The full path to access the calendar file
- Login
A username with read and write privileges to the directory that the calendar is published to
- Password
The password for the account provided in the Login field
- Publish changes automatically
When enabled, changes are automatically pushed to the published calendar; when disabled, changes are pushed manually
- Publish titles and notes
When enabled, event notes are pushed to the calendar
- Publish to do items
Pushes to-do items (e.g., from Mailâs To-Do items)
- Publish alerts
When enabled, the alert items for each event are pushed to the calendar
- Publish attachments
When enabled, pushes attachments in each event to the published calendar; once configured, the calendar will be published
Once published, a URL can be distributed to users that automatically configures iCal to published calendars. Published calendars can also be subscribed to by using the Subscribe menu item in the Calendar menu and manually providing the path to the calendar. Once subscribed, the calendars can be read from by anyone with permission to access the path. In general, the WebDAV directory should be accessible as read-only by everyone except the user publishing the calendar.
Published calendars are really helpful for very specific environments (i.e., ones in which one person is disseminating calendar information to others). Although you donât need to have a server to share calendars, it sure gives you a lot more options, including granular control over who can access which calendars, how they can be accessed, and what can be done once accessible. But, to fully understand how much iCal server changes the game from just publishing calendars, letâs turn it on and take a look.
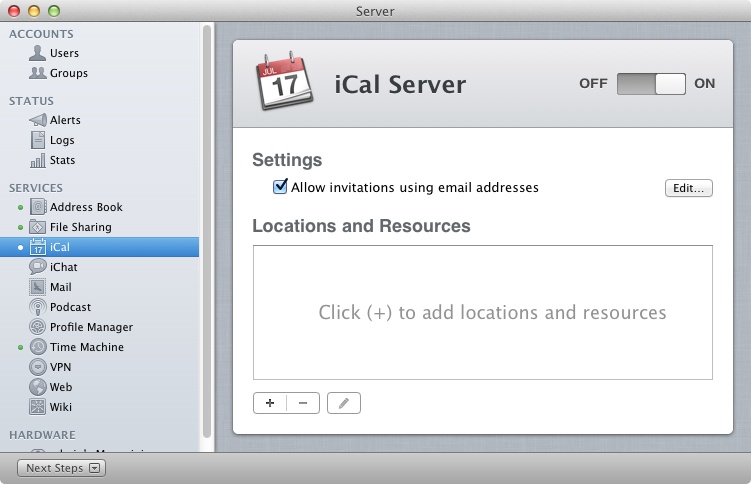
To enable iCal Server, a server must first be running a directory service. Configure iCal Server in the Server application. But first, complete the Next Steps (see Chapter 2 for more information on doing so) section in Server. Once completed and running as a directory server, click on the entry in the Server sidebar under SERVICES for iCal.
iCal Server can send email invitations on behalf of the server. If you want the server to be able to send invitations, check the box for âAllow invitations using email addressesâ and then click on the Edit button (Figure 4-4), which launches the Email address wizard. At the Configure Email Address screen, provide the email address that notifications will come from and click Next. At the Configure Server Email Address screen, configure the type of mail that the address uses. This involves filling in the incoming mail server type (IMAP versus POP), the server address, the port number, the username and the password for that address. These are typically provided by your Internet service provider or mail host. Click on the Next button once configured and then provide the address for the outgoing mail server (or SMTP server), the port number (the default setting will work unless your email host requires a separate address), the authentication type (if any), and if authentication on the SMTP server is required, then include the username and password for the email account as well. Then click on the Next button, review the Mail Account Summary screen, and click on the Finish button to complete the invitation configuration.
Then click the ON button. The service will then be configured and start. Once complete, all users in the directory service will have a calendar. If no resources are required, then the iCal client can be configured. But first, weâll look at configuring resources.
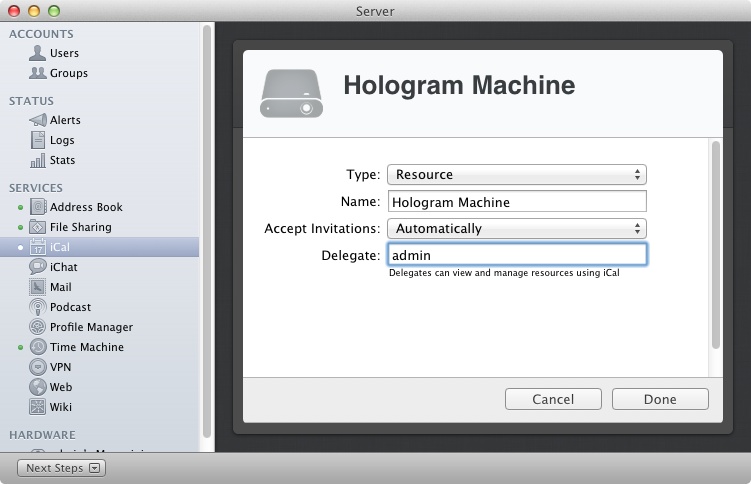
Locations and resources are shared calendars that are accessible to multiple users. Administration of these calendars can be delegated to a user who controls that objectâs schedule. For example, letâs say a film company rents cameras. A resource might be the camera. Or, in a school environment, an auditorium might be a location. Locations and resources are the same thing, making it a cohesive way to manage the schedules for both.
Setting up a location or resource is fairly straightforward. Once the iCal server is running, click on the service in the Server application. From the iCal Server screen, click on the icon for the plus sign (â+â). At the New Locations screen, choose a type in the Type field (the only difference is that each comes with a different icon), and then provide a name. Then choose how new invitations are treated (whether they are automatically accepted or whether the account who gets delegated administrative access over the calendar needs to approve the invitation) and then type the short name of a Delegate. Once the fields are all appropriately configured, click on the Done button (Figure 4-5).
Once the calendars are created, they can be added to the views in iCal, which is covered in the next section.
Once the server has been enabled, use the iCal application on client computers to connect to the server. Sharing calendars between users, or delegating calendars, is also done using the iCal client. By default, iCal has a number of built-in calendars (e.g., home, work, etc.). To create new local calendars, use the On My Mac menu item in the Calendar section under the File menu from within iCal. Once server client configurations have been entered, new calendars on servers can also be created using the Calendar section under the File menu and then selecting the account with which to create a new calendar for.
To set up the server client, click on the iCal menu and then click on Preferences⦠Then, click on Accounts under preferences. At the Accounts screen, click on the plus sign (â+â) to add a new server account.
At the Add an Account screen, click on CalDAV in the Account Type menu. Then provide a username and password from the server and an IP address or server name in the Server Address field. When you are satisfied with your entry, click on Create.
The account will then be added (provided it can be accessed by the client). To test that the account has been configured properly, click on plus sign (â+â) icon at the main iCal screen and add an event for the server category. You can then see in the web portal that the event is synchronizing properly between the server and the client (the web portal is explained further in the section In the Web Portal).
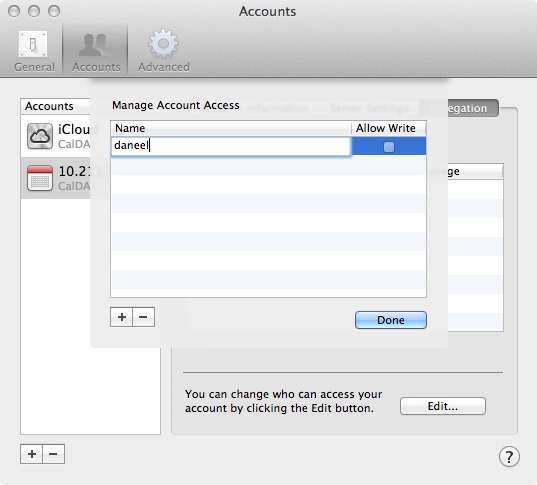
One of the most valuable features of iCal Server is the ability for one user to allow other users access to a private calendar. The ability to have someone else schedule your appointments, to check someone elseâs schedule before booking a conference call, or to set up recurring events for the schedules of your colleagues is one of the main reasons to use iCal Server. As mentioned earlier, configuring clients for delegating access is done within iCal.
Once iCal has been configured to connect to a server, it is possible to delegate other users to connect to one anotherâs calendars. To do so, open iCal from each client system. From iCal, click on the iCal menu and select Preferences⦠Choose the account in question and then click on the Delegation tab. Here, click on the Edit⦠button to give access to your calendar to others. At the Manage Account Access screen (seen in Figure 4-6), click on the plus sign (â+â) icon and provide the name of the user (or email address) to give read access to the calendar(s). Use the Allow Write checkbox to allow others to edit the calendar and click on the Done button to make the changes.
Once a calendar has been shared, it needs to be added to the view in the delegated clientâs iCal. To do so, open iCal and click on Accounts from underneath the Preferences⦠menu. Then click on the account that access was delegated to and the Delegation tab. The accounts that are accessible will be shown automatically. Click on the Show checkbox for each that should be accessible and then close the Accounts screen to see the calendars listed in iCal.
As mentioned, calendar synchronization is easily tested using a client and the web portal. The web portal is also helpful because you canât always be sitting at your computer; when you are in that Internet café in Paris, the web portal makes a great companion to verify you arenât missing any meetings.
The iCal web portal is automatically enabled on each website hosted on a server. We look at managing the web service further in Chapter 5. Once enabled, visit the web portal using Safari and click on Calendar (or use http://127.0.0.1/webcal from the server). From the Calendar, click on any empty time block to create a new event. The event will be created and then, provided that the iCal client has been configured on an iOS or Mac OS X device, the event will synchronize to those devices.
One of the great things about Lion Server is how well it supports iOS-based devices. And iCal Server support is among the best of the supported tools. To configure the iCal Server client in iOS, use the Settings app. From Settings, tap on the entry for Mail, Contacts, Calendars and then tap on Add Account.
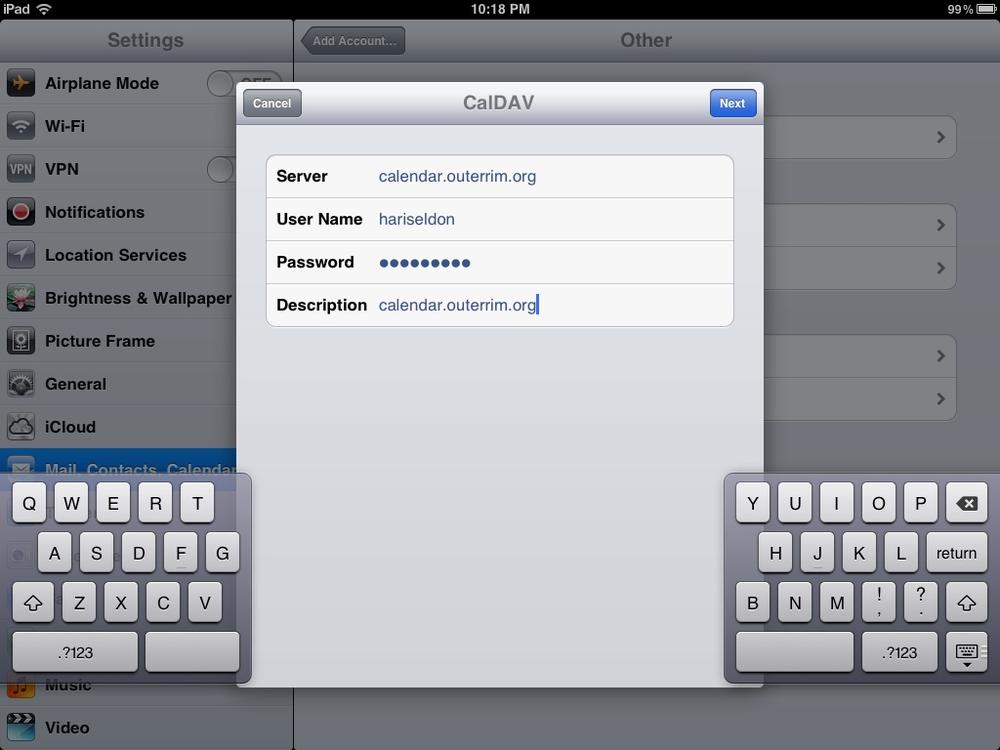
At the Add Account⦠screen, tap on Other and then at the Calendars entry, tap on Add CalDAV Account. At the CalDAV screen, you will see a list of options, as can be seen in Figure 4-7. Here, provide the address for the server in the Server field, the short name or username of the user in the User Name field, the password of the user in the Password field, and a short indication of what the account is used for in the Description field (e.g., Home Calendar). Then tap on Next.
The iOS device will then attempt to verify the connection to the server and if there is no SSL certificate in use, will prompt with a warning as to such. Once complete, a few advanced settings will be available using the Advanced Settings button for the account. These include whether to use SSL (an ON/OFF slider button), the port to use (which by default changes when SSL is added), and an Account URL, which allows administrators who have customized the /principals name with something different or changed the URL scheme in /etc/apache2/servermgr_web_apache2_config.plist to still use the iOS client.
Once fully configured, open the default Calendar app included with every iPad, iPod Touch, and iPhone. Then tap on Calendars to verify that the new calendar is listed (will appear toward the bottom of the screen). Once verified, simply use the Calendar field of any new event to have the event stored on the server. The event can then be seen from any device. Hiding all other calendars will then make the default calendar set to the one on the server. In the Mail, Contacts, Calendars screen of the Settings app, there is also a Default Calendar setting (at the very bottom) that also allows you to configure which calendar to use as the default calendar.
Get Using Mac OS X Lion Server now with the O’Reilly learning platform.
O’Reilly members experience books, live events, courses curated by job role, and more from O’Reilly and nearly 200 top publishers.

