
Advanced Editing
Sometimes, in order to advance, you have to go backward. In this chapter, we are going to demonstrate how you can improve your text-editing skills by understanding how line editors work. This doesn’t mean you’ll have to abandon full-screen editing. The vi editor was constructed on top of a line editor named ex, which was an improved version of another line editor named ed. So in one sense we’ll be looking at the ancestors of vi. We’ll look at many of the ways line editors attack certain problems and how that applies to those of us who use full-screen editors.
Line editors came into existence for use on “paper terminals,” which were basically printers. This was before the time of video display terminals. A programmer, or some other person of great patience, worked somewhat interactively on a printer. Typically, you saw a line of your file by printing it out on paper; you entered commands that would affect just that line; then you printed out the edited line again. Line editors were designed for this kind of process, editing one line at a time.
People rarely edit files on paper terminals any more, but there are diehards who still prefer line editors. For one thing, it imposes less of a burden on the computer. Line editors display the current line; they don’t update the entire screen.
On some occasions, a line editor is simpler and faster than a full-screen editor. Sometimes, a system’s response can be so slow that it is less frustrating to work if you switch to a line editor. Or you may have occasion to work remotely over a dial-up line operating at a baud rate that is too slow to work productively with a full-screen editor. In these situations, a line editor can be a way to improve your efficiency. It can reduce the amount of time you are waiting for the computer to respond to your commands.
The truth is, however, that after you switch from a screen editor to a line editor, you are likely to feel deprived. But you shouldn’t skip this chapter just because you won’t be using a line editor. The purpose of learning ex is to extend what you can do in vi.
▪ The ex Editor ▪
The ex editor is a line editor with its own complete set of editing commands. Although it is simpler to make most edits with vi, the line orientation of ex is an advantage when you are making large-scale changes to more than one part of a file. With ex, you can move easily between files and transfer text from one file to another in a variety of ways. You can search and replace text on a line-by-line basis, or globally. You can also save a series of editing commands as a macro and access them with a single keystroke.
Seeing how ex works when it is invoked directly will help take some of the “mystery” out of line editors and make it more apparent to you how many ex commands work.
Let’s open a file and try a few ex commands. After you invoke ex on a file, you will see a message about the total number of lines in the file, and a colon command prompt. For example:
   $ ex intro

    "intro" 20 lines, 731 characters

   :
You won’t see any lines in the file, unless you give an ex command that causes one or more lines to be printed.
All ex commands consist of a line address, which can simply be a line number, and a command. You complete the command with a carriage return. A line number by itself is equivalent to a print command for that line. So, for example, if you type the numeral 1 at the prompt, you will see the first line of the file:
   :1

   Sometimes, to advance,

   :
To print more than one line, you can specify a range of lines. Two line numbers are specified, separated by commas, with no spaces in between them:
   :1,3

   Sometimes, to advance,

   you have to go backward.

   Alcuin is a computer graphics tool
The current line is the last line affected by a command. For instance, before we issued the command 1, 3, line 1 was the current line; after that command, line 3 became the current line. It can be represented by a special symbol, a dot (.).
   :.,+3

   that lets you design and create hand-lettered, illuminated

   manuscripts, such as were created in the Middle Ages.
The previous command results in three more lines being printed, starting with the current line. A + or − specifies a positive or negative offset from the current line.
The ex editor has a command mode and an insert mode. To put text in a file, you can enter the append or a command to place text on the line following the current line. The insert or i command places text on the line above the current line. Type in your text and when you are finished, enter a dot (.) on a line by itself:
   :a

   Monks, skilled in calligraphy,

   labored to make copies of ancient

   documents and preserve in a

   library the works of many Greek and

   Roman authors.

   .

   :
Entering the dot takes you out of insert mode and puts you back in command mode.
A line editor does not have a cursor, and you cannot move along a line of text to a particular word. Apart from not seeing more of your file, the lack of a cursor (and therefore cursor motion keys) is probably the most difficult thing to get used to. After using a line editor, you long to get back to using the cw command in vi.
If you want to change a word, you have to move to the line that contains the word, tell the editor which word on the line you want to change, and then provide its replacement. You have to think this way to use the substitute or s command. It allows you to substitute one word for another.
We can change the last word on the first line from tool to environment:
   :1

   Alcuin is a computer graphics tool

   :s/tool/environment/

   Alcuin is a computer graphics environment

   :
The word you want to change and its replacement are separated by slashes (/). As a result of the substitute command, the line you changed is printed.
With a line editor, the commands that you enter affect the current line. Thus, we made sure that the first line was our current line. We could also make the same change by specifying the line number with the command:
   :1s/environment/tool/

   Alcuin is a computer graphics tool
If you specify an address, such as a range of line numbers, then the command will affect the lines that you specify:
   :1,20s/Alcuin/ALCUIN/

   ALCUIN is named after an English scholar
The last line on which a substitution was made is printed.
Remember, when using a line editor, you have to tell the editor which line (or lines) to work on as well as which command to execute.
Another reason that knowing ex is useful is that sometimes when you are working in vi, you might unexpectedly find yourself using “open mode.” For instance, if you press Q while in vi, you will be dropped into the ex editor. You can switch to vi by entering the command vi at the colon prompt:
:vi
After you are in vi, you can execute any ex command by first typing a : (colon). The colon appears on the bottom of the screen and what you type will be echoed there. Enter an ex command and press RETURN to execute it.
▪ Using ex Commands in vi ▪
Many ex commands that perform normal editing operations have equivalent vi commands that do the job in a simpler manner. Obviously, you will use dw or dd to delete a single word or line rather than using the delete command in ex. However, when you want to make changes that affect numerous lines, you will find that the ex commands are very useful. They allow you to modify large blocks of text with a single command.
Some of these commands and their abbreviations follow. You can use the full command name or the abbreviation, whichever is easier to remember.
deletedDelete lines movemMove lines copycoCopy lines substitutesSubstitute one string for another
The substitute command best exemplifies the ex editor’s ability to make editing easier. It gives you the ability to change any string of text every place it occurs in the file. To perform edits on a global replacement basis requires a good deal of confidence in, as well as full knowledge of, the use of pattern matching or “regular expressions.” Although somewhat arcane, learning to do global replacements can be one of the most rewarding experiences of working in the UNIX text-processing environment.
Other ex commands give you additional editing capabilities. For all practical purposes, they can be seen as an integrated part of vi. Examples of these capabilities are the commands for editing multiple files and executing UNIX commands. We will look at these after we look at pattern-matching and global replacements.
▪ Write Locally, Edit Globally ▪
Sometimes, halfway through a document or at the end of a draft, you recognize inconsistencies in the way that you refer to certain things. Or, in a manual, some product that you called by name is suddenly renamed (marketing!). Often enough, you have to go back and change what you’ve already written in several places.
The way to make these changes is with the search and replace commands in ex. You can automatically replace a word (or string of characters) wherever it occurs in the file. You have already seen one example of this use of the substitute command, when we replaced Alcuin with ALCUIN:
:1,20s/Alcuin/ALCUIN/
There are really two steps in using a search and replace command. The first step is to define the area in which a search will take place. The search can be specified locally to cover a block of text or globally to cover the entire file. The second step is to specify, using the substitute command, the text that will be removed and the text that will replace it.
At first, the syntax for specifying a search and replace command may strike you as difficult to learn, especially when we introduce pattern matching. Try to keep in mind that this is a very powerful tool, one that can save you a lot of drudgery. Besides, you will congratulate yourself when you succeed, and everyone else will think you are very clever.
Searching Text Blocks
To define a search area, you need to be more familiar with how line addressing works in ex. A line address simply indicates which line or range of lines an ex command will operate on. If you don’t specify a line address, the command only affects the current line. You already know that you can indicate any individual line by specifying its number. What we want to look at now are the various ways of indicating a block of text in a file.
You can use absolute or relative line numbers to define a range of lines. Identify the line number of the start of a block of text and the line number of the end of the block. In vi, you can use ^G to find the current line number.
There are also special symbols for addressing particular places in the file:
.Current line $Last line %All lines (same as 1, $)
The following are examples that define the block of text that the substitute command will act upon:
:.,$sSearch from the current line to the end of the file :20,.sSearch from line 20 through the current line :.,.+20sSearch from the current line through the next 20 lines :100,$sSearch from line 100 through the end of the file :%sSearch all lines in the file
Within the search area, as defined in these examples, the substitute command will look for one string of text and replace it with another string.
You can also use pattern matching to specify a place in the text. A pattern is delimited by a slash both before and after it.
/pattern1/,/pattern2 / sSearch from the first line containing pattern1 through the first line containing pattern2 :.,/pattern/ sSearch from the current line through the line containing pattern
It is important to note that the action takes place on the entire line containing the pattern, not simply the text up to the pattern.
Search and Replace
You’ve already seen the substitute command used to replace one string with another one. A slash is used as a delimiter separating the old string and the new. By prefixing the s command with an address, you can extend its range beyond a single line:
:1,20s/Alcuin/ALCUIN/
Combined with a line address, this command searches all the lines within the block of text. But it only replaces the first occurrence of the pattern on each line. For instance, if we specified a substitute command replacing roman with Roman in the following line:
after the roman hand. In teaching the roman script
only the first, not the second, occurrence of the word would be changed.
To specify each occurrence on the line, you have to add a g at the end of the command:
:s/roman/Roman/g
This command changes every occurrence of roman to Roman on the current line.
Using search and replace is much faster than finding each instance of a string and replacing it individually. It has many applications, especially if you are a poor speller.
So far, we have replaced one word with another word. Usually, it’s not that easy. A word may have a prefix or suffix that throws things off. In a while, we will look at pattern matching. This will really expand what you are able to do. But first, we want to look at how to specify that a search and replace take place globally in a file.
Confirming Substitutions
It is understandable if you are over-careful when using a search and replace command. It does happen that what you get is not what you expected. You can undo any search and replacement command by entering u. But you don’t always catch undesired changes until it is too late to undo them. Another way to protect your edited file is to save the file with :w before performing a replacement. Then, at least you can quit the file without saving your edits and go back to where you were before the change was made. You can also use :e! to read in the previous version of the buffer.
It may be best to be cautious and know exactly what is going to be changed in your file. If you’d like to see what the search turns up and confirm each replacement before it is made, add a c at the end of the substitute command:
:1,30s/his/the/gc
It will display the entire line where the string has been located and the string itself will be marked by a series of carets (^^^).
   copyists at his school

               ^^^
If you want to make the replacement, you must enter y and press RETURN.
If you don’t want to make a change, simply press RETURN.
   this can be used for invitations, signs, and menus.

    ^^^
The combination of the vi commands // (repeat last search) and . (repeat last command) is also an extraordinarily useful (and quick) way to page through a file and make repetitive changes that require a judgment call rather than an absolute global replacement.
Global Search and Replace
When we looked at line addressing symbols, the percent symbol, %, was introduced. If you specify it with the substitute command, the search and replace command will affect all lines in the file:
:%s/Alcuin/ALCUIN/g
This command searches all lines and replaces each occurrence on a line.
There is another way to do this, which is slightly more complex but has other benefits. The pattern is specified as part of the address, preceded by a g indicating that the search is global:
:g/Alcuin/s//ALCUIN/g
It selects all lines containing the pattern Alcuin and replaces every occurrence of that pattern with ALCUIN. Because the search pattern is the same as the word you want to change, you don’t have to repeat it in the substitute command.
The extra benefit that this gives is the ability to search for a pattern and then make a different substitution. We call this context-sensitive replacement.
The gist of this command is globally search for a pattern:
:g/pattern/
Replace it:
:g/pattern/s//
or replace another string on that line:
with a new string:
:g/pattern/s/string/new/
and do this for every occurrence on the line:
:g/pattern/s/string/new/g
For example, we use the macro .BX to draw a box around the name of a special key. To show an ESCAPE key in a manual, we enter:
.BX Esc
Suppose we had to change Esc to ESC, but we didn’t want to change any references to Escape in the text. We could use the following command to make the change:
:g/BX/s/Esc/ESC/
This command might be phrased: “Globally search for each instance of BX and on those lines substitute the Esc with ESC”. We didn’t specify g at the end of the command because we would not expect more than one occurrence per line.
Actually, after you get used to this syntax, and admit that it is a little awkward, you may begin to like it.
▪ Pattern Matching ▪
If you are familiar with grep, then you know something about regular expressions. In making global replacements, you can search not just for fixed strings of characters, but also for patterns of words, referred to as regular expressions.
When you specify a literal string of characters, the search might turn up other occurrences that you didn’t want to match. The problem with searching for words in a file is that a word can be used in many different ways. Regular expressions help you conduct a search for words in context.
Regular expressions are made up by combining normal characters with a number of special characters. The special characters and their use follow.*
Unless you are already familiar with UNIX’s wildcard characters, this list of special characters probably looks complex. A few examples should make things clearer. In the examples that follow, a square (![]()
) is used to mark a blank space.
Let’s follow how you might use some special characters in a replacement. Suppose you have a long file and you want to substitute the word balls for the word ball throughout that file. You first save the edited buffer with :w, then try the global replacement:
:g/ball/s//balls/g
When you continue editing, you notice occurrences of words such as ballsoon, globallsy, and ballss. Returning to the last saved buffer with :e!, you now try specifying a space after ball to limit the search:
:g/ball /s//balls/g
But this command misses the occurrences ball., ball” ball:, and so on.
:g/\<ball\>/s//balls/g
By surrounding the search pattern with \< and \>, we specify that the pattern should only match entire words, with or without a subsequent punctuation mark. Thus, it does not match the word balls if it already exists.
Because the \< and \> are only available in ex (and thus vi), you may have occasions to use a longer form:
:g/ball\([, .;:!?]\)/s//balls\1/g
This searches for and replaces ball followed by either a space (indicated by ![]() ) or any one of the punctuation characters
) or any one of the punctuation characters ,.;:!? Additionally, the character that is matched is saved using \( and \) and restored on the right-hand side with \l. The syntax may seem complicated, but this command sequence can save you a lot of work in a similar replacement situation.
Search for General Classes of Words
The special character & is used in the replacement portion of a substitution command to represent the pattern that was matched. It can be useful in searching for and changing similar but different words and phrases.
For instance, a manufacturer decides to make a minor change to the names of their computer models, necessitating a change in a marketing brochure. The HX5000 model has been renamed the Series HX5000, along with the HX6000 and HX8500 models. Here’s a way to do this using the & character:
:g/HX[568] [05]00/s//Series &/g
This changes HX8500 to Series HX8500. The & character is useful when you want to replay the entire search pattern and add to it. If you want to capture only part of the search pattern, you must use \( and \) and replay the saved pattern with \1 . . . \n.)
For instance, the same computer manufacturer decides to drop the HX from the model numbers and place Series after that number. We could make the change using the following command:
This command replaces Series HX8500 with 8500 Series.
Suppose you have subroutine names beginning with the prefixes mgi, mgr, and mga.
   mgibox routine

   mgrbox routine

   mgabox routine
If you want to save the prefixes, but want to change the name box to square, either of the following replacement commands will do the trick:
:g/mg([iar])box/s//mg\1square/
The global replacement keeps track of whether an i, a, or r is saved, so that only box is changed to square. This has the same effect as the previous command:
:g/mg[iar]box/s/box/square/g
The result is:
   mgisquare routine

   mgrsquare routine

   mgasquare routine
Block Move by Patterns
You can edit blocks of text delimited by patterns. For example, assume you have a 150 page reference manual. All references pages are organized in the same way: a paragraph with the heading SYNTAX, followed by DESCRIPTION, followed by PARAMETERS. A sample of one reference page follows:
   .Rh 0 "Get status of named file" "STAT"

   .Rh "SYNTAX"

   .nf

   integer*4 stat, retval

   integer*4 status(11)

   character*123 filename

   ...

   retval = stat (filename, status)

   .fi

   .Rh "DESCRIPTION"

   Writes the fields of a system data structure into the

   status array. These fields contain (among other

   things) information about the file's location, access

   privileges, owner, and time of last modification.

   .Rh "PARAMETERS"

   .IP "filename" 15n
   A character string variable or constant containing

   the UNIX pathname for the file whose status you want

   to retrieve. You can give the ...
Suppose that you decide to move DESCRIPTION above the SYNTAX paragraph. With pattern matching, you can move blocks of text on all 150 pages with one command!
:g/SYNTAX/,/DESCRIPTION/–1,mo/PARAMETERS/–1
This command moves the block of text between the line containing the word SYNTAX and the line just before the word DESCRIPTION (/DESCRIPTION/—1) to the line just before PARAMETERS. In a case like this, one command literally saves hours of work.
This applies equally well to other ex commands. For example, if you wanted to delete all DESCRIPTION paragraphs in the reference chapter, you could enter:
:g/SYNTAX/,/DESCRIPTION/–1,d
This very powerful kind of change is implicit in the ex editor’s line addressing syntax, but is not readily apparent. For this reason, whenever you are faced with a complex, repetitive editing task, take the time to analyze the problem and find out if you can apply pattern-matching tools to do the job.
More Examples
Because the best way to learn pattern matching is by example, the following section gives a list of examples with brief explanations. Study the syntax carefully, so that you understand the principles at work. You should then be able to adapt them to your situation.
1.
Deleteall blank lines::g/^$/dWhat you are matching is the beginning of the line followed by the end of the line, with nothing in between.
2. Put
troffitalic codes around the word RETURN::g/RETURN/s//\\fIRETURN\\fR/gNotice that two backslashes
(\\)are needed in the replacement, because the backslash in thetroffitalic code will be interpreted as a special character. (\fIalone would be interpreted asfI;it takes\\fIto get\fI.)3. Modify a list of pathnames in a file:
:g/\/usr\/tim/s//\/usr\/linda/gA slash (used as a delimiter in the global replacement sequence) must be escaped with a backslash when it is part of the pattern or replacement; use
\/to get/. Another way to achieve this same effect is to use a different character as the pattern delimiter. For example, you could make the previous replacement as follows::g:/usr/tim:s::/usr/linda:g4. Change all periods to semicolons in lines 1 to 10:
:1,10g/\./s//;/gA period is a special character and must be escaped with a backslash.
5. Reverse the order of all hyphen-separated items in a list:
:g/\(.*\)The effect of this command on several items is:
more–display filesbecomesdisplay files–more
lp–print filesbecomesprint files–lp6. Standardize various uses of a word or heading:
:g/^Example[Note that the brackets enclose three characters: a space (represented in the example by
s. Therefore, this command searches for ExampleAs another similar example, change all occurrences of the word help (or Help) to HELP:
:g/[Hh]elp/s//HELP/g7. Replace one or more spaces with a single space:
:g/*/s//
Make sure you understand how the asterisk works as a special character. An asterisk following any character (or any regular expression that matches a single character, such as
.or[a−z])matches zero or more instances of that character. Therefore, you must specify two spaces followed by an asterisk to match one or more spaces (one plus zero or more).8. Replace one or more spaces following a colon with two spaces:
:g/:9. Replace one or more spaces following a period or a colon with two spaces:
:g/\([:.]\)Either of the two characters within brackets can be matched. This character is saved, using parentheses, and restored on the right-hand side as
1.Note that a special character such as a period does not need to be escaped within brackets.10. Delete all leading blanks on a line:
:g/^Search for one or more blanks at the beginning of a line; save the rest of the line and replace it without any leading blanks.
11. Delete all trailing blanks:
:g/12. Remove manual numbering from section headings (e.g., 1.1 Introduction) in a document:
:g/[1-9]\. [1-9]*\(.*\)/s//\1/gA hyphen-separated pair of letters or digits enclosed in square brackets (e.g,
[1−9]) specifies a range of characters.13. Change manually numbered section heads (e.g., 1.1, 1.2) to a
troffmacro (e.g.,.Ahfor an A-level heading)::g/^[1–9]\. [1–9]/s//\.Ah/14. Show macros in the output by protecting them from interpretation. Putting
\&in front of a macro preventstrofffrom expanding them. This command was used frequently throughout this book to print an example that contained macros. Three backslashes are needed in the replacement pattern: two to print a backslash and one to have the first ampersand interpreted literally.:g/^\./s//\\\&&/
▪ Writing and Quitting Files ▪
You have learned the vi command ZZ to quit and write (save) your file. But you will usually want to exit a file using ex commands, because these commands give you greater control.
:wWrites (saves) the buffer to the file but does not exit. You can use :wthroughout your editing session to protect your edits against system failure or a major editing error.:qQuits the file (and returns to the UNIX prompt). :wqBoth writes and quits the file.
The vi editor protects existing files and your edits in the buffer. For example, if you want to write your buffer to an existing file, vi will give you a warning, because this would delete the original file. Likewise, if you have invoked vi on a file, made edits, and want to quit without saving the edits, vi will give you an error message such as:
No write since last change.
These warnings can prevent costly mistakes, but sometimes you want to proceed with the command anyway. An exclamation mark (!) after your command overrides this warning:
:w! filename
:q!
The :q! command is an essential editing command that allows you to quit without affecting the original file, regardless of any changes you made in the session. The contents of the buffer are discarded.
Renaming the Buffer
You can also use :w to save the entire buffer (the copy of the file you are editing) under a new filename.
Suppose that you have a file letter that contains 600 lines. You call in a copy and make extensive edits. You want to quit and save both the old version of letter and your new edits for comparison. To rename your buffer letter.new, give the command:
:wq letter.new
Saving Part of a File
In an editing session, you will sometimes want to save just part of your file as a separate, new file. For example, you might have entered formatting codes and text that you want to use as a header for several files.
You can combine ex line addressing with the write command, w, to save part of a file. For example, if you are in the file letter and want to save part of letter as the file newfile, you could enter:
:230,$w newfile
which saves from line 230 to the end of the file, or:
:.,600w newfile
which saves from the current line to line 600 in newfile.
Appending to a Saved File
You can use the UNIX redirect and append operator (>>) with w to append the contents of the buffer to an existing file. For example:
   :1,10w newfile

   :340,$w>>newfile
The existing file, newfile, will contain lines 1 through 10, and from line 340 to the end of the buffer.
▪ Reading In a File ▪
Sometimes you want to copy text or data already entered on the system into the file you are editing. In vi, you can read in the contents of another file with the ex command:
:read filename
or:
:r filename
This reads in the contents of filename on the line after the cursor position in the file.
Let’s suppose that you are editing the file letter, and want to read in data from a file in another directory called /work/alcuin/ch01. Position the cursor just above the line where you want the new data inserted, and enter:
:r /work/alcuin/ch01
The entire contents of /work/alcuin/ch01 are read into letter, beginning below your cursor position.
▪ Executing UNIX Commands ▪
You can also display or read in the results of any UNIX command while you are editing in vi. An exclamation mark (!) tells ex to create a shell and regard what follows as a UNIX command.
:!command
So, if you are editing and want to check the time or date without exiting vi, you can enter:
:!date
The time and date will appear on your screen; press RETURN to continue editing at the same place in your file. If you want to give several UNIX commands in a row, without returning to vi in between, you can create a shell with the ex command:
:sh
When you want to exit the shell and return to vi, press ^D.
You can combine :read with a call to UNIX, to read the results of a UNIX command into your file. As a very simple example:
:r !date
This will read in the system’s date information into the text of your file.
Suppose that you are editing a file, and want to read in four phone numbers from a file called phone, but in alphabetical order. The phone file is in the following order:
   Willing, Sue  333–4444

   Walsh, Linda  555–6666

   Quercia, Valerie  777–8888

   Dougherty, Nancy  999–0000
The command:
:r !sort phone
reads in the contents of phone after they have been passed through the sort filter:
   Dougherty, Nancy  999–0000

   Quercia, Valerie  777–8888

   Walsh, Linda  555–6666

   Willing, Sue  333–4444
Suppose that you are editing a file and want to insert text from another file in the directory, but you can’t remember the new file’s name.
You could perform this task the long way: exit your file, give the ls command, note the correct filename, reenter your file, and search for your place.
Or, you could do the task in fewer steps. The command :!ls will display a list of files in the directory. Note the correct filename. Press RETURN to continue editing.
   file1

   file2

   letter

   newfile
The command:
:r newfile
will read in the new file:
"newfile" 35 lines, 949 characters
Filtering Text through a Command
You can also send a block of text as standard input to a UNIX command. The output from this command replaces the block of text in the buffer. Filtering text through a command can be done either from ex or vi. The main difference between the two methods is that the block of text is indicated with line addresses in ex and with text objects in vi.
The first example demonstrates how to do this with ex. Assume that instead of being contained in a separate file called phone, the list of names in the preceding example was already contained in the current file, on lines 96 to 99.
You simply type the addresses of the lines you want affected, followed by an exclamation mark and the UNIX command line to be executed. For example, the command:
:96,99!sort
will pass lines 96 to 99 through the sort filter, and replace those lines with the output of sort.
In vi, this sequence is invoked by typing an exclamation mark followed by any vi objects that indicate a block of text, and then the UNIX command line to be executed. For example:
!) command
will pass the next sentence through command.
There are some unusual features about how vi acts when you use this feature. First, the exclamation mark that you type is not echoed right away. When you type the symbol for the text object to be affected, the exclamation mark appears at the bottom of the screen, but the symbol you type to reference the object does not.
Second, only objects that refer to more than one line of text (G, {}, (), []) can be used. A number may precede either the exclamation mark or the object to repeat the effect. Objects such as w do not not work unless enough of them are specified so as to exceed a single line. A slash (/) followed by a pattern and a RETURN can also be specified, taking the text up to the pattern as input to the command.
Third, there is a special object that is used only with this command syntax. The current line can be specified by entering a second exclamation mark:
!!command
Either the entire sequence or the text object can be preceded by a number to repeat the effect. For instance, to change the same lines as in the previous example, you could position the cursor on line 96, and enter:
4!! sort
or:
!4!sort
As another example, assume you have a portion of text in a file that you want to change from lowercase to uppercase letters. You could process that portion with the tr command. In these examples, the second sentence is the block of text that will be filtered to the command. An exclamation mark appears on the last line to prompt you for the UNIX command:

Enter the UNIX command and press RETURN. The input is replaced by the output.

To repeat the previous command, the syntax is:
!block!
It is sometimes useful to send sections of a coded document to nroff to be replaced by formatted output. However, remember that the “original” input is replaced by the output.
If there is a mistake, such as an error message being sent instead of the expected output, you can undo the command and restore the lines.
▪ Editing Multiple Files ▪
The ex commands enable you to edit multiple files. The advantage to editing multiple files is speed. When you are sharing the system with other users, it takes time to exit and reenter vi for each file you want to edit. Staying in the same editing session and traveling between files is not only faster in access time: you save abbreviations and command sequences you have defined and keep named buffers so that you can copy text from one file to another.
Invoking vi on Multiple Files
When you first invoke vi, you can name more than one file to edit files sequentially, and then use ex commands to travel between the files. The following:
$ vi file1 file2
invokes file1 first. After you have finished editing the first file, the ex command :w writes (saves) file1, and :n calls in the next file (file2).
Suppose that you know you want to edit two files, letter and note. Open the two files by typing:
$ vi letter note
The message:
Two files to edit
appears on the screen. The first named file, letter, appears. Perform your edits to letter, and then save it with the ex command :w. Call in the next file, note, with the ex command :n and press RETURN. Perform any edits and use :wq to quit the editing session.
There is no practical limit to the number of files you can invoke vi on at one time. You can use any of the shell’s pattern-matching characters, or even more complex constructions. Suppose you were writing a program, and wanted to change the name of a function call, for example, getcursor. The command:
$ vi `grep –1 getcursor *`
would invoke vi on all of the files in the current directory containing the string getcursor. The command:
$ grep –l
prints the names of all files containing a string; using a command enclosed in backquotes (‵‵) as an argument to another command causes the shell to use the output of the command in backquotes as the argument list for the first command.
The vi editor will print a message similar to:
5 files to edit
before displaying the first file.
If you try to quit without editing all of the files, vi will issue a warning message:
4 more files to edit
You must type :q! if you want to exit without editing all of the files.
Calling In New Files
You don’t have to call in multiple files at the beginning of your editing session. Any time in vi, you can switch to another file with the ex command :e. If you want to edit another file within vi, first save your current file (:w), then give the command:
:e filename
Suppose that you are editing the file letter, and want to edit the file note and then return to letter.
Save letter with w and press RETURN. The file letter is saved and remains on the screen. You can now switch to another file, because your edits are saved. Call in the file letter with :e and press RETURN.
The vi editor “remembers” two filenames at a time as the current and alternate filenames. These can be referred to by the symbols % (current filename) and # (alternate filename). The # symbol is particularly useful with :e, because it allows you to switch easily back and forth between files. In the example just given, you could return to the first file, letter, by typing the command :e#.
If you have not first saved the current file, vi will not allow you to switch files with :e or :n unless you tell it imperatively to do so by adding an exclamation mark after the command. For example, if after making some edits to note, you wanted to discard the edits and return to letter, you could type :e!#.
The command:
e!
is also useful. It discards your edits and returns to the last saved version of the current file. The % symbol, by contrast, is useful mainly when writing out the contents of the buffer to a new file. For example, a few pages earlier we showed how to save a second version of the file letter with the command:
:w letter.new
This could also have been typed:
:w %.new
Edits between Files
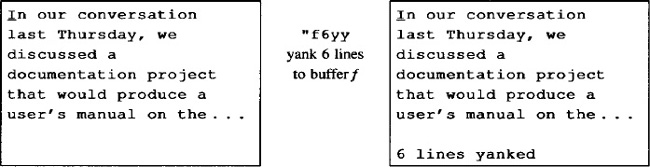
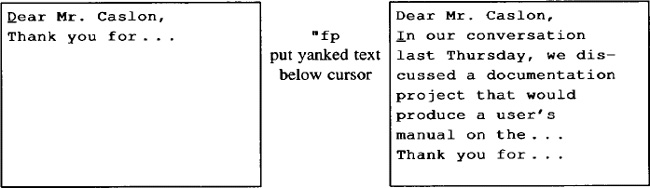
Named buffers provide one convenient way to move text from one file to another. Named buffers are not cleared when a new file is loaded into the vi buffer with the :e command. Thus, by yanking text in one file (into multiple named buffers if necessary), reading in a new file with :e, and putting the named buffer into the new file, material can be transferred selectively between files.
The following example illustrates transferring text from one file to another.
Save the file with the :w command. Enter the file note with :e, and move the cursor to where the copied text will be placed.
▪ Word Abbreviation ▪
Often, you will type the same long phrases over and over in a file. You can define abbreviations that vi will automatically expand into the full text whenever you type the abbreviation in insert mode. To define an abbreviation, use the ex command:
:ab abbr phrase
Where abbr is an abbreviation for the specified phrase. The sequence of characters that make up the abbreviation will be expanded in insert mode only if you type it as a full word; abbr will not be expanded within a word.
Suppose that in the file letter you want to enter text that contains a frequently recurring phrase, such as a difficult product or company name. The command:
:ab IMRC International Materials Research Center
abbreviates International Materials Research Center to the initials IMRC.
Now when you type IMRC in insert mode:
i the IMRC
IMRC expands to the full text:
the International Materials Research Center
When you are choosing abbreviations, select combinations of characters that don’t ordinarily occur while you are typing text.
▪ Saving Commands with map ▪
While you are editing, you may use a particular command sequence frequently, or you may occasionally use a very complex command sequence. To save keystrokes, or the time that it takes to remember the sequence, you can assign the sequence to an unused key.
The map command acts a lot like ab except that you define a macro for command mode instead of insert mode.
:mapx sequenceDefine character x as a sequence of editing commands :unmapxDisable the sequence defined for x :mapList the characters that are currently mapped
Before you can start creating your own maps, you need to know the keys not used in command mode that are available for user-defined commands:
   ^A    g    K   ^K

   ^O    q   ^T    V

    V   ^W   ^X   ^Z

    *    \    − (underscore)
Depending on your terminal, you may also be able to associate map sequences with special function keys. With maps, you can create simple or complex command sequences. As a simple example, you could define a command to reverse the order of words. In vi, with the cursor as shown:
you can the scroll page
the sequence to put the after scroll would be dwelp: delete word, dw; move to the end of next word, e; move one space to the right, 1; put the deleted word there, p. Saving this sequence:
:map v dwelp
enables you to reverse the order of two words anytime in the editing session with the single keystroke v.
Note that when defining a map, you cannot simply type certain keys, such as RETURN, ESC, TAB, BACKSPACE, and DELETE, as part of the map command. If you want to include one of these keys as part of the command sequence, preface that key with a ^V. The keystroke ^V appears in the map as the ^ character. Characters following the ^V also do not appear as you expect. For example, a carriage return appears as ^M, escape as ^[, tab as ^I, and so on.
You can undo the effect of any map sequence with the u command. Fortunately, the undo restores the file as it was before you executed the map sequence, treating the series of commands as though it were a single vi command.
Unless you use unmap to remove a mapped key, its special meaning is in effect for as long as your current session, even if you move between files. It can therefore be a convenient way of making the same edits in a number of files.
All the vi and ex commands can be used in map sequences, with the exception that the p or put command cannot be used to replace entire lines yanked in the same mapping. If you try to yank and then put back a deleted line within a map, you will get the error message:
Cannot put inside global macro.
If you want to move lines from one place to another within a mapping, you can usually get around this restriction using the ex editor’s copy or co command.
Complex Mapping Example
Assume that you have a glossary with entries like this:
   map – an ex command that allows you to associate

   a complex command sequence with a single key.
You would like to convert this glossary list to nroff format, so that it looks like this:
   .IP "map" 10n

   An ex command ...
The best way to do this is to perform the edit on one of the entries and write down the sequence of commands. You want to:
1. Insert the macro for an indented paragraph at the beginning of the line.
2. Press ESC to terminate insert mode.
3. Move to the end of the word and add the size of the indent.
4. Press RETURN to insert a new line.
5. Press ESC to terminate insert mode.
6. Remove the hyphen and capitalize the next word.
That’s quite an editing chore if you have to repeat it more than a few times! With :map, you can save the entire sequence so that it can be re-executed with a single keystroke:
:map z I.IP "^[ea" 10n^M^[3x~
The sequence ^[ appears when you type ^V followed by ESC. The sequence ^M is shown when you type ^V RETURN.
Now, simply typing z will perform the entire series of edits. On a slow terminal, you can actually see the edits happening individually. On a fast terminal, it will seem to happen by magic.
Don’t be discouraged if your first attempt at key mapping fails. A small error in defining the map can give you very different results than you expect. Simply type u to undo the edit, and try again.
Remember, the best way to define a complex map is to do the edit once manually, writing down each keystroke that you must type.
Mapping Keys for Insert Mode
Normally, maps apply only to command mode—after all, in insert mode, keys stand for themselves, and shouldn’t be mapped as commands.
However, by adding an exclamation mark (!) to the map command, you can force it to override the ordinary meaning of a key and produce the map in insert mode. You may find this feature appropriate for tying character strings to special keys that you wouldn’t otherwise use. It is especially useful with programmable function keys, as we’ll see in a minute. Many terminals have programmable function keys. You can usually set up these keys to print whatever character or characters you want using a special setup mode on the terminal. But this will limit you to a particular terminal, and may limit the actions of programs that want to set up those function keys themselves.
The ex editor allows you to map function keys by number, using the syntax:
:map #1 commands
for function key number 1, and so on. (It can do this because the editor has access to the entry for that terminal found in either the termcap or terminfo database and knows the escape sequence normally output by the function key.)
As with other keys, maps apply by default to command mode, but by using the map! commands as well, you can define two separate values for a function key—one to use in command mode, the other in insert mode. For example, if you are a troff user, you might want to put font-switch codes on function keys. For example:
   :map #1 i\f(CW^[

   :map! #1 \fI
If you are in command mode, the first function key will enter insert mode, type in the three characters \fI, and return to command mode. If you are already in insert mode, the key will simply type the three-character troff code.
Note: If function keys have been redefined in the terminal’s setup mode, the #n syntax might not work because the function keys no longer put out the expected control or escape sequence as described in the terminal database entry. You will need to examine the termcap entry (or terminfo source) for your terminal and check the definitions for the function keys. The terminal capabilties k1, k2 through k9, k0 describe the first ten function keys. The capabilities 11, 12 through 19, 10 describe the remaining function keys. Using your terminal’s setup mode, you can change the control or escape sequence output by the function key to correspond with the termcap or terminfo entry. (If the sequence contains ^M, which is a carriage return, press ^M, not the RETURN key.) For instance, to have function key 1 available for mapping, the terminal database entry for your terminal must have a definition of k1, such as k1=^A@. In turn, the definition ^A@ must be what is output when you press that key. To test what the function key puts out, press the key at the UNIX prompt, followed by a RETURN if necessary. The shell should display the sequence output by the function key after trying unsuccessfully to execute it as a command.
@ Functions
Named buffers provide yet another way to create macros—complex command sequences that you can repeat with only a few keystrokes.
If you type a command line in your text (either a vi sequence or an ex command preceded by a colon), then yank or delete it into a named buffer, you can execute the contents of that buffer with the @ command. It works in the same way as a map sequence, except that you enter the command line in the file instead of at the colon prompt; this is helpful if the command sequence is long and might need editing to work properly. Let’s look at a simple but not very useful example of an @ function. In your file, enter this key sequence:
cw\fIgadfly\fR^VESC
This will appear on your screen as:
cw\fIgadfly\fR^[
Then delete your command line into buffer g by typing "gdd. Now, whenever you place the cursor at the beginning of a word and type @g, that word in your text will be changed to gadfly. Because @ is interpreted as a vi command,. will repeat the entire sequence, even if it is an ex command. The command @@ repeats the last @, and u or U can be used to undo the effect of @. The @ function is useful because you can create very specific commands. It is especially useful when you are making specific editing commands between files, because you can store the commands in named buffers and access them in any file you edit.
___________
*\(and\),and\{n,m\} are not supported in all versions of vi. \<, \>, \u,\U,\l, and \L are supported only in vi / ex. and not in other programs using regular expressions.
Get UNIX° TEXT PROCESSING now with the O’Reilly learning platform.
O’Reilly members experience books, live events, courses curated by job role, and more from O’Reilly and nearly 200 top publishers.

