CREATING YOUR OWN PACKAGES
Creating your own package is not only easy using the backoffice tools, but it's also handy for modularizing functionality that can be shared across all of your projects. Plus, if you've developed something that you think others may benefit from, why not share the goods? To create a package, follow these steps:
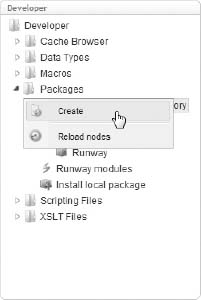
- Right-clicking the Packages node in the Developer section, as shown in Figure 10-6.
FIGURE 10-6
- Name your new package Site Breadcrumb by filling in the name field in the resulting popup.
- Fill in all the fields in the Package Properties tab, as shown in Figure 10-7.
- Package URL: The URL of the site where this package is described/documented.
- Package Version: That is, 1.0 or 0.1 and so on.
- Package file: This field remains empty until you publish the package.
- Author Name: Full name of the author of the project. Contributors can be added to the project details when uploading to the community site, but only one author should be listed as part of the package details.
- Author url: Your blog or corporate site URL.
- License Name: Researching the license model for the package is up to you. The default is MIT, just like the Umbraco core.
- License url: This would be the URL for the details of your license.
- Readme: This field is your opportunity to educate the installer of what the package does and to include any special instructions.
FIGURE 10-7
- Click the Package ...
Get Umbraco User's Guide now with the O’Reilly learning platform.
O’Reilly members experience books, live events, courses curated by job role, and more from O’Reilly and nearly 200 top publishers.

