
In this chapter and the next, I present strategies for organizing and storing your digital assets. I find it’s very helpful to break this discussion into two topics: the directory structure and the hardware configuration. The directory structure is the organization of files into a hierarchy of folders. It should be stable and scalable; it should not fundamentally change, only be added to. The hardware configuration is simply the configuration of the media that happen to be hosting the directory structure at any given time, and this will change as you add storage or move to entirely new media.
Organizing Your Image Files: An Overview
Working File Directory Structure
Archive Directory Structure: An Overview
Archive Directory Structure: Making Buckets
The Fine Art of File Naming
In the previous chapter, we saw you can use metadata to organize your images in robust and flexible ways. In this chapter, we’ll see how to name your files and how to divide them into a folder structure that takes the data lifecycle into account. Let’s start with a basic overview of the organizational structure and tools, and then move to some specific recommendations.
In the physical filing world, folders are very useful for organizing lots of documents. Since a piece of physical film or paper can be in only one place at a time, you can create a highly structured filing system using folders. Computers have used the folder metaphor for decades as a way to help users keep track of where something can be found.
Folders are very limited as an organizational structure, however. There must be one top-level organizational construct, which can only be subdivided in a limited way before the system becomes too cumbersome and breaks down. Is it most important to divide by date, client, project, subject matter, rating, or usage? Furthermore, information that is dependent on folder structure is very fragile. If you remove an image from a folder that designates what that image is, that content information can be lost (Figure 4-1).

Figure 4-1. One of the biggest problems with using folders for organization is that as soon as you remove the image from the folder the information is removed from the image.
However, folders provide an ideal tool for managing the data itself. I suggest you should use folders principally for storage, rather than for organization. By storage, I mean containing the images, putting them away, moving them around, and other handling issues, distinct from the organization of the images that is best accomplished by using metadata. In the physical world, storage and organizational structure are often inseparable. In the digital world, we are not so constrained. We’ll see how you can use folders in a simple, straightforward way to stack files up so that you can back them up, validate them, and restore them in the event of a problem. This does not mean that folder naming is irrelevant as a content-organizing tool; it means that content organizing is a secondary job.
As we saw in the previous chapter, metadata does the heavy lifting for organizational purposes. Letting go of a filing hierarchy based on image content can be difficult, but once you surrender yourself to the concept that the directory structure does not have to be the ultimate keeper of important content data about your images, a very simple preferred data structure emerges—a structure that leverages the particular qualities of digital media. It saves time, reduces confusion, and will really pay off when you hit one of those practically inevitable bumps down the road (such as drive failure or format migration).
Metadata and cataloging software offer much more flexibility and efficiency for organizing than folders do. Cataloging software allows us to organize the same set of files in numerous ways. You can view an entire archive according to multiple criteria, including date created, commissioning client, portfolio images, quality rating, subject pictured, and, yes, where it is stored.
Cataloging software frees us from having to use the directory structure to identify the content of our images. This is a good thing, because you should organize the directory structure with other issues in mind:
It should be scalable in a way that will meet the challenges of decades of storage.
It should be simple: quick to scan and quick to add to.
It should be designed so that it is easy to determine if a file has been backed up, and easy to restore in the event of a problem.
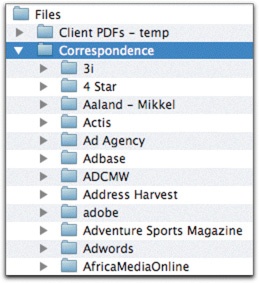
Figure 4-2. My word processing documents are organized so that I can move this folder of subfolders to a new machine and keep my files organized in exactly the same way.
You have probably upgraded your computer before, and had to transfer your saved email files or word processing documents from one machine to another. If you had all your documents in a folder—or perhaps a folder full of subfolders, as shown in Figure 4-2—this part of the upgrade process was probably not too difficult because all you had to do was copy the parent folder from one machine to another. The directory structure (the way the files are stored) stayed constant, even though it was moved to an entirely new data storage device (the hard drive in the new computer).
You’ll want to structure your image storage system so that you can move it as easily as your folder full of documents, and you’ll want to be able to find things when you’re done. The directory structure for your image files should be simple, unified, and scalable, and it should be independent of the storage medium on which it happens to be hosted. Essentially, what we will be designing in this chapter is a structure to hold all your image files and a way to name the files within that structure.
The most basic directory structure—an alphabetized list of folders, for instance—is fine for small text files, but when you try to apply this structure to a large data set of digital photographs, it breaks down. For example, it can break down when the image collections grows too large for one volume. Additionally, the alphabetized directory structure mixes the old and new work in ways that are hard to back up and restore reliably. In order to design a unified directory structure for a digital photography archive, we have to consider a number of factors:
What kinds of files go together?
When are images added to the permanent structure?
How do you configure the structure to be scalable?
How does the structure relate to the storage medium?
How do we back up, validate, and restore files?
We’re going to use the tools of data lifecycle management outlined in Chapter 1 to help configure a directory structure that addresses these questions. Ironically, in order to build a unified structure, we must first look at how to divide up the kinds of data we need to store.
I suggest making several divisions in your storage system to reduce costs and increase security (Figure 4-3). In this chapter, we’re going to look at the working life-cycle phase, as well as the archive phase (ingestion is part of the working phase as far as directory structure is concerned). As we will see in Chapter 6, there are some important file handling differences between working and archive files. Working files need a more rigorous (and probably more expensive) backup system, since the files are changing rapidly. Archive files have reached a more stable state and can be protected by a more secure and cost-effective backup routine. We want the directory structure to reflect this difference and help facilitate the processes involved.
For many users, it will make the most sense to separate original files from derivatives. The most basic reason for this is that derivatives are often made after (sometimes long after) you have archived the originals. In fact you may rework your most valuable images several times over their lifetime. While it’s natural to want to save these files back into the folder with the originals, this can really mess up the backup, validation, and restoration of the archive. We’ll look more closely at these issues in Chapter 6.
For the purposes of this discussion, let’s assume that the original is the image produced by a digital camera, and that a derivative is a TIFF or PSD file produced by some kind of Photoshop work that can’t be done in PIEware—in other words, something that has to be saved in a new, differently formatted file.
The working part of the directory structure is a place to keep your works in progress. Because of the large size of the data, I suggest handling it differently from your word processor documents, email messages, and other smaller files that are in your users folder. I suggest creating a Working folder in the root directory of the drive, as shown in Figure 4-4. Inside this folder, you will keep images that have not yet been archived, as well as your image catalogs, master files in progress, any movie or audio files you’re working on, and so on. In Chapter 6 we’ll look at how to protect this data, and the reason for keeping it separate will become clearer.
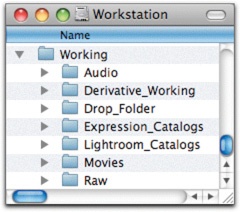
Figure 4-4. A Working folder in the root directory of the hard drive. I keep my imaging works in progress in here.
As images are downloaded, processed, and prepared for archive, you can use a folder structure to track and manage the files. There are several advantages to setting up a dedicated space for downloading and preparing your camera originals. First, it creates an easy-to-find space to target your download and to find the images later. Using a working files folder that is the same on every computer can also help you if you use both a laptop and a desktop. By keeping the folder structure standardized, you make it a lot easier to move back and forth between machines. And since these images have not been archived and gotten full backups, we’ll want to take an extra measure of precaution to protect them.
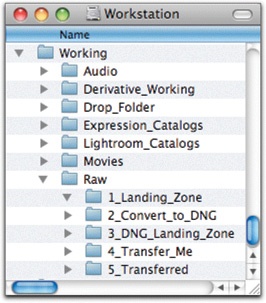
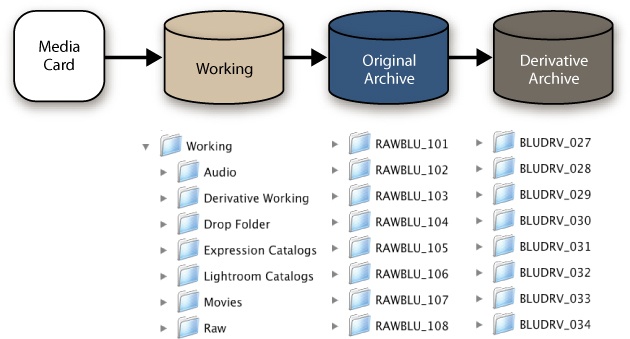
Figure 4-5. A simple image work-flow pipeline. We’ll look at other configurations in later chapters.
We’ll look at the image workflow pipeline in great detail in Chapter 8–Chapter 10, but outlined below are the basic components. I use these numbered folders as a way to track the image on the way from card to archive (Figure 4-5). The folder arrangement shown here is only one way that you can configure the pipeline; I’ll outline other configurations that you might want to use in the workflow chapters.
The ingestion process drops renamed images into the #1 folder with bulk metadata attached.
Once you have rated and adjusted them, images go into the #2 folder, where they await conversion to DNG.
The DNG files land in the #3 folder after conversion.
DNG files are moved into the #4 folder, where they are put into buckets and await transfer to the archive.
After transfer, images are moved to the #5 folder where they stay until the new archive copy is backed up. They can then be erased.
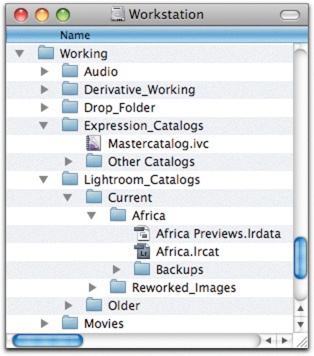
You’ll notice that there are some other files in the Working folder shown in Figure 4-6—Expression Media catalogs, Lightroom catalogs, a drop folder, derivatives in progress, and movie files. I keep all of these in this special folder so that I can back the files up with an easy automated program. If you are a Time Machine user, you may want to exclude this folder from backup, since large volumes of media files and Lightroom catalogs play havoc with that software. We’ll talk more about backups in Chapter 6.
As your collection of digital images grows, a larger percentage of it will be archive files rather than working files. When you start shooting digital, none of your files are archive files. By the time you have been shooting digital for a decade, your collection will be over 95% archive files. This, of course, is similar to film archives, where only a small portion of your photography collection is new—most of it will be archived images.
The archive should be an orderly and secure permanent home for your images. Let’s take a look at how you can structure your archive to achieve that goal.
Figure 4-7 shows two hard drive directories: one for original files and one for derivative images. I suggest making a parent directory structure for each kind of image. This division will assist in streamlining the backup procedures, as well as maintaining file integrity and simplifying future file migration.
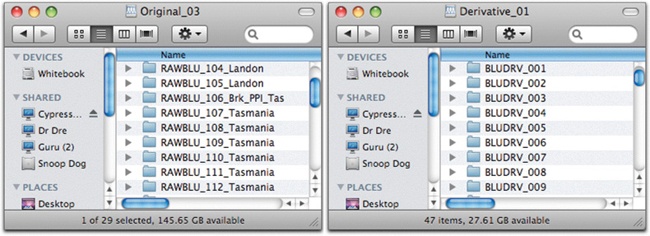
Figure 4-7. Separating original and derivative files makes archiving the images more straightforward because it allows you to archive entire shoots even you have not yet created all final master files.
For those who are still thinking in analog terms, it may seem to make sense to keep all the Shoot X files together in the same folder and on the same drive. I suggest, however, that you segregate all files into groups of originals and derivatives. As software moves forward and you can accomplish more of your work with PIEware rendering tools, you’ll need to make fewer derivative files. What required Photoshop 2 years ago can now be done faster, nondestructively, and with a smaller file-size footprint with Lightroom or ACR. In many cases, you’ll want to revisit original images as the software improves.
One of the most intuitive reasons for keeping originals and derivatives together is the need to find one from the other. If folders are your main method of tracking and finding files, it’s important to keep them near each other. However, if you use catalog software to manage your collection, you can easily find multiple versions of the image without having to depend on folder structure to associate the files (Figure 4-8).

Figure 4-8. If you use unique file names, you can find a master file from an original pretty easily, particularly with catalog software.
Segregating originals and derivatives is a good way to organize your files, particularly from a file-handling point of view:
When the need arises to migrate the files (such as for the conversion of legacy raw files to DNG), it will be easier to batch everything on an entire drive, rather than having to migrate original raw files commingled with derivative images.
For images shot as in-camera JPEG files, it will be immediately clear which are the originals and which are the derivative files, so you won’t accidentally overwrite the originals.
If you are looking for a file, you will generally know before you start searching whether you are looking for an original file or a derivative one. Thus, your search will already be narrowed.
Most importantly, the conversion from original to derivative may not happen for quite some time, particularly for personal work. In this case, commingling file types complicates the backup process, as you will be scattering the new files among a much larger group of older, already backed-up raw files. If you build a directory structure that lumps together old and new files, your backup procedures will be much more expensive, complicated, and time-consuming or, alternately, less safe.
Note
The bucket system is designed to take advantage of some media storage techniques described in the next chapter and in Chapter 6. By using this system, you will be able to maximize the reliability, clarity, scalability, and ease of management of your archive system. Digital photography can seem like a never-ending spending treadmill, so I have developed techniques that enable you to get as much functionality and reliability as possible, as economically as possible.
Now that we have divided our archive images into two main groups—originals and derivatives—we need to come up with an internal structure for those groups. As with all aspects of our archive, we will strive here for simplicity, durability, and scalability.
My system, which I call the bucket system (Figure 4-9), is a deceptively simple technique that addresses a number of the challenges that the digital photographer faces. Images are put away into sequential folders as they are prepared for archive. These sequential folders correspond to the write-once media component of the backup (CD, DVD, or Blu-ray). This structure makes it easy for you to determine that images have all been backed up, and it makes it easy for you to restore the archive in the event of drive failure.

Figure 4-9. Putting images in buckets is a handy way to organize them in a way that helps you address the challenges of long-term storage.
Here are some of the bucket system’s primary characteristics:
It’s simple and it lets you put images into their permanent homes quickly.
It’s visually orderly.
It’s scalable: you just add more buckets to add more images, and you can easily combine smaller buckets into larger buckets if you upgrade your storage media.
It provides an orderly progression of your image files from the recent archive to the deep archive as the images age.
It’s easy to confirm the existence of backups.
It’s easily restorable in the event of calamity.
It forms a file structure that’s well suited to migration through multiple data storage configurations over the life of the archive.
Okay, so what do these magical buckets look like? One of my original file storage drives is shown in Figure 4-10.
At the heart of the bucket system is a very simple idea: put your images into folders that line up in numerical sequence. When a folder becomes full (as described below), you simply make a new folder with the next sequence number.
By structuring your directory in this way, you create a natural progression from old files to new. As you add new images to your collection, they show up at the end of the sequence, and older images are “pushed” deeper into the archive. This directory structure makes adding files easy and logical. It keeps your files organized, provides easy confirmation of backups, and simplifies the workflow.
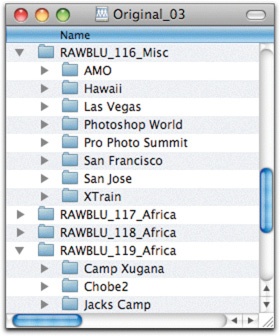
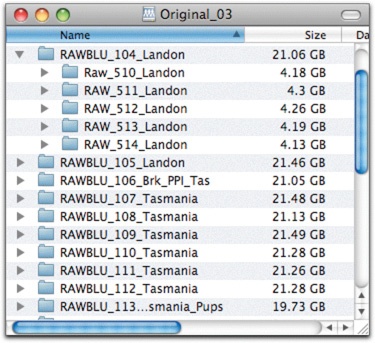
Figure 4-10. I keep my original files in buckets that live on a series of drives labeled Original_01, Original_02, and Original_03. The Bluray-sized buckets of images live on the drive. Small assignments are grouped together in a bucket like 116_Misc. Large assignments, like the Africa pictures, can be spread across multiple buckets.
There are a number of strategies for determining what constitutes a bucket. To find the size that’s right for you, you’ll need to take into account how you shoot and what your storage medium is. We’ll start by looking at a system that employs optical disks, and then look at some other ways to set up your buckets.
I recommend using write-once media as part of your backup strategy. So that this works as cleanly as possible, each of your buckets should fit neatly onto your chosen storage media. As shown in Figure 4-11, this makes for an easy correlation between the original bucket and each of the backup copies (you will see how nicely this logic works in Chapter 6). Each bucket is a self-contained group of files, and it’s easy to see that a copy of each is present by its sequential organization.
Obviously, before you determine how much data to put into each folder, you should decide which backup media you will be using. When I used to back up my images on DVDs, I limited the size of each folder to what will fit comfortably on a DVD, which is about 4.3 GB of data. If you shoot only JPEGs, you may want to use a CD-sized bucket (about 700 MB of data).
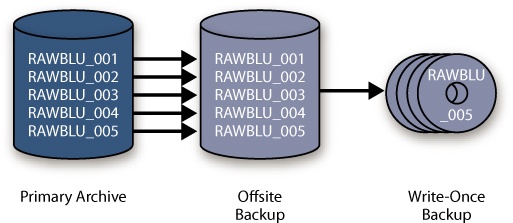
Figure 4-11. The bucket system enables easy confirmation that you have backed up your image files, even if you are using different-sized storage devices—or different media entirely—for your backups. From left to right, these images represent the primary drive with the master original files, the hard drive backups of the originals (perhaps on smaller disks), and the second backup copies on optical media.

Figure 4-12. When I changed from DVD to Blu-ray for my backup optical media, I combined existing buckets into new Blu-ray-sized ones. In this figure, you see how DVD buckets 510–514 ended up inside Blu-ray bucket 104.
I’ve now gone to Blu-ray as my write-once backup media, so I make my buckets 23 GB. For images that were archived before the switch to Blu-ray, I’ve combined DVD buckets to make a smaller number of Blu-ray buckets (Figure 4-12). You may not want to reburn those older archived files to Blu-ray right away, since the cost of Bluray disks is still pretty high (as of this writing). The price should drop relatively quickly to be comparable to the cost of a DVD as more factories come online.
You Might Be Wondering ...
How Do I Split My Files into the Right Sizes?
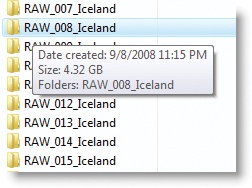
Once you decide to split your archive into chunks of a certain size, you need to figure out how to go about actually doing it. You can use the tools in the operating system to show you how much a folder holds. On the Mac, you can go into List view in the Finder, choose View > Show View Options, and then enable Calculate All Sizes (Figure 4-13). In Vista, you can right-click a folder and choose Properties, or mouse over the folder (Figure 4-14).
I prefer to use my DAM software to split the images into bucket sizes just prior to archiving the files. Unfortunately, I don’t know of any tools that will automatically split files into size-limited folders—you will have to do it manually. I’ve found that this is a pretty quick process in Expression Media. I show you how to do this in Chapter 11.
Organizing your bucket folders by date is a common way to archive images, since it provides an orderly sequence to the photos. You can create a set of folders like the ones shown in Figure 4-15, which provide a sequence and a hierarchy for the image folders. There are a couple of issues to consider if you want to take this approach.
The first challenge is that for most people, date-limited folders are going to be of different sizes, which will make write-once media backup hard to implement. If you generally shoot no more than, say, 3 GB per month, most months will fit on one DVD. How do you handle months, however, where you might shoot more than 3 GB? You have to move to an inconsistent bucket system where some buckets represent one month and some represent part of a month. This can get messy, particularly when you need to restore the archive after some kind of failure.

Figure 4-15. If you use Date folders for your buckets, it’s easiest if all of the time chunks can fit inside the same write-once media size. You’ll also want to make sure to get each month’s files processed before burning that month’s disk.
If budget allows, you could move to a write-once backup that is going to always be oversized, as Blu-ray would be for many people. With Blu-ray disks costing $5 each (at the time of this writing and falling fast), it would not be terribly extravagant to burn a disk monthly, regardless of how much data is in the folder. Of course you could forgo write-once media altogether, but after reading Chapter 5 and Chapter 6, you may see why I think that’s risky.
There’s another challenge that will come up for some people—I know it would for me. It can be inconvenient to process things in the order they were shot. I have sometimes done shoots that sit in the Working folder for quite some time until they are ready to archive. Maybe I get busy with other work or with travel. Maybe I know it’s going to be a chore to get the images looking right and I simply procrastinate. The result is that sometimes images don’t make it all the way through the workflow pipeline for months, long after later shoots have been processed and archived. By insisting on a date-based folder hierarchy, I would make the workflow and archiving process less flexible, and more subservient to the unyielding governance of chronology.
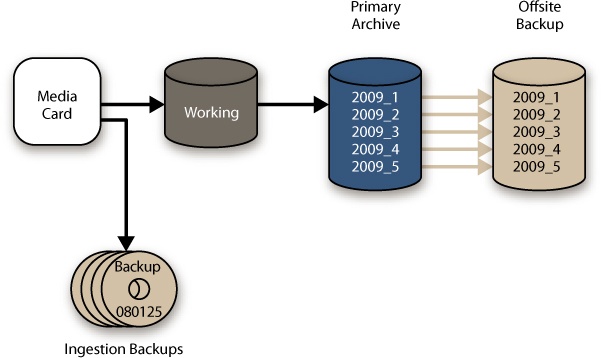
For photographers who want the structure of date-limited buckets in their archives and want the protection of write-once media, there’s another option. You could burn a backup CD, DVD, or Blu-ray disk early in the workflow process and keep it as a disaster recovery copy without worrying too much about making it match the primary storage structure (Figure 4-16). In the event that you lose the primary and backup hard drive copies of the archive, you will still have a copy on optical disk. If the files on the disk had the same unique names as the files in the archive, it might be reasonably easy to put the collection back together the way it was.
It also might be very difficult to reconstruct the archive, depending on how complete the optical disk archive is, whether there is any duplication, and how your DAM software handles finding files in different directory structures. If you’re going to take this approach, you need to be very consistent about exactly when you burn your images off to disk, since it will be difficult to cross-check the completeness later.
If you don’t use optical media as part of your backup plan, you have unlimited flexibility in terms of folder size. You can use whatever organizational structure you want—dates, job numbers, whatever. While I’d still generally suggest some kind of structured, sequential folder hierarchy, it can be more free-flowing. You also don’t have to worry about segregating old and new work since you can back everything up from the primary to the backup(s) as you create it.
If you are depending only on hard drives to store your backups, however, you need to realize that viruses, volume corruption, or possibly human error could cause the loss of the entire archive or a large chunk of the archive. As you consider whether the hassle of burning optical disks is worthwhile, take a moment to consider the value of the collection as a whole or what you might be forced to pay for data recovery in the event of catastrophic loss (think: second mortgage).
If, however, you are in a network environment with a backup like LTO digital tape, it’s likely that you can forgo buckets altogether without much risk of data loss. Digital tape has the advantage of saving changes to image files without losing the previous version. This adds significant protection against viruses, volume corruption, and accidental deletion. But it comes at a price—currently between $5000 and $10,000. It’s a reasonable amount for a company to spend to protect a corporate image collection, but a lot for an individual who just wants to avoid burning Blu-ray disks.
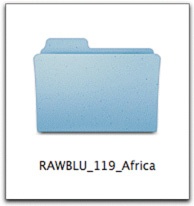
In this section, I’ll show you how I name the folders in my archive, and the logic behind the naming. The naming scheme for the buckets needs to do a couple of things: it needs to tell you in broad terms what kind of files the bucket contains (for instance, original or derivative files), and it needs to make the buckets line up sequentially, from oldest to newest. As long as your names accomplish these two tasks, you have quite a bit of flexibility in choosing a naming scheme. Figure 4-17 shows an example of the format I have chosen for the folders containing my original files.
Here’s a breakdown of my naming scheme:
Prefix. I put the term “RAWBLU” at the beginning to tell me that these are camera originals. In my case, originals can be either raw files, in-camera original JPEGs, or the .mov movie files that my point-and-shoot camera makes. My derivative files get the prefix “BLUDRV” (when I used DVD, I just used the prefixes “RAW” and “DVD,” but I have updated that for Blu-ray storage).
Sequence number. I use a three-digit number as a sequence number for easy identification. Note that this only works for 999 folders. When I was using DVD, I got to the mid-500s before switching to Blu-ray. I’m pretty confident that a new storage medium will be available before I get to
Blu-Ray_999. If you are archiving for a collection that will exceed 20GBx1000 (20 Petabytes), I suggest adding an extra zero.Content. When a bucket is made of images from a particular shoot, I’ll append a shoot name to the end of the bucket name. While I don’t depend on this folder naming to be a principal navigational tool, it can be helpful at times.
This was a more helpful tool when my buckets were sized for DVD. With Bluray buckets, I find that I am generating a lot of “Misc” buckets (as shown in Figure 4-18), since most of my shoots are less than 23GB.
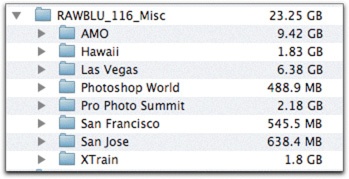
Figure 4-18. If a bucket holds a number of different shoots, the content part of the name can just say Misc.
Warning
Make sure you don’t use any nonstandard punctuation in your folder names. You might be tempted, for instance, to include a / in a date name. This may cause hard-to-diagnose problems to appear sometime later. To be safe, only use numbers, letters, dashes, or underscores in your folder names.
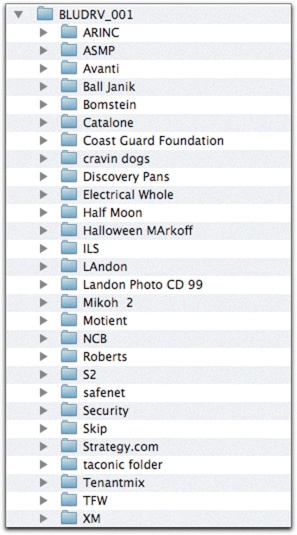
Since I use different directory structures for original and derivative images, I have a slightly different naming convention for each. I call the derivative image buckets BLUDRV_001 and so on. BLU indicates it’s a Blu-ray disk, and DRV indicates it’s a derivative. You can use any other combination of letters that makes sense to you—as long as you’re consistent it doesn’t make a huge difference, although I do recommend that you keep it short. Figure 4-19 shows how my buckets for derivatives look.
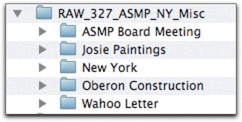
The subfolders within my DVD-sized buckets are each titled with a short reference to the subject matter they contain, such as client, agency, subject matter, or some combination thereof. This is the only directory-based content management that I use. Keeping this information nested inside a numerically sequential directory structure means that it’s still available, but it doesn’t confuse the directory structure.
As you download images from your memory cards and prepare them for their permanent homes in the directory structure, you can put keywords into the subfolder names. As in all of your archive workflow, you will do yourself a favor to use a controlled—or at least consistent—vocabulary. For instance, you might call personal images of your family Kids, Family, FAM, home, or something else along those lines. Decide on a term you like and stick with it.
Figure 4-20 shows how I use subfolder names to indicate basic information about the files inside. This directory-based information is particularly useful as I make my first groupings with my cataloging software. By searching the directory for all image files with “Family” somewhere in the pathname, I can quickly make a virtual set that includes all these files.
You may also wish to append a date to these subfolders so that you can distinguish subfolders with the same content info—for example, Family_081225 and Family_080704—and not risk any folder collisions.
As technology marches along, larger storage solutions will come to market. Those of us who started out using 44 MB SyQuest cartridges have seen the advent of numerous storage media improvements: 100 MB zip disks, 680 MB CDs, 4.4 GB DVDs, and now, Blu-ray discs with capacities of 25 or 50 GB. The beauty of the bucket system is that it’s infinitely scalable—you can simply combine smaller folders together to make bigger ones so that the information structure stays stable (Figure 4-21).
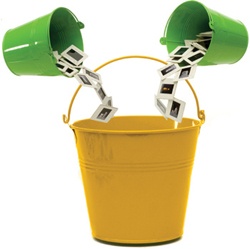
Figure 4-21. Because you can put smaller buckets into larger buckets, your collection will scale well.
There are two different ways to combine smaller buckets into larger ones: either you can place existing folders intact into a new, larger folder or you can dump the contents of the folders together into the new folder. The critical issue is that your cataloging software needs to keep track of the changes. As long as it can still “see” the image files in the new directory structure, you will have an easy transition.
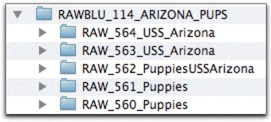
Figure 4-22. As you move to a larger bucket size, you will want to combine the smaller buckets into larger ones. This keeps the information structure stable and provides for reasonably simple data migration.
I think it makes the most sense to place the folders intact into the larger buckets, as shown in Figure 4-22. This is what it looked look like when I changed to Blu-ray for backup.
File naming is the most basic component of your file system structure. As such, it’s important that you choose a method of naming files that you can grow with and use for a long time.
Most imaging software has batch-renaming utilities that allow you to select among various types of text and data to use in the renaming process. In this section we will take a look at the desired end result. We’ll examine how to actually achieve this result in later chapters.
Digital cameras generate huge numbers of files with similar or identical names. As of this writing, no cameras that I am aware of will give you sufficient options to automatically generate unique file names. And even as they do begin to offer this option, you will still have to decide on a naming system that you like.
Here are the most important characteristics of a naming system:
Each image file should have a unique file name. This helps in all sorts of ways, from preventing accidental overwriting, to assisting in any client communications about the files, to archive reconstruction. Using the date taken as part of the file name is probably the easiest method of making sure that you do not give a file a name that has already been given to another image.
Each file name should end in a three-letter extension preceded by a period. For Windows users, this will be second nature. For Mac users, explicitly including file extensions (e.g., .NEF, .CRW, or .JPG) is still optional; however, using the extension ensures greater compatibility.
File names should be no more than 31 characters long, and the only punctuation should be underscores, dashes, and a single period just prior to the file extension. Although most computer systems can support names longer than 31 characters, we want to structure our practices to be universal. Keep it to 31 characters (plus the extension), and you will be safe. Again, Mac users may have to get used to not including spaces and other punctuation in file names, but this will ensure greater cross-compatibility. The compatibility problems that this causes are disappearing, but aren’t gone. Most of the issues show up in web-based environments.
The naming system should be regularized and universally applied. If you implement a standardized naming convention, you’ll save time and avoid errors.
Including a database-style date component in the name can help you line up all your files in the order they were taken. Database-style dates start with the year, then the month, then the day. This keeps files in chronological order. The notation for the date format usually comes in the following form: YY or YYYY indicates the year as either a two- or four-digit number, and MM and DD indicate the month and date, respectively. If you use a two-digit number for year, your naming system will be obsolete in the year 2100. While I’d like to think that I will be shooting pictures when I’m 140 years old, the odds are against it. I have therefore chosen a format that will only really work for images shot up until 2100. Also, by dropping the first two numerals off the year, I gain two more characters to use when renaming files as derivative files (as outlined below). If you want to build a system that works forever, use a four-digit year.
Obviously, your naming system must work with whichever program you are using to generate the names. It should be easy to apply names without having to determine if they have been used previously. Again, using a date in the file name can streamline this process.
You can append tags or codes to the file names to indicate derivative versions of image files. Successive versions of the same file—a master file, for instance, or one converted to black and white—should have some kind of tag added to the file name to note the enhancements. This is generally preferable to renaming the entire file (there are times when you might want to rename a file entirely, though, as discussed in Chapter 8–Chapter 11).
The file name does not have to carry important content information about the file. Putting content information in the file name can get complicated, and it takes up valuable character space. It can be a very time-consuming process compared to simply appending a few keywords. I’m not saying the file name can’t carry content information, just that it doesn’t have to.
A file naming system that incorporates your name can help your clients keep track of your images. As discussed below, adding a string (a sequence of letters) in the file name that identifies a file as yours will help your clients remember where it came from.
Okay, so that’s a lot of considerations. To see them in action, let’s take a look at my favorite naming system and examine why it works. The convention I have settled on for naming my digital camera files looks like this: Krogh_050428_2728.dng (Figure 4-23).

Figure 4-23. My naming convention looks like this—my name, the date taken, and a unique four-digit identifier.
Here are the elements:
The originator string. I start the name with the string “Krogh” because I want people to know the image came from me. This works for me because I have a short and reasonably uncommon name, but if your name is something like Smith or Jones, including it in the file name might be less valuable (I do know one photographer who has a common last name but an uncommon first name; he uses his first name in his file names). If your name is long— Schwarzenegger, for instance—you might also find that it’s unworkable to include it in the file name. You might decide to use your initials instead or to use no originator component at all.
When deciding on a string to use, remember that you may be appending other strings to these file names as you work with the files and that you’ll need to keep the entire name below the 31-character limit.
I put the originator string at the front of the file name, but you could put it elsewhere if you like—after the date, for instance.
The date string. After my name, I place an underscore in the file name to set it apart from the next element, which is the date. The underscore is just a little visual marker that makes the file name easier to read. I then place a database-style date in the file name. My preferred naming format, as indicated earlier, is often noted as the date (YYMMDD). Thus, 050201 is February 1, 2005. It’s a bit hard for us Americans to read this date format quickly at first, but for sorting purposes it makes much more sense than the way we usually write dates (month/day/year, or MMDDYY), as shown in Figure 4-24.
The unique identifier sequence number. The next part of the file name— again, separated by an underscore—is the unique identifier number. In many cases, this is the number that was incorporated in the original file name (e.g., in
DSC_1234.NEF, 1234 is the unique identifier). As a matter of fact, when I am shooting with only one camera, I almost always use the unique identifier number from the original file. If I am shooting with two cameras and want to keep from having overlapping file names, I will generate an automatic sequence number in the ingestion process, rather than picking up the camera-generated one.
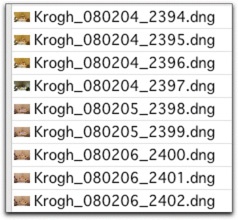
Figure 4-24. As you can see, if you use a database-style date near the front of the file name, your files will line up in chronological order. This is even more important if you use the DNG format because the filesystem will see date created as the date the DNG was made, not the date the picture was taken.
One of the benefits of shooting a raw file is that you know that no application will write over that file (no program can, for instance, reduce the size of the file and then resave it as a raw file, forever changing the original). The only applications that can resave raw files work only on the metadata of the file, not the underlying image data.
If you shoot in-camera JPEG originals, however, your original image files are at risk—it’s possible to accidentally reduce the size of the file or make some other destructive change to it and then save over the original. It’s important, therefore, to have some way to prevent saving over your originals, as well as to have good backups of the files in case you ever need to restore the originals.
I use a combination of careful handling in the workflow pipeline and archive structure to keep from overwriting in-camera JPEGs. Let’s examine how you can use file names to address this problem.
Tip
You may be tempted to rename each batch of photographs with unique identifier sequences starting at 0001, but this will yield a very large number of files in your collection with unique identifiers of, say, 0011. Using the original, camera-assigned unique identifier gives you a range from 0001 to 9999. This makes any directory-based searches for image files much faster and easier to do.
You might choose to append the terms Orig or CO (for Camera Original) to the names of your original JPEG files (for example, Krogh_050101_1234_Orig.jpg), so that you can tell by looking at a file if it is the original. Of course, that means that you will need a way to remove this designation from the file name when you batch out the images. Bridge does not have an easy way to remove elements from multiple file names at once, but Expression Media and some other DAM applications do.
As an alternative to removing the distinguishing extension when batching out the images, you could instead choose to append a designation to the file name to distinguish it from a camera original. You could, for instance, add “PY” to the end of a file name ending in “CO” to get a file name that ends in “COPY.” Most DAM software makes this a fairly easy process.
As you decide on your file naming system, you need to evaluate how confident you are in handling your files so that you can determine whether your JPEG camera originals will need special designations in their names. I have settled on a system that does not name my JPEG files in any special way. They are named just like raw files—Krogh_080101_1234.JPG.
The method detailed above is the basic naming structure I use for original files. I suggest that the core of the file name (in this example, Krogh_050101_1234) should never change for internal uses. By keeping this part of the name constant, you will streamline the file-handling process. A single search on this string, for instance, should be able to identify every version you have ever made and saved of this file.
When you make a new version of the image, I suggest appending a string to the name. For instance, when I prepare a master file—a color-corrected, retouched master version of the image—I append the word “Master” to the file name (e.g., Krogh_050101_1234_Master.tif). If I make a black and white conversion, I add the letters “BW” to the file name.
Table 4-1 shows some examples of the strings I use to note different types of derivative files. As we discussed in the previous chapter on metadata, you should be as consistent as possible so that you always know what each designation represents. You should think about your workflow and the kind of photography you deliver as you decide on the naming convention you will use for derivative files.
Table 4-1. My File Naming Convention
File name | Type of file |
|---|---|
Krogh_050101_1234.DNG | Camera original file. |
Krogh_050101_1234.NEF | Camera original file. |
Krogh_050101_1234_Master.tif | Color-corrected, retouched file. |
Krogh_050101_1234_BW.tif | Black and white version of the color master file. |
Krogh_050101_1234_MasterBW.tif | Master black and white file when a color master also exists. |
Krogh_050101_1234_CMYK.tif | Image that has been converted to CMYK for offset printing. |
Krogh_050101_1234_Flat.tif | Flattened version of the master file. |
Krogh_050101_1234.tif | File intended for client delivery or prepared for printing or proofing. To reduce confusion, I typically remove any suffixes I’ve appended to the file name (except “CMYK”) before I deliver the file to the client. |
Krogh_050101_1234.jpg | In-camera original (for in-camera JPEG originals), or a file to be delivered to a client. |
You might be tempted to rename image files with more descriptive terms at some point (say, changing Krogh_050101_1234 to NewYearsDay.tif). With a few exceptions, I recommend never changing the name of a file after you have given it a unique name and worked on it. Keeping file naming constant will reduce confusion between you and your clients, and also between your present self and your future self.
One exception is if you know that your client will be renaming the files—for instance, naming product photos for the items pictured may be part of the specifications of the job. In this case, it will be helpful for you to rename the file yourself and to put your name into the metadata of the file so that you can reference the original if needed. This ensures that the real name is placed in the metadata, performs a service for the client, and (since I suggest keeping copies of all delivered files, even if they are just flattened copies of master files) provides a way to link a renamed file to its original raw or master file.
The other time I rename is when the destination of the image file is my website and I want the image to be discoverable by image search engines. A descriptive name, rather than a date/sequence name, makes the file easier for Google and other search engines to locate. Google Image Search uses the name of the image file as an important determinant for search results, so descriptive terms in file names can be of real value here.
Aside from these situations, it’s good DAM practice to keep file names permanent because the file name is the foundation of the information structure.
Get The DAM Book, 2nd Edition now with the O’Reilly learning platform.
O’Reilly members experience books, live events, courses curated by job role, and more from O’Reilly and nearly 200 top publishers.

