
In the old days, you pulled the film out of your camera and dunked it in toxic chemicals, or hired someone else to do that for you. With a digital camera, thereâs no need for chemistry or lightproof rooms. Instead, youâll transfer your images to your computer where you can edit and correct them. There are several ways to perform this transfer. In this chapter, weâll take a look at your transfer options and explore Canonâs bundled software. Before we get started, letâs consider your cameraâs media card.
Film is an amazing invention because itâs a single material that can both capture an image and store it. With a digital camera, the image sensor does the capture, but it doesnât have any capability to store an image. For that, a digital camera employs a memory card of some kind. As youâve already learned, the T1i uses Secure Digital (SD) cards (or SDHC cards, a faster, higher-capacity version of SD).
Flash memory cards are similar to the RAM thatâs in your computer, but with one important difference: they donât require power to remember whatâs stored on them. So, after you turn the camera off, the images remain on the card, even if you remove it. Consequently, itâs perfectly safe to take out a full card and replace it with another.
Your camera treats the card just the way your computer treats your hard drive. The camera creates folders on the card, and stores files in those folders, each with a different name.
Because cards are so small, and because they can pack huge capacities, itâs possible to shoot a tremendous number of images with just one or two cards. In fact, because the T1iâs battery is good for âonlyâ about 500 shots, if youâre carrying a couple of high-capacity cards, youâll probably run out of battery before you run out of storage.
With the range of capacities available, there are several ways of carrying storage. You can get a few high-capacity cards or more lower-capacity cards. The advantage of a high-capacity card is that your shooting wonât be interrupted with a card change. The risk, though, is that if something happens to the card, all of your images will be lost.
Though itâs rare, a Secure Digital card can can do it, and sometimes a glitch in your computer or in your camera can mess up a card. While the card probably wonât be permanently damaged, its contents can be rendered unusable. So, you might want to consider using more lower-capacity cards so that if one goes bad you wonât lose as many images.
For maximum flexibility, you might want a combination: a big card that you can use when youâre shooting eventsâsuch as a performance or sporting eventâ and donât want to miss shots because of a card change, and smaller cards that you use for everyday shooting. You may have to change them more often, but your images will be safer in the event of a card failure.
When youâre in the field, youâll need to keep track of which cards youâve used and which are available for shooting. If youâre shooting on-the-go, you donât want to have to worry about whether the card youâre about to use already has images on it. There are a few ways to ease your card management hassles when shooting.
First, after you transfer your images to your computer, erase the card. Weâll look at how to do this later in this chapter. After youâve transferred images, if you just throw the cards back in your camera bag with the idea of erasing them when youâre ready to use them, you can easily end up confused as to whether the card has already been transferred. If you become uncertain, you might be less willing to use the card, and then you can end up short on storage. Also, if you erase beforehand, when you put the card in the camera, itâs ready to use right away.
If you have a camera bag with a lot of pouches and compartments, consider using one pouch for unused cards and another for used cards. This makes it simple to keep track of which media is ready for use.
I carry my cards in a small holder. When I fill up a card, I place it back in the holder, face-down. That way, I can easily see how many cards are remaining, and be certain that Iâm grabbing a card thatâs ready for use. I use a holder made by LowePro (www.lowepro.com).
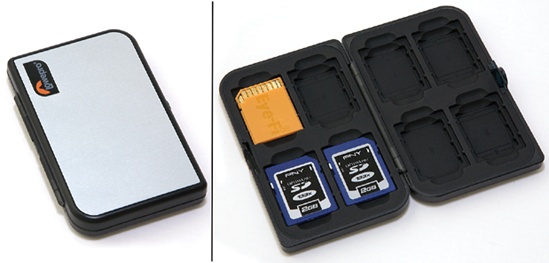
Figure 4-1. A card holder can make it much easier to keep your cards managed while shooting. Face-down cards are full, face-up cards are ready for use.
At some point, though, your cards will be full, and youâll be ready to transfer your images to your computer.
Every image you shoot is stored on your cameraâs media card as an individual file. The file is a document, just like one you might create on your computer. Before you can do any editing of your images using your computer, you have to copy those image documents from your cameraâs media card onto your computerâs hard drive.
There are two ways to transfer images from your camera. Either plug the camera directly into your computer, or remove its media card and place it in a media reader that is connected to your computer.
The advantage of a card reader is that it doesnât consume any of your cameraâs battery power. Also, most card readers support lots of different formats, so if you have more than one camera (say, the T1i and a small point-and-shoot) that use different formats, then you only need to carry one card reader and a cable.
Depending on the type you get, a card reader might provide faster transfer than the T1i. You should be able to find card readers that connect to your computerâs USB-2 or FireWire port.
If you have a laptop with a PC Card slot or a CardBus 34 slot, then you can get card readers that will fit in those slots. These are typically the fastest readers of all, but they rarely support multiple formats.
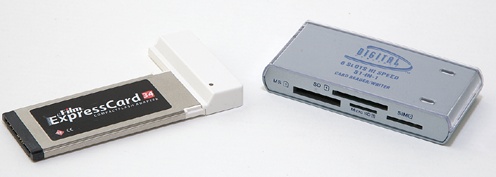
Figure 4-2. On the left is a CardBus card reader that can plug directly into a cardbus slot on a laptop. On the right is a card reader that plugs into a USB-2 slot. Note the huge number of card formats that it supports.
REMINDER: Donât Forget SDHC
If youâre shopping for an SD card reader, be sure to get one that also supports SDHC. You might end up buying SDHC cards at some point, so you might as well have a reader that can handle them in addition to regular SD.
The T1i also ships with a USB cable that you can plug directly into your computer. This allows you to use your camera as a card reader, saving you the hassle of keeping track of an extra piece of gear. However, if you have an especially speedy reader, transferring from the camera might be slower and, as mentioned before, camera transfer will use up battery power. (Note that transferring via USB cable will not work if the camera is in Movie mode. Any other mode is fine.)
QUESTION: What If a Card Wonât Read in My Card Reader?
Sometimes you might find that a card that has always worked fine in your card reader suddenly wonât read. If this happens, put the card back in the camera and see if you can view images on the cameraâs screen. If you can, then you know that the camera can read the card just fine. Plug the camera into your computer and try transferring the images that way. It will usually work. When youâre done, perform a low-level format (as explained in Chapter 3). This will usually get the card working with your card reader again.
What happens on your computer when you plug in a card reader or camera will vary depending on the operating system that youâre using. In the next two sections, weâll go over the separate options available for Windows and Mac users.
Even if you plan on using some other software for editing, itâs worth taking a look at the bundled Canon software. Although ultimately you may not use it in your workflow, itâs worth knowing what itâs capable of, and weâll be using it for some of the examples in this book, so it will help you to follow along.
The Canon EOS Digital Solutions CD thatâs included in the T1i box is a hybrid disk that works with either Mac or Windows. To install the software, insert the CD in your computer and run the installer. The disc puts a number of applications on your computer, with some slight variations between Mac and Windows. Weâll look at how you might use this software in the following sections.
If youâre using Microsoft Windows XP or Vista, youâll find that Windows will take care of a lot of image transfer hassles for you. If you want to customize your transfer experience, you can easily do that to build the type of workflow that you like.
When you plug a card reader or camera into Vista or XP for the first time, Windows might make some kind of mention of installing a new driver.

Follow any necessary on-screen instructions to get the camera or card reader working. Once the card reader or camera is configured, Windows will show you a simple window that lets you specify what you want done with the images on the card.
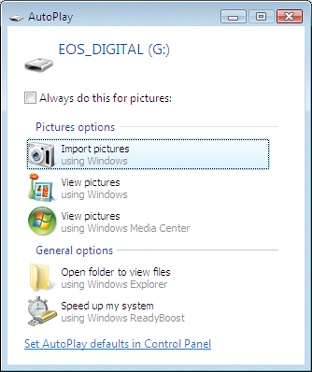
Figure 4-4. Windows lets you choose what you want to have happen when you plug in a card reader or camera.
Import Pictures lets you copy the images on your card to a specific directory on your hard drive. By default, Import Pictures copies images into your Pictures directory. When you first choose Import Pictures, Windows will show you a simple dialog box, which gives you an Import button and an option to add a text tag to your images. Tags make it easier to sort and filter your images later.
If you click the Options button, youâll see a more advanced dialog box that offers additional options:
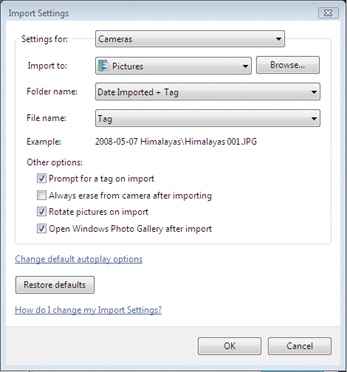
Figure 4-5. Using these controls you can specify which directory you want the pictures imported into, and define naming conventions.
Once your images have been imported, Windows will show them to you in Windows Photo Gallery.
View Pictures using Windows will open the Windows Photo Gallery, which lets you thumb through large views of your images. Using the menu items at the top, you can choose to import the images, print, them, or even perform simple image edits.
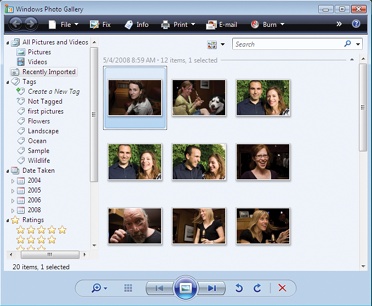
Figure 4-6. The Windows Photo Gallery lets you browse your images as thumbnails, making it easier to sort, rate, and organize.
View Pictures using Windows Media Center lets you view the images on the card using the Windows Media Center, which offers a full-screen interface, with easy navigation to other images on your system.
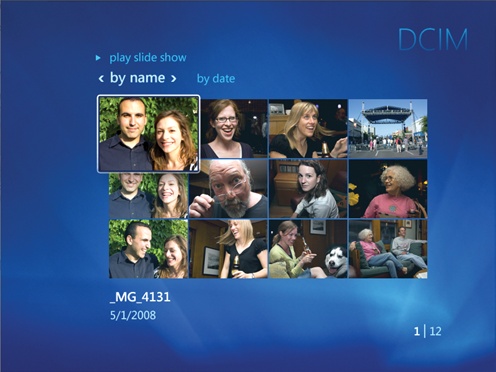
Figure 4-7. Windows Media Center provides a full-screen environment that lets you view images on your computer, present slide shows, and more.
Finally, notice the âAlways do this for picturesâ checkbox at the top of the dialog box. This allows you to specify default behavior for a card insertion.
Changing Your Media Card Preferences
If you check the âAlways do this for picturesâ checkbox and configure an option, and then decide later that youâd like something else to happen when you insert a card, you can change Windowsâ behavior using a Control Panel. From the Start Menu, choose Control Panel, and then select Hardware and Sound. On the following screen, find the AutoPlay section, and click âChange default settings for media or devicesâ. Here you can edit the Pictures category to select a different option, or choose âAsk me every timeâ to get Windows to present you with a dialog box of choices.
The right option for you depends largely on the rest of your workflow. If you think you can manage your entire postproduction workflow in Windows Gallery or Windows Media Center, then these are all good options. If you plan on using some different image editing software, you can still use the Import Pictures command to copy your images to a directory.
Alternately, you might want to use the âOpen folder to view files using Windows Explorerâ option, which gives you the chance to manually copy the files using Windows Explorer. Depending on what software you have installed, the menu might contain other options, such as Adobe Bridge. Once youâve copied the files, you can work with them using your choice of programs. Iâll outline some other options next.
If you installed the Canon Digital Solutions Disk, then you should have a shortcut to Canon ZoomBrowser EX sitting on your desktop. ZoomBrowser also provides you with import capabilities, as well as simple browsing, editing, searching, and sorting.
Itâs worth playing around with ZoomBrowser to see if you like it. If you do, you might want to make it the default application that gets launched whenever you insert a media card. You can do this using the same method described in the previous tip, choosing ZoomBrowser EX from the Pictures menu instead.
If youâve installed Adobe Photoshop Elements 6 or later, when you attach a media card reader or camera to your computer, the Elements 6.0 Photo Downloader will launch automatically. The Photo Downloader lets you choose a location to store your files, and can create subfolders within that location based on the date and timestamp on each image. Photo Downloader can also rename your images from the nonsensical camera names to something more meaningful.
If you click the Advanced Dialog button at the bottom of the screen, youâll get an interface that lets you select which images you want to download and offers some more advanced options, such as the ability to add metadata to each image. Metadata are notes and tagsâsuch as your name, copyright info, or organizational keywordsâthat get added to the image.
Photoshop Elements is a great image editor with all of the features youâll need for almost any image editing task, so if you plan on using Elements for your image editing, you might want to explore Photo Downloader for your image transfers, simply because of its Elements integration.
The full version of Photoshop provides all of the features of Photoshop Elements, along with some more high-end features that you may or may not need. If you think you might need the ability to prepare images for offset printing, or if you routinely work with high-end 3D imaging, scientific, or video/film production software, then Photoshop will be a welcome addition to your toolbox. Otherwise, itâs probably overkill for your photo editing needs, and the money youâd spend on the full-blown version of Photoshop would easily pay for Elements and a new lens for your Rebel.
If you do install Photoshop CS4, youâll also get Adobe Bridge, an excellent image browser that has its own image transfer features.
Whether you use a card reader or plug directly into your camera, transferring images to your Mac is very simple, and you have a number of options for determining what happens when you attach the camera or card reader.
Depending on what kind of Mac you have and when you bought it, you might have a copy of iPhoto, Appleâs image organizing and editing program. IPhoto is very good, and can handle the transfer of images from your media card, as well as help you with the rest of your photographic workflow, from organizing to editing to output.
iPhoto is part of Appleâs iLife suite, and it comes bundled on many new Macs. If your Mac doesnât have it, you can buy the latest version from any vendor that sells Apple products.
Whether or not you have iPhoto, every Mac ships with a copy of Image Capture, a small utility that helps manage the transfer of images into your computer. Image Capture has no editing or organization features; its sole purpose is to get images copied onto your hard drive. Once theyâre there, you can decide what to do with them.
If you installed the Canon EOS Digital Solutions disk, then youâll have some additional software on your Mac, which weâll take a look at later in this chapter. You might also have other editing software that you want to use, such as Adobe Photoshop or Photoshop Elements. These programs can also manage the transfer of images from your computer.
You can tell your Mac what you want to have happen when you plug in a camera or media card reader. This makes it simple to choose what software you want to use to transfer your images.
By default, when you plug a camera or card reader into your Mac, Image Capture will open automatically, and will present a window for managing the transfer of images.
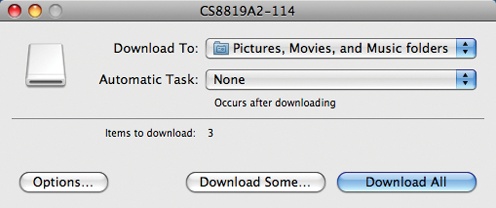
Figure 4-8. Image Capture is included on all Macs and provides a simple way to manage the transfer of images from a camera or media card reader.
Image Capture lets you choose where you want your images downloaded and what to do after the images have copied, and if you press the Download Some button, you can even select specific images to copy.
Image Capture also lets you specify what you want your Mac to do when you plug in a card reader or camera. If you go to the Image Capture menu and choose Preferences, youâll see a pop-up menu that lets you select which application you want to have launched whenever a camera or media card reader is plugged into your Mac.
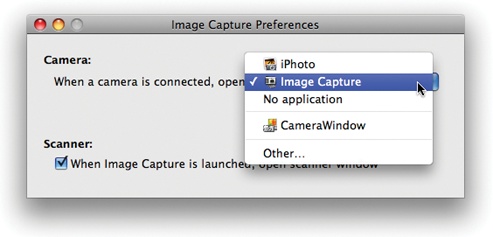
Figure 4-9. Using the preferences in Image Capture, you can control what should happen when a camera or media card reader is connected to your Mac.
By default, the menu will list iPhoto (if you have it), Image Capture, and possibly other applications if you have them installed. If you have a program installed that youâd like to use but donât see it listed, choose Other.... Image Capture will present you with a dialog box that allows you to pick the program youâd like to use.
Finally, if youâd like complete manual control, you can choose No Application.
You can change this menu at any time if you later want to change your image transfer preference. Weâll go over a few image transfer options next.
After installing the EOS Digital Solution Disk that shipped with your T1i, your Macâs default behavior will be to launch Canonâs EOS Utility any time you plug in a camera or card reader. EOS Utility will let you copy images from your card to a specified folder, just like you can do by hand in the Finder. However, it offers you the ability to see preview thumbnails of your images, and to select only the files that you want to copy. It also lets you print your images, either as individual prints or as contact sheets. (Note that the EOS Digital Solution Disk may configure your Mac to launch CameraWindow, which in turn will take care of launching EOS Utility.)
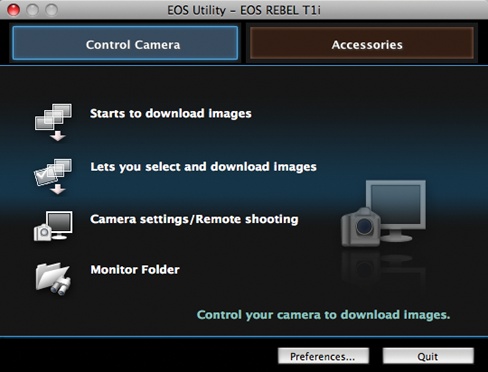
Figure 4-10. After you install the EOS Digital Solutions disk, this window will appear any time you attach a camera or card reader.
Before you use EOS Utility, you need to configure its preferences to determine where it will store your files. From Image Browserâs main dialog box, click the Preferences button. (Note that this is different from the dialog box that is shown when you choose Preferences from the EOS Utility menu.)
Change the pop-up menu to Destination Folder. The Destination Folder field shows the default location where Image Browser will store your images, in most cases the Pictures folder. EOS Utility will automatically create subfolders within the destination folder that you specify. By default, it creates folders that group your images together by shooting date, but you can change this by opening the Shooting Date pop-up menu, and further refine it by clicking the Customize button next to the menu.
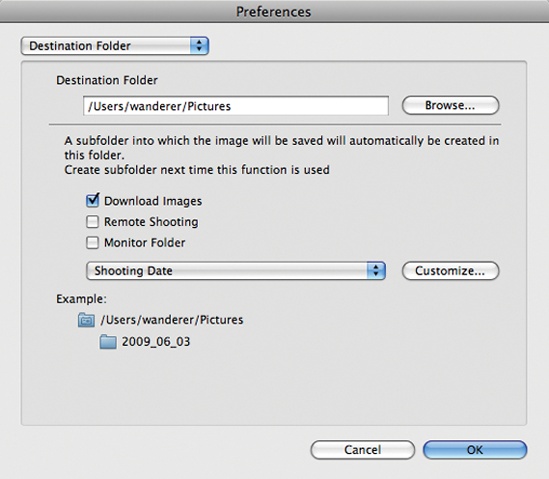
Figure 4-11. You can specify where you want Image Browser to store your images, as well as configure naming options and other settings.
When youâre done configuring preferences, click the OK button.
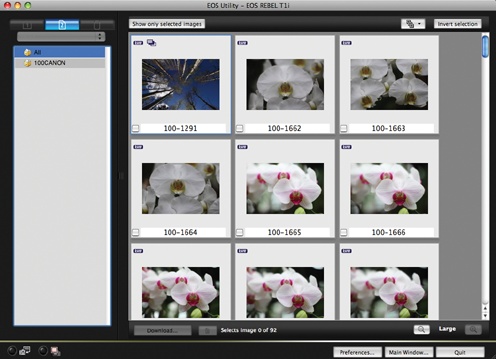
If you choose to download only selected images, EOS Utility will show you a screen with thumbnails of each of your images. Click the checkbox on any image that you want to download, and then click the Download button.
If you want complete manual control of your image transfers, configure your computer to do nothing when a camera or card reader is plugged in. This will simply mount the camera or card reader on your desktop, just as if it were a hard drive, leaving you free to copy files as you please.
The advantage of taking a manual approach is that you can completely control where files are placed, and create a folder structure on your drive that makes the most sense to you. The downside to importing using this approach is that, depending on which version of your operating system youâre using, you wonât necessarily be able to see thumbnail previews of your images before you transfer, which means you wonât be able to pick and choose which images to copy. Obviously, you can always sort through them later.
To transfer images manually, simply plug in the camera or card reader. When the camera or card reader icon appears on your desktop, open it up. You should see a folder inside called DCIM. There might be some other folders, but DCIM is the only one you need to worry about. It is the standard location that camera vendors have agreed upon for storing images.
Inside the DCIM folder you will find additional folders, usually named with some combination of numbers and âCanonâ (i.e. â100CANONâ). Depending on how many images youâve shot, there may be more. Open each folder and copy its contents to your desired location.
When you plug the T1i into your computer, the Direct Transfer screen will appear. From this menu, you can choose to automatically transfer all images or only new images since the last transfer, or you can select specific images and transfer those. The Wallpaper setting lets you select a JPEG image that will automatically be transferred to your computer and set as the background image (this works for both Windows and Mac users).
While reviewing images in your camera, you can specify which images you want to transfer to your computer. Of course, you could also just delete the images that you donât want, which would free up more storage on your card. However, if youâve shot a bunch of images and need to quickly process and deliver just a few, then marking only those images for transfer will let you quickly get those images to your computer for processing. You can transfer the rest later.
Of course, you can also select images for transfer using your transfer software, but marking images in the camera can be convenient, both because itâs something you can do in the field when you have spare time, and because you can mark a âkeeperâ image as soon as you shoot it.
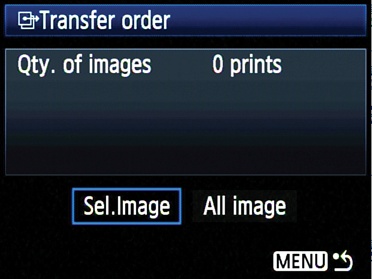
To mark an image for transfer, view the image on the T1iâs screen, then hit the Menu button. Choose âTransfer orderâ from the first Playback menu. On the resulting menu, choose Sel. Image. Use the left and right arrow keys to navigate through your images, and press the up arrow key to tag any image that you want to include in the transfer order. When youâre finished, click the Menu button to exit the âTransfer orderâ menu.
The Direct Transfer menu and the EOS Utility let you choose to download only images that have been marked in the camera, providing you with a one-button method for getting your designated order into your computer.
REMINDER: Using Photo Management Software
If youâre using Appleâs iPhoto or Aperture, or Adobeâs Lightroom (on either a Windows or Mac machine), then those programs can take care of image transfer for you. As with any other application, youâll need to specify that you want those applications to take over image downloading. Consult the documentation for all three programs for more information, and be aware that these applications all copy your images into their own library systems, so you donât need to worry about where the images should be stored. Each program will take care of putting the files in a location thatâs right for them.
No matter which method you use to transfer images to your computer, if youâre managing your image organization yourself (as opposed to having a program such as iPhoto, Aperture, or Lightroom do it for you), you will want to think about how to organize your files.
Youâll be best-served in your organizational chores by making good use of folders. How to organize these folders is entirely a matter of personal preference; just find a scheme that makes sense to you. You can create folders by subjectâArizona Vacation, Winter holidays, Family reunionâor by date. Youâll probably find that some combination of both works best, especially if you find yourself shooting a lot of similar events. As you accumulate more vacation folders, for example, you can group these together into other folders. With well-named folders, you can easily rearrange your taxonomy later, creating new branches of your naming âtreeâ and then rearranging photos as needed.
What you probably wonât need to do is rename files. Yes, the images that come out of your camera have pretty meaningless names, but with a browser program such as the one that came with your camera, or programs such as Adobe Bridge or Camera Bits Photo Mechanic, you can search and sort your images by viewing thumbnails, rather than by digging through lists of arcane filenames.
If you do feel compelled to rename your images, renaming by hand is probably not the way to go, unless youâre talking about only a handful of images. Programs such as Bridge, Photo Mechanic, and most image browsers provide tools for automatically renaming batches of files.
Once youâve transferred your images, youâll be ready to start the rest of your postproduction workflowâcorrecting, editing, adjusting, and outputting your images. Weâll discuss some of these concerns in Chapter 13. For now, though, weâre going to return to shooting. With these first four chapters, you should know how to shoot in Full Auto mode and how to transfer your results to your computer. This means you can continue to practice while we cover some new topics.
Although modern image editing software can do some amazing things, how much editing you can do is limited by the quality of your original shot. So, next weâre going to delve more deeply into some photographic theory, and youâll learn to use the more advanced features on the Rebel T1i. This will allow you to shoot images that can withstand a much higher level of editing and adjustment.
Get The Canon EOS Digital Rebel T1i/500D Companion now with the O’Reilly learning platform.
O’Reilly members experience books, live events, courses curated by job role, and more from O’Reilly and nearly 200 top publishers.

