
If youâre new to the Rebel T1i, youâre probably much more interested in shooting than in reading a book. So, in this chapter Iâm going to quickly get you up to speed on the cameraâs automatic features so that you can get out the door right away and start using the camera. One of the great things about the T1iâs design is that you can start out using it just like a point-and-shoot camera and then activate more sophisticated controls as you need them. This first chapter explains the fundamental concepts of the camera and photographic technique that weâll build on through the rest of the book.
THE SETUP: BEFORE YOU CAN SHOOT WITH THE REBEL T1i
If you havenât yet set up your camera, you need to do a few things before you can shoot with it. Fortunately, the T1iâs manual is very good, and you can learn everything you need to know about setup by reading the following sections of the manual:
The camera battery may have a little charge when you first unpack the camera, but tâs best to give it a good refueling before you head out to shoot. Read pages 24â26 of the Rebel T1i manual to learn about charging and installing the battery.
Youâll need a Secure Digital (SD) memory card for your camera. The Rebel T1i does not ship with a card, so youâll need to buy one. Any photography store or electronics store should carry them. You can learn how to install and remove the card on pages 31â32 of the T1i manual.
A lens must be attached to your camera. If you bought the Rebel T1i kit, then you probably got an 18â55mm lens. If you bought the body-only package, then you should have bought a lens separately. You can learn how to attach and remove a lens on pages 33â34 of the T1i manual.
The power switch on the top of the camera powers up the camera (as long as you have a charged battery installed). If itâs the first time youâre turning the camera on, then the camera will prompt you to enter the date and time. Page 29 will walk you through setting the date and time, and page 30 will show you how to set the language that you want to use in the cameraâs menus.
Finally, the camera includes a shoulder strap. The best way to ensure that your camera doesnât get damaged is to attach the shoulder strap and use it! The camera will be more secure and easier to carry if you have the strap attached. Page 23 of the T1i manual shows how to attach the strap.

If youâve shot only with a point-and-shoot camera, then youâll find much to like about working with an SLR. The bright, clear viewfinder, the ability to change lenses, and the advanced manual controls will give you far more creative power than you probably had on your point-and-shoot camera. If youâre an old-school SLR film shooter, then the switch to digital will bring you huge improvements in workflow, image editing, and overall image quality.
Obviously, with all the power packed into a camera like the Rebel T1i, you have a lot to learn. However, since the camera also has advanced auto functions, you can get started shooting with it right away and, to a degree, use it just like you used your point-and-shoot.
The best way to learn your camera is to use it, so before we look at the specific parts and components of your T1i, you should do a little snapshot shooting just to get your hands on the camera and get a feel for the general control layout.
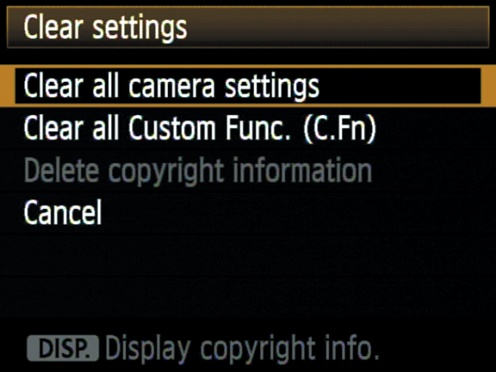
If youâve already been playing with your T1i, you might have made some changes to some of the internal settings. To ensure that your camera behaves the way that Iâll describe in this book, reset to the cameraâs defaults:
Set the Mode dial to P, then press the Menu button.
Press the right arrow button on the back of the camera until the second-tolast menu is selected.
Press the down arrow to select âClear settingsâ.
Press the Set button to execute the âClear settingsâ command, then select âClear all camera settingsâ and press Set.
The camera will ask you to confirm the operation. Select OK and press Set.
Then, choose Clear all Custom Func. And reset those as well.
The Rebel T1i has full autofocus and autoexposure features that can make all of the necessary photographic decisions for most situations. When in Full Auto mode, all you have to do is frame the shot and press the shutter button, and the camera will automatically figure out just about every other relevant setting. However, you need to know a few things to get the most out of Full Auto mode.
On the top of the T1i, on the right side of the camera, is a Mode dial. The mode you choose determines which functions the camera will perform automatically and which will be left up to you. So, if you want more creative control, then youâll want to select a mode that offers less automation and leaves more power in your hands.
For snapshot shooting, Full Auto mode will be your best bet and will make your T1i function much like a simple point-and-shoot cameraâbut one that delivers the superior image quality of an SLR. To select Full Auto mode, set the Mode dial to the green box (![]() ).
).
If you havenât done so already, take the lens cap off the camera. You donât have to worry about accidentally shooting with it on, because if the lens cap is on, you wonât see anything in the viewfinder. Make sure the switch on the lens is set to Autofocus, not Manual.
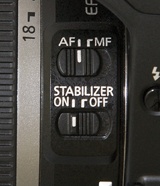
Figure 1-4. The 18â55mm lens kit includes an autofocus switch, and most other lenses will have a similar switch. Make certain itâs set to AF.
This next part you probably already know: look through the viewfinder and frame your shot. If you have a zoom lens attached to your camera, you can zoom to frame tighter or wider. For now, weâre not going to worry about composition, because weâll be discussing that in detail later.
With your shot framed, youâre ready to shoot. However, although pressing the shutter button may seem a simple thing, there are some important things to understand about it, because itâs your key to the cameraâs autofocus feature.
Once youâve framed the shot, press the shutter button halfway. When you do this, the camera will analyze your scene and try to determine what the subject is.
The camera can analyze nine focus points. Once the T1i has determined the subject (or what it thinks is the subject), it will light up the focus point that it thinks is correct. If more than one point sits on the plane of focus, it will light up them all.
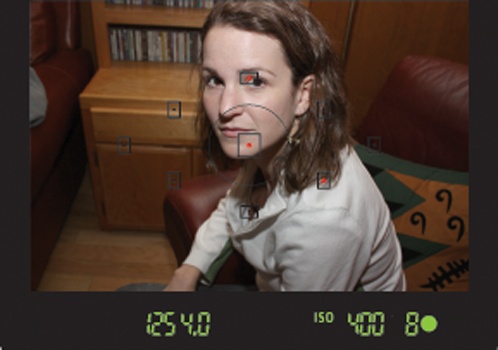
Figure 1-5. When you half-press the shutter button to autofocus, the XS will light up the focus spots that it thinks are correct for your subject.
Very often, several potential subjects sit on the same plane (that is, theyâre all the same distance from the camera). The T1i will show you all the focus points that it considers in focus. As long as one of them is on your subject, then it has focused correctly.
When the T1i has achieved focus, it will beep and show a green circle on the right side of the viewfinder status display. (You can see this in the previous figure.)
This half-press of the shutter is a crucial step when using the T1i (or any other autofocus camera). If you wait until the moment you want to take the shot and then press the shutter button all the way down, youâll miss the shot, because the camera will have to focus, meter, and calculate white balance before it can fire, and these things take time.
Once the camera has told you that itâs focused and ready to shoot, gently squeeze the shutter button. If you jab at the button, you might jar the camera, resulting in a potential loss of sharpness in your image.
OOPS!: ARE YOU IN AUTOFOCUS?
If your camera doesnât beep or flash the confirmation light when you half-press the shutter, your lens might be set to manual focus mode. Somewhere on the body of the lens should be a switch for changing from auto to manual focus.
Figure 1-6. Your lens should have a way to change from auto to manual focus. If the lens provides stabilization, there will be a switch for turning stabilizing on and off.
Make certain itâs set to aF or auto.
If your autofocus light blinks but doesnât lock focus, itâs because the camera canât find a subject that has strong contrast. As weâll see, strong contrast is necessary for autofocus to work. Youâll learn how to compensate for this problem later.
If the focus beep repeats rapidly, then the camera has locked onto a moving subject and is tracking it. Shoot as normal.
After you shoot, the camera will display the image for two seconds, giving you a moment to review. When youâre ready to shoot again, follow the same procedure. Itâs very important to remember to do a half-press of the shutter to give the camera time to autofocus.
Flash Shooting
In a low-light situation, you may see some strange flashes coming from the flash when you press the shutter halfway. These flashes serve to help the cameraâs autofocus mechanism âseeâ when the light is low. Once focus is locked, the camera will beep, indicating that you can press the button the rest of the way, whenever youâre ready, to take your shot.
Those are the basics of shooting. Compose your shot, press the shutter button halfway to focus, and then squeeze the shutter button. This is the process that youâll use no matter what mode youâre shooting in. Spend some time shooting in Full Auto mode to get a feel for the shutter and basic camera controls.
When you press the shutter button halfway down, several things happen inside the T1iâs viewfinder. As I already mentioned, the camera shows you which focus points it has selected for autofocus. It also uses the readout at the bottom of the viewfinder to tell you about its exposure choices and to give you some additional status information. The content of this readout will vary depending on the mode youâre in.
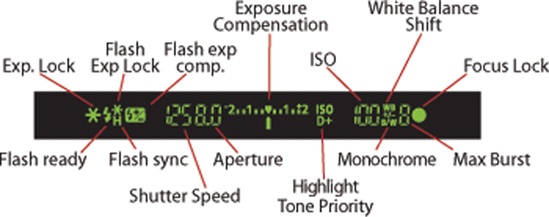
Figure 1-7. The Rebel T1iâs viewfinder shows all the settings you need access to while shooting.
From left to right, the readout includes the following:
If the camera has chosen to use the flash, it will display the flash icon. The flash icon will blink on and off, and the word busy will be displayed, until the flash unit is charged and ready to go. If your battery has a good charge, this shouldnât take very long.
Next, the camera displays its chosen shutter speed and aperture. Youâll learn more about these in Chapter 5.
The Exposure Compensation display is shown next. It has a range of â2 stops to +2 stops.
Next comes ISO choice. For now, all you need to know is that the higher the number is, the grainier your images will be. Donât worry about this now; weâll discuss it in more detail later.
Finally, youâll see a number showing how many shots you can shoot before you will have to wait for the cameraâs buffer to empty. The camera has enough onboard RAM to shoot nine images when in Full Auto mode. Although this may not sound like much, remember that as soon as you shoot, the camera immediately starts writing its buffer out to the storage card.
So, if youâre not shooting too fast, youâll never come close to overrunning the buffer. If youâre shooting bursts of imagesâat a sporting event, sayâthen you might fill up the buffer and have to wait a moment before you can shoot again. You donât have to wait until all nine images are available. As long as the number reads at least 1, you can still shoot.
Finally, at the far right of the display is a green dot that appears whenever the camera has locked focus and is ready to shoot. When you press the shutter button halfway, you can press the rest of the way once this green dot appears.
As you can see, the status display includes a few other indicators, which youâll learn about in later chapters.
In addition to the in-viewfinder status display, the T1i also shows a lot of status information on the rear LCD. Whatâs displayed on the screen varies depending on what mode youâre in, simply because in some modes you donât have as much manual control and so donât need as much status feedback. In Full Auto mode, your screen should look something like the image on the next page.
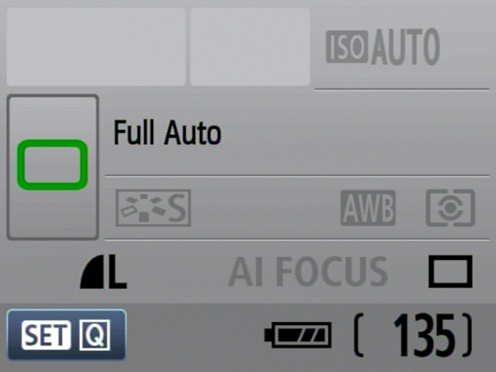
As you can see, you can easily tell how many shots are remaining, how charged the battery is, and the image format that youâre shooting in. The camera also shows what light-metering mode youâre using, which, to be honest, is kind of strange, because you canât actually change this when shooting in Full Auto.
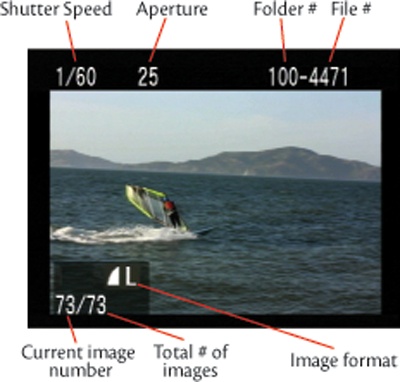
When you half-press the shutter button to tell the camera to focus and meter, it displays its chosen shutter speed and aperture at the top of the status display. Weâll explore what these mean in later chapters.

Figure 1-9. After you half-press the shutter button, the status screen will show your shutter speed and aperture.
Just below the viewfinder, you can see a small black window. This is a sensor that detects when you have the camera held up to your face. As you raise and lower the camera, the T1i automatically disables and enables its LCD screen, so that it doesnât distract you while shooting. You can also turn the display off completely by pressing the DISP button. Pressing it again reactivates the screen.
Shoot some more in Full Auto mode and get comfortable with the cameraâs controls. Even though the camera has a lot of other buttons and dials, you donât really need to worry about them right now.
If the Viewfinder Is Not Sharp
If you wear glasses and like to remove them when shooting, you can use the diopter control, the small knob next to the viewfinder, to compensate for some near- or farsightedness. Turn the knob until the nine autofocus boxes inside the viewfinder are sharp. Note that the diopter may not be able to completely compensate for extremely bad vision. Also, youâll have to change it again if you put your glasses back on. If the viewfinder ever inexplicably goes out of focus, it might just be that you bumped the diopter knob. Turn it until focus is restored. If the diopter does not offer enough correction, youâll want to look at Canonâs replacement diopters.
As youâve seen, the T1i displays your image for a brief time after you shoot. As youâll see later, you can extend this time by changing a menu setting. But when it comes time to review your images, youâll want to use the cameraâs playback mode.
To review your images, press the Play (![]() ) button on the back of the camera (obviously, the camera needs to be powered on for this to work).
) button on the back of the camera (obviously, the camera needs to be powered on for this to work).
The camera displays the last image that you shot, along with some status information. (If you donât see the image number and format information, press the DISP button once.)
The left and right arrow keys on the back of the camera let you navigate forward and backward through your images. Playback mode has a number of other features that youâll learn about in Chapter 3.
At any time, you can press the Play button again or give a half-press to the shutter button to return to shooting mode. Note that the T1i can change between shooting and playback modes very quickly, much faster than most point-and-shoot cameras, meaning you donât have to worry about missing a shot because the camera is locked up in a playback mode.
Now youâve seen how the T1iâs Full Auto mode works. Since Full Auto mode takes care of all the critical decisions regarding camera settings, itâs an ideal mode for snapshot shooting and for getting used to the camera. Before you go off shooting, though, letâs take a quick look at some other auto features that you might find useful while getting started.
On the Mode dial, youâll see a bunch of little icons underneath the Full Auto option. These are the T1iâs scene modes.
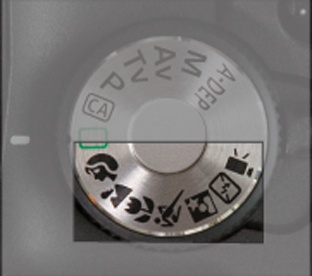
Figure 1-11. These options on the Mode dial are scene modes, which bias the cameraâs decisions under specific conditions so that it calculates more appropriate exposures.
Scene modes are also fully automatic, but each one biases some of its decisions in a certain way to make it more appropriate to particular types of shooting.
 Portrait mode
Portrait mode is ideal for shootingâyou guessed it!âportraits. What makes a portrait different from any other type of shot? Typically, in a portrait you want the background blurred out to bring more attention to your subject. Portrait mode biases its exposure decisions to attempt to blur the background.
 Landscape mode
Landscape mode can help your landscape shots because it will choose settings that attempt to maximize the amount of your scene that will be in focus. Itâs basically the opposite of Portrait mode.
 Close-up mode
Close-up shots of flowers or small objects (what is traditionally referred to as macro photography) are made easier with Close-up mode.
 Sports mode
When shooting fast-moving subject matter such as moving wildlife or a sporting event, opt for Sports mode. Sports mode biases the cameraâs exposure so that fast-moving objects will be sharp and clear.
When using Sports mode, make sure the center focus point is on your subject when you press the shutter button halfway. Unlike other modes, you wonât hear a beep when the camera has locked focus. Instead, the camera will begin beeping continuously to indicate that it is now tracking your subject! Yes, Sports mode uses the Rebel T1iâs Servo focus feature to track a moving object and keep it in focus.
Press the shutter to take a shot. If you keep the shutter button held down, the camera will continue to shoot.
 Night Portrait mode
One of the biggest mistakes people make when shooting with flash is that they assume a flash can light up an entire scene, just as if it were daylight. But the flash on any camera has a limited range. Itâs usually enough to light up your subject but not your background, leaving you with a subject that appears to be standing in the middle of a dark limbo.
REMINDER: Night Portraits Require Still Subjects
When shooting with Night Portrait mode, the flash will fire, but the cameraâs shutter will stay open for a bit. So, itâs important to tell your subject not to move until after you say so. (And itâs just as important for you to stay still until the camera is done, too.)
 Disabling Flash mode
Flash photography is not always allowed. Museums, performances, and other public venues often prohibit flash photography. Set the mode dial to Disabling Flash mode, and the T1i will never use its flash.
When shooting without the flash, you may find that some of the numbers inside the viewfinder blink. When this happens, the camera is informing you that light is low, so you need to be extra careful to hold the camera steady. Also, be aware that when the numbers are flashing, thereâs a good chance that your resulting image will be too dark.

Figure 1-13. At night, if you take a flash picture, youâll usually end up with a well-exposed subject on a background of complete black. This is because the range of the flash is only about 10 feet. Objects beyond that will not be illuminated by the flash.

Figure 1-14. Night Portrait mode uses the flash and a longer shutter speed so that both your subject and background are well-exposed.
Also, when shooting in low light without flash, any moving subjects will likely be blurred, so if youâre trying to shoot a portrait, be sure to tell your subject to sit very still.
QUESTION: What about Movie mode?
The final Scene mode icon on the dial is the Movie mode option, which weâll cover in Chapter 9, Chapter 9.
While the rest of this book is going to cover just about every aspect of shooting in great detailâfrom holding the camera to processing imagesâyou can do a lot with what youâve already learned about the Full Auto capability. Since the camera is taking care of most of the technical issues for you, itâs a good time to practice handling the camera and composing shots.
Weâre going to talk about composition in great detail in Chapter 8. For now, consider the following tips when shooting snapshots.
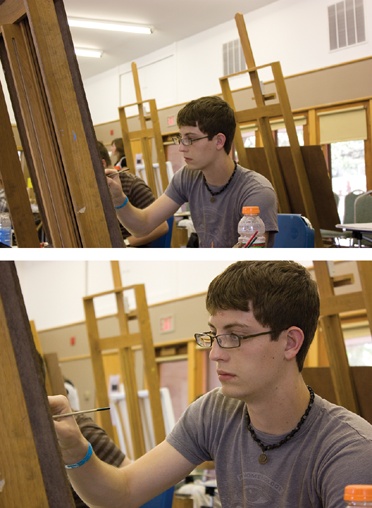
When shooting a portrait or candid snapshot of someone, you usually do not need a lot of headroom, unless you want to show something about the environment theyâre in.
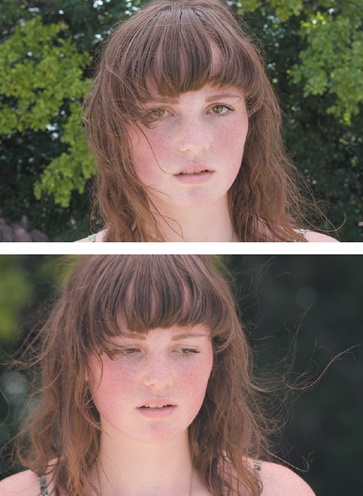
For example, in the top image on the facing page the extra headroom doesnât add anything to the picture. In fact, itâs kind of distracting and takes up space that could be used to show a larger image of the person. In the bottom image, we fill the frame with more of the person. We can see a better view of him, but we still get enough background detail to get an idea of the environment heâs in.
âFill the frameâ is one of the most important compositional rules you can learn, no matter what type of image youâre shooting. Donât waste space in the frame. Empty space in your image is space that could be used to provide a larger, better view of your subject.

Another portrait tip: you donât have to show a personâs entire face or head. Donât be afraid to crop them and get in close for a very personal shot.

Figure 1-17. When shooting portraits, donât be afraid to get in close. You donât have to show a personâs whole head. Itâs fine to crop.
You can get close either by standing physically close to the person or by standing farther away and zooming in. However, as youâll see in Chapter 6, these two options produce very different images, so youâll want to think about which approach is right for your subject.
Itâs easy to forget about that third dimension that you can move in, and shoot all of your shots while standing up. Donât forget that you can bend your knees (or even lie on the ground) to get a different angle. Getting down low is especially important when shooting children and animals, since it puts you at a more personal, eye-to-eye relationship with them.

When shooting a portrait of someone whoâs looking off-frame, consider leading the subject. When someone is looking out of the frame, weâre more interested in the space thatâs in front of them than the space thatâs behind them. Even if we canât see what it is theyâre looking at, we still want to feel the extra space that sits in the direction theyâre looking.
Donât pay attention just to your subject; remember that theyâre also standing in front of something. Make sure thereâs nothing âsticking outâ of their head or juxtaposed in a distracting way.

This is loosely related to the previous tip. Be careful about shooting your subject in front of a brightly lit background, such as a window, or shooting into the sun. Although sometimes you can use such an approach to great effect, for simple snapshots youâll get better results keeping a close eye on the backlight in your shots. If you find yourself shooting someone in front of a window or bright light, try to move them or yourself so that the light is not directly behind them.
The problem with bright lights in the background of a shot is that they confuse the cameraâs light meter. When a bright light appears in the background, the camera meters to properly expose that bright light. This usually means the foreground is left underexposed and appears too dark.
In Full Auto mode, the Rebel T1i should recognize such a situation and automatically pop up the flash. The flash will serve to light up the foreground, creating a more even exposure with the background.
Youâll learn more about metering, as well as other strategies for handling backlighting, in Chapter 7. For now, even if you arenât sure exactly how to handle such a situation, at least start learning to recognize when youâre shooting in this type of difficult lighting condition.

While the flash on the T1i can do a good job of illuminating a subject, you have to remember that it has a limited range. Anything beyond about 13 feet from the camera will fall out of the flashâs range and not be illuminated at all. So, if youâre standing at night across the street from a person or building and you shoot a picture with the flash popped up, youâll probably get a shot thatâs completely black.
For this situation, flash is not the answer. Instead, youâll need to employ some low-light shooting strategies, which weâll discuss in Chapter 7.
Thereâs one mistake that all beginning photographers make: they think an expert photographer sees a scene or subject, determines how to best frame and expose it, and then takes a picture of it. If you describe this process to an âexpertâ or âprofessionalâ photographer, theyâll most likely laugh.
The fact is, even the most accomplished photographer rarely gets it right the first time and so rarely shoots only one exposure of a subject. Instead, they work their subjectâsomething weâll be talking about a lot through the rest of this book.
Very often, the only way to find the best composition or angle on a shot is to move around. Get closer and farther, stand on your tiptoes, squat down low, circle the objectâand look through the viewfinder the whole time, and shoot the whole time.
If you like, review your shots and try again. Often, photography is like sculpture. You canât see the finished shot right away. Instead, you have to âsculptâ the scene, trying different vantage points until you find the angle that makes for the most interesting composition and play of light, shadow, and color.
REMINDER: Keep Moving!
When a subject catches your eye, the chances you happen to be standing in the very best spot in the world and that you happen to be the perfect height to photograph it are pretty slim. So, go out now and practice shooting broad coverage of some scenes. Stay moving, play with distance and angle, and notice the difference in what you see in the viewfinder, what you recognize while youâre shooting, and what the final results look like on the cameraâs screen.
You may be surprised to find that the final images you like best are the ones that are very different from what you originally envisioned.
Get The Canon EOS Digital Rebel T1i/500D Companion now with the O’Reilly learning platform.
O’Reilly members experience books, live events, courses curated by job role, and more from O’Reilly and nearly 200 top publishers.

