While the rest of this book is going to cover just about every aspect of shooting in great detailâfrom holding the camera to processing imagesâyou can do a lot with the Full Auto capability that you've already learned about. Since the camera is taking care of most of the technical issues for you, it's a good time to practice handling the camera and composing shots. We're going to talk about composition in great detail in Chapter 8. For now, consider the following tips when shooting snapshots.
When shooting a portrait or candid snapshot of someone, you usually do not need a lot of headroom, unless you want to show something about the environment they're in.
For example, in this image, the extra headroom doesn't add anything to the picture. In fact, it's kind of distracting and takes up space that could be used to show a larger image of the person. In the next image, we fill the frame with more of the person. We can see a better view of them, but we still get enough background detail to get an idea of the environment they're in.

Figure 1-16. In this image we've filled the entire frame, which lets us see a larger view of our subject.
"Fill the frame" is one of the most important compositional rules you can learn, no matter what type of image you're shooting. Don't waste space in the frame. Empty space in your image is space that could be used to provide a larger, better view of your subject.
Another portrait tip: You don't have to show a person's entire face or head. Don't be afraid to crop them and get in close for a very personal shot.
Figure 1-17. When shooting portraits, don't be afraid to get in close. You don't have to show a person's whole head. It's fine to crop.
You can get close either by standing physically close to the person or by standing farther away and zooming in. However, as you'll see in Chapter 6, these two options produce very different images, so you'll want to think about which approach is right for your subject.
When shooting a portrait of someone who's looking off-frame, consider leading the subject. When someone is looking out of the frame, we're more interested in the space that's in front of them than the space that's behind them. Even if we can't see what it is they're looking at, we still want to feel extra space that sits in the direction they're looking.
It's easy to forget about that third dimension that you can move in and shoot all of your shots while standing up. Don't forget that you can bend your knees (or even lie on the ground) to get a different angle. Getting down low is especially important when shooting children and animals, since it puts you at a more personal, eye-to-eye relationship with them.

Don't pay attention just to your subject; remember that they're also standing in front of something. Make sure there's nothing "sticking out" of their head or juxtaposed in a distracting way.
This is loosely related to the previous tip. Be careful about shooting your subject in front of a brightly lit background, such as a window, or shooting into the sun. While sometimes you can use such an approach to great effect, for simple snapshots you'll get better results keeping a close eye on the backlight in your shots.
If you find yourself shooting someone in front of a window or bright light, try to move them or yourself so that the light is not directly behind them.
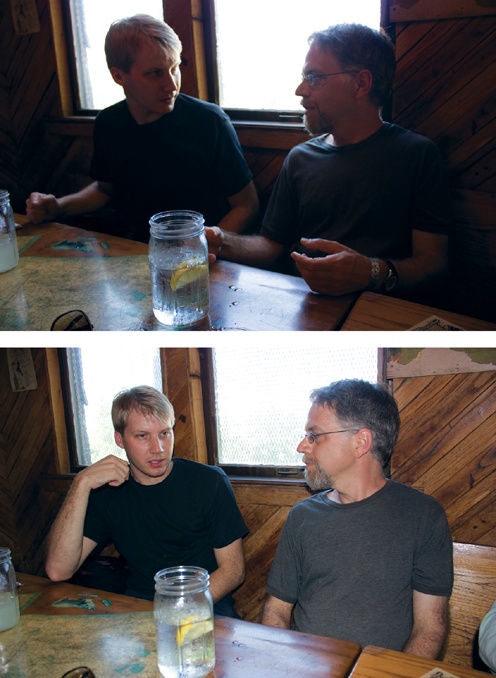
Figure 1-21. The window is throwing off the camera's meter. Shooting with flash helps illuminate the foreground and evens out the exposure.
The problem with bright lights in the background of a shot is that they confuse the camera's light meter. When a bright light appears in the background, the camera meters to properly expose that bright light. This usually means the foreground is left underexposed and appears too dark.
In Full Auto mode, the Rebel XS should recognize such a situation and automatically pop up the flash. The flash will serve to light up the foreground, creating a more even exposure with the background.
You'll learn more about metering, as well as other strategies for handling backlighting, in Chapter 7. For now, even if you aren't sure exactly how to handle such a situation, at least start learning to recognize when you're shooting in this type of difficult lighting condition.
While the flash on the XS can do a good job of illuminating a subject, you have to remember that it has a limited range. Anything beyond about 13 feet from the camera will fall out of the flash's range and not be illuminated at all. So, if you're standing at night across the street from a person or building and you shoot a picture with the flash popped up, you'll probably get a shot that's completely black.
For this situation, flash is not the answer. Instead, you'll need to employ some low-light shooting strategies, which we'll discuss in Chapter 7.
There's one mistake that all beginning photographers make: They think an expert photographer sees a scene or subject, determines how to best frame and expose it, and then takes a picture of it. If you describe this process to an "expert" or "professional" photographer, they'll most likely laugh.
The fact is, even the most accomplished photographer rarely gets it right the first time and so rarely shoots only one exposure of a subject. Instead, they work their subjectâsomething we'll be talking about a lot through the rest of this book.
Very often, the only way to find the best composition or angle on a shot is to move around. Get closer and farther, stand on your tiptoes, squat down low, circle the objectâand look through the viewfinder the whole time, and shoot the whole time.
If you like, review your shots and try again. Often, photography is like sculpture. You can't see the finished shot right away. Instead, you have to "sculpt" the scene, trying different vantage points until you find the angle that makes for the most interesting composition and play of light, shadow, and color.
Remember: When a subject catches your eye, the chances you happen to be standing in the very best spot in the world and that you happen to be the perfect height to photograph it are pretty slim. So, go out now and practice shooting broad coverage of some scenes. Stay moving, play with distance and angle, and notice the difference in what you see in the viewfinder, what you recognize while you're shooting, and what the final results look like on the camera's screen.
You may be surprised to find that the final images you like best are the ones that are very different from what you originally envisioned.
Get The Canon EOS Digital Rebel XS/1000D Companion now with the O’Reilly learning platform.
O’Reilly members experience books, live events, courses curated by job role, and more from O’Reilly and nearly 200 top publishers.

