First,
you’ve got to let javac know
where to find the SWT libraries so that it can compile your
applications.
You first need to create a Java project, and then specify the Java Build Path for that project.
Note
The Java Build Path in Eclipse is the equivalent of specifying the -classpath option for the javac compiler on the command line.
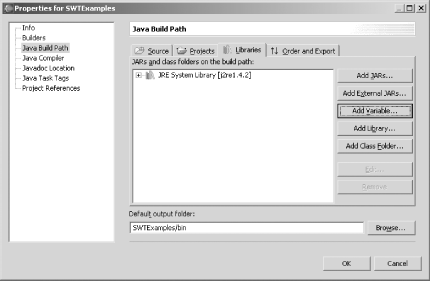
The Java Build Path in Eclipse may be specified either at the time the project is created, or later by selecting Project Properties from the Eclipse menu. Either way, you will invoke a dialog similar to that shown in Figure 1-6, the Project Properties dialog. Select Java Build Path from the list on the left side of the dialog, which will reveal the set of tabs shown in the figure. Click the Libraries tab to specify the SWT packages required for your project.
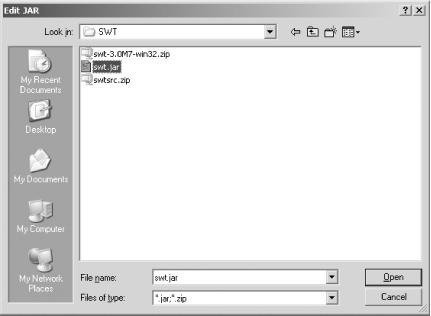
On the Libraries tab, click the Add External JARs button and use the
dialog shown in Figure 1-7 to locate the
JAR file that contains the SWT classes (you
should have these from Section 1.1
Section 1.1. This file is normally
called swt.jar
and will be located in the directory
where you extracted the SWT development files.
Note
Make sure you include swt.jar in your final distribution so that your code can locate the SWT classes at runtime.
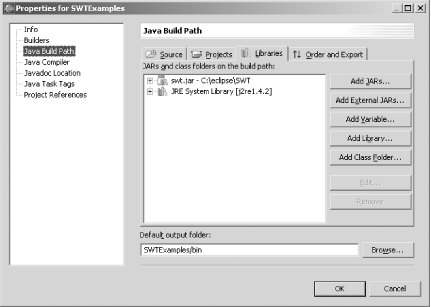
Navigate to the JAR file and click Open; this adds
swt.jar into the Java Build Path for the project
and returns you to the Project Properties dialog, as shown in Figure 1-8. You should see a reference to
swt.jar listed under JARs and class folders on
the build path.
If you need them, you can proceed to add other custom libraries to your project. For our purposes, the SWT classes are all that are needed. Make certain that your properties appear as shown in Figure 1-8 before clicking OK to save these settings in your project.
To test your configuration, simply create a Java class and enter the following lines of code:
import org.eclipse.swt.*;
import org.eclipse.swt.custom.*;
import org.eclipse.swt.graphics.*;
import org.eclipse.swt.widgets.*;
import org.eclipse.swt.layout.*;
If these lines appear in the Eclipse editor with red lines underneath the package identifiers, the project still can’t locate the SWT classes and you should repeat the preceding steps. If the problem persists, try downloading the SWT classes again, as the original download may have been corrupt.
Get SWT: A Developer's Notebook now with the O’Reilly learning platform.
O’Reilly members experience books, live events, courses curated by job role, and more from O’Reilly and nearly 200 top publishers.

