To gain
access to the promise of the SWT,
you must first configure your development environment to allow access
to the packages and libraries that contain both the thin Java layer
as well as the compiled native layer. In this book, all examples are
developed using Eclipse 3.0M8, but there is nothing to stop you from
writing the code using any other available IDE, including
Notepad or vi, with no changes necessary to the code.
No matter what development tool you use, you must do two things before you can develop using the SWT:
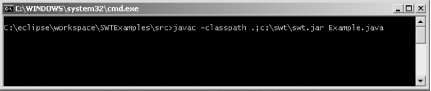
If you are using Notepad or vi,
do this by specifying command-line parameters at compile and
execution time, as shown in Figure 1-4 and
Figure 1-5.

The same requirements apply even if you are using an environment such as Eclipse. The difference is that, in Eclipse, you can specify these settings using graphical tools on a per-project basis and have them applied every time you compile or run your code, just as if you were using an Ant script or a batch file from the command line. Since these are two distinct steps, each is covered in a separate lab in the following sections.
Get SWT: A Developer's Notebook now with the O’Reilly learning platform.
O’Reilly members experience books, live events, courses curated by job role, and more from O’Reilly and nearly 200 top publishers.

