If you could choose only one word to describe Apple’s overarching design goal in recent OS X versions, there’s no doubt about what it would be: iPad. That’s right. In this software, Apple has gone about as far as it could go in trying to turn the Mac into an iPad.
Two things made the iPad the fastest-selling electronic gadget in history. First, it’s so simple. No overlapping windows; every app runs full screen. No Save command; everything is autosaved. No files or folders. No menus. All your apps are in one place, the Home screen. To beginners, technophobes, and even old-timers, the iPad’s software represents a refreshing decluttering of the modern computer.
The second huge iPad sales point is that multitouch screen. You operate the whole thing by touching or dragging your fingers on the glass. For example, you cycle through screens by swiping. You zoom out on a map, photo, or Web page by pinching two fingers. You rotate a photo by twisting two fingers, and so on.
So Apple thought, if simplicity and touch gestures made the iPad a megahit, why can’t we do the same for the Mac?
And it set out to bring as many of the iPad’s features and as much of its personality to your Mac as possible. Today’s OS X features like Full Screen mode, Auto Save, and Launchpad are total iPad rip-offs; if Apple hadn’t stolen these features from itself, it would surely be suing for copyright infringement. In Mavericks, even the app names are the same as what’s on iOS: Reminders, Notes, Notification Center, Game Center, Maps, iBooks, and so on.
Apple even brought the whole multitouch thing over to the Mac. No, you don’t touch the screen; you’d get screaming arm pain if you had to spend the day with your arm outstretched, manipulating tiny controls on a vertical surface three feet away. (The resulting ache actually has a name in the computer biz: gorilla arm.)
Instead, you use all those same iPad gestures and more, right on the surface of your laptop trackpad or (if you have Apple’s Magic Mouse) the top surface of the mouse.
All of OS X’s big-ticket features are intended to work together. For example, suppose you’re looking at a document in Full Screen view (feature #1). How are you supposed to switch to the next app? By swiping across the trackpad in the “next app” gesture (feature #2). Then you might pinch four fingers together (feature #3) to open Launchpad so you can open another program.
It’s a new way to work, for sure. And it’s optional. If it doesn’t float your boat, you can ignore all of it (Full Screen, gestures, Launchpad, Auto Save).
But you should at least make an informed decision—and that’s the purpose of the next few pages. They’re a tutorial. They walk you through a typical OS X working session the way Apple intended you to work. If you follow along, you’ll wind up with a good sense of how much you like (or don’t like) the iPaddified Mac.
Note
In this book, you’ll see touch gestures provided separately for trackpads (either the one on your laptop, or Apple’s external Magic Trackpad) and the Magic Mouse (Apple’s latest mouse, whose surface is touch sensitive).
Why aren’t the gestures identical? Because the Magic Mouse requires at least two fingers to hold, so some of the more multi-fingered gestures aren’t practical. And remember, on the trackpad you need a finger just to move the cursor—and on the Magic Mouse, moving the mouse moves the cursor.
All right. It’s Monday morning. Yawn, stretch, fluff your hair (if any).
You want to start with a quick Web check. And for that, you’ll need Safari, the Mac’s Web browser.
Put four fingers on the trackpad (thumb and three fingers), and pinch them inward toward the center.
If you have a Magic Mouse, just click Launchpad on the Dock.
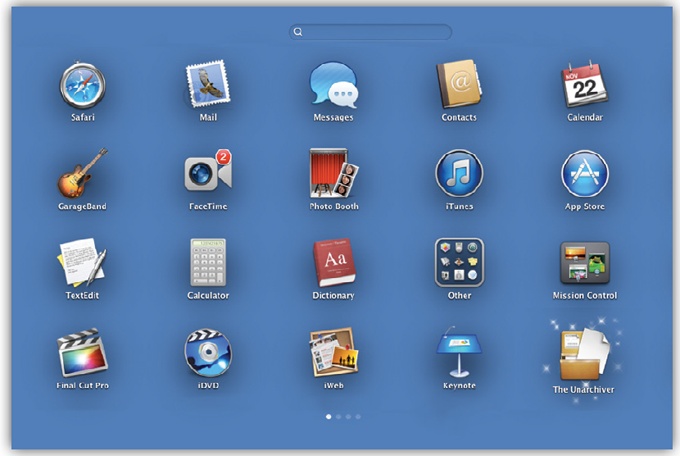
Your screen goes dark and fills up with what looks like the Home screen on the iPhone or iPad. You’ve just opened Launchpad. Here are the icons of all your Mac’s programs, evenly spaced, arrayed (if there are lots of them) on multiple “pages.” Figure 3 shows the idea.
Note
The four-finger pinch gesture opens Launchpad only on trackpads. If you don’t have one, click the Launchpad icon on the Dock instead. It looks like a rocket ship (
 ).
).Suppose, for the sake of this exercise, that you can’t find the Safari icon. It’s on a different page.
With two fingers on the trackpad, swipe left or right to change “pages.” Stop when you spot Safari.
If you have a Magic Mouse, swipe left or right with one finger.
You could, if you like, customize Launchpad just as you would on an iPhone or an iPad. You can drag the icons around, put them on different pages, combine them into folders, or delete them (Deleting App Store Programs). For now, you just want to open the Web browser.
Click the Safari icon once.
That’s one difference between opening a program in Launchpad (one click) and in your Applications folder (two clicks).
Once Safari opens, you’re ready for your first full-screen experience.
Click the
 icon in the upper-right corner of the Safari window.
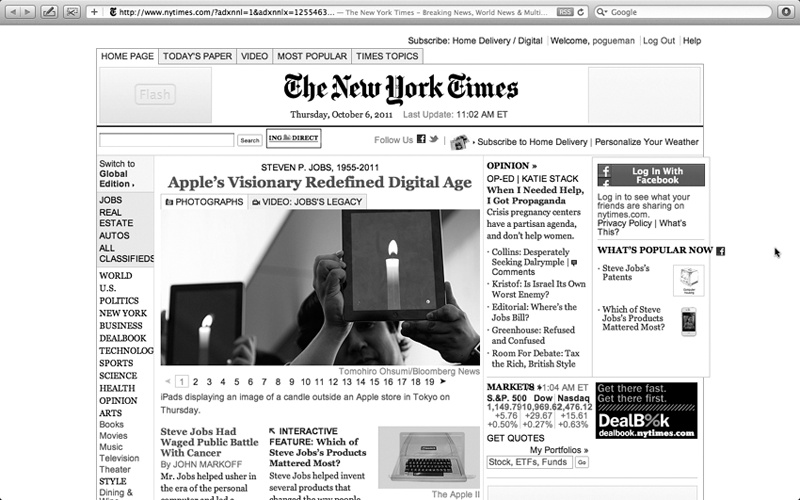
With a smooth animation, your Mac hides the menu bar and the bookmarks bar. The only thing remaining is the address bar. The window’s edges expand all the way to the edges of the screen (Figure 4).
Tip
You may as well learn the keyboard shortcut to enter Full Screen mode: Control-⌘-F. The same keystroke leaves Full Screen mode, but you can also tap the Esc key for that purpose.
Figure 4. This, ladies and gentlemen, is Full Screen mode, one of the flagship features of OS X. The idea is to fight back against the forces of window clutter that have been encroaching on your document windows for years now. Your actual work, your photo or Web page, fills every pixel of that giant screen you paid so much money for.
You don’t have to panic, though. The menu bar is still available: Move the pointer to the top of the screen to make the menus reappear.
Tip
Wouldn’t it be nice if there were a keyboard shortcut for bringing the menu bar back—if nothing else, so that you can check your battery level and the time of day? There is—but not one that Apple intended. Just press ⌘-space bar. That’s the keystroke for Spotlight, the Mac’s master search bar—but it also makes the menu bar appear. Press the same keystroke to hide the menu bar again.
For the next demonstration, call up an actual Web page, preferably one with a lot of text on it—www.nytimes.com, for example. Now suppose you want to scroll down the page.
With two fingers on the trackpad, drag upward.
If you have a Magic Mouse, drag up with one finger.
If you just tried this, you’re no doubt frowning right now. You just scrolled down the page by moving your fingers up. That’s backward, isn’t it?
For your entire computing career so far, you’ve always dragged the scroll bar down to move the contents of the page up—and now, Apple has swapped the directions. Why would Apple throw such a monkey wrench into your life?
The main reason is (what else?) to make the Mac match the iPad/iPhone, where you drag your finger up to move the page up.
Anyway, you have two choices: You can spend a couple of days getting used to the new arrangement—or you can put things back the way they’ve always been. (To do that, open System Preferences. For a trackpad: Click Trackpad, click Scroll & Zoom, and then turn off “Scroll direction: natural.” For a Magic Mouse: Click Mouse, click Point & Click, and then turn off “Scroll direction: natural.”)
Note
If you have a non-Apple mouse that has a scroll wheel, then the Mouse preference pane doesn’t offer this scroll-direction option. You can still reverse the scroll-direction logic, though, if you’re handy in Terminal (Saving a report).
Just open Terminal and type defaults write ~/Library/Preferences/.GlobalPreferences com.apple.swipescrolldirection -bool false. When you press Return and log out, you’ll find that the time-honored scroll directions have been restored.
Find a photo or a block of text. With two fingers, lightly double-tap the trackpad.
These are taps, not full clicks. On the Magic Mouse, double-tap with one finger.
Safari neatly magnifies the photo or text block to fill the screen, just as on an iPhone or an iPad. Neat, huh?
Repeat the double-tap to restore the original size. Click a link to visit a different page.
For this demonstration, it doesn’t make any difference what other Web page you visit. The point is for you to see how cool it is when you swipe your trackpad instead of clicking the Back button.
Go back to the first page by swiping leftward with two fingers on the trackpad.
On a Magic Mouse, use one finger.
The previous page slides back into view as though it’s a tile sliding into place. You can swipe the other way, too—to the right—to go forward a page.
You’re still in Safari, right? And it’s still full screen, right?
But if Safari is full screen, how are you supposed to get to other open programs? That’s what you’ll find out in this exercise. You’ll get to see what it’s like to run multiple full-screen apps.
Pinch your trackpad with your thumb and three fingers.
Launchpad appears, at your service. (As you may recall, this doesn’t work on the Magic Mouse, so if you’re trackpadless, you’ll have to exit Full Screen mode and then click Launchpad on the Dock.)
Find Calendar.
You may have to change Launchpad “pages” to find it. Swipe horizontally with two fingers (trackpad) or one finger (Magic Mouse) to change pages.
Click to open Calendar. Make the new window full screen by clicking the
in the upper-right corner.In theory, you now have two apps running at full screen: Safari and Calendar. Now comes the fun part.
With three fingers on the trackpad, swipe left or right.
(On the Magic Mouse, use two fingers.)
The Full Screen apps slide into or out of view. If you keep three-finger swiping to the right, you’ll see that Dashboard is all the way at the left end of the “channels” that you’re changing. (If it doesn’t work, somebody might have changed the setting to require four fingers in System Preferences.)
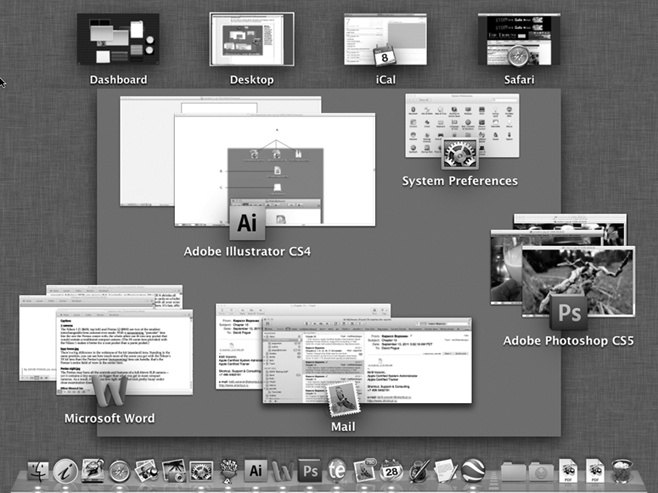
Figure 5. Here in Mission Control, each Full Screen app gets its own “screen,” as indicated by the map at top. But every running program appears here in the main screen area, in miniature. You can click one to jump there, or point and then press the space bar to get a full-size Quick Look.
You’ll also discover that any other programs—the ones that aren’t full screen—are gathered onto a single screen, as they have been for years. Each Full Screen app is one “screen,” and the Finder and all your other apps huddle on another one. But it doesn’t have to be that way.
With three fingers on the trackpad, swipe upward.
If you have a Magic Mouse, double-tap (don’t fully click) with two fingers.
You now enter Mission Control, a special screen full of miniatures of all your other screens; see Figure 5. (Again, if three fingers don’t work, someone might have changed your trackpad preferences to require four fingers.)
Mission Control has all kinds of cool features. It lets you jump to one window in a haystack. It lets you set up multiple virtual screens. It lets you reorganize the Full Screen app screens you already have. For the full rundown, jump to Launchpad.
In this miniature crash course, you’ve had a glimpse at the future that awaits you: a future of trackpad (or Magic Mouse) finger gestures, Full Screen apps, and the new centralized organizing features like Launchpad and Mission Control.
If any of this seems intimidating (or unnecessary), here’s the point to remember: It’s all optional. If you think the Mac works just fine without them, you can ignore the new features and forget about them completely.
But if you think you could get efficiency and pleasure out of adopting a couple of these features, then Mavericks is ready for you. Full speed ahead!
Get Switching to the Mac: The Missing Manual, Mavericks Edition now with the O’Reilly learning platform.
O’Reilly members experience books, live events, courses curated by job role, and more from O’Reilly and nearly 200 top publishers.

