When you choose File→Save, you’re asked where you want the new document stored on your hard drive, what you want to call it, and what Finder tags (Spring-Loaded Folders: Dragging Icons into Closed Folders) you want applied to it. The resulting dialog box is a miniature Finder. All the skills you’ve picked up working at the desktop come into play here.
To give it a try, launch any program that has a Save or Export command—TextEdit, for example. Type a couple of words, and then choose File→Save. The Save sheet appears (Figure 4-26).
Tip
In most programs, a quick glance at the Close button in the upper-left corner of a document window tells you whether it’s been saved. When a small dot appears in the red button, it means you’ve made changes to the document that you haven’t saved yet. (Time to press ⌘-S!) The dot disappears as soon as you save your work.
In programs that offer the Auto Save and Versions features described later in this chapter, like TextEdit, the red-dot convention has been retired. Instead, when you’ve made changes to a document since saving it, you see the light-gray word Edited in the title bar.
In the days of operating systems gone by, the Save dialog box appeared dead center on the screen, where it commandeered your entire operation. Moreover, because it seemed stuck to your screen rather than to a particular document, you couldn’t actually tell which document you were saving—a real problem when you quit out of a program that had three unsaved documents open.
In most Mac programs, there’s no mystery regarding which document you’re saving, because a little Save dialog box called a sheet slides directly out of the document’s title bar.
Better still, this little Save box is a sticky note attached to the document. It stays there, neatly attached and waiting, even if you switch to another program, another document, the desktop, or wherever. When you finally return to the document, the Save sheet is still there, waiting for you to type a file name and save the document.
Of course you, O savvy reader, have probably never saved a document into some deeply nested folder by accident, never to see it again. But millions of novices (and even a few experts) have fallen into this trap.
When the Save sheet appears, a pop-up menu shows you precisely where the Mac proposes to put your newly created document: usually in the Documents folder of your own Home folder. For many people, this is an excellent suggestion. If you keep everything in your Documents folder, it will be extremely easy to find, and you’ll be able to back up your work just by dragging that single folder to a backup disk.
As shown at top in Figure 4-26, the Where pop-up menu gives you direct access to some other places where you might want to save a newly created file. (The keystrokes for the most important folders work here, too—Shift-⌘-H for your Home folder, for example.)
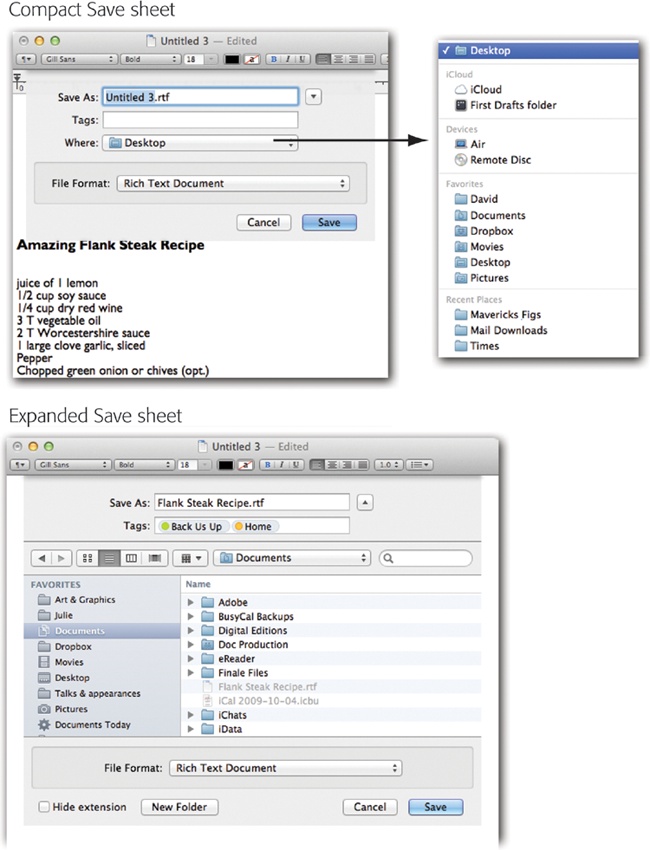
Figure 4-26. Top: The Save dialog box, or sheet, often appears in its compact form. Right: If you open the Where pop-up menu, you’ll find that OS X lists all the places it thinks you might want to save your new document: online (iCloud), on the hard drive, in a folder you’ve put into your Sidebar (“Favorites”), or into a folder you’ve recently opened. Bottom: If you want to choose a different folder or to create a new folder, click the ![]() button (next to the Save As box) to expand the dialog box. Here you see the equivalent of the Finder—with a choice of icon, list, or column view. Even the Sidebar is here, complete with access to other disks on the network. Tip: In most programs, you can enlarge the Save or Open dialog box by dragging one of its edges. You can also adjust the width of the Sidebar by dragging its right edge.
button (next to the Save As box) to expand the dialog box. Here you see the equivalent of the Finder—with a choice of icon, list, or column view. Even the Sidebar is here, complete with access to other disks on the network. Tip: In most programs, you can enlarge the Save or Open dialog box by dragging one of its edges. You can also adjust the width of the Sidebar by dragging its right edge.
In any case, when you save a file, the options in the Where pop-up menu have you covered 90 percent of the time. Most people work with a limited set of folders for active documents.
But when you want to save a new document into a new folder, or when you want to navigate to a folder that isn’t listed in the Where pop-up menu, all is not lost. Click the ![]() button identified in Figure 4-26. The Save sheet expands into a very familiar sight: a miniature version of the Finder.
button identified in Figure 4-26. The Save sheet expands into a very familiar sight: a miniature version of the Finder.
Tip
You can switch back and forth between the compact and expanded versions of this dialog box by pressing the undocumented shortcut ⌘-=.
There’s your Sidebar, complete with access to the other computers on your network. There are the ![]() /
/![]() buttons. There are your little buttons for icon, list, column, and (in most programs) even Cover Flow views.
buttons. There are your little buttons for icon, list, column, and (in most programs) even Cover Flow views.
Incredibly, you can even add new folders to the Favorites listing (drag them into the Sidebar here, either from the desktop, if it’s visible, or right out of the dialog box in front of you) or remove them (drag them out of the Sidebar here). The whole Save box is getting to be more Findery every year.
Tip
In column view, your first instinct should be to widen this window, making more columns available. Do so by carefully dragging either edge of the dialog box. The Mac remembers the size for this Save sheet independently in each program.
And in list view, how’s this for a tip? If you right-click (or two-finger click) one of the column headings, like Name or Date Modified, you get a secret pop-up menu of column names: Last Opened, Size, Kind, Label, and so on. That’s right: You can customize the list view within an Open or Save dialog box. You can sort, too, by clicking one of the column headings, just as at the desktop.
Most of the familiar Finder navigation shortcuts work here, too. For example, press the ![]() and
and ![]() keys to navigate the columns, or the
keys to navigate the columns, or the ![]() and
and ![]() keys to highlight the disk and folder names within a column. Once you’ve highlighted a column, you can also type to select the first letters of disk or folder names.
keys to highlight the disk and folder names within a column. Once you’ve highlighted a column, you can also type to select the first letters of disk or folder names.
In fact, you can use Quick Look (Using the Dock) in the Open and Save dialog box, too. Highlight a file or folder in the list and tap the space bar to view it in a full-size window.
Tip
Even in the Save or Open dialog box, you can highlight an icon (or several) and then press ⌘-I. You switch back to the Finder, where the Get Info box is waiting with the date, size, and other details about the selected icons.
When you’re finished playing around, open the folder where you want to save your newly created document and then click Save to store it there.
Alternatively, click New Folder (or press the usual New Folder keystroke, Shift-⌘-N) to create a new folder inside the folder you’re looking at.
You’ll be asked to type the new name for the folder. After you’ve done so, click Create (or press Return). The new folder appears and opens before you, empty. You can now proceed with saving your new document into it, if you like.
The next time you save a new document, the Save sheet reappears in whatever condition you left it. That is, if you used column view the last time, it’s still in column view. At any time, you can collapse it into simplified view, shown at top in Figure 4-26, by clicking the ![]() button to the right of the Where pop-up menu.
button to the right of the Where pop-up menu.
Tip
For years, there’s been a keyboard shortcut for the Don’t Save button that appears when you close a new document without saving it: ⌘-D. In Mavericks, however, modern Apple programs like TextEdit, Preview, Grab, Pages, and Keynote present a Delete button instead of a Don’t Save button. In that case, you can press ⌘-Delete to “click” it instead of using the mouse.
The search box at the top of the Open and Save dialog box is a clone of the Finder’s search box (Chapter 3). Press ⌘-F to make your insertion point jump there. Type a few letters of the name of the file or folder you’re looking for, and up it pops, regardless of its actual hard-disk location.
Your savings: 5 minutes of burrowing through folders to find it, and several pages of reading about how to navigate the Save and Open boxes.
Whether you’re using the mini-sheet or the expanded view, you can save yourself some folder-burrowing time by following this very weird tip: You can specify a folder location by dragging the icon of any folder or disk from your desktop directly into the Save or Open sheet. OS X instantly displays the contents of that folder or disk. This feature is totally undocumented—but well worth learning.
Tip
If, when the Save box is in its expanded condition, you click the name of an existing file, OS X thoughtfully copies the name of the clicked file into the Save As text box (which otherwise said “Untitled” or was blank).
This trick can save you time when you’re saving a second document with a slightly modified name (“Oprah and Me: The Inside Story, Chapter 1” and then “Oprah and Me: The Inside Story, Chapter 2”). It’s also useful if you want to replace the original file with the new one you’re saving. Instead of having to type out the entire name of the file, you can just click it.
The Save dialog box in many programs offers a pop-up menu of file formats below the Save As box. Use this menu when preparing a document for use by somebody else—somebody whose computer doesn’t have the same software. For example, if you’ve used a graphics program to prepare a photograph for use on the Web, this menu is where you specify JPEG format (the standard Web format for photos).
The dialog box that appears when you choose File→Open is almost identical to the expanded Save File sheet. Because you encounter it only when you’re opening an existing file, this dialog box lacks a Save button, a Tags box, a file name field, and so on.
Note
Furthermore, the Open dialog box gives you access only to disks, folders, and documents that you can actually open at this moment. For example, when you’re using GarageBand, picture files show up dimmed.
But the Open box adds a special Sidebar category called Media (see Figure 4-27), which gives you direct access to all your photos, music, and movies. Apple figures you might want to import these items into a document you’re working on.

Figure 4-27. The Media Browser is built right into the Open dialog box. That is, you get miniature listings of your iTunes, iPhoto, and movie files right in the Sidebar, for convenience in importing them into (for example) Keynote, PowerPoint, or a Web design program.
Most of the other Save File dialog box controls are equally useful here. That handy Spotlight search bar is still there, only a ⌘-F away. Once again, you can begin your navigation by seeing what’s on the desktop (press ⌘-D) or in your Home folder (Shift-⌘-H). Once again, you can find a folder or a disk by beginning your quest with the Sidebar and then navigate using icon, list, or column view. And once again, you can drag a folder, disk, or file icon off your desktop directly into the dialog box to specify where you want to look. (If you drag a file icon, you’re shown the folder that contains it.)
When you’ve finally located the file you want to open, double-click it or highlight it (which you can do from the keyboard), and then press Return, Enter, or ⌘-O.
In general, most people don’t encounter the Open File dialog box nearly as often as the Save File dialog box. That’s because the Mac offers many more convenient ways to open a file—double-clicking its icon in the Finder, choosing its name from ![]() →Recent Items, and so on—but only a single way to save a new file.
→Recent Items, and so on—but only a single way to save a new file.
Note
Certain anointed apps, like TextEdit and Pages, present a new twist to the Open dialog box: the iCloud button, for saving your documents online. Details begin on Revert.
Get Switching to the Mac: The Missing Manual, Mavericks Edition now with the O’Reilly learning platform.
O’Reilly members experience books, live events, courses curated by job role, and more from O’Reilly and nearly 200 top publishers.

