In general, new programs arrive on your Mac via one of two avenues: as an Internet download (whether from the App Store or not), or on a CD or DVD.
Programs you download from the Web (not the App Store) generally arrive in a specially encoded, compressed form. And unless you’ve changed the settings, they arrive in the Downloads folder on your Dock.
The downloaded file’s name usually has one of these file name extensions:
.zip is the standard compression file format for Windows and Mac files. In fact, Mac OS X has a built-in Compress command right in the File menu.
.sit indicates a StuffIt file, the standard Macintosh file-compression format of years gone by.
.dmg is a disk image, described below.
You may occasionally run into .tar files (tape archive, an ancient Unix utility), .gz (gzip, a standard Unix compression format), or combo formats like .tar.gz or .tgz.
Fortunately, your Web browser automatically unzips and unstuffs downloads of all types automatically.
Once you’ve downloaded a program, it often takes the form of a disk image file, whose name ends with the letters .dmg (second from the top in Figure 4-2).
Disk images are extremely common in Mac OS X. All you have to do is double-click the .dmg icon. After a moment, it magically turns into a disk icon on your desktop, which you can work with just as though it were a real disk (third from the top in Figure 4-2). For example:
Double-click it to open it. The software you downloaded is inside.
Remove it from your desktop by dragging it to the Trash (whose icon turns into a big silver
 key as you drag), highlighting it and
pressing
key as you drag), highlighting it and
pressing  -E (the shortcut for File→Eject),
clicking its
-E (the shortcut for File→Eject),
clicking its  button in the Sidebar, or
Control-clicking (right-clicking) it and then choosing Eject
from the shortcut menu.
button in the Sidebar, or
Control-clicking (right-clicking) it and then choosing Eject
from the shortcut menu.You’ve still got the original .dmg file you downloaded, so you’re not really saying goodbye to the disk image forever.
When you’ve finished unzipping or unstuffing a downloaded file, you may have several icons on your desktop or in the Downloads folder. Some are useful; some you’re free to trash:
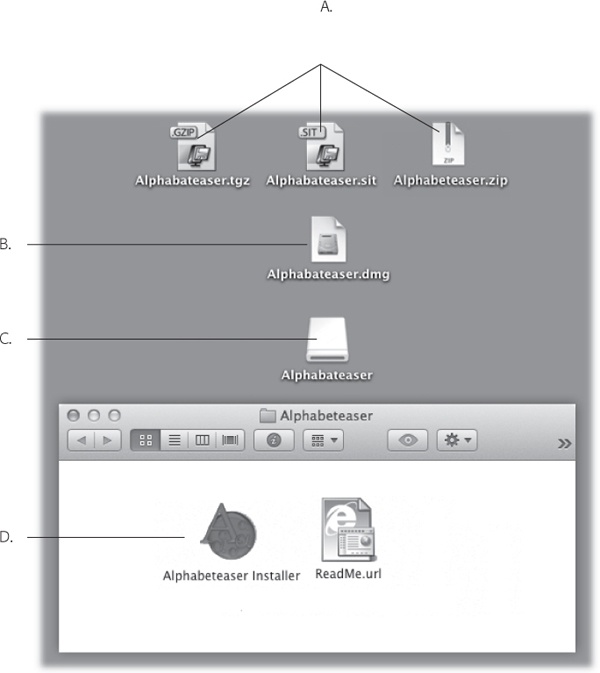
Figure 4-2. Downloading a new program may strew your desktop or Downloads folder with icons. A: These are the downloaded files. Delete them after they’re decompressed. B: The compressed file turns into this .dmg file. Double-click it to “mount” the disk image (if it didn’t appear automatically). C: And now, the disk image itself. Double-click it to open the software installer window. (Dismiss the warning that the software came from the Internet.) “Eject” it after the installation is complete. D: Here’s the actual software installer window. After the installation, you can delete all this stuff (except maybe the .dmg file, if you think you might want to install the software again later).
The original compressed file. It’s safe to throw away the .sit, .tar, .gz, or .tgz file you originally downloaded (after it’s decompressed, of course).
The .dmg file. Once you’ve turned it into an actual disk-drive icon, installed the software from it, and “ejected” the disk-drive icon, you can delete the .dmg file. Keep it only if you think you might need to reinstall the software someday.
The disk image itself. This final icon, the one that contains the actual software or its installer (third from the top in Figure 4-2), doesn’t exist as a file on your hard drive. It’s a phantom drive, held in memory, that will go away by itself when you log out. So after installing its software, feel free to drag it to the Trash (or highlight it and press
-E to “eject” it).
Once you’ve got a disk icon on your desktop—either a pseudo-disk from a disk image or a CD or DVD you’ve inserted—you’re ready to install the software. You can install many Mac OS X programs just by dragging their icons or folders to your hard drive (usually the Applications folder). Others offer a traditional installer program that requires you to double-click, read and accept a license agreement, and so on.
If you got a program from the App Store, it’s easy to delete from the Launchpad (Tip).
If you got it from some other source, well, there’s generally no Uninstall program. To uninstall a program, you just drag it (or its folder) to the Trash.
Frequently Asked Question: Submit to Apple
What the—I was working along in Safari, and all of a sudden it just vanished! Poof! And all I got was this lousy dialog box about “submitting to Apple.” What’s going on?
Apple is trying to assimilate you.
Or, more accurately, it’s trying to enlist your help in ferreting out all the little glitches that make modern computing so much fun. If you’re willing to click the Submit Report button and type a few comments (“I was running Word, minding my own business, and when I clicked the Print button, the whole thing just crashed”), then Apple will add your report to the thousands flowing in from everyone else.
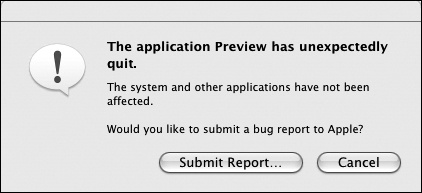
The idea is that when its programmers get a moment, they’ll study these reports, track down the patterns (“Hmm, we’ve received 50,000 reports about that Print button in Word”), and then chase down the software company responsible—and, presumably, get a fix under way.
The report you submit is full of technical info that helps the programmers figure out what was happening at the time of the crash, but no personal information goes along for the ride. So if you feel like doing some good for your fellow Mac fans, by all means submit the report (via the Internet) whenever you’re offered the chance.
Some programs leave harmless scraps of themselves behind; to check for them, look for preference files or folders bearing the dearly departed program’s name in your Library folders (especially in Application Support) and in your Home→Library→Preferences folder.
Get Switching to the Mac: The Missing Manual, Lion Edition now with the O’Reilly learning platform.
O’Reilly members experience books, live events, courses curated by job role, and more from O’Reilly and nearly 200 top publishers.

