Blur Disabled Components #9
Chapter 1, Basic JComponents
|
39
HACK
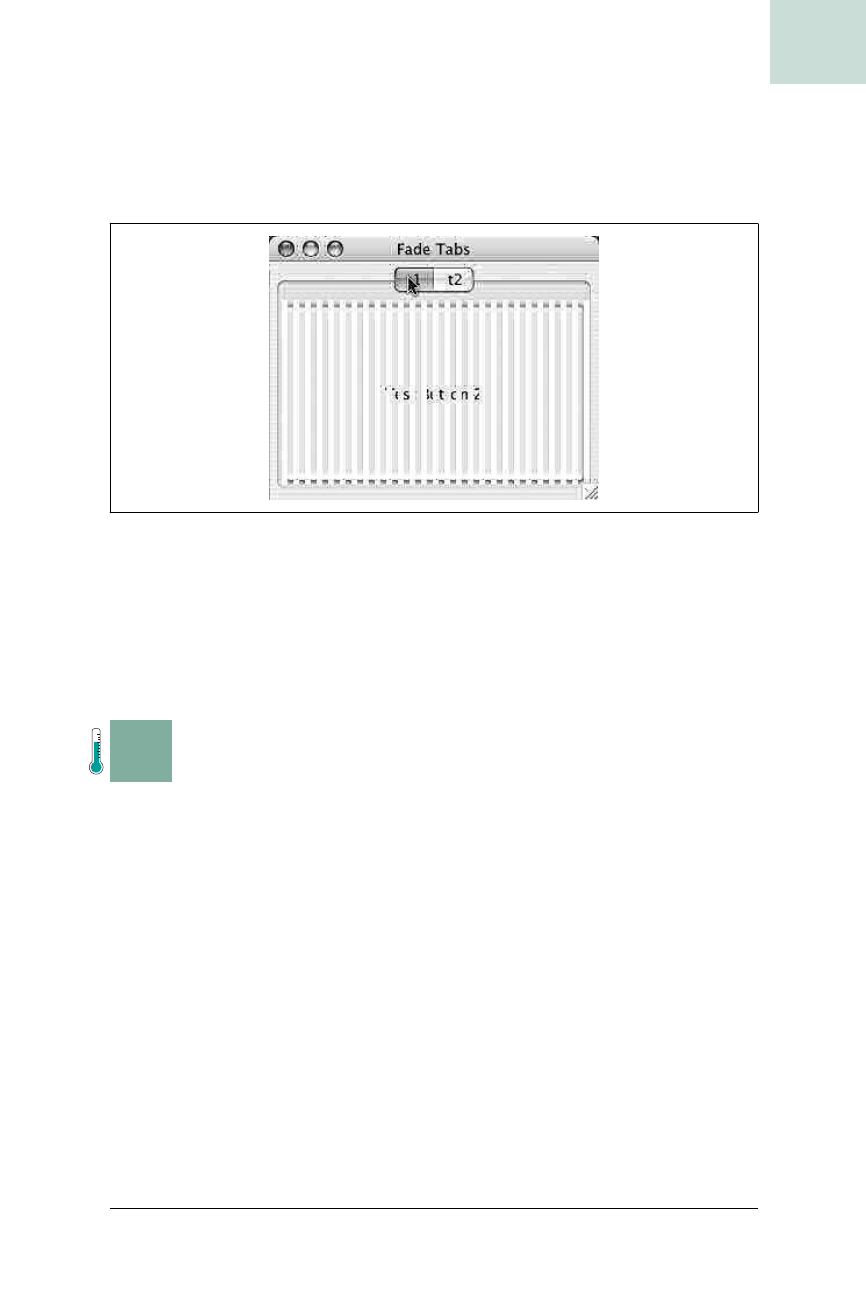
with each frame. For the second half of the animation, it shrinks and moves
to the right, making it appear to fade into nothing. Once the blind is calcu-
lated,
VenetianPane
draws the blind multiple times to cover the entire tab
content area, creating the effect seen in Figure 1-25.
This hack is quite extensible. With the power of Java2D you could add
translucency, blurs, OS X-like genie effects, or anything else you can dream
up. As a future enhancement, you could include more animation settings to
control the frame rate and transition time. If you do create more, please post
them on the Web for others to share.
H A C K
#9
Blur Disabled Components Hack #9
This hack explores creating how to perform a blur transformation on a Swing
component.
Every Swing component draws to the screen via the paintComponent( )
method. This is true even for components that offload the actual drawing to
Look and Feel UI objects. Because all drawing goes through the
paintComponent( ) method at some point, this point is where you can do
some interesting things by manipulating the graphics object during the paint
process.
Swing components draw to the
Graphics object passed in through the
paintComponent( ) method. This means that if you replace the Graphics
object with a custom version, you can capture a component’s drawing into a
bitmap instead of going straight to the screen.
Blurring is a pixel-level operation, meaning the actual blurring is done pixel-
by-pixel in a bitmap. By drawing the component to a bitmap, blurring that
bitmap, and then drawing the bitmap in the place of the component, you can
Figure 1-25. Tab transition with a venetian blinds effect

40
|
Chapter 1, Basic JComponents
#9 Blur Disabled Components
HACK
effectively have a blurred component without disturbing the rest of the Swing
painting routines. The particular implementation in this hack uses a blurred
effect to replace the normal graying of a component when it is disabled.
The first step is to capture the button into a bitmap, as shown in
Example 1-20.
The
BlurJButton class extends a normal JButton and overrides the
paintComponent( ) method. If the button is enabled (neither disabled nor
grayed out), then it calls the superclass’s normal version of
paintComponent( )
and returns. If the button is disabled, however, then BlurJButton creates a
new
BufferedImage with the same dimensions as the component.
A BufferedImage is simply an image backed by a bunch of
bytes in memory. It is a generic kind of image that gives you
a lot of flexibility. I set the type of the image to
TYPE_INT_RGB,
rather than
TYPE_INT_ARGB, because the latter adds an alpha
channel. An alpha channel lets you create transparency
effects, but since the blur doesn’t need transparency, that
feature would cost you unneeded memory.
Finally, the BlurJButton calls the paintComponent( ) on its superclass, the
standard
JButton, passing in the graphics obtained from the buffer. This is
the key to the hack. By passing in
buf.getGraphics( ) instead of the g vari-
able, the button will be drawn entirely to the image buffer, thus enabling the
blurring:
Example 1-20. Creating a blurrable button
public class BlurJButton extends JButton {
public BlurJButton(String text) {
super(text);
}
public void paintComponent(Graphics g) {
if(isEnabled( )) {
super.paintComponent(g);
return;
}
BufferedImage buf = new BufferedImage(getWidth(),getHeight( ),
BufferedImage.TYPE_INT_RGB);
super.paintComponent(buf.getGraphics( ));
// Blur the buffered image (see next section)
}
}
Get Swing Hacks now with the O’Reilly learning platform.
O’Reilly members experience books, live events, courses curated by job role, and more from O’Reilly and nearly 200 top publishers.

