Chapter 4. Notifications
When you receive an email, iMessage, or tweet, applications on your iPhone have the ability to show a notification on the screen. These notifications are generally limited in terms of what they can do: they can display a message, play a sound, and also update the badge number on the applicationâs icon.
With an Apple Watch, notifications that appear on the phone are also displayed on the watch. If you donât do anything, the watch simply displays the notification message (if one is present) alongside the iOS applicationâs icon. This means that you donât need to take your phone out of your pocket when you feel it vibrate; instead, you just need to quickly look at your watch.
However, WatchKit allows you to add more functionality to the notification system, and go beyond simply displaying a message. Your app can provide a custom interface, which takes the contents of the notification that the phone received and presents it using interface elements that are entirely under your control.
In addition to simply presenting messages, notifications can also be actionable. Starting in iOS 8, notifications gained the ability to have actions: notifications could have buttons attached to them, allowing the user to perform some task without having to unlock his phone or leave his current app. These actions can be configured to appear based on different kinds of notifications; for example, when one of your friends checks in somewhere on the location-sharing app Swarm, the notification that Swarm displays includes a button that lets you Like the check-in without having to launch Swarm itself.
Itâs entirely possible that most of the time users spend interacting with their watches will be with notifications, which means that if your iOS app is going to be presenting notifications to the user, you should spend at least some time considering how those notifications will look on the watch. In this chapter, youâll learn how notifications are displayed to the user, and how to create and configure your own interfaces. Youâll also learn how to deal with actionable notifications, and how to let the user take action when a notification arrives.
Glances and notifications
Glances and notifications can seem quite similar, especially when we start talking about the difference between short-look and long-look notifications, which are the two types of interfaces that you design when creating a custom notificationâa short-look notification only appears when you quickly glance at the watch, after all.
To be clear, a glance is a screen of content that appears when you swipe up from the bottom of the watch face. Glances are for providing a summary of important information that relates to an app.
A notification is a screen of content that appears when your phone receives a message. For example, when your phone receives an iMessage from a friend, the notification will show the text of that iMessage. When you build a custom notification, you customize this interface that appears.
Creating Notifications for Your iOS App
In order to work with notifications on the watch, itâs important to first understand how notifications work on the iPhone.
Notifications can come from two different sources:
-
Remote notifications, also known as push notifications, are delivered by the Apple Push Notification server to the phone.
-
Local notifications are notifications that are scheduled by the application itself, and donât involve any communication with the Apple Push Notification server.
From the userâs perspective, remote and local notifications look like the same thing: depending on the content of the notification, the user sees some alert text, hears a sound, sees a badge appear on the application icon, or some combination of the above.
Because both remote and local notifications are effectively the same from the userâs perspective, the way that applications register their intent to show notifications is the same for both remote and local notifications. To begin showing notifications, follow these steps:
-
First, identify the different categories of notifications you plan on receiving. For example, if you were making a social networking app, you might expect to have a notification for when the user receives a message, and another notification for when someone likes their post.
-
Next, for each category of notification, identify the actions that the user can take. To continue the social networking app example, if the user receives a message, a potential action is to reply to that message, while if someone likes a post, a potential action is to view the profile of that user.
-
For each action that can be taken, create a
UIMutableUserNotificationActionand prepare it in your iOS applicationâs application delegateâsapplicationDidFinishLaunchingmethod (for example, in ApplicationDelegate.swift in your project), like so:
letreplyAction=UIMutableUserNotificationAction()replyAction.identifier="replyToMessage"replyAction.title="Reply"
Once you have the notifications you want for a category, you create a UIMutableUserNotificationCategory, give it an identifier, and provide it with the actions that should be attached to it. Different actions can be made available in different contextsâfor example, the default context applies when the notification appears on the lock screen, and the minimal context applies in more space-constrained environments, like when the user pulls down on a notification banner:
letmessageReceivedCategory=UIMutableUserNotificationCategory()messageReceivedCategory.identifier="messageReceived"// The default context is the lock screen.messageReceivedCategory.setActions([replyAction],forContext:UIUserNotificationActionContext.Default)// The minimal context is when the user pulls down on a notification banner.messageReceivedCategory.setActions([replyAction],forContext:UIUserNotificationActionContext.Minimal)
Note
On the Apple Watch, all notifications are shown in the default context. However, you still need to think about the minimal context, because your notifications might also be shown on the iPhone.
Once all of the categories have been created, you need to create a UIUserNotificationSettings object. This object describes to iOS what the user will see when a notification appears; that is, if they will see a message, hear a sound, or see a badge on the app icon (or some combination of the three.) The settings object also contains the collection of category objects:
letsettings=UIUserNotificationSettings(forTypes:[UIUserNotificationType.Alert,UIUserNotificationType.Badge,UIUserNotificationType.Sound],categories:[messageReceivedCategory])
Once the settings object is prepared, you call registerUserNotificationSettings on the shared UIApplication object, like so:
UIApplication.sharedApplication().registerUserNotificationSettings(settings)
At this point, the system will display the alert box that asks for permission to display alerts, play sounds, and update the badge. If the user chooses to not allow this by declining to grant permission to the app, no notifications will be shown, either on the iPhone or the watch.
Note
Thereâs one additional step needed for remote notifications. Once youâve registered your intent to show notifications to the user, you then need to call registerForRemoteNotifications() on the shared UIApplication object. This kicks off an additional process, in which the phone will contact the Apple Push Notification service and deliver a device identifier token to the application delegate, which your app then needs to deliver to a server that you control.
Registering for and delivering push notifications is outside of the scope of this book, as weâre focusing on how the Apple Watch displays notifications in general. To learn more about how to implement remote notifications, see the Local and Remote Notification Programming Guide in the Xcode documentation.
When a notification arrives, the identifier of the notificationâs category is included alongside any other information, like the alert title. The category identifier is used by the system to work out which action buttons should be attached, if applicable. On the lock screen, any actions that were added to the categoryâs default context are accessible by swiping on the notification right to left; if the user has unlocked her phone and a notification banner appears, any actions that were added to the categoryâs minimal context appear when she pulls down on the banner.
Presenting Notifications
There are two types of interfaces that the watch presents for a notification: a short-look interface, and a long-look interface.
When a notification comes in, the watch vibrates and shows the short-look notification. If the user looks at the notification for a couple of seconds (which the watch detects based on information coming from the built-in motion sensors), the watch loads the long-look notification and presents it.
The short-look interface canât be customized. Instead, when you want to customize the way that the notification is presented to the user, you provide your own long-look interface, which replaces the default interface.
Creating Custom Notification Interfaces
The custom long-look notification interface is managed by a special of WKInterfaceController subclass called WKUserNotificationInterfaceController. This class works identically to regular interface controllers, but has two additional methods: didReceiveRemoteNotification and didReceiveLocalNotification. These methods are called when the iOS application that your WatchKit app is paired with displays a remote or local notification, and they serve as your opportunity to update the interface controllerâs UI elements to show useful information.
WKUserNotificationInterfaceController is created by the system, and may be reused for multiple notifications. This means that in the didReceiveRemoteNotification and didReceiveLocalNotification methods, the interface may have already been loaded, and is about to be displayed to the user in just a moment. If this interface controller was previously used to show an earlier notification, it may contain out-of-date information. Itâs up to you to load the most current information being shown to the user, and you need to do so as fast as you can, or the user will see out-of-date content.
Custom long-look notification interfaces all use a similar layout. From top to bottom, the screen shows:
-
The sash, which is a colored bar that contains the app icon and the title of the notification
-
The content area, which is the region in which you can put your own UI content
-
The bottom of the interface controller, which shows the list of buttons for each action registered with the notification, as well as a Dismiss button at the very bottom
Figure 4-1 shows a notification comprising all three of these elements. The sash shows the iMessage icon and the word âMessages,â the content area shows the message itself, and beneath the content area, a Reply button appears above the standard Dismiss button.
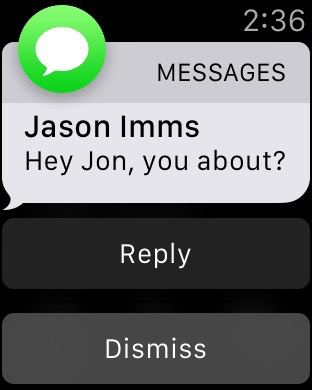
Figure 4-1. A notification received by the Apple Watch
Note
You canât change the structure of this interface beyond the interface elements you put in the content area, the buttons in the bottom of the interface, and the color of the sash.
Static and Dynamic Notification Interfaces
When you create a custom long-look interface, you create at least one interface, called the static interface. You can also create a dynamic interface, which is controlled by your WKUserInterfaceController.
The static interface just shows the alert text of the notification in a WKInterfaceLabel, along with the list of actions, but you can customize its design by configuring the position and style of the alert label, and also by adding your own static text and images. The goal of the static interface is to allow your notifications to look like they fit in with the visual design of your parent iOS application.
The dynamic interface, which is optional, is a WKUserNotificationInterfaceController subclass that you write; in the didReceiveRemoteNotification and didReceiveLocalNotification methods, you receive the contents of the dictionary or UILocalNotification object that the application received (depending on whether the notification was a remote notification or a local notification), and populate the interface according to your own requirements.
Note
The main reason for this split between static and dynamic interfaces for your custom notifications is power consumption. Launching additional code means that the Apple Watch needs to consume additional CPU resources to load, run, and manage a process on the watch that updates the interface.
As the saying goes, the best way to optimize code is to never run that code at all; if the notification is guaranteed to never need code to run, WatchKit can simply display it without having to use these extra resources. This can save a large amount of power.
Because of this, the system may decide to display the static interface even if a dynamic interface is available. If the watch is low on power, or if the code that prepares the dynamic interface takes too long to run, the system will fall back to the static interface.
Itâs worth keeping in mind that many notifications donât actually need a dynamic interface. Consider carefully if you really do need to update your interface from code.
Setting Up for Testing Notifications
In the real world, a notification UI is presented as a result of the iOS app receiving a notification. That can be fiddly to set up when youâre developing and testing your notification interface, so Xcode provides a way to test different notifications in the Apple Watch simulator.
First, you create a file that contains the same information that the Apple Push Notification server sends to the phone. This information is represented in the human-readable JSON format. Next, in the Run action for the scheme that you use for running the Notification in the Apple Watch simulator, you select this new push notification file. When the app launches, the Apple Watch simulator is given the push notification data from the file you wrote, and uses that to display a notification.
Note
If you chose to create a notifications interface when creating the project, you donât need to follow these steps. However, if youâre adding a custom notification interface to an existing project, or if you want to test multiple different types of notifications, read on.
To create a test notification file, follow these steps:
-
Create the file by opening the File menu, and choose NewâFile. Select the Apple Watch category, and choose Notification Simulation File. Create the new file.
-
Customize the notification to suit your needs by opening the file and modifying the notification:
-
The
apsdictionary contains information used by iOS and by the Apple Watch to present the static notification. Thebodykey is the notification message itself, while thetitlekey is optional and determines the notification title. -
The
WatchKit Simulator Actionsdictionary is used only by the Apple Watch simulator, and allows you to control which actions are attached to the notification.Actions are handled in this way when using simulated notifications, because when real notifications are delivered to the phone, the iOS app is responsible for determining which actions are attached to different notifications. When using simulated notifications, like weâre doing here, thereâs no iOS app to provide info about which actions apply, so you need to add them yourself.
-
-
Any other keys you add are available for your code to use, and are delivered inside the dictionary that
handleRemoteNotificationreceives as a parameter.
To test notifications in the Apple Watch simulator, you need to add a new scheme that makes the simulator display a notification. This is very similar to adding a scheme for the glance interface (see âCreating a Glance Schemeâ).
-
Open the Scheme manager by opening the Product menu, choosing Scheme, and then choosing Manage Schemes.
-
Select the scheme for the WatchKit app.
-
Click the settings icon at the lower left, and choose Duplicate.
-
Rename the new scheme something appropriate, like âWatchKit App Notification.â
-
Click the Edit button, and select the Run action.
-
In the settings for the Run action, set the Watch Interface option to
Notification. -
Set the Notification Payload to the file you just created.
-
Close the scheme editor, and select the new Notification scheme.
Creating the Interface Controller
If you want to customize the long-look interface for your notifications, you need to create and configure an interface controller. To do this, follow these steps:
-
Create a subclass of
WKUserNotificationInterfaceController: from the File menu, choose NewâFile, choose the Source category, and create a new Cocoa Touch subclass.Make the Subclass of be
WKUserNotificationInterfaceController. -
Add a new notification interface controller to the storyboard by opening your appâs main storyboard and dragging in a new notification interface controller from the Object Library. This will add the static interface for the notification.
-
Select the arrow thatâs connected to the interface. In the Attributes Inspector, set the Name of the category to the identifier of one of the
UIMutableUserNotificationCategoryobjects that the iOS app registers for.
Note
If you donât specify a notification category, and instead just leave it blank, then the notification interface will be used as the âdefaultâ interface, and will appear for all notifications that donât have their own specific notification interface controllers.
You create multiple notification interface controllers, one for each different notification category your app has. If you have more than one category, simply drag in multiple notification interface controllers, and configure each category to use the appropriate identifier in the Name field.
By default, a notification interface controller only has the static interface, and it doesnât use the WKUserNotificationInterfaceController subclass. Again, itâs worth remembering that many notifications donât need a code-driven interface. If you decide that you donât need to add a dynamic interface, you can skip the first step of this process, and just add the static interface.
If you do decide that you need a dynamic interface, follow these steps:
-
Select the notification category arrow, and turn on âHas Dynamic Interfaceâ in the Attributes Inspector. A new interface will appear, connected to the static interface.
-
Select the dynamic interface, and then select the interface controller by clicking on the yellow circular icon. Open the Identity Inspector, and in the Class field, type the name of your
WKUserNotificationInterfaceController. Once thatâs done, you can set up your interface controller just like any other, by dragging controls into the interface and connecting them via outlets.
Finally, your WKUserNotificationInterfaceController class needs to add methods that run when a notification is received.
Implement didReceiveLocalNotification and didReceiveRemoteNotification (these methods are run when a local or remote notification is received by the iOS app, and receive the notification info as well as a completion block). After you finish using the notification info to set up your dynamic interface, you call the completion block to signal that WatchKit should use a dynamic interface:
overridefuncdidReceiveLocalNotification(localNotification:UILocalNotification,withCompletioncompletionHandler:((WKUserNotificationInterfaceType)->Void)){// The iOS app received a local notification; set up our interface// When done, call completionHandler and pass .Custom.completionHandler(.Custom)}overridefuncdidReceiveRemoteNotification(remoteNotification:[NSObject:AnyObject],withCompletioncompletionHandler:((WKUserNotificationInterfaceType)->Void)){// The iOS app received a local notification; set up our interface// When done, call completionHandler and pass .Custom.completionHandler(.Custom)}
Warning
If you donât call the completion block fast enoughâin about a quarter of a second or lessâthe system will fall back to using the static interface. This means that you donât have time to talk to the network, for example, before calling the completion block.
The notification from this chapter is shown in Figure 4-2.
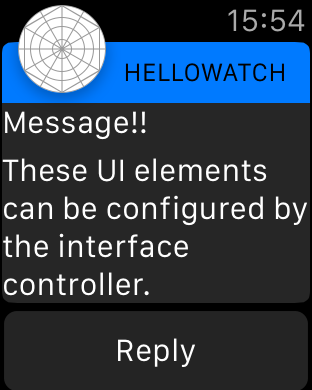
Figure 4-2. The custom long-look notification, running on the watch
Wrapping Up
If your iOS app receives notifications, creating a custom notification interface for the watchOS app can go a long way toward improving the user experience. When you create a custom notification interface, you have full control over what the user sees, and can provide much more useful information than the default interface can provide.
In the next chapter, weâll look at another feature that lets you get the most important information to the user: complications!
Get Swift Development for the Apple Watch now with the O’Reilly learning platform.
O’Reilly members experience books, live events, courses curated by job role, and more from O’Reilly and nearly 200 top publishers.

