Chapter 1. Understanding the Apple Watch
Apple describes the Apple Watch as âa new chapter in the relationship people have with technology.â While it remains to be seen whether this is quite the case, the Apple Watch, as it exists right now, is a tiny programmable computer that sits on your wrist. Itâs even smaller than Appleâs other recent tiny programmable computers.
watchOS apps are written using a framework called WatchKit. The code runs on the watch, but because the Apple Watch is tightly linked to the iPhone, writing apps for the Apple Watch also means writing an iOS app.
How Users Interact with Apple Watch
watchOS apps can provide four different components for the user: full apps, glances, notifications, and complications. You must always create a full Apple Watch app, which can be opened from the home screen of the Apple Watch.
-
Full apps behave in a similar way to iPhone apps, and can have multiple screens and a range of possible interactions.
-
Glances are single screens of content that can be accessed by swiping up from the watch face. They donât have any interactive elementsâtheyâre only for displaying information. If the user taps on the screen, the full app is launched.
-
Notifications appear when the watchOS appâs counterpart iOS app receives a notification. Notifications usually come from the Apple Push Notification service, but they can also be âlocalâ notifications, which the iOS app schedules for later delivery.
-
Complications are small elements that are embedded into certain watch faces. Theyâre not interactive, but they let apps add a little more information to the most quickly accessible part of the phoneâs interface. Additionally, they can also participate in Time Travel, in which the user rotates the Digital Crown to view the watch face as it appeared in the past, or will appear in the future.
Tip
The word âcomplicationâ comes from the fact that these elements on the watch face, when they were part of physical, clockwork-driven watches, were complications in the clockwork assembly.
How the Apple Watch Works with iPhone
watchOS apps are embedded inside iOS apps. When you download and install an iOS app that contains a watchOS app inside it, that app is automatically transferred over the Bluetooth link to the watch. If the watch isnât in Bluetooth range of the iPhone at the time, itâs installed later.
watchOS apps are independent applications that run entirely on the watch: they do their own processing, manage their own memory, and can store files on the watch. However, watchOS apps rely on the parent iPhone for access to any of the userâs data thatâs stored on the device.
Note
Apple Watches require the presence of a parent iPhone. They donât work without one; additionally, they specifically require an iPhone, not an iPod touch or an iPad.
App Life Cycle
Apps for the Apple Watch have a unique life cycle when compared to iOS or OS X applications. Your app can be launched in a variety of circumstances:
-
When the user explicitly launches your app from the watch home screen
-
When the user interacts with notifications from your app on the watch
-
When the user interacts with a glance provided by your app
-
When the watch face needs to update a complication on the watch face provided by your app
Warning
The battery on the watch is significantly smaller than the one built into the phone, which means that it pays to be very careful about the work that you do on the device.
A watchOS Appâs Architecture
A watchOS app is very similar to an iOS app: itâs a bundle of resources and code. The resources include the files that define the UI, any images and media needed by the app, and the compiled binary containing all of the appâs code.
The watchOS app is exposed to the user as an icon on the Apple Watchâs home screen, which is the grid of icons that you see when you press the Digital Crown from the watch face. In addition to the main app itself, a watchOS app can also include the following:
-
A single glance interface, which allows the app to display a quick, single-page summary of the most important information. For example, when you swipe up from the bottom of the screen, you can access a quick summary of the current weather; this is a glance interface provided by the Weather app.
-
Customized interfaces for each of the different types of notifications the user might receive. The Uber app customizes the presentations of notifications that alert the user when the car he has requested is arriving, to show the license plate number of the car to look for.
-
A number of complications: small user-interface elements that are shown as part of the watch face. The Weather app also provides a small summary of the current weather, embedded directly into the watch face.
To communicate with the parent iPhone, you use the WatchConnectivity framework to send and receive files, or small chunks of information. WatchConnectivity is the only way to access information thatâs kept inside the iOS appâbecause the Apple Watch and the iPhone are separate devices, thereâs no shared file storage between them.
Designing for the Apple Watch
The Apple Watch requires you to think about the constraints of the device youâre designing for with even more pedantry and attention to detail than is required for the iPhone and iPad. You need to keep the following in mind when designing Apple Watch apps:
-
The Apple Watch has an absolutely, ridiculously minuscule screenâitâs tiny!
-
The screen is not visible most of the time
-
Nobody wants to spend any more than five seconds, if that, looking at it
-
The watch is a separate computer (more on this later)
-
It has no keyboard, so the only text input available is via voice dictation
-
It has a very, very small storage capacityâless than 8 GB, and only a tiny fraction of that is available for you to use
In general, as long as youâre carefulâand pay attention to the design constraints of the watchâyouâll probably be fine if you follow the same general approach that is taken for iOS development. That said, itâs easy to forget that every single thing that your Apple Watch app does relies on an often unreliable Bluetooth connection to an iPhone. Itâs especially easy to forget this when youâre using the simulator to test things, because the Watch simulator doesnât have to deal with talking over the radio to its simulated counterpart iPhone. This means that the simulator will be significantly faster than a real Apple Watch will be.
Dealing with the Device and Simulator
There are two ways to run an Apple Watch app: running it on a real device, and running it in the simulator.
Just as with building apps for iPhone and iPad, itâs always better to run your code on a real device, for a bunch of reasons: the simulator is faster than the real watch, and responds to user input much more quickly; the simulator is a lot easier to read than the real watch; and apps running on the simulator donât have to compete for attention with other apps. Additionally, when youâre running code on the simulator, youâre not wearing the app on your wrist, and youâre not interacting with it in the same way.
At the same time, though, building and testing your app on the simulator is considerably easier than using a real deviceâyou donât need to worry about pairing, or waiting for the install to complete. You also donât have to own a real device. (Again, though, if youâre making apps, you really should own a watch. Given the cost of buying additional hardware, though, itâs understandable to want to start building apps on the simulator before getting a device.)
Diving In
Letâs dive into creating an app for the Apple Watch. Because weâre starting from scratch, the iOS app that runs on the phone will be mostly empty, and weâll focus our attention on the watchOS app.
To get started, youâll need a copy of Xcode 7.2 or later installed.
Note
When shipping a real app, your iOS app needs to be fully functional. Focus on getting that product complete as well as your Apple Watchâdonât make a poor iOS app and put your entire energy into the watchOS app. The first experience your user will have with your apps will be the iOS app.
-
Launch Xcode. The Welcome to Xcode window will appear, as seen in Figure 1-1.

Figure 1-1. The Welcome to Xcode screen
-
Click âCreate a new Xcode project.â The template chooser window will appear (seen in Figure 1-2). Select âApplicationâ in the âwatchOSâ section of the list, and then choose âiOS App with WatchKit App.â Click Next, and on the following screen, name the project âHelloWatch.â Make sure you choose Swift as the development language, and turn on âInclude Notification Scene,â âInclude Glance Scene,â and âInclude Complication.â Leave âInclude Unit Testsâ and âInclude UI Testsâ as they areâwe wonât be working with them.
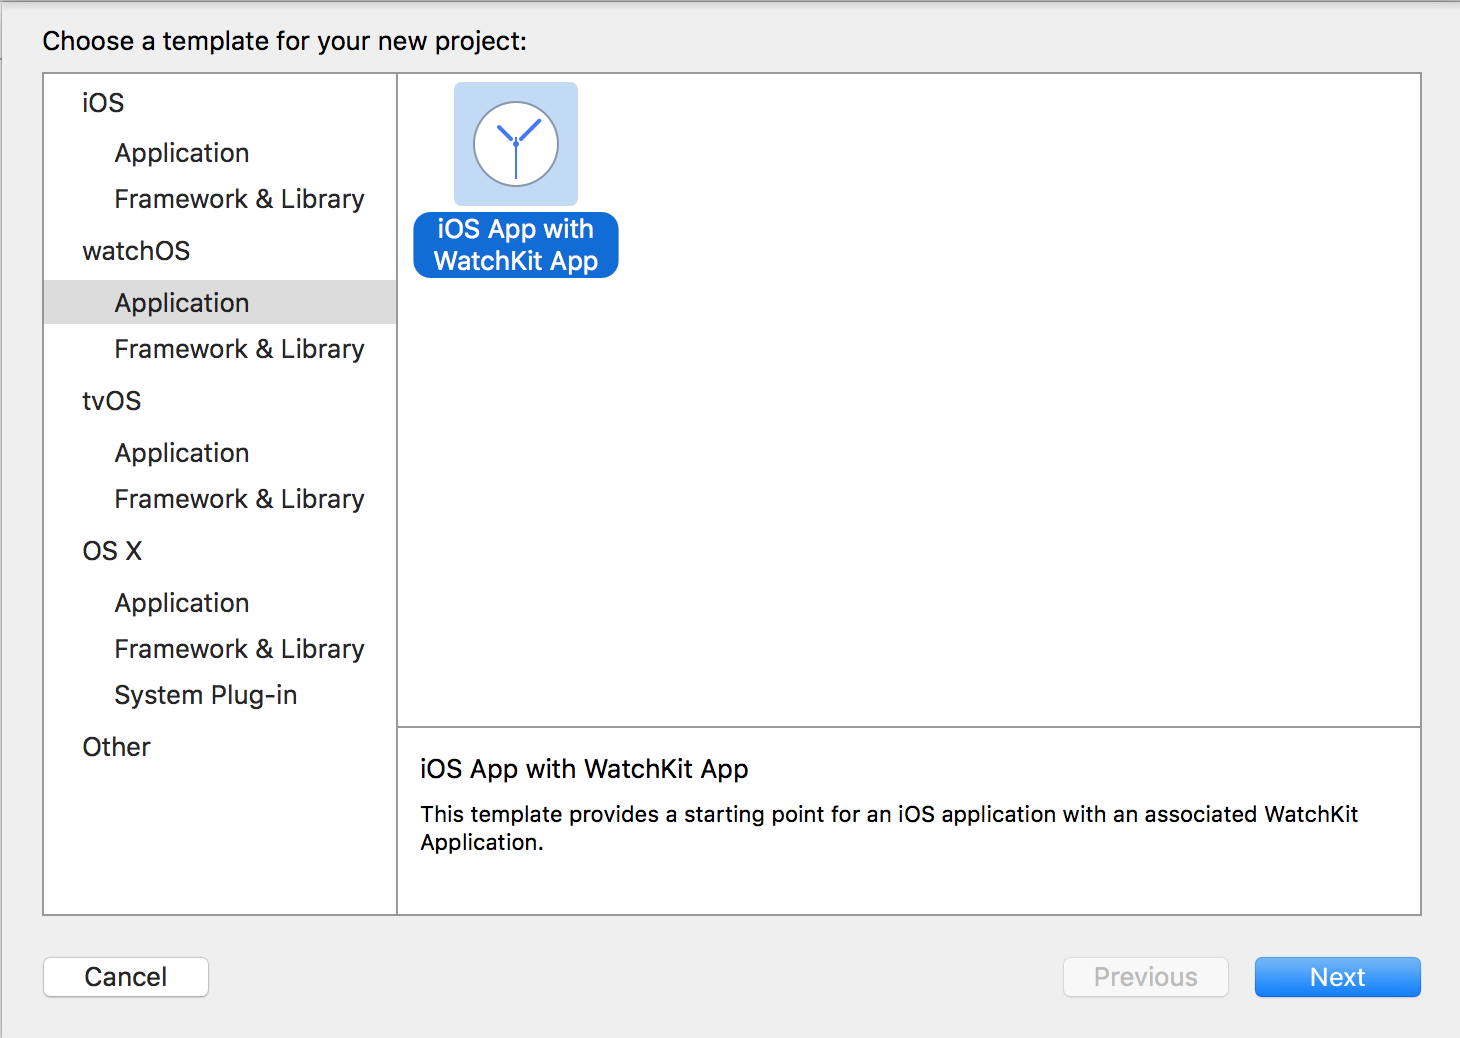
Figure 1-2. Creating the project
The watchOS app will have the same name as your main application, with âWatchKit Appâ attached to the end. So, if you named your iOS app âHelloWatch,â the WatchKit app will be named âHelloWatch WatchKit App.â
-
Open the scheme selector: itâs the drop-down menu at the top-left of the Xcode window.
-
Select the HelloWatch WatchKit App scheme.
-
Build and run the app: press Command-R, and the app will build and launch in the simulator.
Youâll see two windows: the phone and the watch. Both will be empty.
Tip
When an iOS simulator is launched for the first time, it will take some time to prepare itself. This can interfere with the installation of the watchOS app. If the app doesnât appear on the simulated watch, quit both the Simulator and the Simulator (Watch) apps, and try building and running the app again.
Building for Simulator
Simulator comes with built-in support for simulating an Apple Watch. When you create an Apple Watch application and tell Xcode to build and run it, Simulator will display an additional window, in which your Apple Watch will appear (as seen in Figure 1-3).

Figure 1-3. The iOS simulator, with an Apple Watch app being simulated next to it
To run an app on the simulator, you simply select the scheme for your WatchKit application by choosing it in the lefthand side of the scheme selector, and select an iPhone simulator and Apple Watch combination in the righthand side of the scheme selector (see Figure 1-4).

Figure 1-4. Selecting an iPhone and Apple Watch simulator in the scheme selector
You can also interact with the Apple Watch simulator in much the same way as you do an actual Apple Watch. When you press Command-Shift-H, the Apple Watch will act as though you pressed the Digital Crown; when you scroll the trackpad up and down over the simulated Apple Watch screen, it will act as though you rotated the Digital Crown.
Take some time to play with the simulated Apple Watch, and get comfortable with how it works.
Note
You can download additional simulators for use in Xcode. When you install Xcode, it includes the most recent (as at the time of download) versions of iOS and watchOS; you can also download simulators that run older versions of the operating system, and test your software on those.
To install these older versions, open the Xcode menu, and choose Prefences. Click the Components tab, and youâll be shown a list of simulators to download. Once theyâre downloaded, you can choose which version of watchOS you want to run your app through the scheme selector.
Building for the Device
To build a WatchKit application for a device, you first need to have an Apple Watch thatâs paired with an iPhone. When you build and install the app, youâre actually building and installing an iOS app, and the watchOS app it contains is then copied to the Apple Watch.
Building and running the app on the watch is very similar to using the iOS simulator: you select the WatchKit app in the scheme selector, and choose your iPhone as the destination (see Figure 1-5). Hit Command-R to start the building and copying process, and after a moment, the various bits and pieces will be in place.
After the app has finished installing, you may or may not have to manually launch the app on your Apple Watch. If your app isnât launched immediately, you need to manually launch it by pressing once on the Digital Crown, and then locating your appâs icon on the watchâs home screen. Tap the appâs name, and it will be launched. Xcode will attach its debugger to the watchOS app, and you can use your app.

Figure 1-5. Selecting an iPhone in the scheme selector
Congratulations! Youâve built an empty app. In the next chapter, weâll explore what you can do with it.
Get Swift Development for the Apple Watch now with the O’Reilly learning platform.
O’Reilly members experience books, live events, courses curated by job role, and more from O’Reilly and nearly 200 top publishers.

