Chapter 1. Quick Start
I have never liked delayed gratification. I don’t buy self-assembly furniture or bake cakes from scratch—there’s too much waiting involved. Bonsai? You must be joking! With software products and operating systems especially, I want to start putting them to use the instant I have them in hand. Hopefully, this book will help you do that with SUSE Linux. In particular, this first chapter is intended to get you started quickly—to get the system installed; to get your printer, email, and network set up; and to take a step on the road to self-sufficiency through reading the documentation. Changing your operating system is like moving to a new home. You need to figure out how to turn on the electricity, water, and heating. You need to make a hot drink. You need to get the bed assembled before nightfall. Unpacking your CD collection can wait.
Once the system is installed, I suggest you spend some time exploring the menus. From web browsers to HTML editors, from databases to CD players, from image editors to chess programs—there’s just so much stuff! And that’s just the graphical tools. A whole new world of command-line utilities also awaits you. As the SUSE folks say, “Have a lot of fun.”
Installing SUSE Linux from Local Media
Not too long ago—five years, maybe—installing Linux required a great deal of patience and technical know-how. Getting it to work properly on a laptop was especially tricky, rather like teaching chickens to fly. Anyone found in possession of a flying chicken would be besieged by questions from others anxious to see their pet hen airborne. Since then, the device support in Linux has improved beyond recognition; the installation tools in a modern Linux distribution auto-detect most hardware, install the right drivers, and deliver a default installation that is almost certainly going to work.
In this lab I walk through a typical installation of SUSE Linux from local media (in this case, a DVD or set of CDs). Everyone’s installation is different, of course. You may be installing onto a completely “empty” machine, or you may wish to preserve existing partitions and operating systems. You may have specific requirements for the selection of software you want to install. You almost certainly have different hardware than I do. For this walk-through, I use a desktop machine of dubious breeding (I built it myself), which has an existing installation of Windows 2000 (which I will keep) and an existing installation of an earlier version of Linux (that I will replace). Depending on which version of SUSE Linux you’re installing, there may be some minor differences between the screens you’ll see and the screenshots in this book.
How Do I Do That?
Start by booting from the DVD included with your SUSE Linux distribution. (If your machine won’t boot from DVD, or if you’ve created the CDs by downloading ISO images from the OpenSUSE web site [http://www.opensuse.org], boot from CD1.) You will be presented with an initial boot menu that will (if you let it time out) boot from the hard drive. This isn’t what you want, so select “Installation” from the menu. A Linux kernel and a RAM-disk image will now be loaded from the DVD or CD. The RAM-disk image is a small filesystem, held in memory, that Linux uses during the installation. You’ll be asked to select the language you want to use for the installation.
Next, you’ll be invited to perform a media check on the discs you plan to install from. This check verifies the MD5 checksums of the media (CDs or DVDs) that you will install from. My experience (particularly if you are installing from purchased media) is that media errors are relatively rare, and that it is quicker to cancel this check and proceed with the installation. You’ll be informed by the installer if there are read errors on specific packages. You may also be asked to agree to Novell’s license agreement.
After probing the hard drive, my installer detected the existing Linux installation and asked whether I want to perform a new installation, or update the existing one. (Clicking Other also allows you to repair an existing installed system.) I chose to perform a new installation. Note that it’s the existing Linux partitions that I’m replacing here, not the Windows installation. Whichever option I choose, the existing Windows partition will not be touched. (In fact, the installer will automatically include an option to boot Windows in the boot loader configuration and will automatically arrange for the Windows partition to be mounted into the Linux filesystem when I boot Linux.)
Next, you’re asked to enter your geographic region and time zone. SUSE 10.1 then asks if you want a KDE or Gnome desktop. You can also choose a text-mode installation (appropriate for servers) by selecting Other. This selection will likely catch Windows users off-balance. On a Windows system, you get the desktop that Microsoft provided, and there are no alternatives. For Linux there are a dozen or so window managers and desktop toolsets you might choose to use. The mainstream choices presented by the installer are Gnome and KDE. Both are fine. KDE is, if anything, better supported by SUSE, and is the desktop I’m most familiar with, so that’s what I chose.
After further probing of your system, the installer will present a proposal for the new installation. Figures 1-1 and 1-2 show the top and bottom halves of this screen. This is a screen where you’ll probably spend some time, as most of the installation decisions are made from here. SUSE Linux 10.1 adds Overview and Expert tabs to this screen. The figures correspond to the expert view.
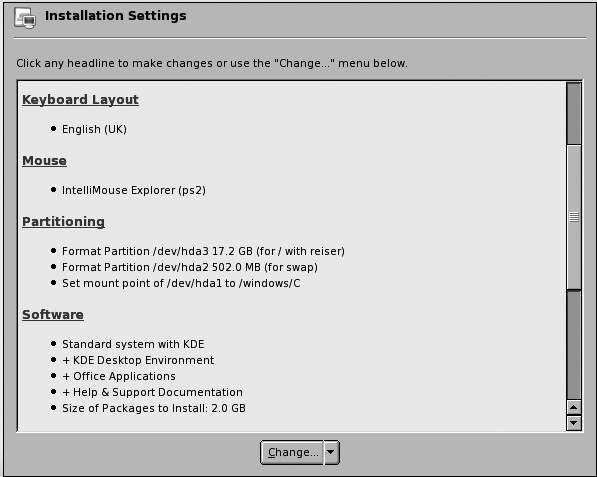

If you’re totally new to Linux, and you simply don’t understand the choices presented to you here, just accept the proposed installation. It will work well enough, and will be fine to get started with. Later on, when you’re more experienced, you can always reinstall. In my experience, the categories you’re most likely to want to change are Partitioning and Software. To change these, click on the underlined blue links, or use the Change button at the bottom of the screen.
Warning
The partitioning decisions are the hardest, because the first time you install Linux you really don’t have any basis for making good decisions, and because they’re almost impossible to change afterwards. Forgetting to install an application or two isn’t a problem, because you can easily install them later, but getting the partitioning wrong is tedious to fix.
A partition is a fixed-sized region of a hard drive. It could be the whole disk or just a part of it. A partition is what Windows calls a “drive.” For Linux, you need at least two partitions, one for swap space (temporary disk storage used as an overflow area for main memory) and one for the filesystem. This is the simplest possible scheme and is the one you’ll see proposed in Figure 1-1 where the installer is simply proposing to take over the existing Linux partitions (hda2 and hda3) for the swap space and the file system, respectively. But it’s not set in stone. Suppose that you need to make a change to this (in my case, I wanted hda3 to be smaller, to leave some unpartitioned space on the drive for later use) Click the Change button, then select Partitioning from the menu. This brings you to the Suggested Partitioning screen where you need to select “Base Partition setup on this proposal.”
Next you’ll see the Expert Partitioner screen. Here you can add, edit, or delete partitions to your exact requirements. I’m planning to resize the hda3 partition from 17.2 GB to 10 GB, but the only way to do this is to delete it and create it again, so I selected it from the list and clicked Delete, followed by Create. After you click Create, you’re asked if you want a primary partition or an extended partition. I discuss this whole issue of partitioning in detail in Chapter 9, but for now, on my system, I selected a Primary Partition.
The next screen allows you to specify the size and type of the filesystem to put on the partition (Figure 1-3).
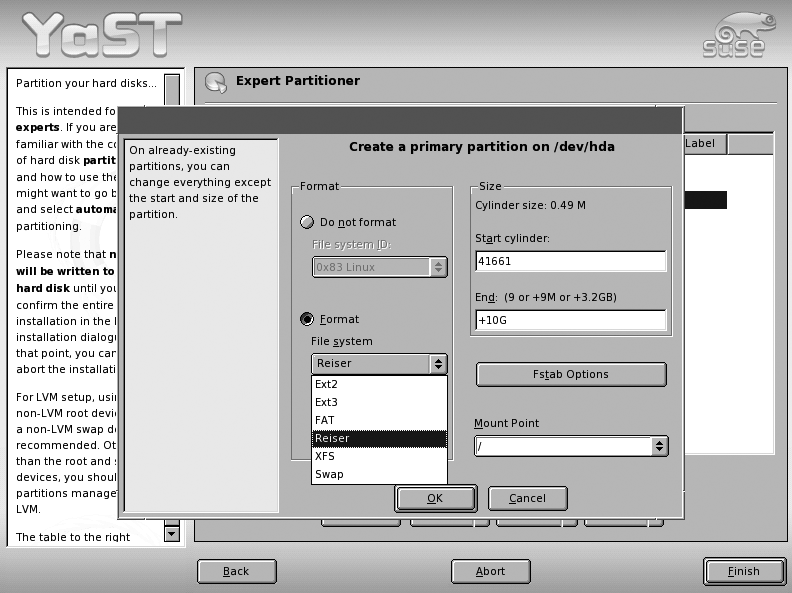
There are two mainstream filesystem types used by Linux, called ext3 and Reiser. These names refer to the layout of the actual data structures on the disk, in the same way that FAT32 and NTFS refer to file system formats used by Windows. Although you will find people who will argue strongly in favor of one file system or the other, the reality is that either ext3 or Reiser will serve perfectly well in most cases. Here I have chosen a Reiser filesystem and set its size to 10 GB.
Tip
Each partition always begins and ends on a cylinder boundary, so the actual partition size will be rounded to a whole number of cylinders. If you prefer to deal directly in terms of the drive geometry, you can specify the partition size in terms of a starting and ending cylinder number, though there’s little point in doing it that way.
With the hda3 partition now set to 10 GB, the partitioning proposal looks like Figure 1-4. At this point, you can click Finish on the Expert Partitioner screen. Note that no changes have actually been made to the partitions on the hard drive yet. That won’t happen until you actually commit to the installation.
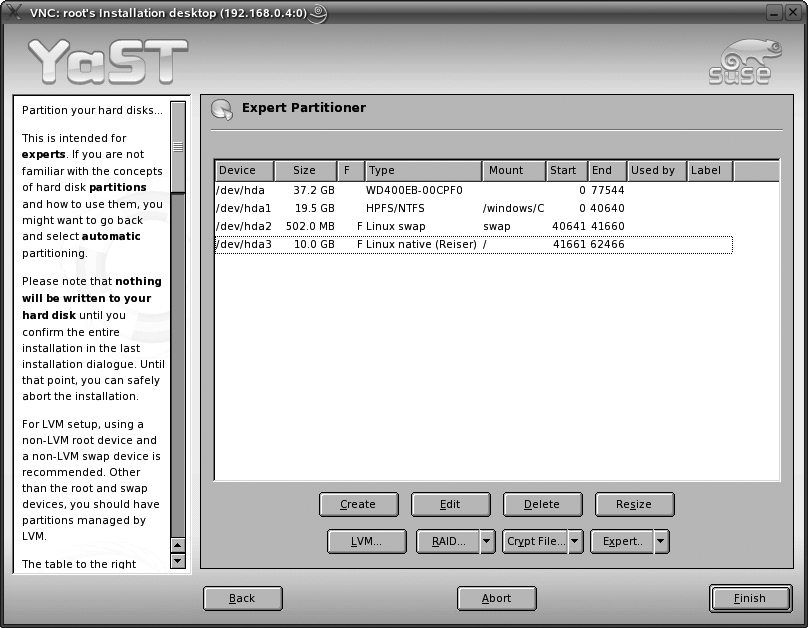
Now you’re back at the main Installation Settings screen, which has been updated to reflect your partitioning changes.
You may also want to add your own choice of software packages to the default selection proposed by the installer, so click on the Change button and select Software from the menu, which brings you to the main Software Selection screen shown in Figure 1-5.
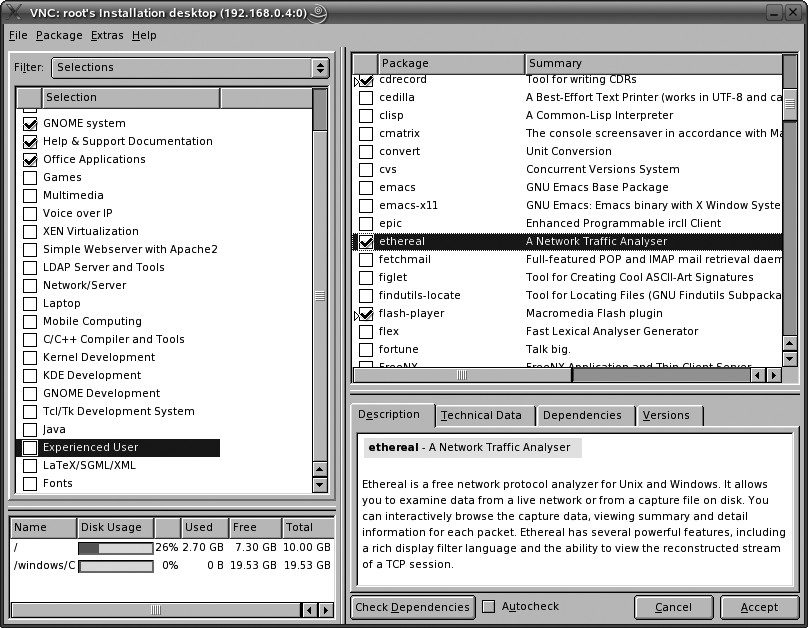
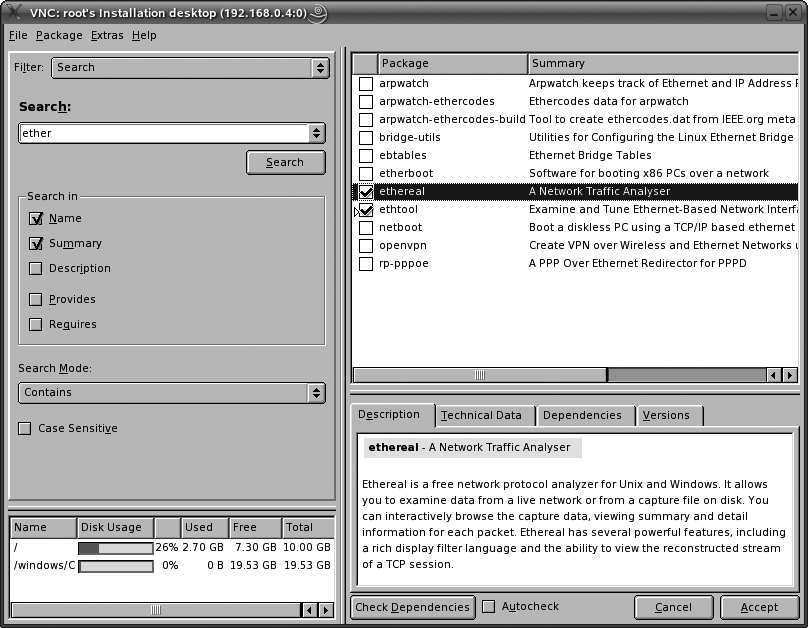
This is quite a complicated screen, but its purpose is simply to allow you to select software packages to install. The drop-down list box labeled “Filter” near the top-left corner provides various views for software selection. The Selections view allows you to select whether to include or exclude about 25 package categories. Unless you’re a Linux expert or are very short on disk space, don’t try to make a selection at a more detailed level than these categories. I chose to add the Gnome system and OpenOffice, so I checked those boxes. I also wanted to add a tool called Ethereal, which is a network traffic monitor that I find really useful. So, I needed to drill down to that more detailed level.
Because I want just a single package here, and I know its name, it’s simplest to select the Search filter and type “ether” into the box (or however many letters you need to find what you’re after). This will bring up a list of matching package names in the top-right pane. I just checked “ethereal,” as shown in Figure 1-6.
Once you’re happy with the software selection, click Accept to go back yet again to the main Installation Settings screen (shown in Figure 1-2). There are, potentially, other things you could change here. For example, right at the bottom is an entry labeled Default Run Level. Leave this at 5 if you want the system to boot directly into a graphical desktop. Set it to 3 if you want the system to boot to a command-prompt login with no graphical desktop. You can also configure the boot loader, which is called GRUB (The GRand Unified Boot loader), but I suggest that you leave it alone. If you already have a Windows installation, you will notice that the installer automatically includes an entry in the boot menu to allow you to boot from your old Windows partition.
Once you’re satisfied with your installation choices, click Accept, which will bring you to the Confirm Installation screen, your last possible chance to change your mind. Once you confirm the install, the installer will repartition your disk, which is the point of no return.
Now begins the long haul of package installation. If you’re installing from CD, you’ll be asked to insert CD2, CD3, and so on at appropriate times. This is not necessary for DVD installations as everything is on one disc. The length of time taken to complete the installation is difficult to predict, as it depends on how many packages you’re installing and the speed of your hardware, but an hour is not unusual. When all the packages have been loaded, the system performs some further installation and then reboots. This reboot is necessary so that the system can discard the kernel it had loaded from CD1 and start running the kernel it has now installed on the hard drive. If installing from CDs, the reboot occurs after loading the packages from CD1, then installation continues from CD2 onward. How many of the CDs you’ll need depends on which packages you’re installing.
One of the first things you’re asked to do after package
installation is complete is to choose a hostname and domain name for
the machine. Your domain name may be determined for you by your
network administrator. If your machine does not have an entry in DNS,
the domain name you assign here is largely irrelevant; example.com is a safe choice. Next, you
need to enter a password for the super-user account. Traditionally, the login name for this account is
root. This account is roughly equivalent to the Administrator
account in Windows. Every Linux installation must have a super-user
account. Some password strength-checking is applied to your choice of
the super-user password. This password is important, so don’t forget
it, and don’t write it down on a sticky note on the screen. It’s worth
spending a moment to choose a strong password; that means (at minimum)
not a word you’ll find in a dictionary. (If you really do forget the
root password, read Lab 2.7, "Rescue a System That Won’t
Boot,” in Chapter 2). At
this screen, if you click on Expert Options, you can specify the
algorithm that will be used to encrypt the passwords (technically,
passwords are hashed, not encrypted, but we’ll
not worry about the difference here). The default algorithm (Blowfish)
is probably the most secure; there is little reason to not use
it.
Next comes the network configuration screen (Figure 1-7). I chose to leave the settings as they are; in particular, I chose to use a DHCP server to establish my network settings, because the ADSL modem that provides me with my Internet connectivity includes a DHCP server. Dial-up modems (if you have one) are also detected and configured at this stage. In SUSE 10.1 there is an important additional setting on this screen called Network Mode. There are two options: “User Controlled Interface via NetworkManager Applet” and “Traditional Method without NetworkManager Applet.” The Network Manager applet is recommended if you have a laptop that roams between, say, a wired network connection and one of several wireless connections. NetworkManager will automatically select the “best available” connection without manual intervention. For a machine with a static wired network connection—particularly one that has a fixed IP address—the “traditional method” may be preferable.

You can do detailed firewall setup here, as well. For more information on security, see Chapter 8.
Next, you’ll be offered the opportunity to test connectivity to the Internet, download the latest release notes, and check for any updates. For security, I recommend installing the most recent updates available from SUSE. However, if you choose not to update at this stage, you can easily do so later. You’ll see how in Chapter 5.
Next, you will be asked to choose a User Authentication Method; that is, to specify where the system looks for its user accounts. There are four choices:
Local (/etc/passwd)
LDAP
NIS
Samba
If you are installing the system for use on a corporate network that runs a centralized account database using—for example, LDAP or NIS—you may need to set that up at this point. Samba authentication might be appropriate if you’re trying to integrate your accounts with those on a Windows domain controller. Otherwise, I would recommend that you keep things simple by keeping accounts locally (in the /etc/passwd file).
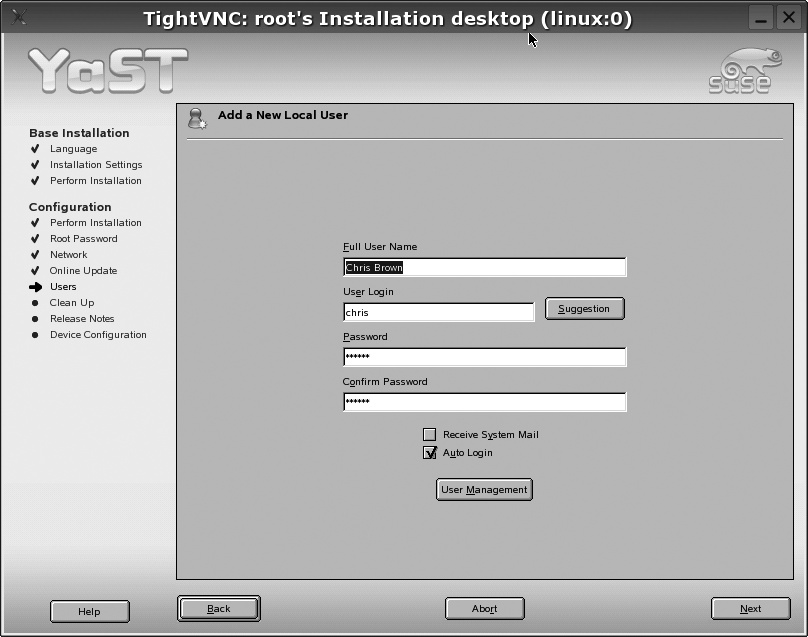
Next you’ll be asked to create at least one regular user account (see Figure 1-8). If you click the User Management button on this screen, you’ll be taken to the main user management screen, where you can add further accounts. You’ll learn more about account creation in Chapter 2.
Warning
One popular Linux distribution suggests that you should not bother creating a regular user account and should log in as root all the time. Even for single-user systems intended for use in a home environment, I do not recommend this way of working, because root is all-powerful and it’s just too easy to do a lot of accidental damage by fumbling a command or a menu selection. For a machine in a corporate environment, it’s a really bad idea.
I would also advise against checking the box marked “Auto Login” on this screen and I’m disappointed to see that this is checked by default. Yes, it’s marginally more convenient to be able to just power up your PC and move directly to the point of being logged in to a graphical desktop without supplying your username and password, but it means that anyone who can press the reset button on your computer has access to your account. (Actually, any really knowledgeable user who has physical access to your machine can do this anyway...but that’s another story.)
Now you’re almost done. The system will run a number of scripts to propagate the configuration selections that you’ve made into the various system configuration files.
You will be presented with the release notes for the version of SUSE Linux that you’re installing. You will, of course, be much too excited about the prospect of logging in to your new system and exploring it to actually read these!
You will see the hardware configuration screen next. From this screen you can (for example) install a local printer, configure your sound card, or set up Bluetooth. You’ll see how to do all of these in later labs.
With the installation complete, you will be invited to log in to SUSE Linux and “have a lot of fun...” There is no need to reboot a second time—in fact, in theory, there is no need to reboot ever again—at least not until you upgrade your kernel. Finally, it’s worth pointing out the checkbox labeled “Clone this System for AutoYaST” on the Installation Completed screen. If you check this box, the installer will create an AutoYaST profile corresponding to the installation you’ve just completed. The profile is written to /root/autoinst.xml. You can use this profile to automate subsequent similar installations. You’ll learn more about AutoYaST in Chapter 9.
Set Up a Local Printer
Moving to a new computer, or to a new operating system, is a bit like moving into a new house. It takes a while to feel comfortable in it, and to get all your stuff arranged just how you want it. And if you’re moving, one of the first things you’ll want to do in your new home is make a cup of tea. So, it’s particularly important to clearly label the packing case in which you packed the tea bags and the kettle. Similarly, if you’re migrating to a new desktop operating system, one of the first things you’ll want to get working is your printer.
Tip
If you’re living in a country, such as the United States, where it is almost impossible to buy anything that the British would regard as even remotely resembling tea, feel free to think of coffee and coffeepots.
How Do I Do That?
In this lab you’ll see how to set up a locally connected printer. In Chapter 2 you’ll see how to connect to a print server across the network.
Tip
You will configure the printer using YaST (Yet another Setup Tool). YaST is an integrated collection of modules that perform a wide variety of system administration tasks from a graphical user interface. It is a key component of SUSE Linux and you will meet it many times in this book.
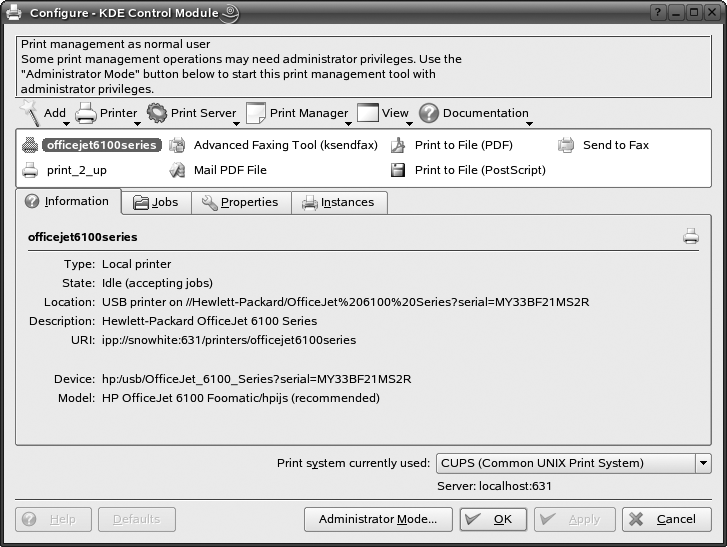
If your printer was plugged in when you installed SUSE Linux, you’ll probably have been offered the opportunity to configure it at that stage. If not, it is easy to add a locally connected printer. In fact, if you simply plug in a printer to a USB port, SUSE should automatically detect it and display a New Hardware Found dialog box asking whether you want to configure it. Answering Yes in this dialog box will start the YaST printer module. As always, when YaST starts up, it will display the Run as Root screen to ask you for the root password. YaST should auto-detect the printer and include it in the list of available printers in the main printer configuration screen, as shown in Figure 1-9.
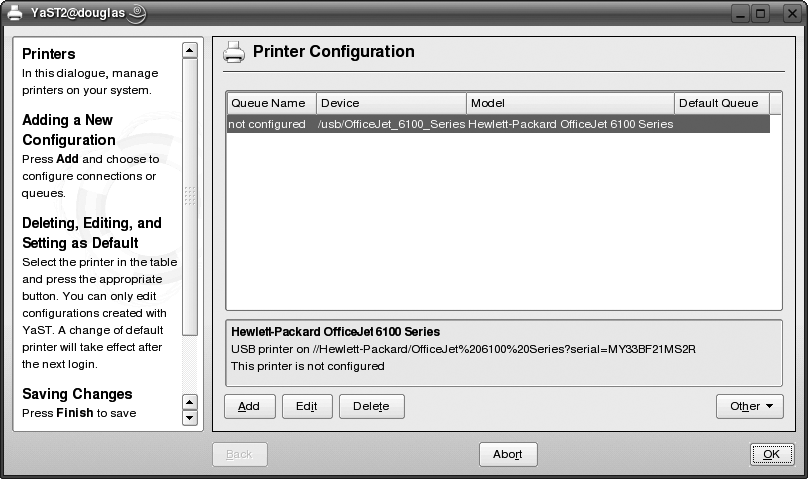
Select the printer from the available printers list and click Edit. This will take you to the Edit Configuration screen shown in Figure 1-10.
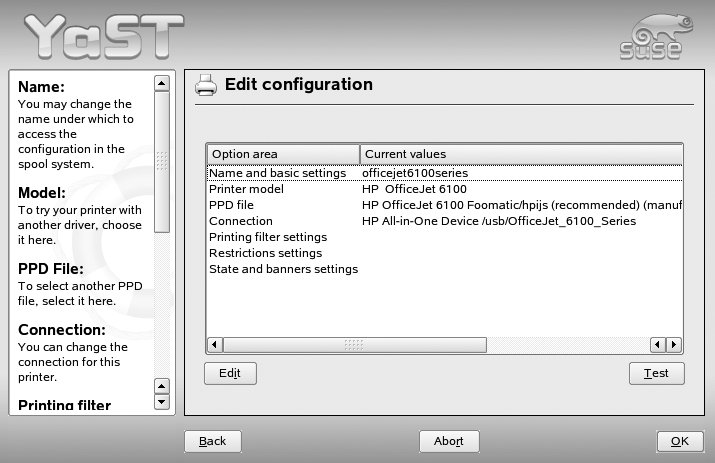
You can adjust the settings in any of the option areas by selecting the option area and clicking Edit. The one you’re most likely to edit is “Name and basic settings,” where you can set the name for the printer. This is the name that will show up in the printer list in any print-aware applications such as OpenOffice.
Back on the Edit Configuration screen, click Test to send a test page to the printer. Doing so verifies correct operation and provides you with a printout of your printer configuration. Assuming all is well, close the printer configuration screens, and you’re done.
If the printer is not auto-detected when you plug it in, try starting YaST manually from Main Menu → System → Yast. From the panel on the left, select Hardware, then select Printer from the panel on the right. YaST will try to auto-detect your printer and bring you to the main printer configuration screen. YaST should auto-detect both parallel and USB printers. If your printer now shows up in the list of available printers, you can proceed as before. If not, try selecting Add from the main printer configuration screen. If you go this route, you’ll be taken through additional screens and will need to specify how the printer is connected to your computer, its manufacturer, and model number.
Within KDE, there is an alternative tool for printer configuration and management called KDEPrint, accessible via Main Menu → Utilities → Printing → Printing Manager. From this tool you can view and modify settings for existing printers, add new printers, and manage the printer job queues, as shown in Figure 1-11.
What About...
...choosing a printer? If you are planning to buy a printer specifically to use with Linux, it is worth doing a little research to make sure that you get something that’s fully supported. Support for printers under Linux is vastly better than it used to be, thanks to the (relatively) new print system called CUPS (Common Unix Print System), but you cannot rely 100% on all printers having drivers for Linux, and especially cannot rely on those drivers being shipped on a CD with the printer, like you can for Windows. The HPLIP (HP Linux Imaging and Printing) driver project from Hewlett-Packard is worthy of special mention here. The HPLIP drivers integrate with CUPS to provide high-quality printing on most HP InkJet and LaserJet printers, and also provide support for scan and fax functions (for more information, see http://hpinkjet.sourceforge.net).
Printing in Linux is largely based on PostScript, and any printer that uses PostScript is likely to be 100% supported, though PostScript tends to be found only on the more expensive models. The print system includes filters for converting to other printer languages such as PCL (used by HP printers) or ESC/P (used by Epson), so printers that use these languages are also likely to work. The printers most likely to cause problems with Linux are the so-called “GDI” printers at the bottom end of the retail market. These printers are intended to work with the manufacturer’s own drivers and to support Microsoft’s proprietary GDI graphics API. They are really cheap, but quite apart from any compatibility issues, most of them have a very flimsy build standard and I recommend against buying them.
Where to Learn More
There’s a detailed hardware compatibility database for SUSE Linux at http://cdb.suse.de that shows the support status of a huge number of printers, graphics cards, sound cards, modems, networks cards, scanners, and more, under the various versions of SUSE Linux. Another site to go for advice about choice of printer is http://www.linuxprinting.org. There is some good tutorial material on this site, too.
The underlying print system used by SUSE Linux is CUPS (Common Unix Print System). You’ll find documentation on CUPS in /usr/share/doc/packages/cups, and on their web site, http://www.cups.org. Assuming that the CUPS server is running, you can also access the documentation by pointing your browser to http://localhost:631 and clicking on the link On-Line Help. The KDEPrint handbook (accessible through the SUSE Help Center or via the Documentation button on the KDEPrint tool itself) also has useful information including a good discussion about PostScript, rasterization and filtering.
I also discovered (somewhat to my surprise) a good chapter on CUPS architecture in The Official SAMBA-3 HOWTO and Reference Guide by John H. Terpstra and Jelmer R. Vernooij (Prentice Hall), though it is not easy reading.
Get Started with Email
After getting your printer set up, one of the next things you will want to get working on Linux is email. Assuming that you have Internet connectivity (either broadband or dial-up), this process is quite straightforward. There are many mail user agents for Linux. (Mail user agents are the programs that let you read, compose, and organize your mail.)
How Do I Do That?
Both KDE and Gnome desktops include graphical mail user agents; for KDE there’s KMail and for Gnome there’s Evolution. Mozilla Thunderbird is also available, but is not installed by default. If you’re coming from a Windows background, think of these as roughly equivalent to Outlook Express.
Kmail
Start Kmail from the KDE desktop using Main Menu → Internet → KMail. (Later, you may want to add a launch icon for KMail onto the toolbar. You’ll see how to do that in Chapter 3.) The very first time you launch Kmail, it will offer a wizard that guides you through a few screens to set up an initial account. I recommend that you cancel the wizard on its first screen, and proceed to the main KMail screen, from which you can set up your own accounts.
Before you can send and receive email with Kmail you will need, at minimum, to define an “identity” and specify your ISP’s inbound and outbound mail servers.
Tip
Incoming mail is usually received from a POP3 or IMAP server. Outbound mail is usually sent to an SMTP server. The mail servers for incoming and outgoing mail are entirely separate and may not even be operated by the same service provider. In any case, they need to be configured separately in KMail.
From KMail’s main menu, select Settings → Configure KMail. The configuration dialog has several sections that you can select via the pane on the left. Begin by selecting Identities. An identity is basically just a named collection of KMail configuration settings. You probably won’t need to define more than one of these, so click Modify to edit the default identity. Complete the form by entering your name, organization and email address (as you would like them to appear on outbound mail) and click OK.
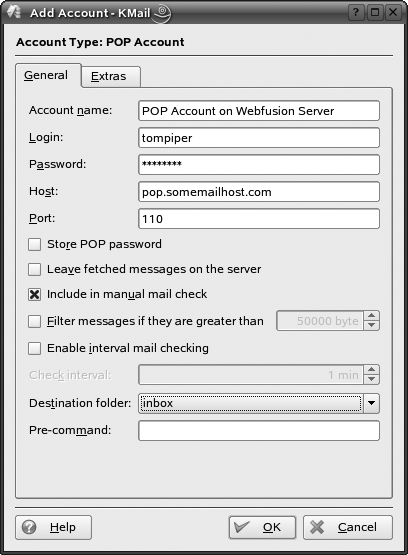
Next, you need to point KMail at your inbound mail server. In the main configuration screen, click Accounts and then the Receiving tab. Typically, you’ll need to add only one mail server to the list, but you can configure KMail to retrieve mail from multiple mail boxes if you want. To add a new POP3 server, click Add, then specify an account type of POP3 (use IMAP if you have an IMAP server). Fill in the form (as in Figure 1-12), specifying the server name, login name, and password that your ISP or employer has (hopefully) given you. If you need to use a secure connection (recommended if available), click the Extras (POP3) or Security (IMAP) tab and specify the encryption scheme (SSL or TLS).
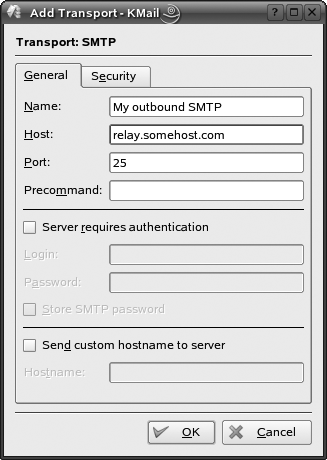
Next, you need to specify the SMTP server for outbound mail. Return to the main KDE configuration screen and select the Sending tab. Click Add and specify SMTP as the transport type, then fill in the form (see Figure 1-13) with the SMTP server name that your ISP or employer has given you. If your server requires a username and password, check the “Server requires authentication” checkbox and enter the login name and password there.
Warning
If your SMTP server uses a secure connection, visit the Security tab and specify the details. If you are using an external SMTP server (such as your employer’s) via a broadband connection, or if you plan to use it in public hotspots, you may find that you can’t reach it on port 25 (the default SMTP port). If this is the case, contact the system administrator in charge of the SMTP server, and ask whether an alternate port is available.
The reason you may be unable to access port 25 is that ISPs only allow you to connect to their SMTP servers from their own network, and will block you from accessing the server from other networks. This means that usually you’ll have to use an SMTP server that belongs to the same ISP as provides your dial-up or broadband service. The ISP isn’t just being deliberately difficult; SMTP servers that will relay mail from anywhere are known as “open relays” and are a really bad idea, because spammers can hide behind them. Not only that, but some worms need to make direct SMTP connections to other servers in order to propagate.
If you send mail from a single physical location, this isn’t a problem, but if you regularly move your laptop to another location you may find that you have to reconfigure KMail to use a different SMTP service. This is where KMail’s “Identities” are useful. For example, you could define one identity as “Me at home” and another as “Me in the office.”
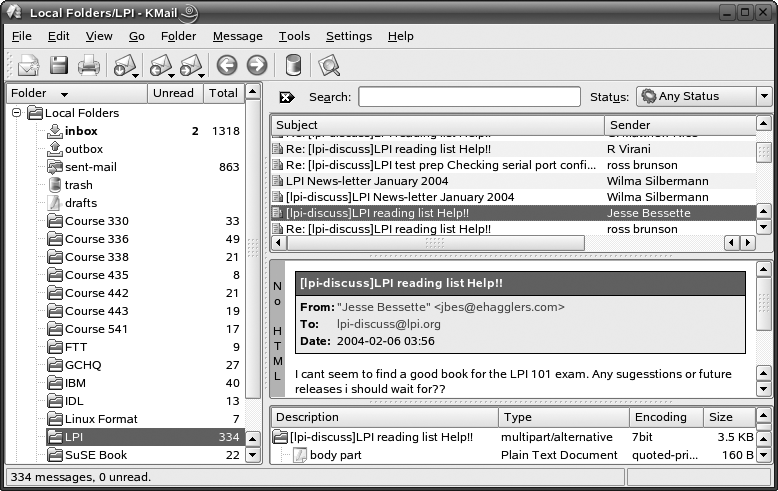
With your inbound and outbound servers specified, you should be able to send and receive mail. As a mail user agent, KMail presents a fairly conventional user interface, shown in Figure 1-14. It also provides an address book, accessible via Tools → Address Book on its main menu. (If you want to add a toolbar button for the address book, go to Settings → Configure Toolbars.)
Evolution
Evolution is a collaboration tool from Ximian. In addition to functioning as a mail user agent, it offers calendar and contact management tools. The first time you run Evolution, a setup wizard kicks in and guides you through the process of configuring your inbound and outbound mail servers. On the four screens of this wizard, you will need to supply essentially the same information as when configuring Kmail:
Identity screen
— Full name
— Email address
— Reply-To address (optional)
— Organization name (optional)
Receiving email screen
— Server type (interestingly, one of the mail servers supported by evolution is Novell’s Groupwise)
— Server host name
— Account name on server
— Authentication type
Sending email screen
— Server type (probably SMTP)
— Server host name
— Type of authentication (if any)
Account Management screen
— An account name of your choice (simply used to identify this configuration)
What About...
...importing mail from other mailers? If you are using an IMAP-based mail server, the responsibility for long-term storage and organization of your mail messages lies with the mail server. It is easy to migrate your mail between machines, because there is no locally held message store to migrate. That’s the benefit of IMAP. However, if you are using a POP3-based mail server, the responsibility for long-term storage of mail messages lies with your machine. The message store is held locally. It’s this case—of migrating local message stores—that I consider here.
If you’re migrating to a new mail user agent, you’ll almost certainly want to transfer your existing mail archive from the old user agent to the new one. It has always surprised me that there is no universally accepted format for storing mail messages on a computer, but the fact is that each mail user agent has its own way of doing things. In the Unix/Linux world, there is the traditional “mbox” format. Using this format, all the messages for each folder are stored in a single flat file named after the folder. This file contains all the messages in the folder, one after the other, with a From line marking the start of each. KMail can use the mbox format, but by default it uses the newer (or at least, less ancient) maildir format for its folders. In this format, each folder has its own directory and each message appears as a separate file in that directory. For example, I have a folder called “SUSE_Book.” Each message in that folder is held in a file in the directory /home/chris/Mail/SUSE_Book/cur.
When it comes to migrating your mail folders from one mail user agent to another, the number of possible combinations of “from” and “to” is too large to handle them all here. I look at one common case: migrating mail folders from Microsoft’s Outlook Express to KMail.
KMail provides a tool called KMailCVT, which can import mailboxes from a variety of user agents, including Outlook Express. The biggest challenge lies in finding the mailbox files on your Windows system, and physically copying them to the Linux system. On my old Windows 2000 system, for example, a user’s mail folders are stored in files with the extension .dbx, and you can use the Search tool in Windows to find these files. Once found, the Outlook Express mailbox files need to be copied over to the Linux system. If you are running a dual-boot system, you can just boot into Linux and reach across into the Windows partition to find the files. (If you install SUSE Linux onto a machine that already has Windows installed, it will arrange to mount your Windows filesystems onto directories such as /windows/C and /windows/D.) If your Windows system is running on a different machine, you will need to find some other way to copy the files across. For example, you can use Samba on your Linux machine to make your home directory visible to Windows across the network and copy your .dbx files onto that. (You’ll see how to do this in Lab 7.4, "Serve Filesystems to Windows with Samba.”) Or, if your machines are not networked, you can copy the files onto a USB memory stick, external drive, or (failing all else) burn them onto a CD or DVD. You’ll see how to access removable media in Chapter 3.
Once you have your .dbx files accessible on the Linux system, start KMail and select Tools → Import Messages from the main menu. The drop-down menu on this tool shows that there’s a variety of mailer formats that KMail can import from. For a .dbx, select Import Outlook Express Emails. On the following screen, navigate to the file where you saved your exported Outlook Express mailbox. Folders will be imported with OE- prefixed to their name; for example, a folder named quilting in Outlook Express will be imported as OE-quilting in KMail. Once you have imported the folders, you can easily rename them within KMail by right-clicking on the folder and selecting Properties.
Configure a Network Card
It’s perfectly possible to install and operate a completely standalone Linux system with no network connection at all, but it’s rather unusual. Most systems need to connect to a local area network, either in the office or at home. In this lab you’ll see how to configure a network card to connect to a local wired network (i.e., Ethernet). I’ll begin by looking at the traditional YaST way (which requires the root password), then I’ll look at a couple of more recent applets (netapplet and NetworkManager) that allow easy—though limited—management of network interfaces without root privilege. In Chapter 6, you’ll see how to set up wireless networking.
How Do I Do That?
If your network card was auto detected during installation, you will have been offered the opportunity to configure it at that stage. If not, or if you need to configure it later, use YaST (K Menu → System → YaST).
On YaST’s main screen, select Network Devices from the panel on the left, then Network Card from the panel on the right. On the main network card configuration screen, you will see a list of available (but unconfigured) cards. To configure one of these, select it from the list and click Configure.
A list of already-configured devices is shown at the bottom of the screen. To change one of these, click Change. On the next screen, titled Network Card Configuration Overview, you’ll again see the list of configured cards. They will probably have names like “eth-id-00:01:02:8E:21:9.” Select the card that you want to configure and click Edit. This will bring you to the Network Address Setup screen shown in Figure 1-15.
The easiest way to configure a network card is to select Automatic Address Setup (via DHCP). Using this method, the machine will broadcast a request over the network when it starts up (or to be more accurate, whenever the interface is activated), hoping to find a DHCP server that will supply its IP address, subnet mask, default gateway, and other network settings. This choice is usually appropriate if you are putting your machine onto a corporate network, which probably operates a DHCP server. If you have a home network with an ADSL modem/router, it’s likely that the router offers DHCP, so you can use this setting here also.
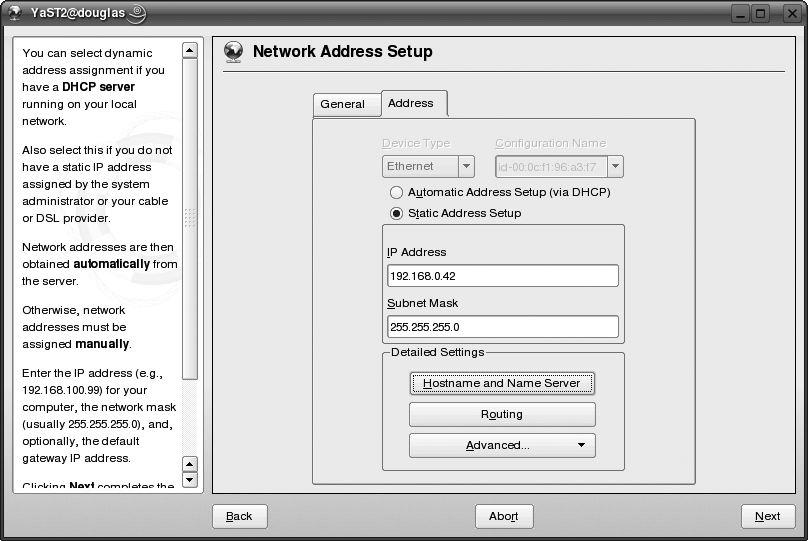
If you have no DHCP server, or if (for example) you are configuring a machine as a gateway, proxy, or firewall and need to explicitly set an IP address, then click on Static Address Setup and fill in the IP address and subnet mask. You may also wish to click the Host Name and Name Server button in the Detailed Settings panel. This will bring you to the Host Name and Name Server Configuration screen (see Figure 1-16).
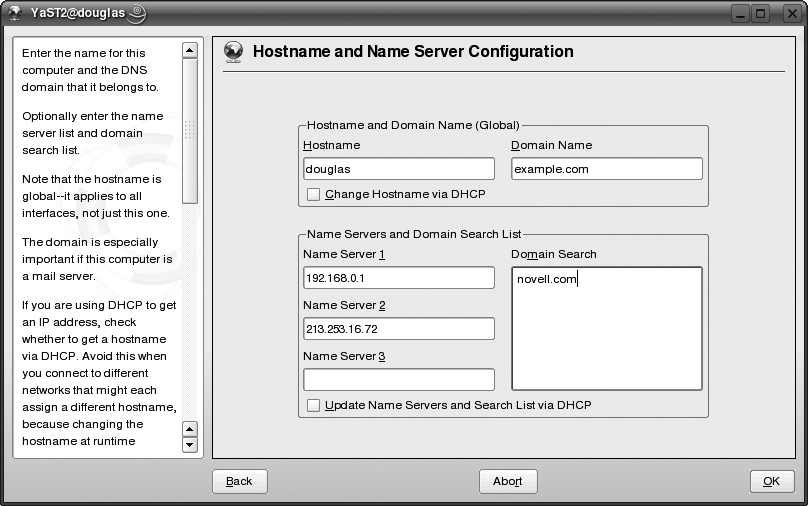
Here you can specify a hostname and domain name for your own machine, and the IP addresses of up to three DNS servers to use. Notice the checkboxes labeled “Change Host Name via DHCP” and “Update Name Servers and Search List via DHCP.” By un-checking these boxes, you can still retain explicit control of things like your hostname and DNS servers even if you’re using DHCP to get your basic network settings.
The boxes that allow you to specify a domain search order are,
in my opinion, best left blank. The idea is that you can specify
default domains in which DNS lookups can be performed. For example, if
you specify a search domain of novell.com you can type ping www at the command line and you’d be
pinging www.novell.com, or you can point your
browser to http://www and see Novell’s home page.
This feature has been around a long time in Unix and Linux. It made
some sort of sense back in the days when every machine on a corporate
network had a fixed IP address and an entry in the DNS. By including
your own domain name in the search list, you could, for example,
telnet to a local machine just by typing:
$ telnet zaphodrather than having to use a fully qualified name:
$ telnet zaphod.mycompany.co.ukHowever, specifying a list of (external) search domains such as novell.com and redhat.com and suse.com is effectively saying “if I use the name www, I don’t really mind which of these three sites I reach.” So, just include your own domain name in the list and leave it at that.
Tip
If you are currently using DHCP, after clicking on “Host Name and Name Server,” you may receive a warning that the file you’re about to change (/etc/resolv.conf) has been modified by DHCP. Just click Modify and YaST will allow you to edit the settings.
Back on the Network Address Setup screen, you’ll see two more buttons labeled Routing and Advanced. In most situations, you won’t need these.
Once you’re finished entering your settings, close out the YaST screens to cause the new settings to be written and the interfaces to be restarted.
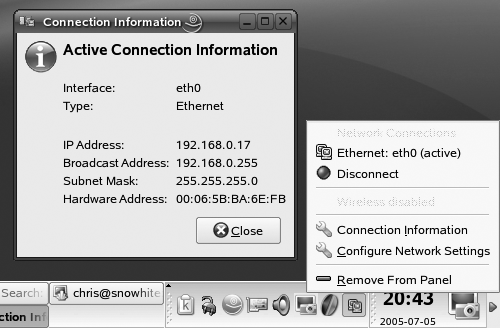
Some versions of SUSE Linux also include a small but useful application called netapplet, which can be used to activate and deactivate your network interfaces and to verify key network settings such as your IP address. One of the nice things about netapplet is that you don’t need root privilege to run it. It may be started from Main Menu → Internet → Administration → Network Selector, and once it has started, it will place a small icon in the system tray near the righthand end of the KDE main panel. Clicking on this icon raises a menu that will allow you to activate or deactivate your network (Ethernet) interfaces, and your wireless network connections too, if your machine has a wireless card. The menu item labeled “Connection Information” will report your IP address, subnet mask and other settings. Figure 1-17 shows the menu, the Connection Information box, and the netapplet icon (just to the left of the clock).
SUSE Linux 10.1 ships with a new network management tool called NetworkManager. This tool substantially simplifies the management of network connections and is a replacement for netapplet. It’s available for both Gnome and KDE, and like netapplet, it permits management of network connections without requiring root privileges. It is particularly useful on laptops which may, at different times, use wired network connections or connections via any one of several wireless networks. When moving into range of networks that you’ve connected to before, NetworkManager automatically connects to the last network you chose to connect to and will choose the network with the strongest signal, if appropriate. When back at the desk, NetworkManager will switch to the faster, more reliable wired connection. NetworkManager tries to implement an “always connected” policy.
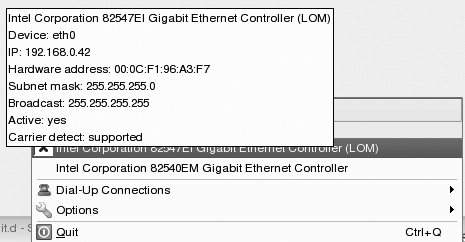
When using KDE, the applet KNetworkManager places a small icon in the system tray. Hovering over this icon displays a tooltip showing the currently active network interface. Left-clicking brings up the KnetworkManager menu, shown in Figure 1-18. From here you can activate and deactivate interfaces and examine the settings of each interface. This screenshot comes from a machine that has two Ethernet cards but no wireless interface.
NetworkManager offers a number of benefits. It supports wired, wireless, and dial-up network connections, and has integrated VPN handling. NetworkManager is primarily intended to manage interfaces that are configured using DHCP, and does not provide a user interface for setting static IP addresses on interfaces. However, it does honor static settings established using YaST.
How It Works
Like most configuration changes you make using YaST, all you are really doing is editing the underlying configuration files, all of which are plain-text files and can be viewed with commands like less or edited directly with editors such as vi. (See Lab 2.1, "View and Edit Text Files" for details.)
Each named network device in SUSE Linux has a configuration file to hold settings such as its IP address. For example, the settings for a device named xyz are stored in the file /etc/sysconfig/network/ifcfg-xyz. In this way, a specific group of settings is associated with a specific device name. In earlier versions of SUSE Linux, network devices had simple names like eth0 and eth1. The names were allocated in the order that the cards were detected as the system booted—the first was eth0, the second was eth1, and so on. Until the advent of hot-pluggable devices, this arrangement worked fine. The order that cards were detected in (and hence the name of the device and the name of its configuration file) was stable.
Hotplugging changes all that. We can no longer assume that the first device to be detected is always the same physical device. So, a smarter device naming scheme was introduced to ensure that the right configuration is associated with the right device. The scheme can use several ways to uniquely identify a device; two common ways are to use the MAC (Media Access Control) address of the card, or to use its position on the computer’s bus. For example, the name:
eth-id-00:01:02:8E:21:9
refers to an Ethernet device with the MAC address 00:01:02:8E:21:9, whereas the name:
eth-bus-pci-0000:00:07.2
refers to any device in PCI slot 0000:00:07.2. Of course, this scheme is overkill for most machines, which have only one network interface.
Here is a sample configuration file for a statically configured
card with the IP address 192.168.0.44. On my current system, the
filename is
/etc/sysconfig/network/ifcfg-eth-id-00:06:5b:ba:6e:fb.
Note in particular the settings for the parameters BOOTPROTO and IPADDR:
BOOTPROTO='static'
MTU=''
NAME='Dell 3c905C-TX/TX-M [Tornado]'
REMOTE_IPADDR=''
STARTMODE='auto'
UNIQUE='rBUF.oOfgbdRycVB'
USERCONTROL='no'
_nm_name='bus-pci-0000:02:01.0'
BROADCAST='192.168.0.255'
IPADDR='192.168.0.44'
NETMASK='255.255.255.0'
NETWORK='192.168.0.0'
DNS configuration is stored in the file /etc/resolv.conf. A typical example looks like this:
nameserver 192.168.0.1
nameserver 213.253.16.72
search example.com
This example specifies two name servers (the second is tried only if the first fails) and a single search domain.
Where to Learn More
If you don’t know what an IP address, a subnet mask, or a default gateway is, you might want to read an introductory text on TCP/IP, though you really don’t need to know much of this to get a basic network connection going. There are guides available at The Linux Documentation Project (http://www.tldp.org); in particular, look for “The Linux Network Administrator’s Guide Second Edition,” which is available as a free download in PDF form. If you’d prefer a real paper book, try Linux TCP/IP Network Administration by Scott Mann (Prentice Hall). Both of these books are beginning to show their age, but they provide a good introduction.
For the gory details on the device naming scheme, look at the
manual page for the command getcfg.
(The following lab, Lab 1.5, "Access Documentation,” shows
how to read manual pages.)
For more detail on the entries in the ifcfg-* files, try reading /usr/share/doc/packages/sysconfig/Network. There is also a rather technical discussion of the design rationale in /usr/share/doc/packages/sysconfig/README.
Access Documentation
It used to be said that Unix and Linux were short on documentation. Nowadays, if anything, there’s too much. This lab will guide you to some of the sources of documentation.
I will deal first with the most traditional source of documentation for Unix and Linux systems, the so-called “manual” pages, often abbreviated to “manpages.” The usage and format of these goes back many years. They were originally intended to document the command-line tools, and that is still their main purpose. You will, generally speaking, not find manpages for the graphical tools.
How Do I Do That?
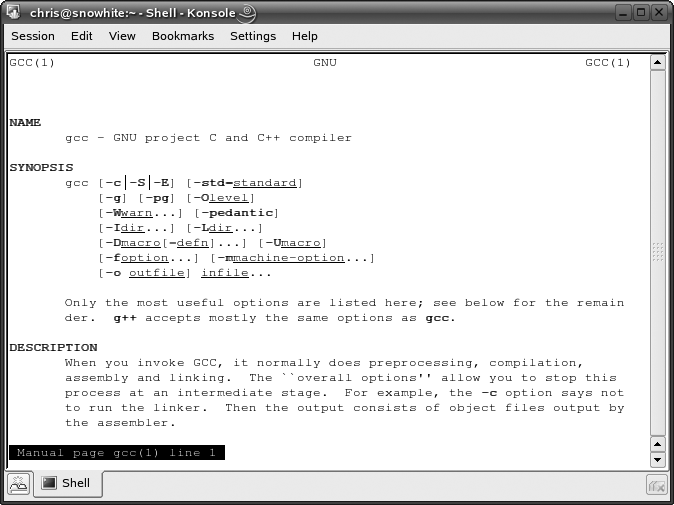
From a command prompt, access the manpages with the man command; for example:
chris@snowhite:~> man gccwill show the manual page for the GNU C compiler (the first screen of it is shown in Figure 1-19).
As you’ll see even from this small example, the manpages are
very terse. The content is provided under various standard
headings—NAME, SYNOPSIS, DESCRIPTION, OPTIONS, and so on. Most of them
have a SEE ALSO section near the end, which provides a cross-reference
to related commands. The manpages vary enormously in length and
complexity. The page for the id
command is just 64 lines. The page for gcc is over 9,000 lines. When viewed from a
command prompt, manpages are piped through the program
less to allow you to browse them. I discuss
less in more detail in Chapter 2, but for now it is
sufficient to know that you can press the up and down arrow keys to
scroll through the material, and q to quit.
Of course, looking up a command by name works only if you
already know the name of the command. If you don’t, you can try using
the apropos command to search the
keyword-in-context index of the manpages and show matching entries.
For example:
chris@snowhite:~> apropos compilerwill show you all manpages with the word ‘compiler’ in their ‘NAME’ section.
There are other ways to access the manpages. From the Konqueror browser, for example, entering “man:gcc” into the location field will show you the manpage for gcc. It is formatted to look a little prettier than viewing it from the command prompt, but it’s derived from exactly the same unformatted source, so the actual content is identical.
You can also access the manpages via the SUSE Help Center on the main menu. On the help center’s home page, click Linux Documentation.
In addition to the manpages there’s another command-line tool called info, which has its own database of documentation. The info system comes from the developers at the Free Software Foundation who were responsible for (re)writing many of the command-line tools in Linux (most of which are closely based on their earlier counterparts in Unix) and info is the preferred documentation system for these developers. Consequently you may find more complete or more up-to-date documentation in the info pages than in the manpages.
Tip
In a way it’s a shame that there are two “competing” command-line documentation tools, but that’s the price you pay for the freedom of choice that open systems bring you.
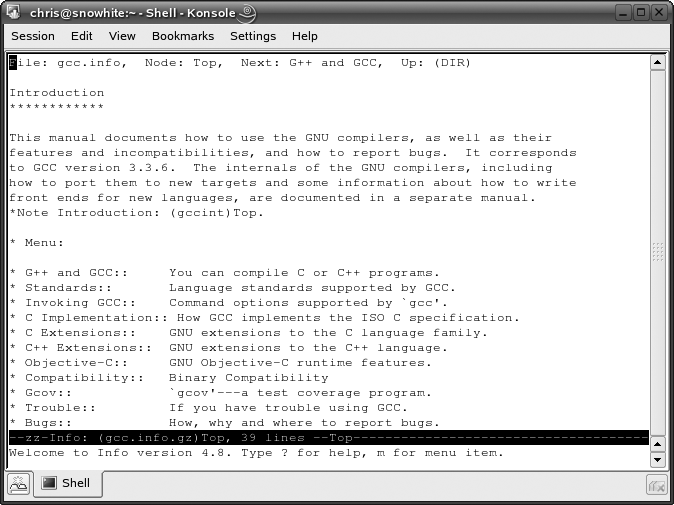
From a command prompt, you can access the info page on a topic
with the info command; for
example:
chris@snowhite:~> info gccwill show you the top-level screen of the gcc documentation (Figure 1-20).
Each “page” within info is called a node, and the nodes are arranged in a hierarchy, allowing you to drill down to greater levels of detail, or up to broader coverage of a topic. From each node you can navigate to a neighboring node as follows:
To move down to a more detailed topic, move the text cursor to any line beginning with an asterisk ('*') and press Enter.
To move up in the hierarchy, press
u.To move to the next topic at the same level in the hierarchy, press
n.To move to the previous topic at the same level in the hierarchy, press
p.
If you keep pressing u,
you’ll end up at the very top-level node, which is where you would
have started out if you ran the info command with no arguments.
Both man and info are designed for use in a command-line
environment, and are designed to provide documentation for
command-line tools. They both provide terse reference material, often
with no actual examples of command usage and little or no tutorial
content.
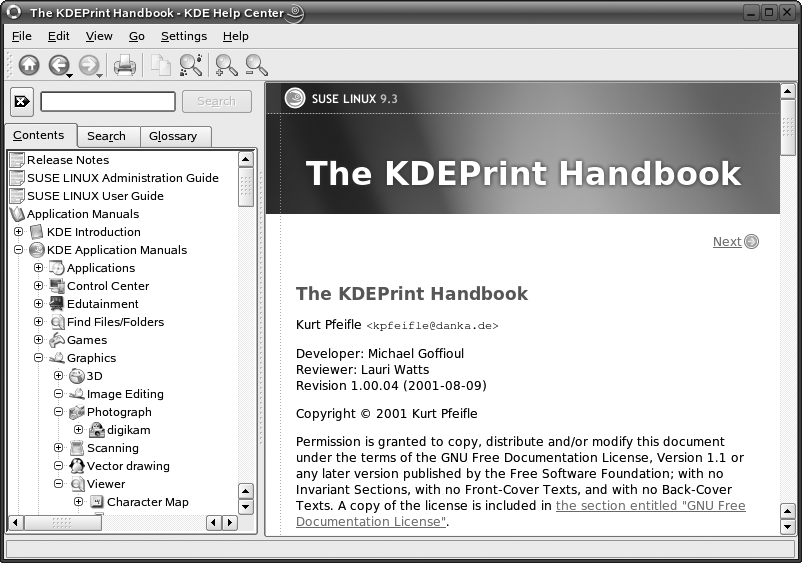
From the graphical desktop, the most obvious source of help is the SUSE Help Center, accessed via the life belt/preserver icon on the main menu. This tool brings together help from a number of sources. Perhaps the most important of these are the HTML versions of the printed User Guide and Administration Guide that you would have received if you bought the boxed product of SUSE Linux Professional. The content is identical to the printed manuals, but the HTML version has the benefit of hyperlinks for the cross-references. Also available through SUSE Help Center are the user manuals for many individual KDE applications. These are arranged in topics that correspond (approximately) to the main menu hierarchy on the KDE desktop. Handbooks are included for the KMail and Evolution mail clients, the Konqueror browser, the Kate and KWrite editors, the KDE Print manager, and much else. The help center includes a tree view which makes it easier to see the overall structure and makes navigation easy (see Figure 1-21).
Many of the KDE applications include an item on their Help menu that will take you directly to the SUSE Help Center, opened up to the application’s handbook.
Where to Learn More
Many of the packages installed on the system include documentation in subdirectories under /usr/share/doc/packages. There are nearly a thousand of them. Be aware, though, that much of this is written by developers and some of it is fairly technical stuff aimed at system administrators and other developers.
On the web, several sites collect Linux documentation. For example, The Linux Documentation Project, at http://www.tldp.org, carries a huge number of guides and HOWTO documents.
Tip
The HOWTO documents have long been an important source of information on a huge variety of topics ranging from Astronomy to Zip Drives. The HOWTO collection is the Linux equivalent of The Hitchhiker’s Guide to the Galaxy—“a very unevenly edited book containing many passages that simply seemed to its editors like a good idea at the time.”
There is a huge resource here, and if you begin to browse it, you will find yourself moving well outside the comfortable world of a preinstalled, preconfigured point-and-click system to a world populated by pioneering spirits prepared to spend many hours figuring out how to make stuff work on the bleeding edge of Linux technology. Do not believe everything you read in a HOWTO. Some of them are very old. Some apply to versions of Linux you don’t have. A few are plain wrong, though doubtless they seemed like a good idea at the time.
Get SUSE Linux now with the O’Reilly learning platform.
O’Reilly members experience books, live events, courses curated by job role, and more from O’Reilly and nearly 200 top publishers.

