Along with using these advanced techniques, effectively implementing subclassing and hooking in our development work requires that we employ debugging tools beyond the capabilities of the VB debugger.
While developing the projects for this book, I used several software utilities as well as other professional applications that I built. Although you can successfully build applications that subclass various windows or that hook into certain message streams without these utilities, I do not suggest doing so. These utilities give you, the developer, a valuable insight into what is happening inside the system while running your projects in the VB integrated development environment (IDE) and especially at runtime. You will be able to see things operate in a way that is unavailable to you by just using the Visual Basic or Visual C++ development environments.
I would go as far as saying that some of these utilities are necessary to understand how subclassing and hooks work. Otherwise, you will only be blindly plugging code into an application, not fully understanding why you are doing it and what is happening behind the scenes. When the application locks up, debugging it will be frustrating and possibly futile. What I am stressing here is that we, as programmers, must aspire to have an understanding of what we are doing. Without this understanding we cannot hope to reach the more advanced areas of our discipline. Having an understanding of how subclassing and hooks work and interact with the rest of the Windows system will allow you to build successful applications.
I will describe the utilities that I use in the following sections. Although this book will not include a tutorial for operating these utilities, there is some very good documentation in the Microsoft Developer Network Library (MSDN) for Spy++ and PView. The NuMega tools come with their own documentation. Note that some of these tools display different information depending on which operating system you are using (e.g., Windows 9x, NT, or 2000).
The Spy++ utility is included in the Win32 Software Development Kit (SDK) as well as in Microsoft Visual Studio.
I have used this utility the most, except maybe for NuMega’s SmartCheck utility. Spy++ is one of the most valuable tools when implementing subclassing and superclassing. Spy++ can provide you with all the information you need to verify the state of the application before and after a subclassing operation, as well as all the message information being passed to and from a window. Spy++ is described as a tool for “spying” on different parts of the operating system. This means you can watch as processes, threads, and windows contained within the threads are created and destroyed. Also, you can get valuable information on these objects, some of which is contained within the structures used to create them. But even more useful is the ability to watch in real time as messages flow throughout the system. This, in my opinion, is the most powerful feature of this tool.
Spy++ is a Multiple Document Interface (MDI) application. Let’s start up Spy++ and quickly run through the windows and menus, just to become familiar with getting around in the tool. Each child window within Spy++ displays information on processes, threads, top-level windows, or messages. Let’s start with the Processes window and work our way down.
When Spy++ is started, it will take a snapshot of the system at that point in time. (This does not apply to spying on messages; messages are displayed as soon as they arrive at the window.) Any time an application is started or ended, or its state changes, you should refresh the display by pressing the F5 key. This will allow you to view the most current state of the system.
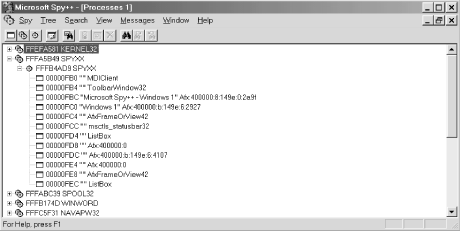
The Processes window, which is shown in Figure 1-1, is opened automatically when Spy++ is launched, and displays a list of currently running processes in the system in a tree hierarchy. You can drill down through the processes, which are displayed with a two-gear icon, into the threads within a process, displayed with a single-gear icon. If a thread contains any top-level windows, you can drill down into these windows as well. Top-level windows are windows that have the desktop window as their only window. The top-level windows are displayed with a rectangular window icon. Each item in the tree can be double-clicked to display a dialog box that displays its properties. Within each properties dialog box, except for the Processes Properties dialog, there are hyperlinks to facilitate the process of drilling up and down through processes, threads, windows, and messages. Each item can be right-clicked as well to display a pop-up menu for that item. A separate pop-up menu is displayed for processes, threads, windows, and messages.
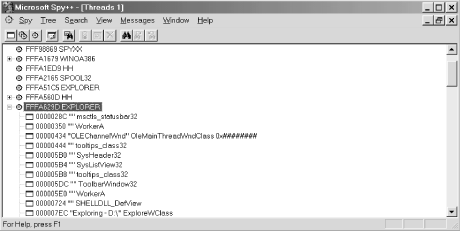
If your primary interest is examining the running threads rather than the processes, you can open the Threads window by selecting the Threads option from the Spy menu. The Threads window, which is shown in Figure 1-2, displays a list of currently running threads in all processes in the system, sorted by thread ID. The display is similar to the Processes window, except that the Processes level has been removed and the running threads are now at the top of the hierarchy. You can double-click and right-click the items in the list, just as in the Processes window.
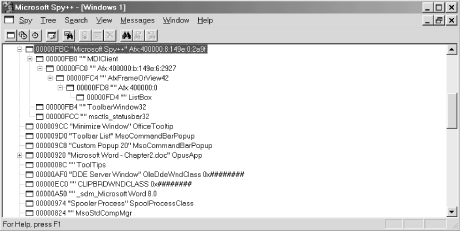
Finally, if you’re interested in the windows handled by the system and its applications, you can use the Windows window, which also is opened when Spy++ starts. The Windows window, which is shown in Figure 1-3, operates like the Processes and Threads windows and displays a list of all currently running top-level windows and their child windows. With this information, you can see how an application’s designer arranged the user interface (UI) for each application.
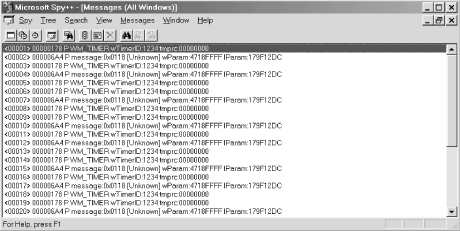
Finally, the Messages window, which is shown in Figure 1-4, is the window that we will be most interested in for the applications that we will be building throughout this book.
Clicking the Messages → Options... menu item displays the Message Options dialog box. This dialog contains the following three tabs.
- The Windows tab
Determines which windows will be watched. Dragging the Finder icon and dropping it onto a window will select that window’s messages to be displayed in Spy++. The checkboxes in the Additional Windows frame allow you to view messages for additional windows.
- The Messages tab
Because watching every message for every window in the system would produce far too much information to digest, this tab allows you to choose which messages to display. The Messages to View list box displays every message that can be watched. The checkboxes in the Message Groups frame, to the right of the list box, correspond to separate groups of related messages. Most of the checkboxes are self-explanatory; for example, mouse messages correlate with the Mouse checkbox. The Non-Client checkbox relates to messages that usually have the letters
NCin them.NCstands for non-client. These messages describe actions originating from the non-client area of a window, such as the title bars and/or a border that is being resized. The General checkbox relates to the messages commonly used in a window, such asWM_COMMAND,WM_TIMER, orWM_PAINT. The Registered checkbox watches for messages defined by the developer using the RegisterWindowMessage application programming interface (API) function. The Unknown checkbox watches for messages that are defined to be in the range of zero to one less than theWM_USERconstant (&H400). These are message identifiers that are reserved for the system to use. The Registered checkbox watches for messages that are defined to be equal to or greater than theWM_USERconstant. These are application-defined messages. After you select all the messages you want to watch, it is a good idea to check the Save Settings as Default checkbox; this way, you will not have to go back every time and re-select the appropriate messages.- The Output tab
This tab allows you some control over the message information displayed by Spy++. For this tab, I usually check all the checkboxes grouped in the Show in Message Log frame, and increase the value in the Lines Maximum text box to an appropriate value (somewhere around 3,000). Checking all these checkboxes will display the maximum amount of information about a message. We will not need the Message Origin Time and Message Mouse Position checkboxes until later, when we look into using journaling hooks. Checking the Save Settings as Default checkbox is a good idea here as well.
After selecting which messages to view for which windows, clicking Messages → Start Logging will allow Spy++ to start displaying the messages that you have selected in the Messages window. The first column of the Messages window will display a line number to denote the order of the messages. The next column is the window handle that the message was directed to. The third column is for message codes. A message code could be displayed as a P, S, s, or R. A message code of P means that this message was posted to the window’s message queue, and that the posting application has continued to execute code and it is not waiting for a return code to be sent back. An S means that the message was sent to this window using the SendMessage API function or one of its derivatives, such as SendMessageCallback. SendMessage will wait for a return value to be passed back to it before continuing to execute code in the calling application. Every message with a code of S is followed by that same message with a code of R. A message code of R means that a return value has been passed back to the caller. A message code of s means that the return value cannot be accessed due to a security restriction. The next column in the Messages window displays the actual message name. This name might be preceded by one or more periods. Each period is a nesting level. This means that a message could be received by the window procedure that, in turn, might fire off several other messages, each of which could be handled before the original message completes processing. If you watched for every message for a particular window, you would notice that some messages having a code of S (sent messages) are not immediately followed by the returned message. Instead several other nested messages might be fired off, each being preceded by one or more periods. It would look something like this in Spy++:
000301B0  S  WM_NCACTIVATE
000301B0  S  .WM_GETTEXT
000301B0  R  .WM_GETTEXT
000301B0  R  WM_NCACTIVATE
Values following the message will
describe in detail
the wParam and
lParam parameters.
This
description depends on the type of message.
By
checking the Decoded Message Parameters and Decoded Return Values
checkboxes in the Message Options dialog box, you will be able to see
a useful description of the wParam,
lParam, and return values of each message.
If you double-click a message, the Message Properties dialog box appears. This dialog basically displays the same information that is present in the Messages child window, but it adds two useful features. The first is the Window Handle field in the dialog box, which is a hypertext link to the window properties. Clicking this field will take you to the Window Properties dialog box for the window with that particular handle. The second is that, if a message contains a pointer to a string or a structure, the Message Properties dialog box displays the actual text in the case of a string or the members and their values in the case of a structure.
Clicking Messages → Stop Logging will stop Spy++ from displaying messages.
The parent of all windows is the Desktop window; this
window
will always be at the top of the hierarchy. Below that window are all
the parent windows within each running application. To view the
window information for your VB application, search through the list
for any parent windows containing the
text
ThunderRT6FormDC. The caption of your window should be to the left of
ThunderRT6FormDC (e.g., “Chapter 4 -- Subclassing
Example” ThunderRT6FormDC). ThunderRT6FormDC is the name
of
the class from which this form was created. Any form that your
application creates will be created from this class and will be
considered a parent window. The next level below the parent is the
child window. Child windows are usually controls contained within a
VB form. Any VB-intrinsic control class will be prepended with the
word ThunderRT#. Hence, a command button would be
called ThunderRT6CommandButton in Version 6 of VB. Child windows can
be parents to other child windows, as happens when controls (such as
a PictureBox control) contain controls. Each container control is the
parent to the child control(s) that it contains.
If you run a simple VB executable (EXE), you will notice that several different hidden windows are running within the same process as your EXE. These hidden windows are VBBubbleRT6, OleMainThreadWndClass 0x########, VBMsoStdCompMgr, ThunderRT6Main, OleDdeWndClass 0x########, and VBFocusRT6.
Every VB application has a hidden top-level window to
which all messages and events are
initially sent. This window is
derived
from the class called ThunderRT6Main. This window
owns all other VB forms in the application.
OleMainThreadWndName is a hidden
window
derived from the OleMainThreadWndClass 0x########
class. It is created by COM to handle message marshaling between COM
components.
The VBMsoStdCompMgr class is the basis
for
several controls developed for Microsoft Office. For example, the
Microsoft Office development team created the default toolbar that
all windows now use. The letters “Mso” contained in
VBMsoStdCompMgr stand for Microsoft Office. While running an
application in the VB IDE, this class
will drop the VB in its name and be displayed as MsoStdCompMgr
instead.
The window created from the VBFocusRT6 class
is
an
invisible
proxy form for windowless or
lightweight controls. This proxy form is used to receive keyboard,
mouse, and system messages for these controls.
All VB form and control classes are superclasses
of the
VBBubbleRT6 class, which is also a superclass of
the ThunderRT6Main class. The
VBBubbleRT6 class is responsible for forwarding
messages to the appropriate window.
If you bring up a VB application (EXE) in Spy++, you might notice
that all windows beginning with the word
ThunderRT6 have the same window procedure and class window procedure,
except for ThunderRT6Main. To see this, look at the Window Proc field
in the General and Class tabs of the Window Properties dialog box.
The reason all window procedures use the same function pointer is
that all classes beginning with the word ThunderRT6, except for
ThunderRT6Main, are derived from the same base
class, VBBubbleRT6. In other words,
ThunderRT6CommandButton,
ThunderRT6FormDC, etc., are all superclasses of
the base class, VBBubbleRT6. Other third-party
controls will have different window procedures because these controls
were created from different window classes.
Another interesting thing to notice is the construction of the ThunderRT6ComboBox control. When viewing a control created from this class, you can drill down one level deeper to discover a standard Windows edit control. (This is not a VB control because the class name is not prefixed with the word Thunder). This shows that a ThunderRT6ComboBox control consists of a VB-defined combo box and a standard Windows edit control. This information will come in handy if you ever need to subclass a VB combo box.
If you double-click a window in the hierarchy, Spy++ opens the Window Properties dialog, which contains information about that particular window. There are five tabs in this dialog box: General, Styles, Windows, Class, and Process. The General tab has several items of interest. The Window Caption displays the caption of a form or button. Some windows, such as the text box control, do not have captions. The Window Handle is the unique, system-wide handle of the selected window. This value is always passed on to the window’s window procedure to identify which window the message was directed to. When watching messages with Spy++, it is sometimes helpful, especially when debugging, to match up the window handle in the message to an actual window. This will show you which window is receiving the message. The Window Proc is another very valuable field on this tab; this is the field we change to subclass a window. Do not confuse it with the class window procedure, which is contained only within the class and not the window instance. Before subclassing a window, check out the value of its Window Proc. After subclassing a window, recheck this value (don’t forget to hit F5 to refresh the view). You’ll notice that it has changed and is now pointing to the window procedure we defined in our code (BAS) module. After removing the subclass, check this value again and notice that it has been returned to its original number.
The Styles tab has two list boxes, one containing Window Styles and
the other containing Extended Styles. These styles have an indirect
effect on the messages that a window sends and receives; for details,
see the documentation on the MSDN CD-ROM. The Windows tab contains
the window handles to the selected window’s parent, the first
child, and any owner windows of that particular window. The parent
window handle is useful to determine to which window a notification
message will be sent. The owner window of any VB application is the
window created from the ThunderRT6Main class. The
handles listed on this tab are hyperlinks to the windows that they
reference. Clicking the hyperlink displays the properties of that
window in the Window Properties dialog box.
The Class tab is also very useful for determining subclassing
information. The Class Name is the name given to this class when it
was registered with the system. The Class Atom is the unique 16-bit
integer value that identifies this class; it is returned from the
call to RegisterClassEx. Every class also has
styles similar to a window style. The CD_DBLCLKS,
CS_HREDRAW, CS_VREDRAW, and
CS_SAVEBITS class styles can have an effect on the
messages sent and received by a window. There is one more bit of
critical information on this tab: the Window Proc field, which
translates to the window procedure of the class, not the window.
Using this field, we can determine when a window has been subclassed.
All we have to do is see whether the Window Proc values on the
General and Class tabs match. If they do, the window has not been
subclassed. If they are different, the window is subclassed. Global
subclassing and superclassing are two techniques that will modify the
class window procedure directly.
This completes the whirlwind tour of Spy++. If you do nothing else, familiarize yourself with this utility. Even if you never use subclassing or hooks, you can still use this utility to debug application message flow, as well as watch and learn how an application is set up and operates within the system.
SmartCheck, developed by NuMega (http://www.numega.com), is a tool designed to help developers track down bugs and correct them. As an additional bonus, with this tool you can take a look under the hood of a compiled VB application and watch how it works. To tell you how to use it would require more than just one chapter. I will leave that subject to the documentation provided with the tool.
SmartCheck really shines when your application throws a General Protection Fault (GPF). If you have ever had the pleasure of tracking down a GPF in VB without any tools, you will understand what I mean. Because VB hides many lower-level system operations from the developer, it is difficult to determine why a piece of code will produce a GPF, and if it happens at random intervals, it is nearly impossible to figure out. SmartCheck goes over each executing line of code with a fine-toothed comb. That way, it is possible to see a problem such as a string returned from an API call that is overwriting its bounds and setting up a time bomb that will eventually blow up in your face. Try finding that problem yourself without any tools.
SmartCheck tracks all sorts of items such as API calls, bad calls to intrinsic VB functions, value coercion problems, messages, memory leaks, hooks, and much more. We will be paying close attention to the hooks, messages, and API calls that SmartCheck will be watching throughout the book.
This is a dynamic link library (DLL) that you can get from the Microsoft web site that helps with troubleshooting VB applications that use subclassing. As we shall see later, debugging a VB application that uses the subclassing and hooking techniques described in this book is difficult because, having circumvented VB’s own protective mechanisms, you cannot go very far with the debugging tools VB provides. Dbgwproc.dll is a tool that, when your application is running in debug mode, will allow you to trace through your application without crashing. You can find this tool on the Microsoft web site at http://msdn.microsoft.com/vbasic/downloads/controls.asp. I will talk about this tool in Chapter 8.
This utility can be run under Windows 98 by selecting Start → Programs → Accessories → System Tools → System Information. Sadly, the System Information application provided with Windows NT/2000 does not show this information.
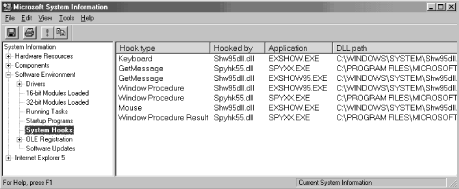
This tool can display all the system-wide hooks that are currently installed in the system. To do this, expand the path System Information → Software Environment → System Hooks. This will give us insight into applications that use system-wide hooks to do their work. In the Applications column in Figure 1-5, you see three entries for SPYXX.EXE, which is the Spy++ utility that we discussed previously. We can see that it installs three system-wide hooks: GetMessage, Window Procedure, and Window Procedure Result. We will discuss system-wide hooks, including these three types of hooks, throughout Part III of this book. This utility also can be used to make sure that our applications are installing our system-wide hooks correctly. Unfortunately, this is all the information about hooks that it can give us.
Get Subclassing and Hooking with Visual Basic now with the O’Reilly learning platform.
O’Reilly members experience books, live events, courses curated by job role, and more from O’Reilly and nearly 200 top publishers.

