When I begin to build any application, it's usually tightly coupled. That's okay. I can always refactor it later. In this example, I'll structure the application so that it will work with Spring when I add it. I introduce an interface to the façade layer, so that I can have a façade layer that implements several different strategies.
The first step to learning Spring is the dependency injection pattern. It's not complicated, but it's the central concept. It's different enough from the typical way that most people code that you'll want to get it down quickly.
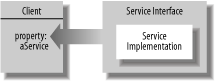
Figure 1-1 shows a client and server prepared for
dependency injection. A client uses another
class that we'll
call a service. The client has a property that
accepts a service. The service is wrapped in an interface. The client
can't see the implementation of the service. But
this code is not yet loosely coupled: you still have to create the
service somewhere. With dependency
injection, a third-party, called
the assembler or container,
creates both the client and service, and then sets the value of
aService (which is a reference to an instance of
Service) to satisfy the dependency.
Note
Many see dependency injection for the first time and wonder, "What's the big deal? " After working with it some, they come to understand that this simple change can dramatically improve their code and ease future maintenance.
You probably already code this way in spots. You'll see how powerful this programming model can be when you use it in a framework that applies it in a consistent way across your application. Code made of decoupled components is easier to test, maintain, and understand.
You don't have to use a lightweight container to use this design pattern. To decouple with dependency injection, there are three steps:
The first step is to extract the interface. We'll
rename the RentABike file, class definition, and
constructor to ArrayListRentABike (Example 1-4), and create an interface (Example 1-5).
Example 1-4. ArrayListRentABike.java (renamed from RentABike.java)
import java.util.*;

public class ArrayListRentABike implements RentABike {
    private String storeName;
    final List bikes = new ArrayList( );

    public ArrayListRentABike( ) { initBikes( ); }

    public ArrayListRentABike(String storeName) {
        this.storeName = storeName;
        initBikes( );
}

public void initBikes( ) {
    bikes.add(new Bike("Shimano", "Roadmaster", 20, "11111", 15, "Fair"));
    bikes.add(new Bike("Cannondale", "F2000 XTR", 18, "22222", 12, "Excellent"));
    bikes.add(new Bike("Trek", "6000", 19, "33333", 12.4, "Fair"));
}

public String toString( ) { return "RentABike: " + storeName; }

public List getBikes( ) { return bikes; }

public Bike getBike(String serialNo) {
    Iterator iter = bikes.iterator( );
    while(iter.hasNext( )) {
        Bike bike = (Bike)iter.next( );
        if(serialNo.equals(bike.getSerialNo( ))) return bike;
    }
        return null;
    }
}
Example 1-5. RentABike.java
import java.util.*;
interface RentABike {
    List getBikes( );
    Bike getBike(String serialNo);
}
Next, Example 1-6 gives the view. Note that
we've extracted the methods that print out the bikes
to the command line. We also add a property to the view, which uses
the RentABike interface.
Example 1-6. CommandLineView.java
import java.util.*;
public class CommandLineView {
    private RentABike rentaBike;
    public CommandLineView( ) { }

    public void setRentaBike(RentABike rentaBike) {
        this.rentaBike = rentaBike;
    }

    public RentABike getRentaBike( ) { return this.rentaBike;}

    public void printAllBikes( ) {
        System.out.println(rentaBike.toString( ));
        Iterator iter = rentaBike.getBikes( ).iterator( );
        while(iter.hasNext( )) {
            Bike bike = (Bike)iter.next( );
            System.out.println(bike.toString( ));
        }
    }
}
Finally, we have an assembler that creates each object, and sets the property (Example 1-7).
Example 1-7. RentABikeAssembler.java
public class RentABikeAssembler {
    public static final void main(String[] args) {
        CommandLineView clv = new CommandLineView( );
        RentABike rentaBike = new ArrayListRentABike("Bruce's Bikes");
        clv.setRentaBike(rentaBike);
        clv.printAllBikes( );
    }
}
Next, you'll compile the application like this:
Note
You can see the dependency injection happening here. Third-party code—custom code in this case—creates both objects, and injects the value of RentABike into the view.
C:\RentABikeApp\src> javac -d ../out *.java
Your output directory now contains the compiled class files.
Directory of C:\RentABikeApp\out

07/28/2004  10:12 AM    <DIR>          .
07/28/2004  10:12 AM    <DIR>          ..
07/28/2004  10:50 AM             1,475 ArrayListRentABike.class
07/28/2004  10:50 AM             1,753 Bike.class
07/28/2004  10:50 AM               186 RentABike.class
07/28/2004  10:50 AM               495 RentABikeAssembler.class
07/28/2004  10:50 AM               944 CommandLineView.class
Run the application like this:
C:\RentABikeApp\out>java RentABikeAssembler

RentABike: Bruce's Bikes
Bike : manufacturer -- Shimano
: model -- Roadmaster
: frame -- 20
: serialNo -- 11111
: weight -- 15.0
: status -- Fair.

Bike : manufacturer -- Cannondale
: model -- F2000 XTR
: frame -- 18
: serialNo -- 22222
: weight -- 12.0
: status -- Excellent.

Bike : manufacturer -- Trek
: model -- 6000
: frame -- 19
: serialNo -- 33333
: weight -- 12.4
: status -- Fair.
You just saw an example of dependency injection, outside of a lightweight container. The lightweight container community makes a whole lot of noise, but the ideas behind the movement are simple. Program using interfaces, and let a third party inject the dependency instead of setting it yourself.
You're going to eventually replace the assembler with Spring. When that happens, Spring will actually fire the constructors for our objects and set the dependencies. But first, you'll need to give this build a little attention.
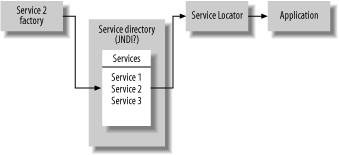
...service locators, or factory objects? Of course, dependency injection is not the only way to manage dependencies. In fact, it's not the only good way. J2EE users tend to use service locators. Using that pattern (shown in Figure 1-2), you take a dependency, wrap it in an interface, register it in a dictionary, and then look it up using a helper class called a locator. It's not a bad approach.
The dependency injection strategy lets you pick a consistent approach, and separate the dependency completely from your application. You'll see how this approach will help you test, and help you build applications that are easy to customize and configure.
In fact, earlier lightweight containers, like Avalon, used this approach. Most modern containers provide dependency lookup, but prefer other types of dependency resolution.
Get Spring: A Developer's Notebook now with the O’Reilly learning platform.
O’Reilly members experience books, live events, courses curated by job role, and more from O’Reilly and nearly 200 top publishers.

