Chapter 4. Tweak and Tune Skype
Hacks 43–51: Introduction
In many ways, this chapter builds on the previous one. However, the emphasis here is even more on making Skype do the things you want—that is, on tweaking and tuning Skype in interesting ways. Indeed, sometimes tweaking it in ways—it must be said—that the engineers at Skype probably never intended! Think of it this way. This chapter’s goal is not only to make Skype work in interesting and novel ways, but also to stimulate your imagination and encourage you to experiment with Skype.
Make Calls from Your Web Browser
Configure Internet Explorer so that you can make calls directly from a web page or from the browser toolbar.
Works with: Windows version of Skype.
There are three ways in which you can make calls directly from within a web browser. The first method uses the URL prefix skype: (note the missing //, as this method won’t work if you include //) to control Skype from within a browser. The second method uses the callto:// URL prefix and can be used in a number of ways to make calls, including from your browser’s address bar or from a link embedded in a web page. The third method uses the Skype Toolbar, which is an add-on application for Internet Explorer (and is available for Microsoft Outlook as well) that you can download at http://www.skype.com/products/skypetoolbars/.
skype:
You’re probably familiar with URLs such as http://www.oreilly.com/. Now Skype has added its own type of URL, which looks like this: skype:echo123. Entering “skype:echo123” in a browser’s address bar will open Skype and call the Skype sound-test service.
The syntax of the skype: URL is somewhat intimidating, but it is not as difficult to use as the following syntax diagram might make it seem, as you will soon see when we try some examples:
	Skype URL   = "skype:" [targets] ["?" query ] ["#" fragment ]

	targets     = 1* (target / ";" )
	target      = identity / PSTN
	identity    = skypename / alias
	skypename   = 1*(ALPHA / DIGIT / "." / "," )
	skypenames  = 1*( skypename / ";")
	alias       = … ; see ["TechGroup/DataFormats"]
	                   ; unicode chars are in UTF-8 and % encoded
	                   ; see RFC3987 uchar mapping
	PSTN        = "+" (DIGIT / ALPHA ) *(DIGIT / ALPHA / "-" )
	                   ; PSTN supports +800-FLOWERS
	query       = action [ *( "?" term "=" conditon ) ]
	term        = 1*ALPHA
	condition   = 1*unserved ; to be clarified by Skype
	fragment    = 1*unserved ; to be clarified by Skype
Warning
Note that skype: won’t work with speed-dial numbers. For example, skype:7?call, where 7 is an existing speed-dial number, won’t work.
skype: is quite powerful—and quite simple in practice—as the examples in Table 4-1 show. To try these examples, open a browser window and enter them in the address bar, then press Return.
skype: URL | What it does |
skype:echo123 | Calls or chats with Skype’s sound-test service (it does one or the other depending on what you have set double-click to do) |
skype:echo123?call | Calls Skype’s sound-test service |
skype:+442075551212?call | Calls a regular phone number (you must be a SkypeOut subscriber for this to work) |
skype:echo123?chat | Chats with Skype’s sound-test service |
skype:skypehackslinux?voicemail | Leaves voicemail for Skype user skypehackslinux |
skype:skypehackslinux?add | Adds skypehackslinux to your Contacts list |
skype:skypehackslinux?sendfile | Opens the File Send dialog to select a file to send to skypehackslinux |
skype:skypehackslinux?userinfo | Shows a profile for skypehackslinux |
skype:?chat& id=2005-09-02T12:00:00TZ | Opens an existing chat session having the ID specified (YYYY-MM-DDThh:mm:ssTZ or YYYY-MM-DDZhh:mm:ss) |
skype: | Focuses Skype (brings the Skype window to the foreground and gives it focus) |
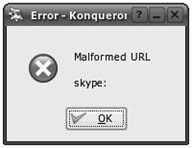
Not only can you enter the URLs in Table 4-1 into a browser’s address bar to make them work, but you also can embed them in HTML/XHTML, as the following XHTML file, skype.htm, illustrates. If you load this file in a browser and click on the “Call echo123” link, Skype will open and call the Skype sound-test service (echo123). However, before you start including skype: links in all your web pages, you should be aware that they only work for browsers on machines that run Skype and that know how to handle skype: style URLs. If a user on a non-Skype machine clicks on a skype: link, it certainly won’t work and will most likely be treated as an error, as shown in Figure 4-1.
	<?xml version="1.0" encoding="UTF-8"?>
	<!DOCTYPE html
	   PUBLIC "-//W3C//DTD XHTML 1.0 Strict//EN"
	   "http://www.w3.org/TR/xhtml1/DTD/xhtml1-strict.dtd">

	<!-- File: skype.htm -->

	<html xmlns="http://www.w3.org/1999/xhtml" xml:lang="en" lang="en">

	   <head>
	      <title>skype: URL</title>
	   </head>

	   <body>
	      <p><a href="skype:echo123?call">
	         Skype's sound test service (echo123)</a>
	      </p>
	   </body>

	</html>
You can even enter skype: URLs from the run line (but not from the command prompt window), and from the Windows Explorer address bar! For example, select Start → Run …, enter “skype:echo123?chat”, and press Enter or click OK. A chat window will open, enabling you to chat with Skype’s sound-test service (echo123). Entering the same URL in the Windows Explorer address bar will achieve the same result.
callto://
When you enter a web address such as http://www.oreilly.com in your browser address bar, you are instructing the browser to use the HyperText Transfer Protocol (HTTP) to access the O’Reilly web site. Similarly, when you enter the web address callto://echo123, you are in effect telling the browser to do something with “callto,” and what it does depends on how your browser is configured. This is because “callto” can be interpreted in many different ways.
When you install Skype on Windows, you are given the choice to associate callto:// with Skype. However, if you failed to make that choice during installation, or if callto:// simply isn’t working properly, you can easily fix it using one of two methods.
First, select Skype → Tools → Options… → Advanced, and then under the Other category check the “Associate Skype with callto: links” checkbox. If that fails to work for you, you may want to try the second method (a third method uses the Windows registry, but I don’t recommend it).
Second, from within Windows Explorer (the
file browser that comes with Windows), select
Tools → Folder Options… and in the dialog that opens click on the File
Types tab. Scroll down the list of file types until you find URL:
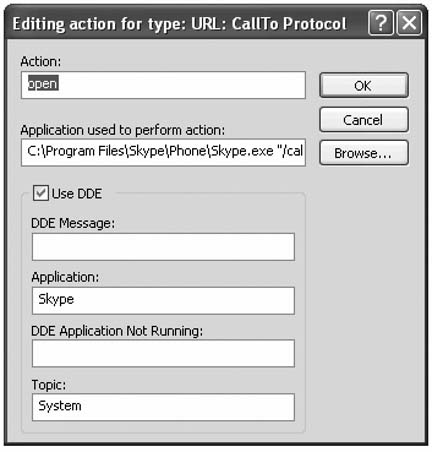
CallTo Protocol; highlight it, and then click on the Advanced button.
In the Edit File Type dialog that opens, highlight the “open” action
and click Edit…. That will open the dialog shown in Figure 4-2. Under “Application
used to perform action,” enter the command C:\Program Files\Skype\Phone\Skype.exe
"/callto:%1" (replacing the path to Skype.exe with your own,
if required). Click OK, and now, any time Internet Explorer (or,
indeed, Windows Explorer) encounters callto://,
it will pass the request on to Skype.
After setting up callto:// in this manner, you can use it to make calls in a number of different ways. The choice is yours.
- Internet Explorer (or other browser)
Enter callto://
Skypenamein the address bar and press Enter or click Go.- Windows Explorer
Enter callto://
Skypenamein the address bar and press Enter or click Go.- Run…
Select Start → Run…, enter callto://
Skypename, and press Enter or click OK.- Web-page link
Any web page with a callto://
Skypenamelink embedded in it forms a hyperlink that you can click on to start a call using Skype. If you want to include such links in your own web pages, the following XHTML example will show you how:<?xml version="1.0" encoding="UTF-8"?> <!DOCTYPE html PUBLIC "-//W3C//DTD XHTML 1.0 Strict//EN" "http://www.w3.org/TR/xhtml1/DTD/xhtml1-strict.dtd"> <!-- File: callto.htm --> <html xmlns="http://www.w3.org/1999/xhtml" xml:lang="en" lang="en"> <head> <title>Skype Callto</title> </head> <body> <p><a href="callto://echo123">Call echo123</a></p> </body> </html>
Skypename can be a Skype username or,
if you are a SkypeOut subscriber, a regular telephone number.
Skype Toolbar
This neat add-on for Internet Explorer provides the following useful features, all of them available without leaving your browser:
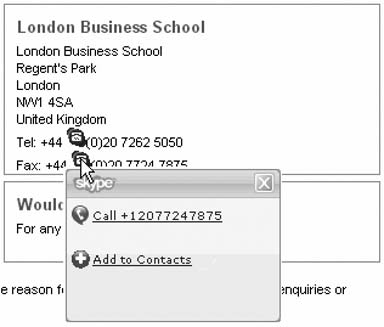
It recognizes phone numbers and provides a phone icon you can click on to make a call—even for phone numbers that aren’t callto:// links (see Figure 4-3).
It lets you add phone numbers on web pages to your Contacts list.
It lets you call and chat to existing contacts.
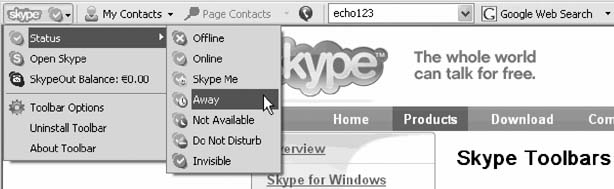
It lets you change your online status.
If you’re a SkypeOut subscriber, it displays your remaining credit.
All this functionality is packed into a surprisingly small space on your Internet Explorer toolbar (see Figure 4-4). And best of all, the Skype Toolbar is free.
Accelerate Skype Using Your Keyboard
Make Skype fly, by speeding up common tasks with key sequences and hotkeys.
Works with: Windows version of Skype.
If you’re proficient with the keyboard, sometimes driving Skype in this way can be easier, and faster, than if you use the mouse. Even if you’re not one of these people, this hack will nevertheless help you speed up some Skype tasks.
Tip
If you’re visually impaired in some way, or if your motor skills with the mouse aren’t quite what they used to be, or if you merely help such a person with their computer activities, you will find this hack very useful in terms of configuring Skype to make it easier to use.
Skype has the ability to control a very limited amount of its functionality using global hotkeys (see Figure 4-5). You can set these by selecting Skype → Tools → Options… → Hotkeys.
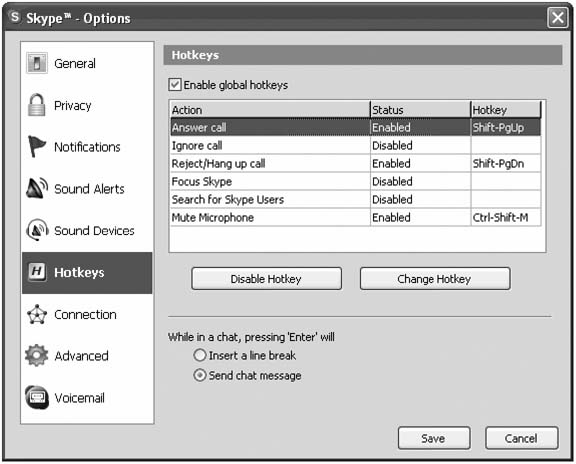
Skype’s global hotkey feature, though useful, is somewhat limited.
Another option is to drive Skype’s GUI using key sequences. In this case, there’s almost nothing you can do with the mouse that you cannot do with a key sequence entered at the keyboard. But if you want to use this approach, your efforts will be made a lot easier if you first set up a hotkey sequence to open Skype and give it focus. Once you do that, it will be a lot easier to drive Skype’s GUI via the keyboard.
One method is to set a global hotkey sequence to Focus Skype (see Figure 4-5). However, this method has the annoying habit of minimizing Skype if it’s already open! What we want is a foolproof way of always bringing Skype to the foreground and giving it focus wherever it may presently be lurking—behind another window, or in the system tray, or not running at all! Fortunately, such a method exists in the form of a hotkey sequence for a shortcut to Skype.exe. Create a shortcut that points to Skype.exe as its target, and then right-click on the shortcut and choose Properties. In the shortcut properties dialog that is displayed, select the Shortcut tab, click on the text entry field opposite “Shortcut key,” press the key sequence you want as your hotkey (for example, Ctrl-Shift-S), and then click OK. Now you have a hotkey sequence that will bring Skype to the foreground of your desktop and give it focus—no matter where it might be hiding!
On my machine, I have the hotkey sequence Ctrl-Shift-S set up so that it always opens Skype and gives it focus. You may have to choose something different if this hotkey sequence conflicts with a hotkey sequence that already exists on your machine. However, for the remainder of this hack, we’ll assume that Ctrl-Shift-S works as desired; but remember, it doesn’t really matter what it is, just replace Ctrl-Shift-S in this hack with whatever you have set up instead.
Now we’re ready to start driving Skype. Let’s try some Skype keyboard acceleration:
- Ctrl-Shift-S, Alt-F, Enter, A
Will change your online status to Away.
- Ctrl-Shift-S, Alt-T, R, Enter
Will reopen your most recent chat session.
- Ctrl-Shift-S, Alt-T, L
Will clear your call list.
- Ctrl-Shift-S, Ctrl-Tab (repeat)
Will cycle through the tabs (Contacts, Dial, and Call List) in the Skype application window.
- Ctrl-Shift-S, Alt-{down arrow}, Enter
Will repeat the last call you made from the Skype address bar.
Don’t be afraid to experiment, as it often takes a little trial and error (and sometimes a notepad and pencil) to find the right key sequence for what you want to do. This method works best, of course, when key sequences are short, as they’re obviously easier to remember. However, even complex key sequences can be put to good use, and I’ll show how next.
Hacking the Hack
Think of the following simple script, drive_skype.vbs, as a car you’re meant to drive. You don’t have to be a mechanic or look under the hood to drive a car, and so it is with this script. Just download the script from the book’s web site (http://www.oreilly.com/catalog/SkypeHacks/index.html) and start using it to make Skype fly!
Warning
This script uses the Windows Scripting Host (WSH), which comes with Windows XP but must be downloaded (from http://www.microsoft.com/) and installed separately for Windows 2000.
	' File: drive_skype.vbs

	' Invoke like this from the run-line:
	'       drive_skype "^+S|%(TO)"
	' where "^+S|%(TO)" is the key sequence to be sent to
	' the Skype GUI (in this case ctrl+shift+S,
	' followed by alt+T then alt+O)

	Dim objShell, objArgs, keystrokes, keys, pause
	Set objShell = WScript.CreateObject("WScript.Shell")
	Set objArgs = WScript.Arguments
	keystrokes = Split(objArgs(0), "|")
	pause = 1500
	For Each keys In keystrokes
	    objShell.SendKeys keys
	    WScript.Sleep pause
	    If pause>100 Then pause=100 End If
	next
To run this script, you will need to enter something like “C:\Scripts\drive_ skype.vbs” “^+S|%(TO)” at the run line (Start → Run…), or use a similar command as the target of a shortcut (with or without a hotkey sequence assigned to it). Of course, if you put drive_skype.vbs in a folder on your path, you can dispense with C:\Scripts\.
Warning
When I ran drive_skype.vbs from the
command line in a command prompt window, it produced inconsistent
results. It seems that sometimes, the command window grabs focus
away from Skype before all the keystrokes have been sent to Skype.
For this reason, I recommend that you run VBScripts that drive
Skype’s GUI (specifically, scripts that use the SendKeys command) using the run line, or
as the target of a shortcut.
Let’s look at some examples—and the power—of this simple script:
drive_skype.vbs
            "^+S|%(TO)"
, if made into a shortcut and assigned a convenient hotkey sequence—say, Ctrl-Shift-O—will display the options dialog for Skype.drive_skype.vbs "^+S|%(TO)|{TAB}|{TAB}|{DOWN}|{DOWN}|{DOWN}|{DOWN}| {TAB}|{TAB}|L|{TAB}|L|{TAB}|L|{TAB}|{TAB}|{TAB}|{ENTER}" will, in my case, set the sound input and output device used by Skype to Logitech USB Headset (note the L in the script). An identical key sequence, but with L replaced with C, will, again in my case, set the sound input and output device used by Skype to C-Media USB Headphone Set. These two key sequences enable me to hot-switch between sound devices in a snap—even during the middle of a call! To use the key sequence yourself, simply experiment with replacing the L.drive_skype.vbs "^+S|%(TC)|Progress_Report|{TAB}|{DOWN}|{UP}| +({DOWN}{DOWN}{DOWN}{DOWN})|{TAB}|{TAB}|{ENTER}|{ENTER}" will start a conference call with the topic Progress_Report for the first four contacts in your Contacts list.
Clearly, some of the examples given here would stretch anyone’s memory capacity, but when you use them in combination with the simple script presented in this hack, as well as with shortcuts, they can be extremely useful and great timesavers.
To help you explore the full power and possibilities of using drive_skype.vbs to drive Skype’s GUI, here’s a short crib sheet of the possible key sequences:
- Letter keys
A–Z and numbers 0–9.
- Special keys
+ for Shift, % for Alt, and ^ for Ctrl.
- Function keys
{F1} through {F16}.
- Tab and Enter keys
{TAB} and {ENTER}.
- Arrow keys
{UP}, {DOWN}, {LEFT}, and {RIGHT}.
- Miscellaneous keys
{BACKSPACE}, {BREAK}, {CAPSLOCK}, {DELETE}, {END}, {ESC} escape, {HELP}, {HOME}, {INSERT}, {NUMLOCK}, {PGDN} page down, {PGUP} page up, {PRTSC} print screen, and {SCROLLLOCK}. I’ve provided descriptions only for nonobvious keys.
- Sequence of keys
To hold down one key—say, Alt (which is represented by %) and then press the keys T and O in sequence—all while holding down Alt, simply put the key presses in round brackets, like this: %(TO).
Now you are in a position to experiment for yourself. Using keyboard key sequences can really make Skype fly, and all it takes is a willingness to experiment, a systematic approach (having a notepad and pencil close by helps), and some imagination. Once a key sequence has been well thought out and tested, this way of using Skype can be both faster and less error prone than using the manual keyboard or the mouse!
Tweak Skype by Editing config.xml
config.xml is where Skype stores many of its configuration settings, and by editing it directly, you can have greater control over how Skype works.
Works with: all versions of Skype.
A word of caution. Hacking around with Skype’s config.xml file can cause problems, especially if you tinker with settings not discussed in this hack. Skype, however, has the ability to rebuild a default—but valid—config.xml file when it encounters a problem with the existing config.xml file. This is the case even if you rename or delete config.xml—Skype simply builds a new one. Under such circumstances, Skype tries to restore as many of your personal settings and preferences in the new config.xml as possible, but it’s always wise to make a backup of your current config.xml before you make any changes. That way, if things go wrong, you can restore the old version or copy across selected settings from the old to the new. You have been warned!
Warning
Always stop Skype from running (by right-clicking on Skype in the system tray and choosing Quit) before making any changes to config.xml (or shared.xml), because even though your editor may tell you it has saved your updated version of config.xml, you may find that Skype ignores your changes and they are missing when you reopen config.xml. The procedure for editing any of Skype’s configuration files should go like this: quit Skype (that is, stop it from running), edit (or delete) the configuration file, save the changes, and restart Skype.
You can find config.xml on all platforms, though the extent to which you can edit Skype on each varies. In terms of the opportunities for tweaking, the platform order, from the greatest to the least extent, goes like this: Windows, Linux, Mac OS X, and Pocket PC. Typically, you can find config.xml in these locations on each platform:
Username is your login name for the
machine and Skypename is the name you use to
log into Skype.
Warning
If you cannot find config.xml (or shared.xml) it might not be because it is missing. Rather, on some platforms, files of this type are treated as “hidden” by the application you are using to search for them.
You can fix this problem on Windows Explorer by selecting Tools
→ Folder Options… → View → Advanced Settings, and clicking on the
“Show hidden files and folders” radio button. Alternatively, to find
config.xml without having to enable “Show hidden
files and folders,” enter %appdata%\Skype \Skype logon
name\ in the Windows Explorer address bar and it will
display all files, regardless of whether they’re hidden.
Mac OS X Finder displays all file types by default, but you may want to display the .xml file extension of config.xml (select Preferences → Advanced, and check “Show all file extensions”).
Most Linux file browsers have a similar option to show hidden files and folders. As such a wide choice of file browsers is available for Linux, look at the help file for your favorite file browser to find how to display hidden files and folders.
There is another file, shared.xml, from which Skype obtains configuration information that is common to all users of Skype on the same Windows machine, to all instances of Skype running in the same user session for Linux and Mac OS X, and to only one instance of Skype on Pocket PC, as Pocket PC supports neither multiple user sessions nor multiple running instances of Skype. You also can edit this file to tweak how Skype behaves, but the scope for tweaking is far more limited than for config.xml. You typically can find shared.xml in these locations on each platform:
- Windows (version 1.3 and before)
C:\Documents and Settings\All Users\Application Data\Skype\shared.xml
- Windows (version 1.4 and after)
C:\Documents and Settings
\Username\Application Data\Skype\shared.xml- Linux
/home
/Username/.Skype/shared.xml- Mac OS X
/Users
/Username/Library/Application Support/Skype/shared.xml- Pocket PC
\Application Data\Skype\shared.xml
config.xml Deconstructed
config.xml (and shared.xml) are what’s known as Extensible Markup Language (XML) documents. XML files are human-readable text files that are made up of tags (named identifiers) that demark elements (items of data) that are organized in the structure of a tree (a collection of tags laid out in a root and branch fashion). Now that’s a mouthful! However, it’s all rather plain and easy if we look at an example—in this case, a fragment of config.xml:
	<?xml version="1.0" ?>
	<config version="1.0" serial="414" timestamp="1123702750.6">
	   <Lib>
	      <Call>
	         <IncomingPolicy>everyone</IncomingPolicy>
	         <MicVolume>255</MicVolume>
	         <SkypeInPolicy>everyone</SkypeInPolicy>
	      </Call>
	      <CentralStorage>
	         <LastBackoff>0</LastBackoff>
	         <LastFailure>0</LastFailure>
	                            .
	                            .
	                            .
	                            .
	</config>
The first line tells any application that uses this file that it
is an XML file. From then onward, data is stored in a hierarchical
fashion, with individual data elements and groups of elements always
bracketed between two matching tags. Tags that have no data element
are the exception and look like this: <NoDataTag attrib="value"/>. For tags
with a data element, there’s always an opening tag—for example,
<Call>—and a corresponding
closing tag—in this example, </Call>. Whatever you do, don’t break
this matched tag structure. Other than that, XML files are easy to
edit. In fact, XML was specifically designed to be both easy to
understand and easy to edit for a human, not just for a
machine.
This hack deals with only a subset of the whole config.xml file, as it isolates only those tags that contain configuration data that does something useful from the perspective of a Skype user. Table 4-2 summarizes the tags we’ll hack in this chapter. You can download a more complete table of config.xml tags and their meanings from the book’s web site, http://www.oreilly.com/catalog/SkypeHacks/index.html.
Tag | Parent tag | Description | Platform | Default | Values |
| | Automatic gain control | W | 1 | 0,1 |
| | Automatic echo correction | W | 1 | 0,1 |
| | Echo correction | P | 1 | 0,1 |
| | Microphone volume control | WLMP | 0–255 | |
| | Pop-up notification from friends | W | 1 | 0,1 |
| | Pop-up notification from others | W | 1 | 0,1 |
Key: W = Windows, L = Linux, M = Mac OS X, P = Pocket PC
Editing config.xml
XML files are text files. However, you can encode them in different character sets; specifically, wide character sets (ones with more than 256 characters in them). This may cause problems on different platforms and with different versions of Skype. One way to avoid this is to look at the encoding of your existing (working) config.xml file. If you always save your modified version of config.xml (or shared.xml) using the same encoding, encoding won’t be a problem.
As a general rule, the default text editor on your platform should be up to the job of editing and saving config.xml (and shared.xml) in a format that Skype will recognize. Here are some suggestions, by platform (in all cases, make sure you save files in plain-text format without any formatting information of any sort).
- Windows
Notepad or WordPad. Perhaps the fastest way to edit config.xml on Windows is to right-click on it in Windows Explorer and choose Edit (or highlight config.xml and then choose File → Edit from the menu). That will immediately open config.xml in an editor window, from where you can make your changes directly or search for and, if necessary, replace text. Save your changes, close the window, and you’re done!
- Linux
Emacs or Vim.
- Mac OS X
Vi and Emacs.
Tweaks
A number of tweaks are available to the Skype user who is willing to delve into config.xml and shared.xml and hack away. There are two motivations for doing so. First, some tweaks fix something that is broken with Skype. Second, some tweaks add functionality to Skype or otherwise enhance or improve it. Both are covered in the tweaks that follow, which are prefixed with “Fix” or “Enhancement” to help you distinguish between the two.
config.xml tweaks.
- Fix (Windows): degraded sound and/or broken speech
Find the automatic gain control tag,
<AGC>, and set its value to 0. There should be two entries for<AGC>, one under the parent tag<Call>and the other under<General>; if either is missing, add it. When you’re done, both<AGC>entries should be set to 0, and your config.xml file should look something like this:<?xml version="1.0"?> <config version="1.0" serial="327" timestamp="1125399449.34"> <Lib> <Call>
<AGC>0</AGC><IncomingPolicy>everyone</IncomingPolicy> <MicVolume>173</MicVolume> <SkypeInPolicy>everyone</SkypeInPolicy> </Call> . . . </Lib> . . . <General> <AEC>1</AEC><AGC>0</AGC><AdvancedFaF>0</AdvancedFaF> <AutoAudioSettingsAdjust>1</AutoAudioSettingsAdjust> . . . </General> . . . </config>- Fix (Windows): others cannot hear me
Select Skype → Tools → Options… → Sound Devices, uncheck the “Let Skype adjust my device settings” checkbox, and save. Find the microphone volume control tag,
<MicVolume>. The valid range of values for this element is between 0 (off) and 255 (maximum). Try adjusting this value upward and downward, each time calling echo123 to test the result. After a little trial and error, hopefully you will find a microphone volume setting that enables others to hear you properly.- Fix (Windows and Pocket PC): echo
Find the automatic echo correction tag,
<AEC>, on Windows (<EC>on Pocket PC), and try toggling its value between 0 and 1, each time testing the effect by calling the echo123 service. On Pocket PC, you can also toggle this setting using the user interface (select Skype → Tools → Options…).- Enhancement (Windows): disable pop ups
Pop-up notifications from Skype can be an irritation, particularly if you’re in the throes of something important, like a video game! To disable pop ups, set both
<FriendsPopup>and<OthersPopup>to 0; that is, set<FriendsPopup>0</FriendsPopup>and<OthersPopup>0</OthersPopup>. Now your config.xml file should look something like this:<?xml version="1.0"?> <config version="1.0" serial="327" timestamp="1125399449.34"> . . . <UI> <Calls> <AllowMultiCalls>0</AllowMultiCalls> <FriendsAutoAnswer>0</FriendsAutoAnswer>
<FriendsPopup>0</FriendsPopup><OthersAutoAnswer>0</OthersAutoAnswer><OthersPopup>0</OthersPopup><PopupOnAll>0</PopupOnAll> </Calls> . . . <Messages> <AuthPopup>1</AuthPopup> <CafeMode>0</CafeMode> <DisplayCallInfo>0</DisplayCallInfo> <DisplayCallLogLimit>0</DisplayCallLogLimit> <FriendsFlash>1</FriendsFlash><FriendsPopup>0</FriendsPopup><ImChatStyle>0</ImChatStyle> <OthersFlash>1</OthersFlash><OthersPopup>0</OthersPopup><PopupOnAll>0</PopupOnAll> <ShowTime>1</ShowTime> </Messages> . . . </UI> </config>
shared.xml tweaks.
- Enhancement (all platforms): refresh Skype super-node list
Refreshing your list of super nodes will change the way in which your Skype client interacts with the Skype network. It may change how calls are routed and have an impact on how many relays (hops from Skype client to Skype client) you have. Having a new and different super-node list sometimes improves how Skype runs. To refresh your super-node list, simply rename or delete shared.xml. The next time Skype starts it will build shared.xml, and your super-node list, anew.
See Also
O’Reilly (http://www.oreilly.com/) has published a comprehensive range of books on XML, from beginner to expert level. Particularly noteworthy for someone new to XML is Learning XML, Second Edition (2003).
“Eliminate Echo and Noise” [Hack #39] also uses some config.xml tweaks.
Run Skype from the Command Line
You can control how Skype is launched and behaves by running it from the command line with options.
Works with: Windows and Linux versions of Skype.
Skype runs in a graphical Windows environment. Nevertheless, for those diehards for whom anything but the command line is a strange and alien environment, there is good news. You can run Skype from the command line with options.
Even for those lesser mortals who are comfortable with the GUI in general, and with Skype in particular, running Skype from the command line offers some distinct benefits in terms of additional flexibility. Command-line options can be particularly useful when you combine them with shortcuts (see “Add Fast-Dial Shortcuts to Your Menu or Desktop” [Hack #49] ).
Tip
Running Skype from the command line with options is also a good way for the visually impaired to use Skype.
Windows
The Windows version of Skype currently supports the command-line options shown in Table 4-3.
Command-line option | What it does |
| Places call to the specified user or number |
| Specifies where user personal data is to be stored by Skype |
| Stops splash screen from displaying |
| Runs Skype minimized in the system tray |
| Ensures that nonexistent paths aren’t written to the Windows registry and does other housekeeping for running Skype from removable media |
| Stops Skype from running |
Here are some things to try with command-line options entered in a command window (Start → All Programs → Accessories → Command Prompt) or from the run line (Start → Run, but if you choose this method, enter commands using quotes, like this: “Skype.exe” “/callto:echo123”). All of the following examples assume you have put the folder containing Skype.exe on your path:
Skype /callto:echo123will place a call to echo123, or to anyone else if you replaceecho123with their Skype name.Skype /callto:+442075551212will place a call to a regular telephone number, provided you are a SkypeOut subscriber. Don’t forget to use the correct Skype dialing format (“+” and then country code, and then region/city code, and then phone number).Skype /nosplash /minimizedwill start Skype and put it in the system tray without anything appearing on the screen.Skype /shutdownwill stop Skype from running (it’s the equivalent of right-clicking on Skype in the system tray and choosing Quit).
Linux
The Linux version of Skype currently supports the command-line options shown in Table 4-4.
Command-line option | What it does |
| Places call to the specified user or number |
| Disables Skype’s Application Programming Interface (API) |
| Uses session bus rather than default bus |
To make a call from the command line on Linux, enter this at the prompt in a terminal window, and press Enter:
/usr/local/bin/skype --callto:echo123 &
Display the Technical Details of a Call
Make a small change to your config.xml configuration file to have Skype display a wealth of detail about a call.
Works with: Windows and Linux versions of Skype.
This feature, on by default in earlier versions of Skype, is now off by default in the current version of Skype. Why Skype disabled this feature is a mystery, as it can provide a wealth of detail about what’s happening during a call. Armed with this technical detail about a call, you will not only better understand what Skype is doing behind the scenes, but also perhaps get some clues as to why Skype is performing poorly. Even if Skype is performing well, the technical details provided by this hack might give you some ideas for further tweaking and tuning Skype’s performance.
Fortunately, it’s easy to switch call technical details back on. All you need to do is make a one-line change to your Skype configuration file, config.xml. Making this change is simple, especially if you follow the guidance provided in “Tweak Skype by Editing config.xml” [Hack #45] .
Note that you will have to quit Skype (right-click on Skype in the Windows system tray, and then choose Quit; select File → Close on Linux) and restart Skype for the changes to take effect. Editing config.xml while Skype is running will result in your changes being ignored by Skype. Quit Skype, and then in your config.xml file locate the appropriate tag and set its value to 1, like this:
Tip
With version 1.4 of Skype for Windows, Skype reintroduced the
option of setting <DisplayCallInfo> using its user
interface (select Skype → Tools → Options… → Advanced, and then check
or uncheck “Display technical call info”). On Linux, you can likewise
change <TechCallInf> using
the user interface (select Skype → Tools → Options… → Advanced, and
then check or uncheck “Display technical call info”).
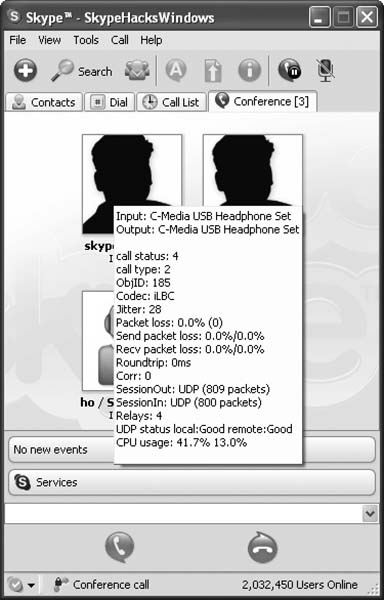
Now, restart Skype and the ability to display call technical details will be enabled, so when you let your mouse hover over the picture in the middle of an active call window, it will display the technical details for that call (see Figure 4-6). This works for both outgoing and incoming calls, and for one-on-one and multiperson conference calls (though for the latter, CPU usage is displayed only in the case of the first, top-left, conference call participant on Windows, and not at all on Linux).
By activating call details, you get a lot of useful information about calls. However, the format of the information is somewhat terse and cryptic. So, I’ve provided the following explanations to help you interpret the displayed information:
- Input and Output
Displayed are the sound-in and sound-out devices that Skype is using. If either of the devices listed against input and output doesn’t match the hardware you are using, or intend to use, for making and receiving calls, that’s a problem. You can change the sound devices Skype uses by selecting Tools → Options … → Sound Devices and selecting the devices you want from the Audio In and Audio Out pull-down lists. While there, you may also want to check the “Ring PC speaker” checkbox, as that will act as an additional notification of an incoming call.
- Call status
The numeric code displayed has these meanings: 1 = connecting (you should hear a dial tone); 2 = failed call (the user is not on the line); 3 = ringing; 4 = connection established (the call is in progress); 5 = local hold; 6 = finished; 7 = missed; 8 = refused; 9 = busy; 14 = playing voicemail greeting; and 15 = connected to voicemail (you can leave a voicemail message, but only if the recipient is a Skype voicemail subscriber). A full list of call status codes and their meanings is available as a web extra from the book’s web site, http://www.oreilly.com/catalog/SkypeHacks/index.html.
- ObjID
This is an internal reference used by the Skype programmers and has little meaning, or significance, from the user’s point of view.
- Codec
Codec is an acronym that stands for code/decode. It is the software component of Skype that is responsible for converting speech into data packets that are suitable for transmission across a network, and at the receiving end for converting those same data packets into sound that we can hear. There are many types of codecs. For Skype-to-Skype calls, one called ISAC from Global IP Sound (http://www.globalipsound.com/) is used, and for SkypeOut calls a G.279 codec is used (G.279 is a specification from the International Telecommunication Union, or ITU, http://www.itu.int/). This is part of the internal workings of Skype, so it is something over which the user has no control.
- Jitter
Jitter is a measure of the variations between consecutive data packets arriving at the Skype client. The lower this number is, the better your voice connection will be. The jitter buffer in your network router holds incoming data packets until a bunch of them have been received and sequenced. Then it starts to release the packets as an even stream so that the sound you hear is continuous. Meanwhile, new data packets are being received. The idea behind the jitter buffer is that buffering increases the chances that, even if some subsequent packets arrive late, enough packets will be available in the buffer for the sound you hear to continue uninterrupted. Clever algorithms implemented in firmware within the router detect and try to compensate for the effects of jitter. In addition, Skype does its own jitter correction internally in software, so presumably, Skype’s jitter number is some composite measure of the residual jitter arriving from the router and its own efforts at correcting jitter. High levels of jitter cause large numbers of data packets to be discarded by the jitter buffer. This may result in degraded call quality. Skype’s jitter measurement is difficult to interpret in any precise way (outside of Skype); however, as already mentioned, the lower this number is, the better your voice connection will be. Many things cause jitter, and the time spacing between arriving data packets and other characteristics of the packets themselves can vary for a multitude of reasons, but common causes are network congestion and packet route changes. Skype’s jitter number can peak in the thousands at the beginning of a call, but should then drop back to 300 or less. Since the jitter buffer and its corrective algorithms are built into your router, the level of jitter you experience is in part a function of your router’s quality and sophistication. Upgrading to a new and improved router is one way to improve jitter. However, before doing this, it is worth checking your current router manufacturer’s web site for firmware updates that will improve the router’s performance. The “Roundtrip” section of this list provides some advice on router setup that may also help with jitter.
- Send/Recv packet loss
Packet loss and “Send packet loss” shows the proportion of data packets lost at both ends of a call—that is, by you and the other party—for packets that are sent out. Likewise, “Recv packet loss” shows the proportion of data packets lost at both ends of a call, for packets that are received. “Packet loss” is a measure of the overall number of packets lost during the call. Loss of data packets is the bane of VoIP! High levels of packet loss mean poor voice quality and even dropouts, where the connection goes silent for seconds at a time. The ideal is to have zero packet loss, but this is rarely achieved in the real world unless you and the other caller have an outstanding network connection. As a rule of thumb, a packet loss of less than 5% (that is, 5% of data packets sent, or received, are “lost,” and typically have to be resent) has very little noticeable effect on call quality. A packet loss of greater than 5% progressively degrades voice quality, to the point that when packet loss rises higher than 25%, call quality is significantly degraded and soon thereafter becomes unusable. You can address high packet loss by improving your network connection, specifically by giving Skype data packets higher priority than other data packets, which is a technique commonly referred to as Quality of Service (QoS). See “Improve Service Quality” [Hack #59] for ways in which you can improve your Skype QoS.
- Roundtrip
This is a measure of your network connection’s latency (see “Test Your Internet Connection Latency” [Hack #34] ). Roundtrip times of 150 ms to 200 ms will mean excellent call quality and that there’s very little need for you and the other caller to pause in your conversation just to know the other has stopped talking. When roundtrip times stretch to 350 ms and higher you will find yourself having to leave longer and longer pauses in your conversation just to know, without ambiguity, that the other party has stopped talking. Anything higher than 500 ms and conversations will become stuttered and very strained, as both calling parties will run the risk of talking over one another. If you use Skype, and you use a geostationary satellite link to connect to the Internet, you can expect this number to be quite high, but you can do little about it, as it is a consequence of the finite nature of the speed of light. Similar to jitter (discussed earlier), roundtrip data-packet transfer time is primarily a function of the speed and quality of your Internet connection. Also, malware and adware, which are common forms of spyware (unwanted software installed on your computer—often without your knowledge— that consumes processing power and Internet bandwidth; see http://arstechnica.com/articles/paedia/malware.ars/ for a good overview of the topic), can have a detrimental effect on roundtrip time. An excellent tool for removing spyware is Spybot—Search & Destroy, freely available from http://www.safer-networking.org/en/spybotsd/index.html. Also, upgrading your router firmware to the latest version can sometimes improve roundtrip time. Finally, if you’re a real techie, you can tinker with the router port settings for the ports Skype uses (you can find Skype’s port settings by selecting Tools → Options… → Connection); see “Fix Badly Behaving Routers” [Hack #51] for details on setting up port forwarding for Skype.
- Corr
The meaning of this term is unknown.
- SessionOut and SessionIn
These are counts of the number of UDP data packets both sent (out) and received (in).
- Relays
When a Skype call is a relayed transfer, it means that a direct connection between the caller and callee could not be established, so data packets must be routed via intermediate Skype nodes (peers, just like you, in the Skype network). The fewer the number of relay nodes, the smaller the number of “hops” data packets have to make from node to node, and the better your call quality will be. This is another call attribute for which the lower it is, the better it is for call quality. The ideal is to have zero relays, in which case the call is said to be in direct transfer. The most common cause for relayed transfer is because you, or the other party, are using a machine that lives behind a restrictive firewall or uses Network Address Translation (NAT). These are the areas to look at if you are suffering badly from relayed transfer. Note that relayed transfer not only affects voice-call quality, but it also severely impacts file transfers made through Skype, as file-transfer traffic is throttled back by Skype to a measly 1 kilobyte per second (so a 1MB file would take more than 15 minutes to transfer, and larger files would take correspondingly longer). You can improve file-transfer speed by not talking at the same time a transfer is taking place, because Skype gives voice packets priority over data packets. A high number of relays can also be a symptom of a malfunctioning or old router. Sometimes you can give an old router a new breath of life—including reduced relays— by upgrading its firmware.
- UDP status
The User Datagram Protocol (UDP) is a specification for a network protocol. UDP is one of the two methods by which Skype communicates with other Skype clients (nodes). The other is the Transmission Control Protocol (TCP). Together with the Internet Protocol (IP), UDP and TCP/IP provide the network infrastructure on which Skype runs. Skype uses UDP when it can because it is the preferred protocol for small data packets, like the ones used by Skype. Skype indicates the quality of your (local) and the other party’s (remote) UDP connection. If either end of a Skype call has poor UDP, call quality will suffer. The fix is for the offending end to make its network more UDP friendly.
- CPU usage
This displays both your (local) and the other party’s (remote) current CPU usage. High CPU usage numbers on either end of a call spell problems because Skype might not be able to get the processing power it needs to do its real-time job of encode → encrypt → send → receive → unencrypt → decode. Very high CPU usage (greater than 90%) may impact call quality. Oftentimes, high CPU usage is the result of other processes running on your or the other party’s machine. In this case, you can improve things by shutting down the other non-Skype processes. Sometimes the problem is with Skype itself, in which case you should investigate and troubleshoot (see “Troubleshoot Skype” [Hack #12] ).
Remove Unused Names from the Login List
Need to remove old, unused, or mistyped Skype usernames from the Skype login screen? A little work with files will get the job done.
Works with: Windows version of Skype.
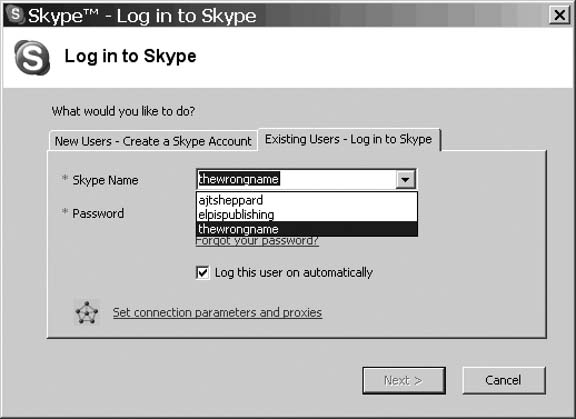
Did you mistype your username when setting up a Skype account? Or were you bored with the old name, so now you use a new username? Regardless of why a Skype username becomes defunct, it is a rather surprisingly resilient fellow. It won’t go away unless you take some direct action (see Figure 4-7).
Fortunately, removing the no-longer-welcome username is a breeze. Stop Skype from running (otherwise, you will find the directory locked), and then simply delete the account directory associated with it. For the example in Figure 4-7, delete this directory:
C:\Documents and Settings\Username\Application Data\Skype\thewrongnameHere, Username is your Windows login
name.
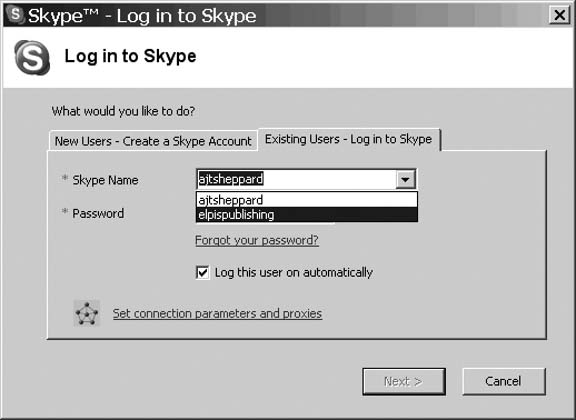
Once the directory is gone, restart Skype, and your unwanted Skype username is banished from the Skype login screen, as shown in Figure 4-8.
A word of warning, however: Skype names persist “out there” on the Skype network. So, if at any time, you again log on to “thewrongname,” it will again be added to the Skype login screen and you will have to repeat the preceding process to get rid of it!
Add Fast-Dial Shortcuts to Your Menu or Desktop
Add shortcuts to your menu or desktop for your most frequently called contacts.
Works with: Windows version of Skype.
When making a Skype call, the typical procedure goes something like this: double-click the Skype icon in the system tray or the Skype shortcut on the desktop, navigate to the Contacts tab, find the entry for the contact you want to call, and then double-click on it. Now, for some people of leisure, all this clicking is a great adventure. For the rest of us who must work for a living, wouldn’t it be nice to make that call with as little as just one double-click? Fortunately, this is possible with the Windows version of Skype, as we can add shortcuts to the Windows desktop or menu for our most frequent calls.
Menu Shortcuts
Navigate to Skype on the Windows menu (select Start → All Programs → Skype), and right-click on the Skype icon. A pop-up menu should appear, from which you should choose Create Shortcut. This will create a shortcut under the Skype menu (see Figure 4-9).
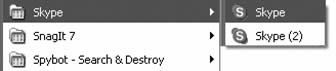
Next, right-click on the new shortcut (Skype (2)) and choose Properties. This will open a window in which you can edit the properties of the shortcut you have just created (see Figure 4-10).
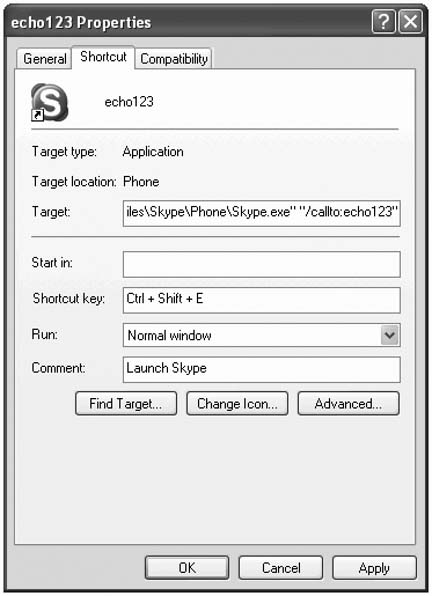
With the Shortcut properties window open, you should follow these steps:
Go to the General tab and rename the shortcut. In the example in Figure 4-10, the shortcut has been named echo123.
Go to the Shortcut tab and in the Target box, enter a command such as this:
"C:\Program
            Files\Skype\Phone\Skype.exe" "/callto:echo123"
. Pay particular attention to the use of quotes, and if necessary, change the path to the Skype.exe executable.If you want to associate a hotkey sequence with the shortcut, click on the Shortcut key text box and enter the key sequence you want to use for this shortcut—for example,
ctrl + shift + E.
Tip
Here’s a nifty tip for when you associate hotkeys with
shortcuts. If you have speed dial numbers set up for
your Skype contacts, you can use them as part of your hotkey
sequences. For example, suppose you gave echo123 the speed dial
number 4 within your Skype Contacts list. You can assign the hotkeys
ctrl + shift + 4 as its
corresponding hotkey sequence. That way, your shortcut hotkeys match
your speed dials. Unfortunately, as you can use only single digits
within a hotkey sequence, this tip works only for speed dial numbers
between 1 and 9. But if you assign 1 through 9 to your most
important or most frequently called contacts, you’ll always be only
a short hotkey sequence away from making your most important
calls.
Desktop Shortcuts
To create fast-dial shortcuts on your desktop, you have a couple of choices.
First, if you already have fast-dial shortcuts in your menu, you
can simply right-click on any of them and choose Send To → Desktop.
That will create an identical shortcut, but one that lives on your
desktop instead (see Figure
4-11). Double-clicking on a fast-dial desktop shortcut will
start a call to whomever you have entered as the /callto: name (or to the regular phone
number, if you’re a SkypeOut subscriber).

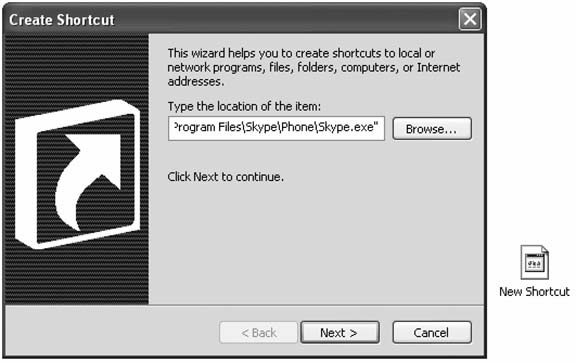
Second, you can simply right-click anywhere on an unoccupied area of your desktop. From the pop-up menu that appears, select New → Shortcut. This will create an empty shortcut on your desktop, as well as open the Shortcut Wizard. Use the Browse… key to find Skype.exe (see Figure 4-12).
In effect, the shortcut we’re creating will run Skype from the
command line, and as such we can add command-line options. The
command-line option we will add is /callto:
Skypeuser, where
Skypeuser is the name of the Skype user we
want to contact when we double-click on the shortcut. Under “Type the
location of the item” in the wizard, add the /callto: command-line option after
Skype.exe, like this: "C:\Program Files\Skype\Phone\Skype.exe"
"/callto:echo123". Pay particular attention to the use of
quotes, and if necessary, change the path to the
Skype.exe executable. Click Next, then name the
shortcut, and then click Finish. Now you should have a freshly minted
fast-dial shortcut on your desktop, like that shown in Figure 4-11.
Note that a careful naming convention for your Skype desktop shortcuts will pay dividends when it comes to organizing your desktop. This is particularly true if you have more than a few shortcuts. Using a short prefix, such as Skype–, for shortcut names will mean that when you organize your desktop icons by name or file type, all your fast-dial shortcuts will group together nicely as a block. This should make finding and calling your most frequent Skype contacts quicker and easier still.
With this hack, calls are now just a double-click away!
Fix Windows Wireless
Windows Wireless is largely self-configuring and mostly problem free. But Windows can sometimes shoot itself in the foot, and so it is sometimes with its Wireless Zero Configuration Service.
Works with: Windows version of Skype.
The Windows Wireless Zero Configuration Service (WZCS) is meant to help you, by doing all of the wireless configuration on your behalf. But it can become as much of a hindrance as a help as far as Skype is concerned.
During operation, the WZCS constantly hunts around for a better WiFi connection, and if it finds one, it switches you to that connection and away from your current connection. However, this switch is not instantaneous. This is not a problem if you are, say, browsing the Internet, as the momentary disruption to your Internet connection is not noticeable. However, Skype is sensitive to both latency and packet loss, both of which are adversely affected during the switch. if you are in a WiFi “noisy” location, the WZCS might constantly try to switch your machine from one access point to another, and possibly back again. Even the WZCS’s habit of continuously hunting around for a better wireless connection by hopping from access point to access point can degrade call quality, as latency is injected into your connection and packets are lost.
Fortunately, the WZCS, which is switched on by default in Windows, can be disabled, but only after Windows startup; otherwise, your wireless services will fail to start. After Windows startup, you can stop the WZCS by selecting Start → Control Panel → Administrative Tools → Services, right-clicking on Wireless Zero Configuration, and choosing Stop.
Alternatively, if you don’t want to have to remember this sequence of actions every time you start Windows, you can add the following entry to the Windows registry using RegEdit (select Start → Run…, enter “RegEdit,” and click OK) to do the job for you:
	HKEY_CURRENT_USER
	  Software

	    Microsoft
	       Windows
	          Current Version
	             Run
	               WZCS-Killer REG_SZ "c:\windows\system32\net.exe" stop WZCSVC
See Also
If you have a wireless or nonwireless router that is causing problems, you might want to look at “Fix Badly Behaving Routers” [Hack #51] .
Fix Badly Behaving Routers
Skype works without a problem with most routers, both wireless and nonwireless. This hack is for those of you who have a router that behaves badly with Skype, or vice versa!
Works with: all versions of Skype.
If Skype habitually drops calls, suffers from poor call quality, or simply doesn’t work at all, after testing all else you should turn your attention to your network router. By working your way through this list of things to try, you stand a good chance of either fixing the problem or resigning yourself to buying a new router!
- Reset your router
If problems have started to occur only recently and prior to that, your Skype calls were largely trouble free try resetting your router. You can do this by either pressing the Reset button (most routers have one, though it’s oftentimes tucked away so that the router is not easily reset by accident), or powering the router off and then on again.
- US Robotics router
Go to the configuration settings, and under Access/Special App, look for a setting named PC-to-Phone. Enable it.
- Other routers
Look for a setting similar to that for the US Robotics router and enable it.
- Avoid being a super node
Skype uses a lot of simultaneous port connections. When you become a super node, the number of connections can increase substantially. This might overwhelm your router, especially if it has very limited built-in processing power. If you stop Skype from using ports 80 and 443 for incoming connections (select Skype → Tools → Options… → Connection on Windows or Skype → Tools → Options… → Advanced on Linux; this option is not available on Mac OS X or Pocket PC), you will very likely not become a super node. However, I must say that Skype is continuously being developed, and the rules by which a regular Skype node (client) becomes a super node are not public, so you can never be sure your node is not operating as a super node.
- Enable ports 80 and 443
Letting Skype use ports 80 and 443 for incoming connections can improve things, as it gives Skype more options and flexibility in terms of routing traffic. However, doing so does increase the probability that you may become a super node, which can create problems of its own (as discussed earlier). At first glance, this suggestion may seem to contradict the advice I gave earlier under the “Avoid being a super node” heading, which argues in favor of closing off ports 80 and 443. The point is that both enabling and disabling ports 80 and 443 has advantages and disadvantages, in both cases. I suggest you try both approaches to see which brings the greatest net benefit.
- Port scanning
Routers sometimes block Skype because it uses a large number of ports (TCP and UDP). Some malware programs go from port to port, in a process call port scanning, probing each to find a vulnerability to exploit. Because Skype tries to use so many ports, it can be mistaken for port-scanning malware and therefore be blocked. If your router blocks this type of behavior, disable its port-scanning blocking feature. However, bear in mind that doing so might make you more vulnerable to port-scanning malware.
- Port forwarding
You can find out the port number, let’s call it N, that Skype prefers to use for incoming connections, under connection options (select Skype → Tools → Options… → Connection on Windows, Tools → Options… → Advanced on Linux, or Skype → Preferences… → Advanced on Mac OS X; this option is not available for Pocket PC). If your machine lives behind a restrictive NAT or firewall, it might not be accessible to other machines outside on the Internet, so Skype won’t work. However, by using port forwarding, incoming connection requests to port N (and/or ports 80 and 443) can be forwarded directly to your machine, allowing machines on the Internet to connect with your machine and, in so doing, enabling Skype to work. You can find an excellent resource for support documents specifically on port forwarding for individual router models at http://www.portforward.com/routers.htm. You can find a more general tutorial on port forwarding at http://www.dlink.com.au/tech/drivers/files/modems/DSL-302G_Open.ports_DMZ.zip. Although this tutorial is specific to a D-Link router, it nevertheless has information useful to anyone considering opening ports for forwarding.
- Erratic or strange router behavior
For unknown reasons, some routers (wireless and nonwireless) behave erratically with Skype. Common router models reported to have this problem are the D-Link 604 (nonwireless), D-Link 614 (wireless), Linksys BEFSR41 (nonwireless), and Linksys BEFSX41 (nonwireless). There are others. If upgrading your router firmware doesn’t fix the problem, there’s very little you can do, other than buy a new router!
- Upgrade firmware
This is always worth a try and it costs you nothing. By upgrading to the latest firmware for your router (visit the manufacturer’s web site), you might not only cure all sorts of problems, but also boost your router’s performance.
- Buy a new router
This is always a last resort, but it’s worth considering if all else has failed and you’re fairly sure that the problem is with your router.
See Also
It might also be worth testing your Internet connection for Skype friendliness (see “Test Your Connection for Skype Friendliness” [Hack #38] ).
You can get a handle on jitter, packet loss, and other things influenced by your router’s behavior by looking at the technical details of the calls you make (see “Display the Technical Details of a Call” [Hack #47] ).
Get Skype Hacks now with the O’Reilly learning platform.
O’Reilly members experience books, live events, courses curated by job role, and more from O’Reilly and nearly 200 top publishers.

