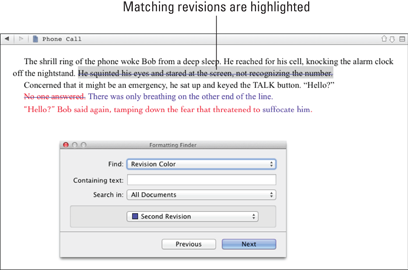
Figure 20-5: Finding text by revision level.
Finding Revisions
Scrivener’s Find by Formatting function provides the option to search by revision level, which lets you step through each change to decide whether you’re happy with it or ready to delete it. (You can discover more about Find by Formatting in Chapter 17.) Follow these steps:
1. Choose Edit⇒Find⇒Find by Formatting.
The Formatting Finder window opens.
2. In the Find drop-down list, select Revision Color.
3. If you’re looking for a revision with specific text in it, enter the text into the Containing Text text box.
Otherwise, leave this text box blank.
4. From the Search In drop-down list, select whether you want to go through All Documents or Selected Documents (those selected in the Binder).
5. In the drop-down list at the bottom of the window, select which revision color you want to find.
6. Click Next.
Scrivener highlights the next instance of that revision color in your project, as shown in Figure 20-5 (where I searched all documents for Second Revision). Continue to click Next until you’ve cycled through all the desired revisions.
Any other text in your project that uses the same color as the revision level is also highlighted.
7. Click the red X button to close the Formatting Finder window when you’re done.
Get Scrivener For Dummies now with the O’Reilly learning platform.
O’Reilly members experience books, live events, courses curated by job role, and more from O’Reilly and nearly 200 top publishers.

