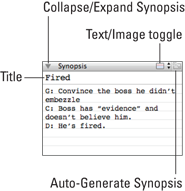
Figure 3-1: The key parts of the Synopsis.
Understanding the Synopsis
The Synopsis resides at the top of the Inspector pane and looks a lot like an index card. In the Synopsis, you can enter a brief description of your scene, chapter, part, or whatever type of item you’re working with.
But don’t think of this section as simply the three-sentence recap. You can enter all sorts of things in the Synopsis. You might use it to track your timeline, point of view (POV), setting, subplot, scene purpose, or questions you need to answer.
Save longer notes for the Document Notes (covered in Chapter 5), but for an at-a-glance view of what your document is about, the Synopsis is perfect.
When you view your project in the Corkboard (more on the Corkboard in Chapter 8), the index cards show whatever’s written in the Synopsis section. So, if you’re storyboarding, think about what you need to see for each document.
Figure 3-1 provides an overview of the parts of the Synopsis.
 If the Inspector isn’t visible, click the Inspector button in the toolbar. If the Synopsis isn’t displayed in the Inspector pane, choose View⇒Inspect⇒Synopsis.
What appears in the Editor and what’s selected in the Binder may not always match, but the Inspector pane always applies to the file displayed in the Editor. If ...
Get Scrivener For Dummies now with the O’Reilly learning platform.
O’Reilly members experience books, live events, courses curated by job role, and more from O’Reilly and nearly 200 top publishers.

