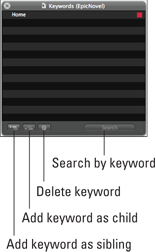
Figure 5-14: The Project Keywords window.
Working with the Project Keywords Window
The Project Keywords window floats over the Scrivener project window and lets you easily change keyword colors or delete keywords from the entire project.
Open the Keywords window by clicking the Keywords button in the Scrivener toolbar or choosing Project⇒Show Project Keywords. You can also click the gear button in the Keywords header of the Inspector pane, and then choose Show Project Keywords from the drop-down list that appears. The Project Keywords window shows all keywords available in the project. (To close the window, click the X in the upper-left corner.)
Figure 5-14 provides an overview of the Project Keywords window.
Applying keywords
You can apply existing keywords to an item from the Project Keywords window easily. Just drag and drop the desired keyword from the window onto the item name in the Binder or into the Keywords pane in the Inspector.
 If you want to add the same keyword to more than one file, select all the desired items in the Binder, and then drag the keyword from the window onto any one of the selected filenames.
Finding items by keyword
Want to know which documents have a keyword applied? Follow these steps to find out:
1. In the Project Keywords window, select the ...
Get Scrivener For Dummies now with the O’Reilly learning platform.
O’Reilly members experience books, live events, courses curated by job role, and more from O’Reilly and nearly 200 top publishers.

