Chapter 4. Scaffolding
For centuries, scaffolding has helped builders provide access and support to buildings through the early stages of the construction process. Programmers, too, use temporary scaffolding code to lend structure and support until more permanent code is available. Rails automates scaffolding to make early coding more productive than ever before.
In almost any Ruby on Rails demonstration of five minutes or more, youâre likely to see scaffolding. Rails opponents dismiss the feature quickly, saying that any scaffolding code must be thrown away, so the advantages are artificial. In some ways, the detractors are right. Scaffolding user interfaces are ugly and incomplete. But scaffolding provides more than cheap demo thrills. Here are some benefits:
You can quickly get code in front of your users for feedback.
You are motivated by faster success.
You can learn how Rails works by looking at generated code.
You can use the scaffolding as a foundation to jumpstarts your development.
You can use metaprogramming thatâs automatically updated as the structure in the database changes.
In this chapter, weâll show how to use scaffolding to build a primitive user interface for Photo Share. Then, in later chapters, we will extend that foundation to flesh out our application.
Using the Scaffold Method
Weâve already demonstrated a working model for Photo Share, including photos, categories, slideshows, and slides, and you should be able to manage schema from Active Record objects with the Rails console. The next step is to use scaffolding to build primitive web user interfaces for these classes. Scaffolding will take you a good ways down the road, but it wonât generate a completed application. Thatâs okay. Weâre looking for a head start, not a completed production-quality application.
A List of Photos
Letâs start by letting the user manage a list of photos from the Web. Ensure that youâve got a database, that itâs configured, and that youâve got tables with model objects for slides, slideshows, categories, and photos.[*] If your server is not started, restart it as usual with ruby script/server. Point your browser to
http://localhost:3000/ to make sure things are working. Youâll see the Rails welcome page if everything is working correctly. Letâs build some scaffolding.
Youâll start to build scaffolding using the scaffold method. That method goes into the controller, so we need to generate a controller called Photos:
ruby script/generate controller Photos
Add the scaffold :photo method to photo_controller.rb, like this:
    class PhotosController < ApplicationController
      scaffold :photo
endThatâs all you needâRails will do the rest. Now, load the URL
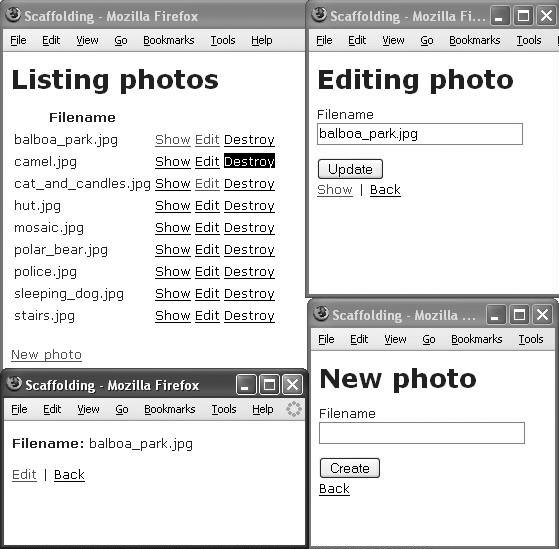
http://localhost:3000/photos to see the scaffolding in action. Youâll see a list of photos, with links to create new photos, edit existing photos, and show existing photos. With the simple scaffold :photo statement, you got all the pages that show in Figure 4-1. The scaffolding generates surprisingly complete controller and view code. To be sure, the scaffolding does not generate production-ready code, but itâs a starting point. The next section shows how scaffolding works.
More Metaprogramming
scaffold :photo does the magic. scaffold is a method on ActionController.[â ]
:photo is a symbol that determines the Active Record model that Rails uses for this scaffold. When you specify this single method, Rails adds to your controller the nine methods in Table 4-1. Four of them render views. Together, the methods build a simple CRUD interface for your Active Record model based on the model object. Within the model, the @@content_columns attribute contains information about each of the columns in the database.
|
Methods |
Purpose |
View |
|
|
Renders a welcome page. By default, |
No |
|
|
Renders a view with a paginated list of |
Yes |
|
|
Creates and saves an Active Record object from the target object. |
No |
|
|
Renders a view to create a new controller object. |
Yes |
|
|
Renders a view to edit the target object with the supplied |
Yes |
|
|
Updates the active record target object with the supplied |
No |
|
|
Renders a view to show an object |
Yes |
|
|
Destroys the object of type |
No |
|
|
Renders the default view for the view methods if no |
N/A |
Most of the methods listed in Table 4-1 wind up calling the render_scaffold method, which checks to see whether youâve added the corresponding view. (Remember that by default, Rails views will have the same name as the controller method.) If so, Rails uses your views. Otherwise, the controller provides default views.
Replacing Scaffolding
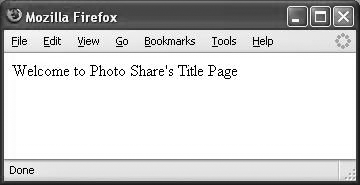
In many frameworks (such as those that rely completely on code generation), once you replace any of the scaffolding, you take on responsibility for managing all of the scaffolding yourself. Not so with Rails. You can modify or rewrite any single view or controller method without affecting the rest of the scaffolding. For example, letâs add a title page through the index method to the PhotosController class:
    class PhotosController < ApplicationController
      scaffold :photo

      def index
        render_text('Welcome to Photo Share\'s Title Page')
      end
    end
Now, load http://localhost:3000/photos/index. Youâll see the âWelcome to Photo Shareâs Title Pageâ message printed, as in Figure 4-2, which shows that youâve overridden the index method provided by the scaffolding.
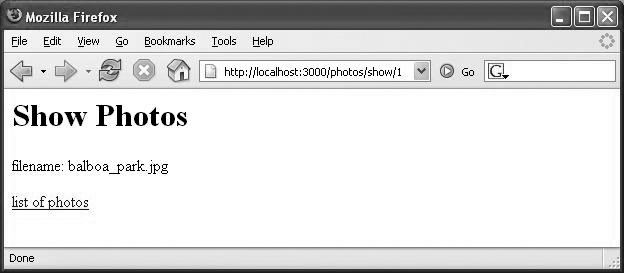
Load http://localhost:3000/photos/listto verify that the rest of the scaffolding is still intact. Rails also makes it easy to replace a view while leaving the controller scaffolding intact. Letâs replace the view for the show action. Create the file app/views/photos/show.rhtml:
<h1>Show Photos</h1>

<p>filename: <%= @photo.filename %></p>

<%= link_to 'list of photos', :action => 'list', :id => @photo %>
Youâll see the view shown in Figure 4-3. As before, you can replace some views and leave the others intact. As you can see, scaffolding stays around until you need to override it. Then it just gradually melts away, a piece at a time, as you replace it.
Scaffolding Is Dynamic
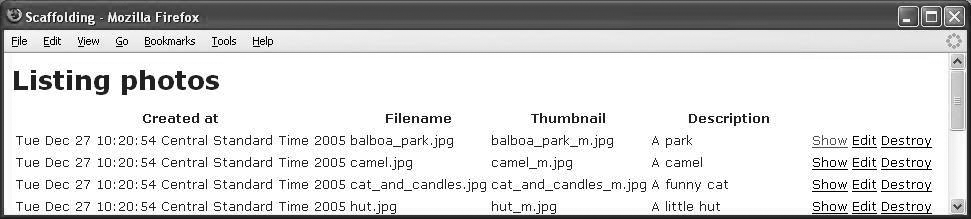
You can use Rails scaffolding to provide a simple user interface while youâre working on your database schema. Your users can then verify that youâre maintaining all of the data you need. Letâs see how the Rails scaffolding handles changes in the schema. Weâll start by adding columns for a timestamp, a thumbnail, and a description to the photos database table. Create a new migration called add_photo_columns that changes the definition of the photos table by typing ruby script/generate migration add_photo_columns. Edit the resulting migration in db/migrate to look like this:
class AddPhotoColumns < ActiveRecord::Migration
  def self.up
    add_column "photos", "created_at", :datetime
    add_column "photos", "thumbnail", :string
    add_column "photos", "description", :string
    Photo.find(:all).each do |photo|
      photo.update_attribute :created_at, Time.now
      photo.update_attribute :thumbnail, photo.filename.gsub('.', '_m.')
    end
  end
  def self.down
    remove_column "photos", "created_at"
    remove_column "photos", "thumbnail"
    remove_column "photos", "description"
  end
end
This migration script updates the photos table and the data in it. Now, execute the migration by typing rake migrate, and reload your browser (http://localhost:3000/photos/list). Youâll see the new columns appear, as in Figure 4-4. In fact, all of the scaffolding views work. So using scaffolding, you can quickly improve your database schema and model without having to focus on your user interface development at the same time.
Pros and Cons
Youâve just seen how to use scaffolding with the scaffold tag, or the metaprogramming approach. This approach to scaffolding has some critical advantages over other frameworks, like code generation:
The
scaffoldtag is dynamic, allowing you the freedom to build on the database schema; the user interface automatically changes to keep up.You can override controller methods or views without having to maintain all of the scaffolding yourself.
The scaffold tag is terse, so you can accomplish much with a single line of code.
In general, the Rails metaprogramming approach provides revolutionary advantages over code generation. Most significantly, dynamic scaffolding continually changes with the surroundings. But the metaprogramming approach does have some core disadvantages as well:
You canât see whatâs going on. If you are learning Rails or scaffolding, having the code hidden from you is a distinct disadvantage.
The behavior of the scaffolding may change with later versions of Rails. This behavior may be a distinct disadvantage if you need to maintain predictability.
You canât use the scaffolding code as a base for further development.
For these reasons, Rails offers code generation as an alternative method for scaffolding. Weâll explore the scaffolding code generator next.
Generating Scaffolding Code
Code generation is the other major form of scaffolding. You generate scaffolding with the ruby script/generate scaffold command. Run it without parameters to see the parameters you can specify and a description of the generator:
>ruby script/generate scaffold
Usage: script/generate scaffold ModelName [ControllerName] [action, ...]

General Options:
    -p, --pretend        Run but do not make any changes.
    -f, --force          Overwrite files that already exist.
    -s, --skip           Skip files that already exist.
    -q, --quiet          Suppress normal output.
    -t, --backtrace      Debugging: show backtrace on errors.
    -h, --help           Show this help message.
    -c, --svn            Modify files with subversion. (Note: svn must be in path)

Description:
    The scaffold generator creates a controller to interact with a model.
...
Here, you need to specify a model and a controller name. So, to generate the scaffolding for the controller and views of our Photo model, type:
> ruby script/generate scaffold photo photos
...
Respond y when Rails asks if you want to replace a file. Any additional parameters are added as empty methods on the new controller. If you omit the name of the controller, Rails uses the English plural of the model name. So, to generate scaffolding for our slides, slideshows and categories, type:
ruby script/generate scaffold slide
...
ruby script/generate scaffold slideshow
...
ruby script/generate scaffold category
...
Inside the Generated Code
Letâs look at the controller Rails generated. Your version may be slightly different than the code you see here, but the principles should be the same. Open apps/controllers/photos_controller.rb:
class PhotosController < ApplicationController
  def index
    list
    render :action => 'list'
  end

  def list
    @photo_pages, @photos = paginate :photos, :per_page => 10
  end

  def show
    @photo = Photo.find(params[:id])
  end

  def new
    @photo = Photo.new
  end

  def create
    @photo = Photo.new(params[:photo])
    if @photo.save
      flash[:notice] = 'Photo was successfully created.'
      redirect_to :action => 'list'
    else
      render :action => 'new'
    end
  end

  def edit
    @photo = Photo.find(params[:id])
  end

  def update
    @photo = Photo.find(params[:id])
    if @photo.update_attributes(params[:photo])
      flash[:notice] = 'Photo was successfully updated.'
      redirect_to :action => 'show', :id => @photo
    else
      render :action => 'edit'
    end
  end

  def destroy
    Photo.find(params[:id]).destroy
    redirect_to :action => 'list'
  end
endAs you can see, Rails generates a controller with each of the methods found in Table 4-1. Point your browser to http://localhost:3000/photos to verify that the generated code behaves identically to the code generated with the scaffold :photo method.
But the code is slightly different. Instead of generating the views from within the controller like the scaffold method, the generated code explicitly renders views in rhtml code. Letâs look at one of the views. Open app/views/photos/list.rhtml:
1 <% for column inPhoto.content_columns%> 2 <p> 3 <b><%=column.human_name%>:</b> <%=h@photo.send(column.name)%> 4 </p> 5 <% end %> 6 7 <%= link_to 'Edit', :action => 'edit', :id => @photo %> | 8 <%= link_to 'Back', :action => 'list' %>
This view is be rendered by the list method of PhotosController. Letâs look at the first and third lines in detail:
-
<% for column in Photo.content_columns %> In line 1, the view loops through each column in the database. Recall that Active Record added metadata to
Photo, maintaining an array with each column in the table.content_columnshas all of the columns that are for public display. (You donât see foreign keys or theidproperty, for example.)-
<b><%= column.human_name %> The view renders a friendly name to serve as a label of the element.
-
<%=h @photo.send(column.name) %> The view sends a message to
@photowith the name of the column and renders the result. (For example,@photo.send "filename"would be the same as@photo.filename.)
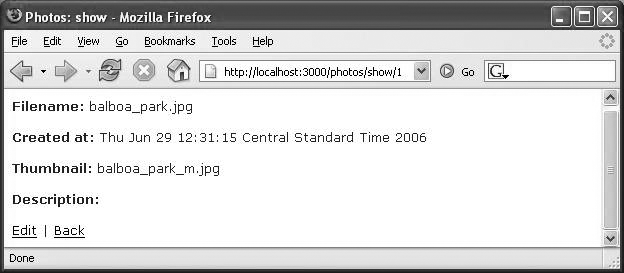
Figure 4-5 shows the result. The view lists all the properties of a Photo record in the database. The Filename property was in the database from the beginning; the Created At, Thumbnail, and Description properties were added by a migration earlier in this chapter. Furthermore, if we add more properties, the list.rhtml view wonât require any modification to display them.
The show.rhtml view reflects changes in the database. Now, letâs look at a view thatâs a little less dynamic. Open app/views/photos/_form.rhtml:
<%= error_messages_for 'photo' %>

<!--[form:photo]-->
<p><label for="photo_created_at">Created at</label><br/>
<%= datetime_select 'photo', 'created_at'  %></p>

<p><label for="photo_filename">Filename</label><br/>
<%= text_field 'photo', 'filename'  %></p>

<p><label for="photo_thumbnail">Thumbnail</label><br/>
<%= text_field 'photo', 'thumbnail'  %></p>

<p><label for="photo_description">Description</label><br/>
<%= text_field 'photo', 'description'  %></p>
<!--[eoform:photo]-->
This view is called a partial, and itâs responsible for rendering a form for a photo in edit.rhtml and new.rhtml. (Youâll learn more about partials
in the next chapter.) The words in bold are attributes on Photo. Because youâve generated explicit code to render the form, this view works only for the database columns that were present when you created the scaffolding. So here, you see one of the primary differences between scaffolding created through metaprogramming and generated scaffolding. When we used metaprogramming, because our scaffold :photo method generated scaffolding at runtime, the scaffolding reflects changes in the database. With our generated code, the scaffolding gives a one-time benefit, but must be maintained thereafter.
The Best of Both Worlds
Most Rails developers use both kinds of scaffolding. The scaffold method helps when youâre revising your Active Record models quickly, because it reflects database changes in the user interface. Later, you can generate scaffolding and flesh out your controllers and user interfaces, starting from a foundation of generated code. Using both in combination is a powerful way to work.
Scaffolding does have its limits, though. You get a one-size-fits-all user interface and controller. Itâs not going to be right for all purposes, and itâs not complete. One of the biggest deficiencies of scaffolding is the lack of relationship management. Scaffolding does not take relationships in the existing model under consideration when creating the scaffold.
Moving Forward
In this chapter, we generated scaffolding for a primitive user interface. But there are limits to the scaffolding code. It doesnât manage relationships, so you canât see or edit the photos associated with a category or the slides in a slideshow. The views are also ugly and incomplete. In the next chapter, weâll start to remedy the problems. Weâll use the generated scaffolding as a base and build a more complete user interface. Photo Share is moving quickly, and weâre not about to slow down.
[*] If you havenât been coding along but wish to start, you can download all of the code through Chapter 3 from the bookâs web page (http://www.oreilly.com/catalog/rubyrails).
[â ] You can see the actual definition in the Rails source code. scaffold is actually defined on ClassMethods and mixed in as a module to ActionController.
Get Ruby on Rails: Up and Running now with the O’Reilly learning platform.
O’Reilly members experience books, live events, courses curated by job role, and more from O’Reilly and nearly 200 top publishers.

