Chapter 4. JSX
So far in the book you’ve seen how your user interfaces are defined in the render() functions using calls to React.createElement() and the React.DOM.* family (e.g., React.DOM.span()). One inconvenience with that many function calls is that it’s a little hard to keep up with all the parentheses and curly braces you need to close. There’s an easier way: JSX.
JSX is a separate technology from React and completely optional. As you see, the first three chapters didn’t even use JSX. You can opt into not using JSX at all. But it’s very likely that once you try it, you won’t go back to function calls.
Note
It’s not quite clear what the acronym JSX stands for, but it’s most likely JavaScriptXML or JavaScript Syntax eXtension. The official home of the open-source project is http://facebook.github.io/jsx/.
Hello JSX
Let’s revisit the final “Hello World” example from Chapter 1:
<scriptsrc="react/build/react.js"></script><scriptsrc="react/build/react-dom.js"></script><script>ReactDOM.render(React.DOM.h1({id:"my-heading"},React.DOM.span(null,React.DOM.em(null,"Hell"),"o")," world!"),document.getElementById('app'));</script>
There are quite a few function calls in the render() function. Using JSX makes it simpler:
ReactDOM.render(<h1id="my-heading"><span><em>Hell</em>o</span>world!</h1>,document.getElementById('app'));
This syntax looks just like HTML and you already know HTML. The only thing is, because it’s not valid JavaScript syntax, it cannot run in the browser as-is. You need to transform (transpile) this code into pure JavaScript that the browser can run.
Transpiling JSX
The process of transpilation is a process of taking source code and rewriting it to accomplish the same results but using syntax that’s understood by older browsers. It’s different than using polyfills.
An example of a polyfill is adding a method to Array.prototype such as map(), which was introduced in ECMAScript5, and making it work in browsers that support ECMAScript3, like so:
if(!Array.prototype.map){Array.prototype.map=function(){// implement the method};}// usagetypeof[].map==='function';// true, `map()` is now usable
A polyfill is a solution in pure JavaScript-land. It’s a good solution when adding new methods to existing objects or implementing new objects (such as JSON). But it’s not sufficient when new syntax is introduced into the language. New syntax, such as making the keyword class work, is just invalid syntax that throws a parse error in browsers without class support and there’s no way to polyfill it. New syntax therefore requires a compilation (transpilation) step so it’s transformed before it’s served to the browser.
Transpiling JavaScript is getting more and more common as programmers want to use features of ECMAScript6 (aka ECMAScript2015) and beyond and not have to wait for browsers to support them. If you already have a build process set up (that does, e.g., minification or ECMAScript6-to-5 transpilation), you can simply add the JSX transformation step to it. But let’s assume you don’t have a build process and go through the steps of setting up a light client-side one.
Babel
Babel (formerly known as 6to5) is an open source transpiler that supports the latest JavaScript features and also includes JSX support. It’s a prerequisite to using JSX. In the next chapter, you’ll see how to set up a build process that will allow you to ship React apps to real-life users. But for the purposes of this JSX discussion, let’s keep things lightweight and do the transpilation on the client side.
Note
Obligatory warning: client-side transformations are only for prototyping, education, and exploration. For performance reasons, they should not be used in real-life applications.
For in-browser (client-side) transformations, you need a file called browser.js. Babel no longer provides it since version 6, but you can always grab the last working copy:
$mkdir ~/reactbook/babel$cd~/reactbook/babel$curl https://cdnjs.cloudflare.com/ajax/libs/babel-core/5.8.34/browser.js > browser.js
Note
Before v0.14, React included a JSXTransformer client-side script. Also, the react-tools NPM package installed a command-line jsx utility in previous versions. These have been deprecated in favor of Babel.
Client Side
There are two things you need to do in your page to make JSX work:
-
Include browser.js, the script capable of transpiling JSX
-
Mark up the script tags that use JSX to let Babel know it has work to do
All the examples in the book so far include the React library like so:
<scriptsrc="react/build/react.js"></script><scriptsrc="react/build/react-dom.js"></script>
In addition to these, you now need to include the transformer:
<scriptsrc="react/build/react.js"></script><scriptsrc="react/build/react-dom.js"></script><scriptsrc="babel/browser.js"></script>
The second step is to add text/babel (which is not supported by the browsers) as a type attribute to the <script> tags that require transformation.
Before:
<script>ReactDOM.render(/*...*/);</script>
After:
<scripttype="text/babel">ReactDOM.render(/*...*/);</script>
When you load the page, the browser.js kicks in, finds all the text/jsx scripts, and transforms their content into something the browsers can use. Figure 4-1 shows what happens in Chrome when you try to run a script with JSX syntax as-is. You get a syntax error, just as expected. In Figure 4-2, you can see that the page works fine after the browser.js transpiles the script blocks with type="text/babel".
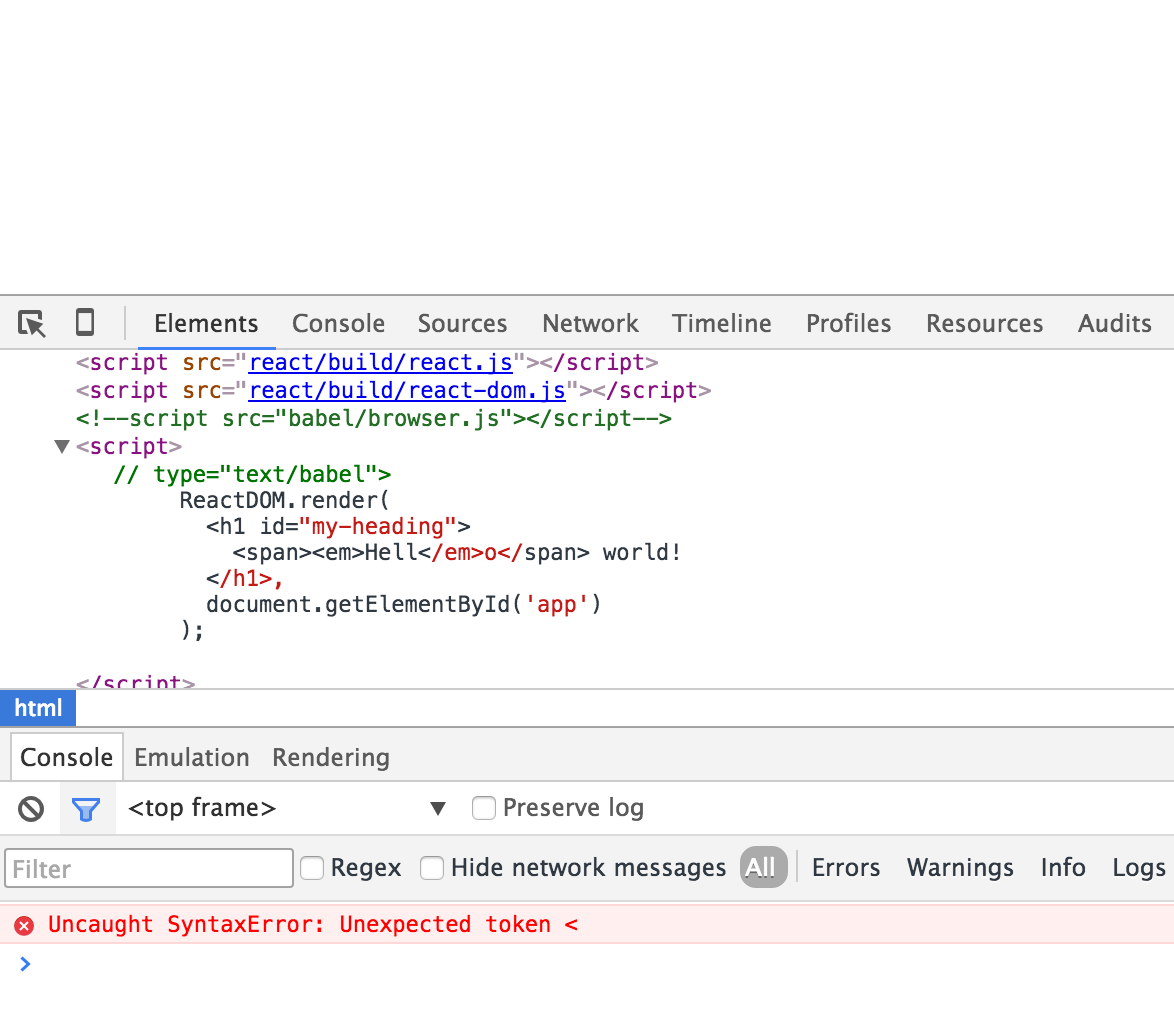
Figure 4-1. Browsers don’t understand JSX syntax
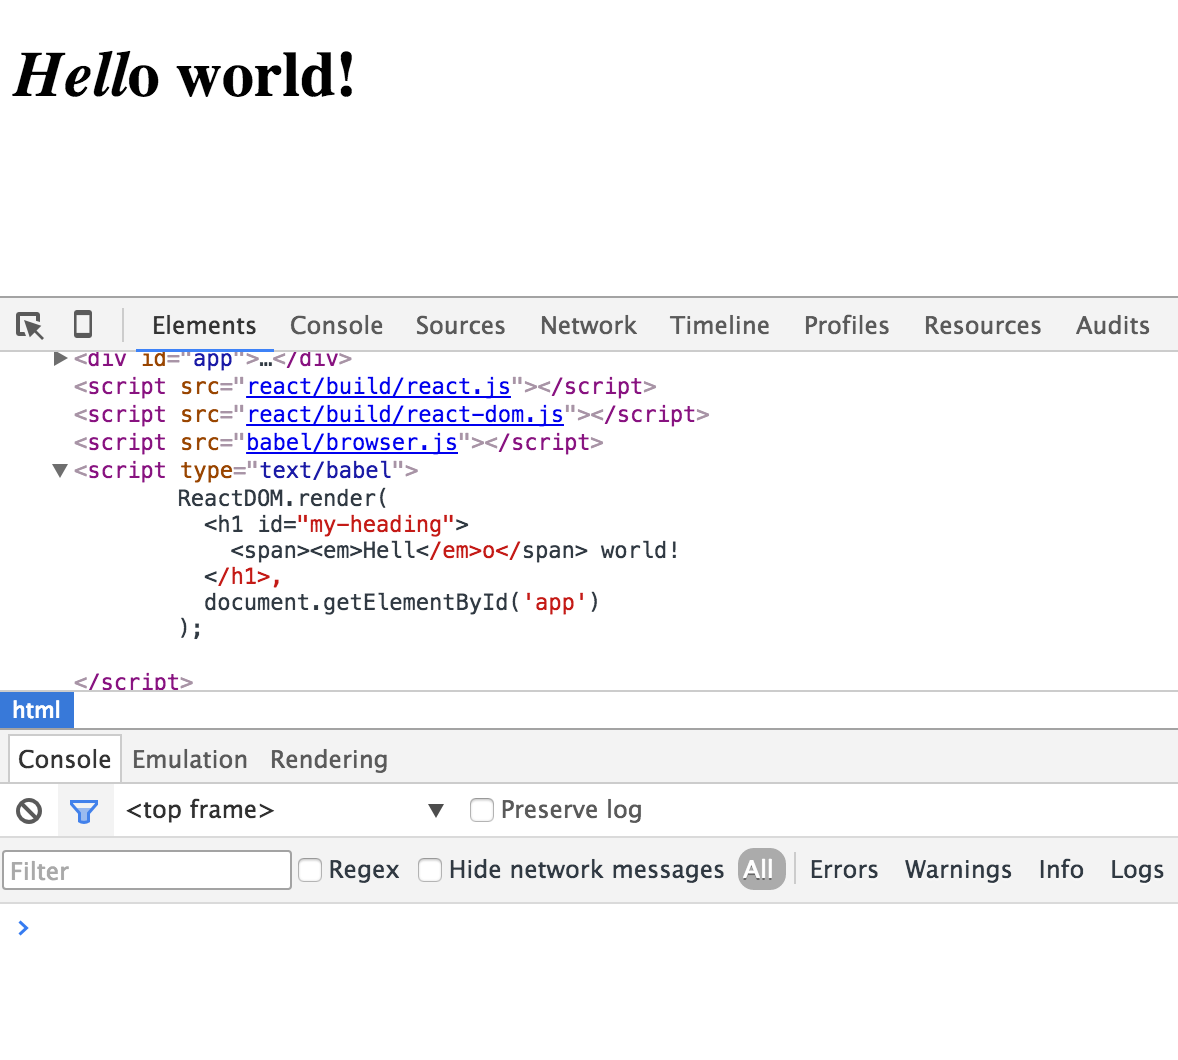
Figure 4-2. Babel’s browser script and text/babel content-type
About the JSX transformation
To experiment and get familiar with the JSX transforms, you can play with the live editor at https://babel.js.io/repl/ (Figure 4-3).
As you can see in Figure 4-4, the JSX transform is lightweight and simple: the JSX source of “Hello World” becomes a series of calls to React.createElement(), using the same functional syntax you’re already familiar with. It’s just JavaScript, so it’s easy to read and understand.
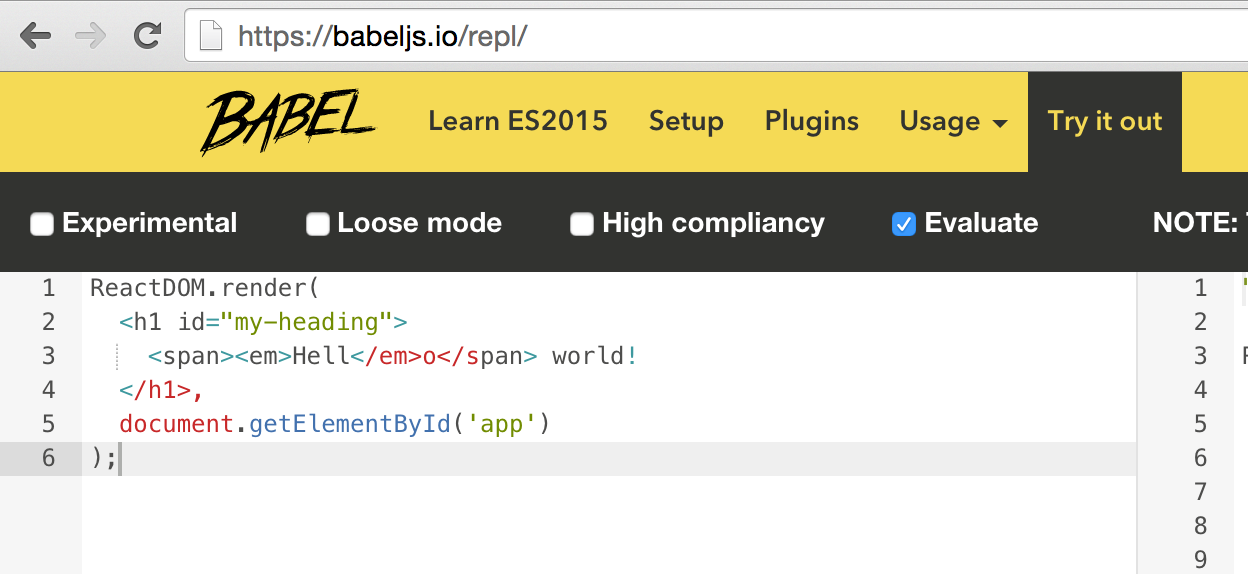
Figure 4-3. Live JSX Transformation tool
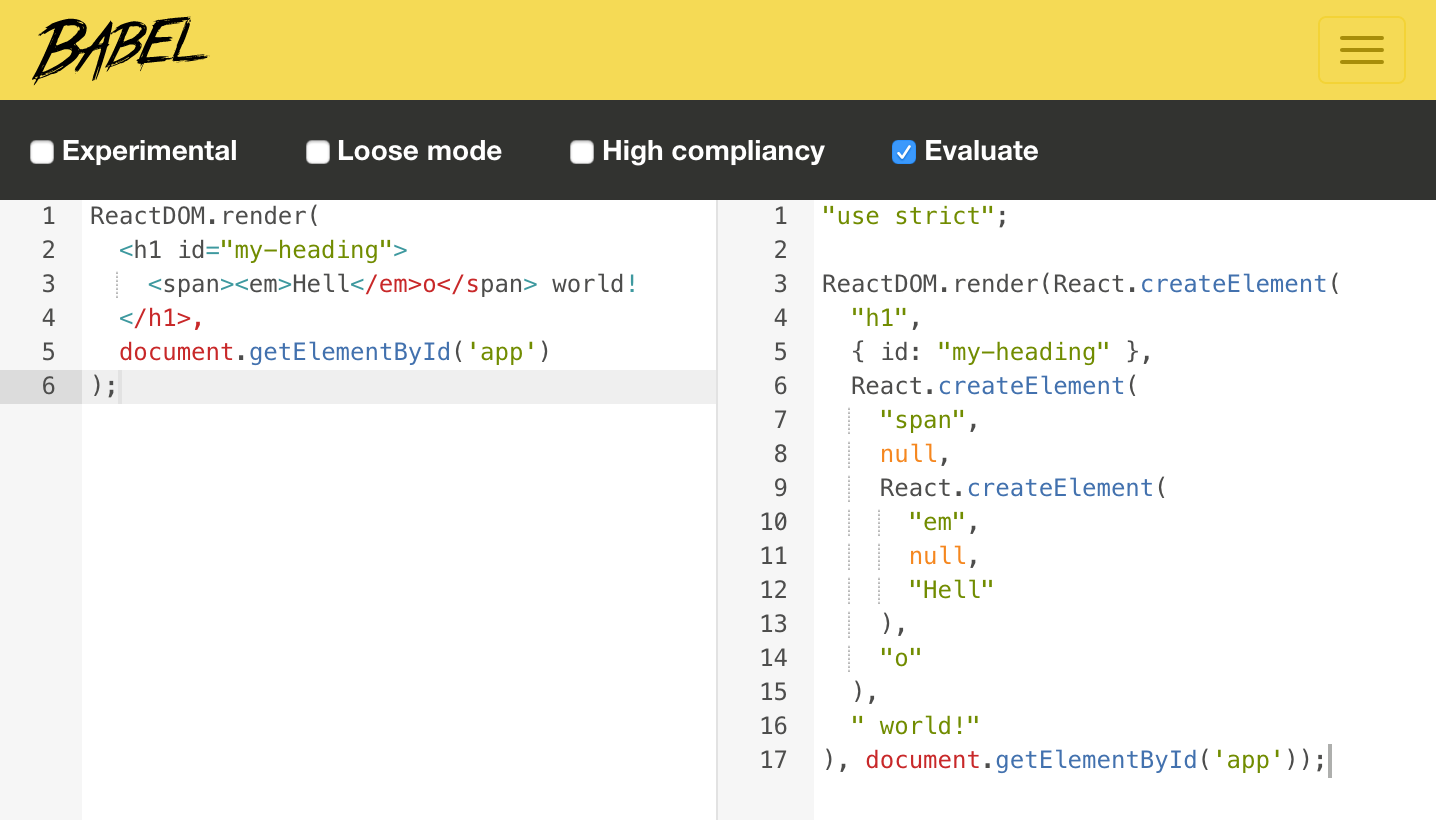
Figure 4-4. “Hello World” transformed
There’s another online tool you may find helpful when learning JSX or transitioning an existing app’s markup from HTML: an HTML-to-JSX transformer (Figure 4-5).
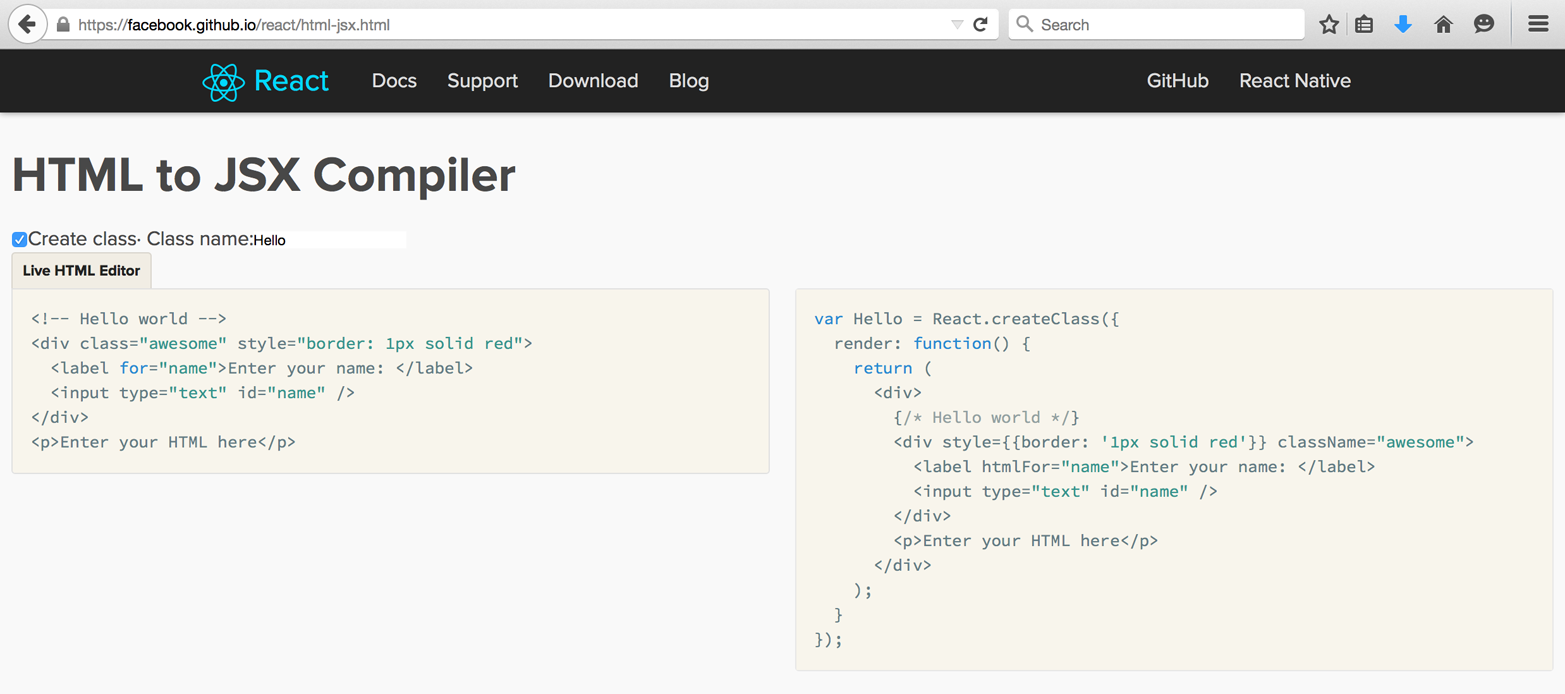
Figure 4-5. HTML-to-JSX tool
JavaScript in JSX
When building a UI, you often need to use variables, conditions, and loops. Instead of making up yet another templating syntax, JSX lets you write JavaScript inside of the markup. All you need to do is wrap your JavaScript code in curly braces.
Take, for example, one of the Excel examples from the previous chapter. To replace the functional syntax with JSX, you end up with something like this:
varExcel=React.createClass({/* snip... */render:function(){varstate=this.state;return(<table><theadonClick={this._sort}><tr>{this.props.headers.map(function(title,idx){if(state.sortby===idx){title+=state.descending?' \u2191':' \u2193';}return<thkey={idx}>{title}</th>;})}</tr></thead><tbody>{state.data.map(function(row,idx){return(<trkey={idx}>{row.map(function(cell,idx){return<tdkey={idx}>{cell}</td>;})}</tr>);})}</tbody></table>);}});
As you can see, to use variables, you wrap them in curly braces:
<thkey={idx}>{title}</th>
For loops, you can wrap map() calls in curly braces too:
<trkey={idx}>{row.map(function(cell,idx){return<tdkey={idx}>{cell}</td>;})}</tr>
You can have JSX in JavaScript in JSX nested as deeply as you need. You can think of JSX as JavaScript (after a light transformation), but with familiar HTML syntax. Even members of your team who are not as well-versed in JavaScript as yourself, but who know HTML, can write JSX. And they can learn just enough JavaScript to use variables and loops to build the UI with live data.
In the Excel example just shown, there is an if condition in a map() callback. Although it’s a nested condition, with a little formatting help you can make it a readable one-shot ternary:
return(<thkey={idx}>{state.sortby===idx?state.descending?title+' \u2191':title+' \u2193':title}</th>);
Note
Notice the repeating title in this last example? You can get rid of it:
return(<thkey={idx}>{title}{state.sortby===idx?state.descending?' \u2191':' \u2193':null}</th>);
However, in this case, you need to modify the sorting function in the example. The sorting function assumes a person clicks a <th> and uses cellIndex to figure out which <th>. But when you have adjacent {} blocks in JSX, you get <span> tags to differentiate the two. In other words, <th>{1}{2}</th> turns into DOM as if it was <th><span>1</span><span>2</span></th>.
Whitespace in JSX
Whitespace in JSX is similar to HTML, but not quite:
<h1>{1}plus{2}is{3}</h1>
…results in
<h1><span>1</span><span>plus</span><span>2</span><span>is</span><span>3</span></h1>
…which renders as “1 plus 2 is 3” exactly as you’d expect in HTML: multiple spaces become one.
However, in this example:
<h1>{1}plus{2}is{3}</h1>
…you end up with
<h1><span>1</span><span>plus</span><span>2</span><span>is</span><span>3</span></h1>
As you can see, all the whitespace is trimmed, so the end result is “1plus2is3.”
You can always add space where you need it with {' '} (which produces more <span> tags) or make the literal strings into expressions and add the space there. In other words, any of these will work:
<h1>{/* space expressions */}{1}{' '}plus{' '}{2}{' '}is{' '}{3}</h1>
<h1>{/* space glued to string expressions */}{1}{' plus '}{2}{' is '}{3}</h1>
Comments in JSX
In the preceding examples, you can see how a new concept sneaked in—adding comments to JSX markup.
Because the expressions wrapped in {} are just JavaScript, you can easily add multiline comments using /* comment */. You can also add single-line comments using // comment, but you have to make sure the closing } of the expression is on a separate line so it’s not considered part of the comment:
<h1>{/* multiline comment */}{/*multilinecomment*/}{// single line}Hello</h1>
Because {// comment} is not working (} is now commented out), there’s little benefit to using single-line comments, and you can keep your comments consistent and stick to multiline comments in all cases.
HTML Entities
You can use HTML entities in JSX like so:
<h2>More info»</h2>
This examples produces a “right-angle quote,” as shown on Figure 4-6.
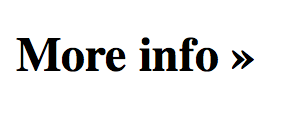
Figure 4-6. HTML entity in JSX
However, if you use the entity as part of an expression, you will run into double-encoding issues. In this example…
<h2>{"More info»"}</h2>
…the HTML gets encoded and you see the result in Figure 4-7.

Figure 4-7. Double-encoded HTML entity
To prevent the double-encoding, you can use the Unicode version of the HTML entity, which in this case is \u00bb (see http://dev.w3.org/html5/html-author/charref):
<h2>{"More info \u00bb"}</h2>
For convenience, you can define a constant somewhere at the top of your module, together with any common spacing. For example:
constRAQUO=' \u00bb';
Then use the convenient constant anywhere you need, like:
<h2>{"More info"+RAQUO}</h2><h2>{"More info"}{RAQUO}</h2>
Note
Notice the use of const instead of var? Welcome to the brave new Babel world where you can avail yourself of all things modern JavaScript has to offer. Details in Chapter 5.
Anti-XSS
You may be wondering why you have to jump through hoops to use HTML entities. There’s a good reason that outweighs the drawbacks: you need to fight XSS.
React escapes all strings in order to prevent a class of XSS attacks. So when you ask the user to give you some input and they provide a malicious string, React protects you. Take this user input, for example:
varfirstname='John<scr'+'ipt src="http://evil/co.js"></scr'+'ipt>';
Under some circumstances, you may end up writing this into the DOM. For example:
document.write(firstname);
This is a disaster, because the page says “John,” but the <script> tag loads a malicious JavaScript and compromises your app and the users that trust you.
React protects you from cases like this out of the box. If you do:
React.render(<h2>Hello{firstname}!</h2>,document.getElementById('app'));
…then React escapes the content of firstname (Figure 4-8).

Figure 4-8. Escaping strings
Spread Attributes
JSX borrows a useful feature from ECMAScript6 called the spread operator and adopts it as a convenience when defining properties.
Imagine you have a collection of attributes you want to pass to an <a> component:
varattr={href:'http://example.org',target:'_blank',};
You can always do it like so:
return(<ahref={attr.href}target={attr.target}>Hello</a>);
But this feels like a lot of boilerplate code. By using spread attributes, you can accomplish this in just one line:
return<a{...attr}>Hello</a>;
In example, you have an object of attributes you want to define (maybe conditionally) ahead of time. This is useful in itself, but a more common use is when you get this object of attributes from outside—often from a parent component. Let’s see how that case plays out.
Parent-to-Child Spread Attributes
Imagine you’re building a FancyLink component that uses a regular <a> behind the scenes. You want your component to accept all the attributes that <a> does (href, style, target, etc.) plus some more (say size). So people can use your component like so:
<FancyLinkhref="http://example.org"style={{color:"red"}}target="_blank"size="medium">Hello</FancyLink>
How can your render() function take advantage of spread attributes and avoid redefining all the properties of <a>?
varFancyLink=React.createClass({render:function(){switch(this.props.size){// do something based on the `size` prop}return<a{...this.props}>{this.props.children}</a>;}});
Note
Did you notice the use of this.props.children? This is a simple and convenient method to allow any number of children to be passed over to your component and access them when composing your interface.
In the preceding snippet, you do your custom work based on the value of the size property, then simply carry over all the properties to <a>. This includes the size property. React.DOM.a has no concept of size, so it silently ignores it while using all the other properties.
You can do a little better and not pass around unnecessary properties by doing something like:
varFancyLink=React.createClass({render:function(){switch(this.props.size){// do something based on the `size` prop}varattribs=Object.assign({},this.props);// shallow clonedeleteattribs.size;return<a{...attribs}>{this.props.children}</a>;}});
Note
Using the ECMAScript7-proposed syntax (brought to your fingertips free of charge by Babel!) this becomes even easier without any cloning:
varFancyLink=React.createClass({render:function(){var{size,...attribs}=this.props;switch(size){// do something based on the `size` prop}return<a{...attribs}>{this.props.children}</a>;}});
Returning Multiple Nodes in JSX
You always have to return a single node from your render() function. Returning two nodes is not allowed. In other words, this is an error:
// Syntax error:// Adjacent JSX elements must be wrapped in an enclosing tagvarExample=React.createClass({render:function(){return(<span>Hello</span><span>World</span>);}});
The fix is easy—just wrap all the nodes in another component, say a <div>:
varExample=React.createClass({render:function(){return(<div><span>Hello</span><span>World</span></div>);}});
While you cannot return an array of nodes from your render() function, you can use arrays during composition, as long as the nodes in the array have proper key attributes:
varExample=React.createClass({render:function(){vargreeting=[<spankey="greet">Hello</span>,' ',<spankey="world">World</span>,'!'];return(<div>{greeting}</div>);}});
Notice how you can also sneak in whitespace and other strings in the array, and that these don’t need a key.
In a way, this is similar to accepting any number of children passed from the parent and propagating them over in your render() function:
varExample=React.createClass({render:function(){console.log(this.props.children.length);// 4return(<div>{this.props.children}</div>);}});React.render(<Example><spankey="greet">Hello</span>{' '}<spankey="world">World</span>!</Example>,document.getElementById('app'));
JSX Versus HTML Differences
JSX should look very familiar—it’s just like HTML, but with the benefit of an easy way to add dynamic values, loops, and conditions (just wrap them in {}). To start with JSX, you can always use the HTML-to-JSX tool, but the sooner you start typing your very own JSX, the better. Let’s consider the few differences between HTML and JSX that may surprise you at the beginning as you’re learning.
Some of these differences were described in Chapter 1, but let’s quickly review them again.
No class, What for?
Instead of the class and for attributes (both reserved words in ECMAScript), you need to use className and htmlFor:
// No-no!varem=<emclass="important"/>;varlabel=<labelfor="thatInput"/>;// OKvarem=<emclassName="important"/>;varlabel=<labelhtmlFor="thatInput"/>;
style Is an Object
The style attribute takes an object value, not a semicolon-separated string. And the names of the CSS properties are camelCase, not dash-delimited:
NO-NO!varem=<emstyle="font-size: 2em; line-height: 1.6"/>;// OKvarstyles={fontSize:'2em',lineHeight:'1.6'};varem=<emstyle={styles}/>;// inline is also OK// note the double { {} } - one for the dynamic value in JSX, one for the JS objectvarem=<emstyle={{fontSize:'2em',lineHeight:'1.6'}}/>;
Closing Tags
In HTML some tags don’t need to be closed; in JSX (XML) they do:
// NO-NO// no unclosed tags, even though they are fine in HTMLvargimmeabreak=<br>;varlist=<ul><li>item</ul>;varmeta=<metacharset="utf-8">;// OKvargimmeabreak=<br/>;varlist=<ul><li>item</li></ul>;varmeta=<metacharSet="utf-8"/>;// orvarmeta=<metacharSet="utf-8"></meta>;
camelCase Attributes
Did you spot the charset versus charSet in the preceding snippet? All attributes in JSX need to be camelCase. This is a common source of confusion when you’re first starting out—you might type onclick and notice that nothing happens until you go back and change it to onClick:
// No-no!vara=<aonclick="reticulateSplines()"/>;// OKvara=<aonClick={reticulateSplines}/>;
Exceptions to this rule are all data- and aria- prefixed attributes; these are just like in HTML.
JSX and Forms
There are some differences between JSX and HTML when working with forms. Let’s take a look.
onChange Handler
When using form elements, users change their values when interacting with them. In React, you can subscribe to such changes with onChange attribute. This is much more consistent than using the checked value for radio buttons and checkboxes, and selected in <select> options. Also when typing in textareas and <input type="text"> fields, onChange fires as the user types, which is much more useful than firing when the element loses focus. This means no more subscribing to all sorts of mouse and keyboard events just to monitor typing changes.
value Versus defaultValue
In HTML, if you have <input id="i" value="hello" /> and then change the value by typing “bye”, then…
i.value;// "bye"i.getAttribute('value');// "hello"
In React, the value property always has the up-to-date content of the text input. If you want to specify a default, you can use defaultValue.
In the following snippet, you have an <input> component with a pre-filled “hello” content and onChange handler. Deleting the last “o” in “hello” results in value being “hell” and defaultValue remaining “hello”:
functionlog(event){console.log("value: ",event.target.value);console.log("defaultValue: ",event.target.defaultValue);}React.render(<inputdefaultValue="hello"onChange={log}/>,document.getElementById('app'));
Note
This is a pattern you should use in your own components: if you accept a property that hints that it should be up to date (e.g., value, data), then keep it current. If not, call it initialData (as you saw in Chapter 3) or defaultValue or similar to keep the expectations straight.
<textarea> Value
For consistency with text inputs, React’s version of <textarea> takes value and defaultValue properties. It keeps value up to date while defaultValue remains the original. If you go HTML-style and use a child of the textarea to define a value (not recommended), it will be treated as if it was a defaultValue.
The whole reason HTML <textarea> (as defined by W3C) takes a child as its value is so that developers can use new lines in the input. However React, being all JavaScript, doesn’t suffer from this limitation. When you need a new line, you just use \n.
Consider the following examples and their results shown in Figure 4-9:
functionlog(event){console.log(event.target.value);console.log(event.target.defaultValue);}React.render(<textareadefaultValue="hello\nworld"onChange={log}/>,document.getElementById('app1'));React.render(<textareadefaultValue={"hello\nworld"}onChange={log}/>,document.getElementById('app2'));React.render(<textareaonChange={log}>helloworld</textarea>,document.getElementById('app3'));React.render(<textareaonChange={log}>{"hello\n\world"}</textarea>,document.getElementById('app4'));
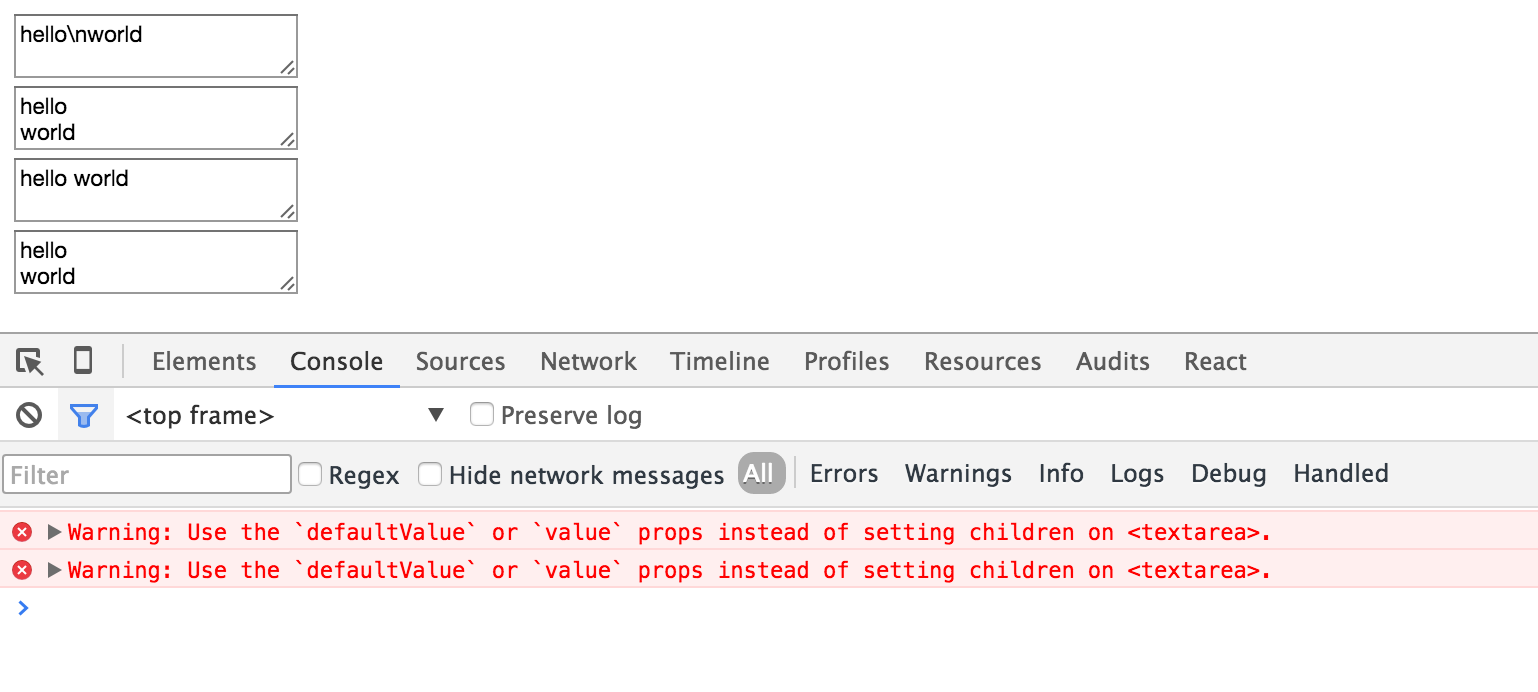
Figure 4-9. New lines in textareas
Note the differences between using a literal string "hello\nworld" as a property value versus using the JavaScript string {"hello\nworld"}.
Also note how a multiline string in JavaScript needs to be escaped with a \ (fourth example).
And finally, see how React warns you about using old-school <textarea> children to set the value.
<select> Value
When you use a <select> input in HTML, you specify pre-selected entries using <option selected>, like so:
<!-- old school HTML --><select><optionvalue="stay">Should I stay</option><optionvalue="move"selected>or should I go</option></select>
In React, you specify value, or better yet, defaultValue on the <select> element:
// React/JSX<selectdefaultValue="move"><optionvalue="stay">ShouldIstay</option><optionvalue="move">orshouldIgo</option></select>
The same applies when you have multiselect, only you provide an array of pre-selected values:
<selectdefaultValue={["stay","move"]}multiple={true}><optionvalue="stay">ShouldIstay</option><optionvalue="move">orshouldIgo</option><optionvalue="trouble">IfIstayitwillbetrouble</option></select>
Note
React warns you if you get mixed up and set the selected attribute of an <option>.
Using <select value> instead of <select defaultValue> is also allowed, although not recommended, as it requires you to take care of updating the value that the user sees. Otherwise, when the user selects a different option, the <select> stays the same. In other words, you need something like:
varMySelect=React.createClass({getInitialState:function(){return{value:'move'};},_onChange:function(event){this.setState({value:event.target.value});},render:function(){return(<selectvalue={this.state.value}onChange={this._onChange}><optionvalue="stay">ShouldIstay</option><optionvalue="move">orshouldIgo</option><optionvalue="trouble">IfIstayitwillbetrouble</option></select>);}});
Excel Component in JSX
To wrap up, let’s use JSX and rewrite all render*() methods in the final version of the Excel component from the previous chapter. I’ll leave this exercise for your own amusement and you can always compare your solution with the example from the code repository accompanying this book.
Get React: Up & Running now with the O’Reilly learning platform.
O’Reilly members experience books, live events, courses curated by job role, and more from O’Reilly and nearly 200 top publishers.

