Chapter 1. The React Native Toolchain
React Native lives in an ecosystem with dozens of little software tools. You have transpilers (Babel, Metro, Webpack), package managers (NPM, Yarn), linters, unit test frameworks, and more. This chapter will cover the language basics and the minimum set of open source tools you will be working with in your React Native project. Youâre probably writing your React Native application with JavaScript or some kind of transpiled source that compiles down to JavaScript, like TypeScript or ES6+. I hope this chapter will help acquaint you with JavaScriptâs breakneck speed.
Expo
Recently the React Native team has partnered with Expo to deliver React Native applications in development without running a local development environment. This is a great way to explore React Native and get a taste, but you will likely want to work with the hardware at some point, at which point a local development environment will be critical to your productivity.
1.1 Setting Up Your Development Environment
If youâre working with any of these tools in other web projects, you might find yourself having to troubleshoot your environment. Like a carpenter arriving on a job site, you need to know how all the tools work and if they need to be fixed.
React Native is a package that includes three programming environments: Node.js, iOS, and Android. NPM, the Node Package Manager, needs to be in good working order.
Problem
React Native is a software library that depends on a lot of different tools. How do we know if all of them are configured correctly? Letâs review them and make sure.
Node and Watchman
Node.js (usually abbreviated to âNodeâ) enables your computer to run JavaScript locally in the same way that a web browser runs JavaScript when a web page is executed. Because Node.js runs directly on top of your operating system, Node code can wrap or bind to C libraries and solve the same programming problems that are suited to languages like PHP, Python, PERL, and Ruby.
Watchman is a little utility that watches for file changes locally and triggers events. This tool makes it possible to execute updated code on your Simulator without having to recompile the whole project. Installation is quick and easy.
Installing Node.js
Installing Node depends on your operating system. The best place to get started is The Node.js website. If you are running on Mac OS, you may find it preferable to install Node.js through Homebrew, a Mac OS package manager.
Check that Node is properly installed
You may find yourself with many versions of Node.js installed on your computer. Version managers like the Node Version Manager (NVM) can help you keep different versions of Node installed, with each development project configured with its own version of Node.
POSIX-style operating systems (Linux, BSD, Mac OS) can rely on symbolic links (symlink) to support multiple versions.
You shouldnât be surprised if you have two versions of Node installed using Homebrew with Mac OS. This is what your installation should look like, except with your own username and date information next to the directories listed:
$>which node /usr/local/bin/node$>node -v v8.6.0
Iâm using version 8.6.0 of Node; however, if I check the Homebrew directory (default is /usr/local/Cellar) I will discover a symlink (alias to the actual location):
$>ls -l /usr/local/bin/node lrwxr-xr-x1jon admin2927Sep 15:14 /usr/local/bin/node -> ../Cellar/node/8.6.0/bin/node
A little more digging and Iâll find other versions of Node that have been superseded:
$>ls -l /usr/local/Cellar/node total 0 drwxr-xr-x14jon admin47611May 14:14 7.10.0 drwxr-xr-x14jon admin47625Apr 13:41 7.9.0 drwxr-xr-x14jon admin44827Sep 15:14 8.6.0
Your results will likely be different; however, what is important is that you have a recent version of Node installed and accessible to your project.
NPM
The NPM is two things: a package management tool running from the command line and a global catalog of open source packages available at your fingertips.
The react-native package in NPM includes JavaScript ES6 modules that
rely on platform-specific code. For example, the <Text /> React Native component
is implemented by RCTText.m in iOS and ReactTextView.java in Android.
What About Using Yarn?
React Native has historically been set up with NPM, but Yarn is gaining ground in the JavaScript community. Yarn is a faster alternative to NPM that still relies on the NPM registry. A yarn.lock file ensures that dependencies are maintained correctly. Yarn will start by checking the yarn.lock file, then look for package.json, making the transition to Yarn seamless.
NPM packages can live globally or within a node_modules folder for a given
project. React Native is best installed globally, whereas project-related
dependencies should be downloaded to a local folder. This approach allows you to
run React Nativeâs command-line tool, react-native-cli, anywhere. Specific versions
of the React Native can be part of your projectâs dependencies.
Check that NPM is properly installed
$> which npm
/usr/local/bin/npm
Your terminal should return with a path. Check the version:
$> npm -v
4.2.0
Install the React Native command-line tools
$> npm install -g react-native-cliXcode (required for iOS)
Xcode is Appleâs official development environment for building and running applications on Mac OS and iOS. You will need Xcode (available only on Mac OS) installed in order to compile the React Native components that are backed by Objective-C and Swift.
Xcode also ships with command-line tools, which are necessary to build code from the command line and to bind to the Mac OS libraries from Node.js.
Running Xcode Beta
With regular updates to iOS, you may have a beta of Xcode on your development machine. Having multiple versions of Xcode will result in multiple versions of the iOS Simulator. Iâve found it best under these circumstances to launch the Simulator from Xcode rather than the command line.
JDK
Android and Java go together like sugar and butterâtogether they make delicious experiences possible. React Native on Android is no different. The React components you write in JavaScript will ultimately touch the Android Java Virtual Machine. In order to run Android locally, you need the Java Development Kit (JDK) installed.
Download the JDK (minimum version 8) from the Oracle website.
Android Studio
Android Studio is the official development environment for building and deploying Android applications. Itâs free to download. Once you have it set up, it comes with yet another package manager. Fortunately, the React Native Getting Started guide goes through all the details step by step.
1.2 Writing ES6 with Babel
Babel brings a 20-year programming language into the twenty-first century. With Babel,
you can write JavaScript with some syntactic enhancements that make your code
more expressive. Common patterns, like transforming data structures, handling
this in the appropriate scope, and inheriting from classes become part of the
native development experience.
Babel enables these syntactic improvements to the language through a series of syntax transformers. Each transformer runs through your code, taking newer ES6 language features and transforming them into equivalent behaviors in JavaScript syntax.
The following ES6 code is transformed automatically using the react-native preset.
Save the following to a file called babel-transform.js:
AsyncStorage.getItem("loginParameters").then((login)=>{this.setState({login});});
From the command line, run:
$> babel babel-transform.jsBabel should return (formatted for readability):
var_this=this;AsyncStorage.getItem("loginParams").then(function(login){_this.setState({login:login});});
The React Native preset has:
-
Expanded
{ login }into{ login: login }. -
Replaced the
=>operator with a reference to_thisdefined in the outer method scope.
Working with React Native almost always means using React and the JSX preprocessor. The JSX preprocessor enables XML syntax inside of JavaScript files. The Babel transpiler has plug-ins for handling JSX out of the box.
Any of the React Native initialization scripts will include a .babelrc file in the root folder of the application. It should look like this:
{"presets":["react-native"]}
At the time of this writing, the React Native preset is shorthand for the following Babel transpilations:
-
class-properties -
es2015-arrow-functions -
es2015-block-scoping -
es2015-classes -
es2015-computed-properties -
es2015-destructuring -
es2015-for-of -
es2015-function-name -
es2015-literals -
es2015-modules-commonjs -
es2015-parameters -
es2015-shorthand-properties -
es2015-spread -
es2015-template-literals -
flow-strip-types -
object-assign -
object-rest-spread -
react-display-name -
react-jsx-source -
react-jsx
Problem
In the previous example, es2015-shorthand-properties and
es2015-arrow-functions were applied to the one-line code snippet referenced at the beginning of this recipe.
Letâs add a new syntax transformer that will add support for do blocks to our environment.
Solution
The do block is a helpful combination of a switch operator and a function.
You may find this syntax useful when switching out the appropriate React
component based on something in this.state or this.props:
$>npm i --save-dev babel-plugin-transform-do-expressionsCreate a simple file called babel.js in your project folder:
WelcomeHeader=(username)=>do{if(username!==undefined){`Welcome,${username}.`;}else{'Hello there, stranger!';}}console.log(WelcomeHeader('Mr. Robot'));console.log(WelcomeHeader());
Add the transform to babel.rc:
{"presets":["react-native"],"plugins":["syntax-do-expressions"]}
Now try converting the file with Babel:
$>babel babel.jsWelcomeHeader=functionWelcomeHeader(username){returnusername!==undefined?'Welcome,'+username+'.':'Hello there, stranger!';};console.log(WelcomeHeader('Mr. Robot'));console.log(WelcomeHeader());
Try running the code example with babel-node:
$>babel-node babel.js
Welcome, Mr. Robot.
Hello there, stranger!
See Also
Support for decorators is upcoming in Babel. Currently this transform can be
handled using the
transform-decorators-legacy transform.
Decorators are functions that wrap existing code. Since higher order functionsâfunctions that call JSX components in other functionsâare wrapping code, the decorator transform provides syntax for declaring this wrapping code.
1.3 Organizing Project Files
Organizing code is tricky. One of the greatest software engineers of our time, Robert C. Martin, shared the following insight about directory structures and how they impact software architecture:
So what does the architecture of your application scream? ... do they scream: Rails, or Spring/Hibernate, or ASP? ... Tell readers about the system, not about the frameworks you used in your system. If you are building a health-care system, then when new programmers look at the source repository, their first impression should be: âOh, this is a health-care system.â
Robert C. Martin, Screaming Architecture (30 September 2011)
With tools like react-native init and create-react-native-app weâre given a
great starting point for structuring our application. You should treat this as a
starting point and nothing more.
Create React Native App
If you are looking for some project scaffolding, the React Community
has put together
create-react-native-app,
a library that will help you set up a React Native project with some helpful
defaults. This is a great tool as long as your project is purely written in
JavaScript and a limited list of supported Expo libraries. Eventually, you may want to eject the app from the
scaffolding and manage the build process yourself.
Problem
Your React Native application is taking off! You can barely keep the bits on the digital shelves. You are responding to feature requests as soon as they come in. The result is lots of new code. The architectural seams of your project are giving way: code is being duplicated and you find yourself repeating components and business logic. Worst of all, these duplicates are hard to find because your project structure doesnât surface dependencies to your project team.
Solution
Thereâs no one-size-fits-all solution to how to structure your application. Most React Native applications will have directories that describe components, screens, state management, and utilities. You will know that your structure fits well when you strike a balance: having directories with a cluster of files that implement a feature and not having too many folders to keep track of at any given time.
Some examples
Itâs helpful to see the end in the beginning: how sophisticated will the application ultimately become? Will it need to be localized into multiple languages? Will it have to support different user types or roles? Following are three example folder structures from some popular open source React Native applications.
Notice how they all communicate a blueprint of the main aspects of the application.
Bullet
Bullet is a cryptocurrency management tool:
. âââ actions âââ api âââ assets â  âââ fonts â  âââ icons âââ components â  âââ adverts â  âââ bull â  âââ converter â  âââ currencies â  âââ errors â  âââ graphs â  âââ navigations â  âââ news â  âââ portfolio â  âââ search â  âââ utilities âââ configuration âââ constants âââ middleware âââ mock âââ navigations âââ properties â  âââ languages â  âââ themes âââ reducers âââ schematics âââ screens âââ styles âââ utilities
Chain Conference app
This mobile application was built for a conference:
âââ App â  âââ Components â  â  âââ Styles â  âââ Config â  âââ Containers â  â  âââ Styles â  âââ Fixtures â  âââ I18n â  â  âââ languages â  âââ Images â  â  âââ Icons â  â  â  âââ sun-phases â  â  âââ sponsors â  âââ Lib â  âââ Navigation â  â  âââ Styles â  âââ Redux â  âââ Sagas â  âââ Services â  âââ Themes â  âââ Transforms â  âââ Videos âââ AppIcon âââ Tests â  âââ Components â  âââ Sagas â  âââ Services âââ _art âââ android âââ ios
MatterMost mobile chat application
A sophisticated asynchronous chat application frontend to a cloud-based team collaboration product:
âââ android
âââ app
â  âââ actions
â  â  âââ device
â  â  âââ views
â  âââ components
â  â  âââ at_mention
â  â  âââ autocomplete
â  â  â  âââ at_mention
â  â  â  âââ channel_mention
â  â  â  âââ emoji_suggestion
â  â  âââ channel_drawer
â  â  â  âââ channels_list
â  â  â  â  âââ filtered_list
â  â  â  â  âââ list
â  â  â  â  âââ switch_teams
â  â  â  âââ drawer_swipper
â  â  â  âââ teams_list
â  â  âââ channel_intro
â  â  âââ channel_link
â  â  âââ custom_list
â  â  â  âââ channel_list_row
â  â  â  âââ user_list_row
â  â  âââ emoji
â  â  âââ emoji_picker
â  â  âââ error_list
â  â  âââ file_attachment_list
â  â  âââ file_upload_preview
â  â  âââ inverted_flat_list
â  â  âââ layout
â  â  âââ markdown
â  â  â  âââ markdown_code_block
â  â  âââ offline_indicator
â  â  âââ options_context
â  â  âââ post
â  â  âââ post_attachment_opengraph
â  â  âââ post_body
â  â  âââ post_body_additional_content
â  â  âââ post_header
â  â  âââ post_list
â  â  âââ post_profile_picture
â  â  âââ post_textbox
â  â  â  âââ components
â  â  â  âââ typing
â  â  âââ profile_picture
â  â  âââ radio_button
â  â  âââ reactions
â  â  âââ root
â  â  âââ search_bar
â  â  âââ search_preview
â  â  âââ slack_attachments
â  â  âââ status_bar
â  â  âââ status_icons
â  âââ constants
â  âââ i18n
â  âââ mattermost_managed
â  âââ notification_preferences
â  âââ push_notifications
â  âââ reducers
â  â  âââ device
â  â  âââ navigation
â  â  âââ views
â  âââ screens
â  â  âââ about
â  â  âââ add_reaction
â  â  âââ channel
â  â  â  âââ channel_post_list
â  â  âââ channel_add_members
â  â  âââ channel_info
â  â  âââ channel_members
â  â  âââ code
â  â  âââ create_channel
â  â  âââ edit_post
â  â  âââ image_preview
â  â  âââ load_team
â  â  âââ login
â  â  âââ login_options
â  â  âââ mfa
â  â  âââ more_channels
â  â  âââ more_dms
â  â  â  âââ selected_users
â  â  âââ notification
â  â  âââ options_modal
â  â  âââ root
â  â  âââ search
â  â  âââ select_server
â  â  âââ select_team
â  â  âââ settings
â  â  â  âââ advanced_settings
â  â  â  âââ general
â  â  â  âââ notification_settings
â  â  â  âââ notification_settings_email
â  â  â  âââ notification_settings_mentions
â  â  â  âââ notification_settings_mentions_keywords
â  â  â  âââ notification_settings_mobile
â  â  â  âââ settings_item
â  â  âââ sso
â  â  âââ thread
â  â  âââ user_profile
â  âââ selectors
â  âââ store
â  âââ styles
â  âââ utils
â  âââ sentry
âââ assets
âââ fastlane
âââ test
Components
React Native applications will use React components. Each React component will live in its own file. These components are usually presentational components,1 meaning that they can be used without any knowledge of an external dependency. React applications assume that it is the componentâs responsibility to declare what it needs from its consumer. A simple component could just be a single JavaScript file in the components/ folder.
Here are some files you may wish to include with a component. This is an example of a Dropdown component that
depends on a few different files:
- JSX component file
-
components/dropdown/dropdown.js - Specific styles
-
components/dropdown/styles.js - Subcomponents
-
components/dropdown/row.js - Index file
-
components/dropdown/index.js
Writing Cross-Platform Components
Sometimes the iOS and Android version of a component differ so greatly that it
makes sense to have a completely different component for each. The React Native compiler
is intelligent enough to infer the correct variation based on the file suffix
and folder structure. For example, a Dropdown component can be inside of a
/dropdown folder with three files: dropdown.android.js, dropdown.ios.js,
and index.js. The index.js will automatically reference the correct version
of the component based on the suffix:
importDropdownfrom'./dropdown';exportdefaultDropdown;
The rest of your application is spared from having to know that there are two implementations of Dropdown!
Screens
Screens, also called containers, are components that also have some sort of
state management. Most applications will have some library or framework for
handling state across different pages. By using a library like React
Navigation described in Recipe 2.4, you will already be indicating which
components are screens that a user will navigate to. Not all containers can be considered screens; for example, a login form could be considered a container that will rest inside a number of different screens.
// components/root/container.jsimportGuestfrom"../guest";importLoggedInfrom"../loggedIn";import{StackNavigator}from'react-navigation';constRouteConfig={guest:{screen:Guest.container},loggedIn:{screen:LoggedIn.container},}exportdefaultStackNavigator(RouteConfig);
Screens are often kept in their own folder, making the state management dependencies very clear.
- GraphQL mutations
-
components/guest/mutations.js - GraphQL queries
-
components/guest/queries.js - Redux actions
-
components/guest/actions.js - Redux types
-
components/guest/types.js
State management
Global state management is often handled outside the components/ and screens/ directories.
GraphQL libraries like Relay and Apollo will bring their own conventions for managing GraphQL queries and mutations. If you decide to use a Flux-inspired architecture, like Redux or MobX, it may make sense to keep Action Creators or any code that the screen may call to talk to the larger application in the folder. See Recipe 2.5 for an example of global state management.
Utilities
Most projects will also include files with functions, business logic, or other helper code. These files will often live in a lib/ or utils/ folder. If you find yourself writing a lot of utility code, it may be a sign that a separate package or module needs to be written that can simply be referenced by your React Native application.
Discussion
Let the application domain dictate the structure. For example, you may be working on a reporting application with hundreds of little components that come together in a beautiful mobile dashboard. You will likely have hundreds of components in a /components folder with slight variations.
Another application might be dozens of little forms as part of a customer loan application. In this case state might need to be managed across views and validated throughout. Business logic might find its way peppered through the components or in some state management library like redux. Another approach is called Ducks, a proposed way of structuring redux-driven applications.
How do you know if your project files are well organized? Interview someone on your team and see if they can find their way around the the project intuitively. If you find yourself changing files across several directories every time a new, distinct feature is developed, then you might want to consider reorganizing your project files.
1.4 Dealing with Catastrophic Failure
Like a mousse that wonât set, sometimes we have to face catastrophic failure. Fortunately React Native provides a set of common tools for debugging applications.
Problem
You have an error and you donât know what you changed or you find yourself with a warning and are struggling to track it down.
Solution
Unlike real cooking, we can save ourselves the unpleasant task of starting from
scratch simply by using version control. Even if I donât plan on sharing my
React Native experiments with the world, I make a point of using git locally
to keep different versions of my project. This way I can refactor away and
always have a waypoint in my development trail to refer to. A git checkout is
all thatâs required to undo a fatal red screen of death as shown in Figure 1-1.
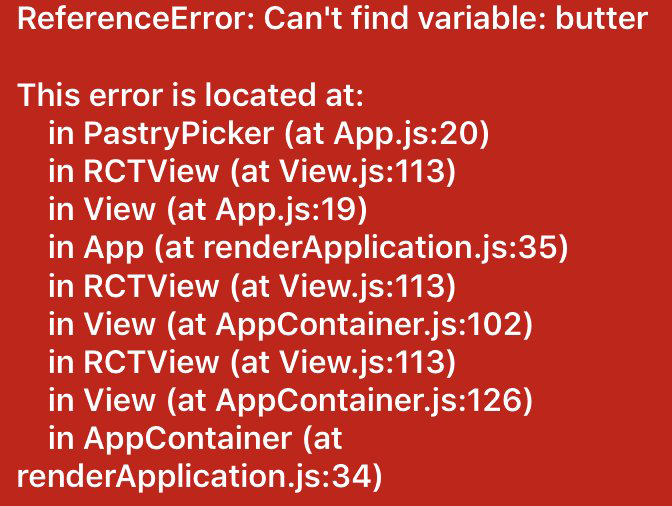
Figure 1-1. The React Native red screen of death (RedBox)
Rely on the React Native debugger. You can access it by doing a Hardware >
Shake Gesture in the iOS Simulator. With Android, you will need to run âM on a
Mac. You can refresh your app by typing rr in the Android Simulator or âR in
the iOS Simulator. See more details in the
React Native
Debugging Guide. See an example of the React Native debugging toolbar on iOS in Figure 1-2.
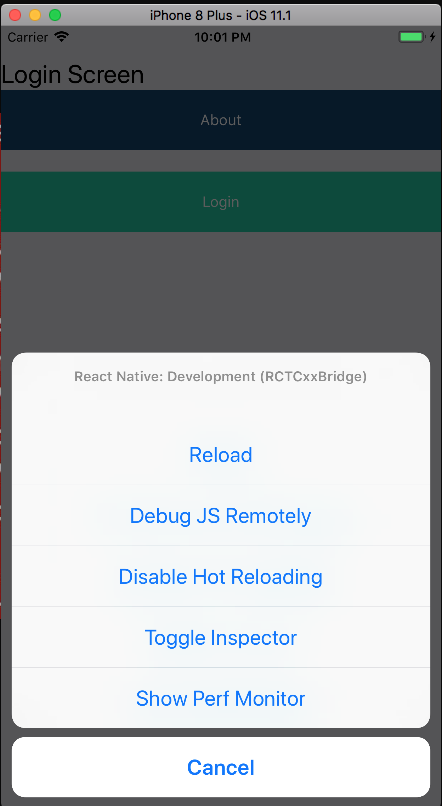
Figure 1-2. React Native applications have a debugging toolbar
Because React Native relies on JavaScript, you can use console.log() or
the debugger directive in your components to output a variable or stop the
render midstream and treat the Chrome console as an expression viewer.
If you think everything should be running correctly, try quitting the React
Native Packager (usually a node process), clean your build with Xcode or Android Studio, and reinstall and
run the application.
If your application uses the popular Redux state management library, the
redux-devtools-extension
might help with stepping through the state changes in your application. You might also want to try the
react-devtools standalone debugger
provided by Facebook. The React Native
Debugging guide provides some helpful insights as well. Lastly, Reactotron provides a desktop application for inspecting React Native applications in real time.
1 Dan Abramov discusses the difference between presentational components and container components in greater detail in this Medium post.
Get React Native Cookbook now with the O’Reilly learning platform.
O’Reilly members experience books, live events, courses curated by job role, and more from O’Reilly and nearly 200 top publishers.

