Chapter 4. Software
4.1 Making a Media Center
Solution
To use your Raspberry Pi as a media center, you should definitely go for the superior performance of the Raspberry Pi 3 or 2 Model B, as video playing is very processor-intensive.
You can set up your Raspberry Pi as a media center during the NOOBS installation process (Recipe 1.5). Instead of selecting Raspbian as the distribution to install, select either OpenELEC_Pi1 if you have a Raspberry Pi 1 or OpenELEC_Pi2 if you have a Raspberry Pi 2.
OpenELEC is a distribution that optimizes your Raspberry Pi as a media center. It incudes the Kodi media center software, which is based on the XBMC open source project that was originally developed to convert Xbox game consoles into media centers. The code has since been ported to many platforms including the Raspberry Pi (Figure 4-1).
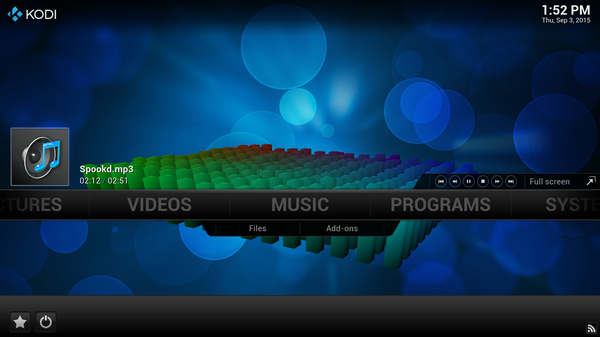
Figure 4-1. Raspberry Pi as a media center
Raspberry Pi is perfectly capable of playing full HD video as well as streamed music, MP3 files, and Internet radio.
Discussion
Kodi is a powerful piece of software with many features. Perhaps the simplest way to check that it is working is to put some music and/or video files onto a USB flash drive or external USB hard disk and connect it to the Raspberry Pi. You should be able to play them from Kodi.
Since the Raspberry Pi is likely to be sitting near your TV, you may find that your TV has a USB port that can provide enough current to run the Raspberry Pi. If this is the case, you won’t need a separate power supply.
A wireless keyboard and mouse are a good idea because if you buy them as a pair, they will use a single USB port for the dongle, which avoids the need for wires trailing all over the place. You can also buy mini-keyboards with built-in trackpads that are useful in this situation.
A wired network connection is generally higher performance and better than a WiFi connection, but it is not always convenient to have the Pi near an Ethernet socket. If this is the case, then you can set up XBMC to use a WiFi dongle for a network connection.
Setting up Kodi is very intuitive, and you can find full instructions on using the software at http://kodi.wiki/.
See Also
You can add an IR remote to Raspberry Pi to control XBMC.
4.2 Installing Office Software
Solution
Raspberry Pi is, after all, a Linux computer, so there are several office applications that you can install to use spreadsheets and word processor documents.
Programs for the Raspberry Pi are downloaded from the Internet, so you’ll need an Internet connection.
Before you install any new software, it is a good idea to open a Terminal and run the following command:
$ sudo apt-get update
To install the AbiWord word processor, run this command:
$ sudo apt-get install abiword
You will be asked to confirm the installation by typing Y; after a minute or so, installation will be complete. If you look on your Start menu, you will see a new section called Office, where you will find AbiWord (Figure 4-2).
AbiWord will open .doc, .docx, and other common word processing document formats.
If you need to use a spreadsheet, Gnumeric is a good choice. Install it by using the command:
$ sudo apt-get install gnumeric
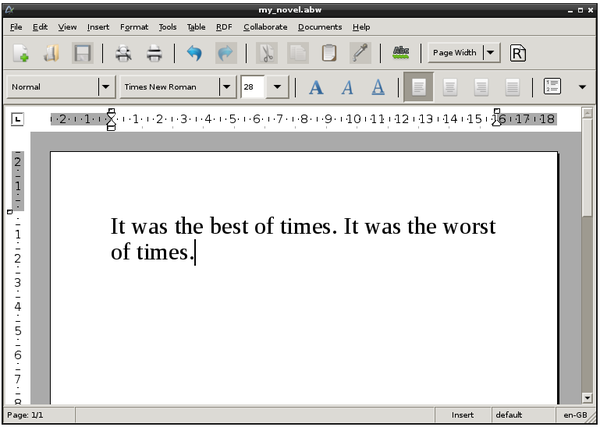
Figure 4-2. AbiWord on Raspberry Pi
Discussion
If you find that the office applications run a bit too slowly, try overclocking your Raspberry Pi (Recipe 1.10) to speed things up. A Raspberry Pi 3 or 2 will also run office applications much better than an older Raspberry Pi.
See Also
There are efforts in progress to port other office software to the Raspberry Pi, such as Libre Office (a fork of Open Office). Check the Internet for the latest news on office software ports.
See Recipe 3.16 for information on using apt-get.
4.3 Installing other Browsers
Solution
You can use a number of browsers on the Raspberry Pi. The Pi is not a powerful computer, and modern browsers and web pages can put quite a load on it. This means that when you use a browser on a Raspberry Pi, there is always a trade-off between features and performance.
Chromium (Figure 4-3), as the name suggests, will be familiar to users of Google Chrome. It is full-featured but noticeably slow when you try to scroll up and down a busy web page. You can install Chromium by using the following command, which will put a new link in the Internet section of your Start menu:
$ sudo apt-get install chromium-browser
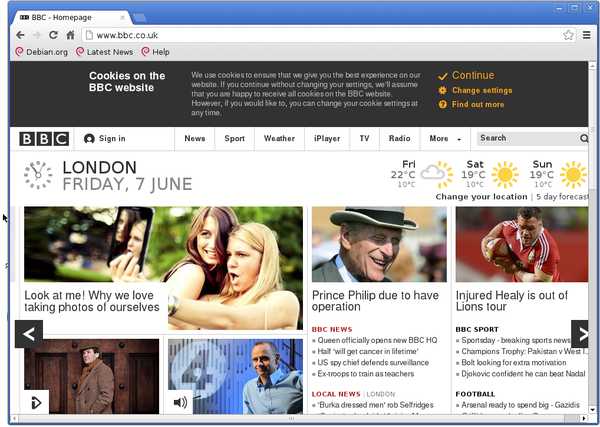
Figure 4-3. The Chromium browser
Another popular alternative to Midori is Iceweasel (Figure 4-4). This browser is based on Firefox and will perform faster than Chromium because it uses the mobile version of websites (when available), which will normally be much simpler HTML. You can download and install Iceweasel by using this command:
$ sudo apt-get install iceweasel
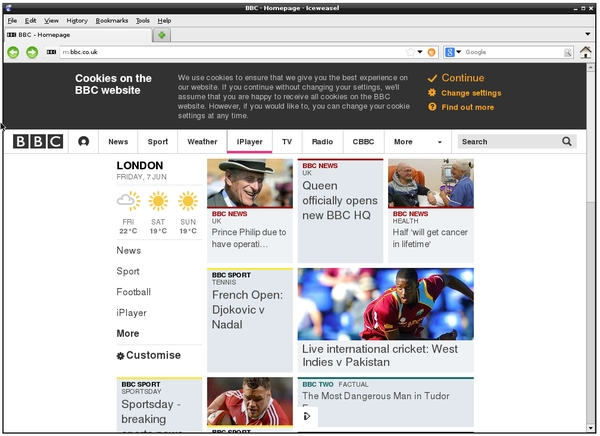
Figure 4-4. The Iceweasel browser
Discussion
Since browsers require a certain amount of power for many websites, you really need a Raspberry Pi 3 or 2 to avoid a frustratingly slow experience.
See Also
For more information on installing with apt-get, see Recipe 3.16.
4.4 Using the Pi Store
Solution
The Pi Store (Figure 4-5) is the Raspberry Pi equivalent of Apple’s App Store or Google’s Play Store; it is a place from which you can download, install, and run all sorts of applications, both free and for sale.
You will find a shortcut on your Start menu for the Pi Store application in the Internet section.
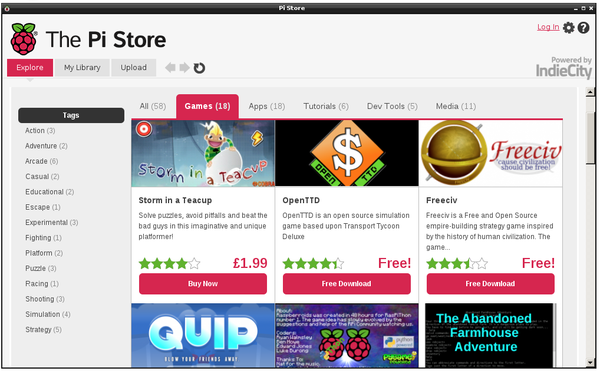
Figure 4-5. The Pi Store
The first time you try to download an app, you will be asked to register. After you register, the app will download and appear in the My Library tab. To run the app, just double-click it.
Discussion
This is a convenient way to browse for interesting programs to use on your Raspberry Pi. More and more apps are finding their way into the store.
See Also
See the official Pi Store website.
4.5 Making a Webcam Server
Solution
Download the motion software. This will allow you to set up a Raspberry Pi with a USB webcam connected to it so you can connect to a web page and view the webcam.
To install the software, enter the following command in a Terminal window:
$ sudo apt-get install motion
Plug in your USB webcam and type lsusb to see if the webcam is connected:
$ lsusb
Bus 001 Device 001: ID 1d6b:0002 Linux Foundation 2.0 root hub
Bus 001 Device 002: ID 0424:9512 Standard Microsystems Corp.
Bus 001 Device 003: ID 0424:ec00 Standard Microsystems Corp.
Bus 001 Device 004: ID 3538:0059 Power Quotient International Co., Ltd
Bus 001 Device 006: ID eb1a:299f eMPIA Technology, Inc.
If you can’t see an entry that obviously looks like a webcam, try disconnecting it, run the command again, and see if one of the entries vanishes from the list. In this case, the final entry in the list is for the webcam.
There are now a few configuration changes that you need to make. First, edit the file /etc/motion/motion.conf using the command:
$ sudo nano /etc/motion/motion.conf
This is quite a big configuration file. Right near the top of the file, you will find the line daemon off; change this to daemon on.
The other change is much further down the file. You need to change webcam_localhost = on to webcam_localhost = off.
There is one other file that you need to change. Enter the command:
$ sudo nano /etc/default/motion
Change start_motion_daemon=no to start_motion_daemon=yes.
To get the web service running, issue the command:
$ sudo service motion start
You should now be able to open your web browser and view the webcam. To do this, you will need to know the IP address of your Raspberry Pi (Recipe 2.2).
From another computer on the same network, open a browser and go to the URL http://192.168.1.16:8081/. You will need to change the URL to match the IP address of your Raspberry Pi, but keep the :8081 port number on the end of the URL.
If all goes well, you should see something like Figure 4-6.

Figure 4-6. A Raspberry Pi webcam
Discussion
The motion software is actually really powerful; there are many other settings you can tweak to change how your webcam works.
By default, the webcam will be viewable only from within your network. If you want your webcam to be visible to the whole Internet, you need to set up port forwarding on your home hub. This will require you to log in to the admin console for the hub, look for the port forwarding option, and enable it for port 8081 for the IP address of the Raspberry Pi.
You will then be able to view the webcam by using the external IP address allocated by your ISP. This is usually shown on the front page of your admin console. But beware: unless you pay your ISP for a static IP address, this IP address is likely to change every time you restart your home hub modem.
Services such as No-ip can also be used to provide dynamic DNS, so that you can register a domain name that automatically follows changes to your IP address.
See Also
There is thorough documentation on the motion website.
You can find a list of webcams compatible with the Raspberry Pi at http://elinux.org/RPi_USB_Webcams.
The Raspberry Pi has a plug-in camera module (Recipe 1.14). At the time of writing, this is not compatible with motion, but it may be by the time you read this.
To use a webcam for computer vision projects, see Chapter 8.
See Recipe 3.16 for information on using apt-get.
4.6 Running a Vintage Game Console Emulator
Solution
There are a number of emulators around for game consoles from the 1980s. One of the most popular is Stella, an emulator for the Atari 2600 (Figure 4-7).

Figure 4-7. Asteroids on the Stella Atari 2600 emulator
Warning
It is worth noting that even though these games are ancient, they are still owned by someone. The ROM image files that you need to play the games on an emulator like Stella—although easy to find on the Internet—are not necessarily yours to take. So, please stick to the law.
To install Stella, simply enter the following command in a Terminal window:
$ sudo apt-get install stella
Once it’s installed, you will find a new program in Games on your Start menu. Do not run it yet—you need to obtain the ROM image for a game.
If you are outside of the US and own the actual game, you are entitled to take a copy of the ROM image for backup purposes in many, but not all, countries. You can also find ROM images for some games that have been released without any license restrictions.
Now that you have the ROM image for the game you wish to play, create a folder called roms and place the ROM image in that folder. Then start Stella.
Click the image file to start a game. By default, the cursor keys are mapped to the joystick controls and the space bar is fire. You can change a number of settings for the emulator—for example, you almost certainly want to go to Video Settings and set it to fullscreen mode.
You can also use Input Settings and the Emul Events tab to map controller buttons to your keyboard.
Discussion
The emulator uses a surprisingly large amount of the Raspberry Pi’s meager resources, so you may find that you need to use a Raspberry Pi 3 or 2.
If you search the Internet, you will find that many people have taken this basic setup and added a retro USB controller, like the widely available and quite low-cost Nintendo Retrolink USB Super SNES Classic Controller, and built the Pi and a monitor into a big arcade-style housing.
See Also
There are a number of other console emulators available—at various stages of maturity, and thus reliability—on the Raspberry Pi. One to consider is Mame, which emulates a number of different game platforms.
For more information on installing with apt-get, see Recipe 3.16.
4.7 Running Minecraft Pi Edition
Solution
Mojang, the original developers of Minecraft, have ported it to the Raspberry Pi and Minecraft Pi is pre-installed on the latest Raspbian distribution.
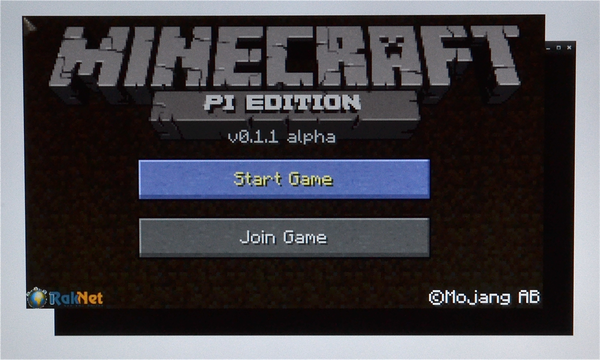
Figure 4-8. Minecraft on Raspberry Pi
Discussion
To get Minecraft to fit on the Raspberry Pi, the developers made some shortcuts in the graphics code. This means that you can only play the game directly on the Raspberry Pi with the keyboard, mouse, and monitor connected directly to it. It will not work over a remote VNC connection.
The Pi edition of Minecraft is based on the mobile version of Minecraft and lacks some features, most notably Redstone.
See Also
Find out more about the Raspberry Pi port of Minecraft.
You can also run a full version of the Minecraft Server on a Raspberry Pi (Recipe 4.8), although a Raspberry Pi 3 or 2 will perform a lot better (see Recipe 1.1).
Minecraft Pi also includes a Python programming interface, and in Recipe 7.20, you will learn how to send commands to Python over an SSH connection to do automated building.
4.8 Running a Minecraft Server
Solution
The first step is to install the Java runtime environment by using these commands:
$ sudo apt-get update
$ sudo apt-get install openjdk-7-jdk
Then create a directory to contain the server code and fetch the spigot Minecraft server using the commands:
$ mkdir mcserver
$ cd mcserver
$ wget http://getspigot.org/spigot18/spigot_server.jar
Start the server using the command:
$ java -Xms512M -Xmx800M -jar spigot_server.jar nogui
The server will soon give you the following error message:
[15:51:26 WARN]: Failed to load eula.txt
[15:51:26 INFO]: You need to agree to the EULA in order to run
the server. Go to eula.txt for more info.
[15:51:26 INFO]: Stopping server
This is telling you that you need to accept the terms of the license agreement by editing the file called eula.txt that the server has just created for you. So, open eula.txt using nano using the command:
$ nano eula.txt
Change the line that says eula=false to eula=true and save the file, then run, and then start the server again. This time it will take several minutes to create a world and start up the server. Don’t worry, the next time you run it, it will be a lot quicker.
Eventually, the server will start and you can test it by connecting to it from another computer running Minecraft on your network.
Start Minecraft and click on Multiplayer and then Direct Connect. Enter the IP address of your Raspberry Pi (Figure 4-9) and then click Connect.
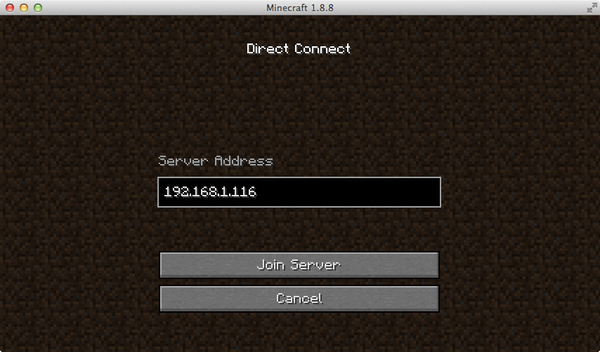
Figure 4-9. Connecting to the Minecraft server
Once you are connected, you and anyone else on your network can join the server and start playing (Figure 4-10).
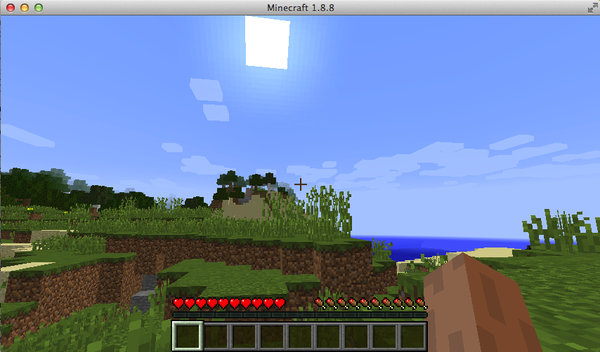
Figure 4-10. Playing on a Raspberry Pi Minecraft server
You will probably want to give yourself operator status in the game by typing the command:
> op YourName
where YourName is your nickname in the game.
Discussion
A Raspberry Pi 2 with its four processor cores and 1 GB of memory will run a pretty decent Minecraft server. The parameters -Xms512M and -Xmx800M set the minimum and maximum amounts of memory that Java should use for the server.
The LXTerminal or SSH window will let you know when anyone connects to the server, and you can also issue various server admin commands from here. Type help for a list of commands.
When you want to stop the server, enter the command stop.
[17:41:10 INFO]: UUID of player SimonMonk is 4e3e1a27-4e7e-4bfb-b331-a30af5bd49ec
[17:41:11 INFO]: SimonMonk[/192.168.1.5:58831] logged in with entity id
382 at ([world]257.23244892748414, 67.0, 185.3728463324922)
>stop
[17:41:20 INFO]: Stopping the server
[17:41:20 INFO]: Stopping server
[17:41:20 INFO]: Saving players
[17:41:20 INFO]: SimonMonk lost connection: Server closed
[17:41:20 INFO]: SimonMonk left the game.
[17:41:21 INFO]: Saving worlds
[17:41:21 INFO]: Saving chunks for level 'world'/Overworld
[17:41:24 INFO]: Saving chunks for level 'world_nether'/Nether
[17:41:24 INFO]: Saving chunks for level 'world_the_end'/The End
>pi@Pi2headless ~/mcserver $
To allow your friends from the wider Internet to play on your server, you will need to use your router’s admin console to set up port forwarding.
See Also
You do not need to be directly connected to the Raspberry Pi to start a Minecraft server; it will work just fine if started from SSH (Recipe 2.7).
For information on running your own Minecraft server, check out http://uk.ign.com/wikis/minecraft/Admin_and_Server_Commands.
See also the Minecraft Pi edition (Recipe 4.7).
4.9 Running Open Arena
Solution
Download and run Open Arena (Figure 4-11) from the Pi Store.
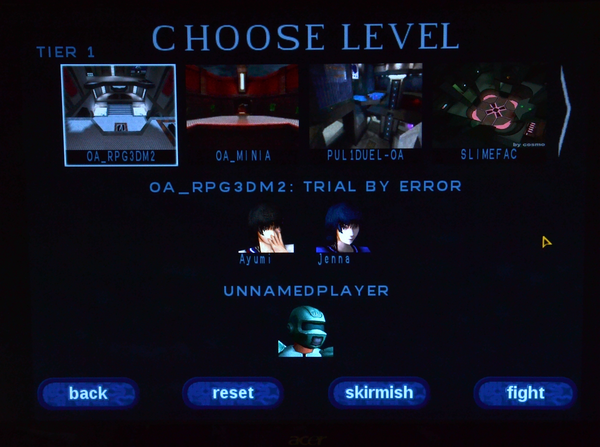
Figure 4-11. Open Arena on Raspberry Pi
Discussion
Not surprisingly, you will find Open Arena in the Games section of the Pi Store. Since the game is quite violent and bloody, it comes under a plain wrapper.
See Also
Find out more about Open Arena.
For more information on using the Pi Store, see Recipe 4.4.
4.10 Raspberry Pi Radio Transmitter
Note
Be sure to check out the accompanying video for this recipe at http://razzpisampler.oreilly.com.
Problem
You want to convert your Raspberry Pi into a high-powered FM transmitter that will send a radio signal to a normal FM radio receiver (Figure 4-12).
Solution
The clever folks at Imperial College, London, have created some C code and a Python wrapper that allow you to do just this. The download even includes the theme from Star Wars to play as a sample.
All you need is a short length of wire attached to GPIO pin 4. A female-to-male header lead will work just fine for this. In fact, it should work with the radio right next to your Pi without any kind of antenna—such is the strength of the transmission.
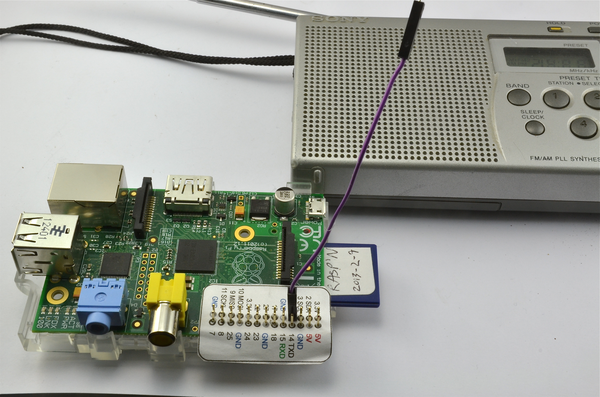
Figure 4-12. Raspberry Pi as an FM transmitter
The first step is to install the pifm library using the following commands:
$ mkdir pifm
$ cd pifm
$ wget http://www.icrobotics.co.uk/wiki/images/c/c3/Pifm.tar.gz
$ tar -xzf Pifm.tar.gz
Next, find yourself an FM radio receiver and tune it to 103.0 MHz. If this frequency is already occupied by some other transmission, pick another frequency and make note of it.
Now run the following command (changing the final parameter from 103.0 if you had to change frequency):
sudo ./pifm sound.wav 103.0
If all is well, you should hear the stirring tones of the Star Wars theme.
Discussion
You need to know that this project may not be legal in your country. The power output is higher than that of FM transmitters used with MP3 players.
You can play other .wav files, but they must be 16-bit 44.1kHz.
The code also includes a Python library that you can use within your own Python programs. So, you could write a user interface to allow the selection and playing of tunes.
The following fragment of code illustrates the use of the Python interface:
pi@raspberrypi ~/pifm $ sudo python
Python 2.7.3 (default, Jan 13 2013, 11:20:46)
[GCC 4.6.3] on linux2
Type "help", "copyright", "credits" or "license" for more information.
>>> import PiFm
>>> PiFm.play_sound("sound.wav")
Were you to put a Raspberry Pi in your vehicle, this would be a great way of outputting sound through the vehicle’s audio system—especially if you use the features of the latest version of pifm, which allow you to stream music to the FM transmitter from various sources.
See Also
This description is based on the original post from Imperial College London. This also includes clever tricks for piping music from various sources to pifm including from a USN microphone, which opens up all sorts of opportunities.
4.11 Running GIMP
Problem
You want to edit an image.
Solution
Download and run the GNU image manipulation program (GIMP; see Figure 4-13).
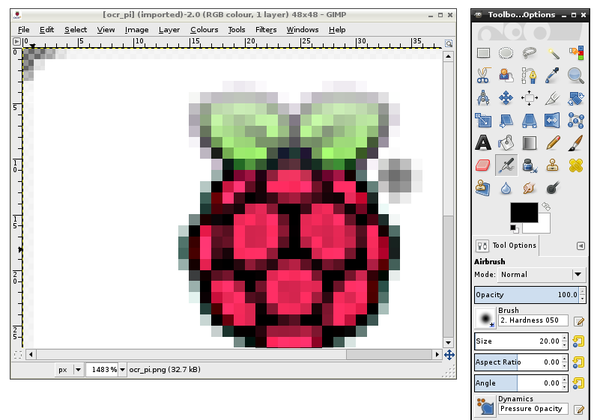
Figure 4-13. GIMP on the Raspberry Pi
To install GIMP, open a Terminal session and type the following command:
$ sudo apt-get install gimp
Once GIMP is installed, you’ll find a new entry in your Start menu under the Graphics heading called GNU Image Manipulation Program.
Discussion
Despite being very hungry for memory and processor power, GIMP is quite usable on a Raspberry Pi model B.
See Also
Find out more from the GIMP website.
GIMP has a lot of features and is a very sophisticated image editing program, so it does take a little learning. You’ll find an online manual for the software at the GIMP website, under the Documentation tab.
For more information on installing with apt-get, see Recipe 3.16.
4.12 Internet Radio
Solution
Install the VLC media player by running the following command:
sudo apt-get install vlc
Once it’s installed, you can find VLC in the Sound & Video section of your Start menu.
Run the program and select the Open Network Stream option on the Media menu. This will open a dialog box (see Figure 4-14) where you can enter the URL of the Internet radio station that you wish to play.
You will need to plug headphones or amplified speakers into the audio socket on the Raspberry Pi.
Discussion
VLC can also be run from the command line:
$ vlc http://www.a-1radio.com/listen.pls -I dummy
VLC will probably produce a series of error messages, but then play the audio just fine.

Figure 4-14. VLC on Raspberry Pi
See Also
This recipe borrows heavily from this tutorial, where Jan Holst takes things a step further and adds radio-style controls to the project.
For UK readers, you can find a list of the BBC radio stream URLs online.
Get Raspberry Pi Cookbook, 2nd Edition now with the O’Reilly learning platform.
O’Reilly members experience books, live events, courses curated by job role, and more from O’Reilly and nearly 200 top publishers.

