Chapter 1. Getting Started
Introduction
Since it first appeared in July 2004, Ruby on Rails has revolutionized the process of developing web applications. It has enabled web developers to become much faster and more efficient, allowing for quicker application developmentâa critical advantage in these days of âweb time.â How does Rails do it? There are a few reasons behind Railsâ success:
- Convention over configuration
Rather than forcing you to configure every aspect of your application, Rails is full of conventions. If you can follow those conventions, you can do away with almost all configuration files and a lot of extra coding. If you canât follow those conventions, youâre usually no worse off than you were in your previous environment.
- Liberal use of code generation
Rails can write a lot of your code for you. For example, when you need a class to represent a table in your database, you donât have to write most of the methods: Rails looks at the tableâs definition and creates most of the class for you on the fly. You can mix in many extensions to add special behavior, and when you really need to, you can add your own methods. Youâll find that youâre writing only a fraction as much code as you did with other web frameworks.
- Donât repeat yourself (DRY)
DRY is a slogan youâll hear frequently. With Rails, you need to code behavior only once; you never (well, almost never) have to write similar code in two different places. Why is this important? Not because you type less, but because youâre less likely to make mistakes by modifying one chunk of code, and not another.
David Heinemeier Hansson and the other Ruby on Rails core developers have learned from the mistakes of other web application frameworks and taken a huge step forward. Rather than provide an extremely complex platform that can solve every problem out of the box if you can only understand it, Rails solves a very simple problem extremely well. With that solution under your belt, youâll find that itâs a lot easier to work up to the hard problems. Itâs often easier, in fact, to solve the hard problem for yourself with Rails than to understand some other platformâs solution. Want to find out whether Rails is everything itâs cracked up to be? Donât wait; try it. If youâre not a Ruby developer yet, donât worry; you only need to know a limited amount of Ruby to use Rails. Iâd be willing to bet that youâll want to learn more, though.
Joining the Rails Community
Problem
You know that Rails is an evolving open source project, and you want to stay on top of the latest developments. Where do you get your questions answered, and how do you know what new features are being developed?
Solution
Like most popular open source projects, Rails has a number of mailing lists that developers, system administrators, and other interested parties can join to stay abreast of the latest developments. These lists also have searchable archives that will help you understand the evolution of a feature. Currently, the following mailing lists are available:
- rubyonrails-talk
General Rails topics: http://groups.google.com/group/rubyonrails-talk
- rubyonrails-core
Discussions about the core development and future of Rails: http://groups.google.com/group/rubyonrails-core
- rubyonrails-security
Security announcements: http://groups.google.com/group/rubyonrails-security
- rubyonrails-spinoffs
Discussions about prototype and script.aculo.us: http://groups.google.com/group/rubyonrails-spinoffs
Also, http://ruby-forum.com has a number of Rails- and Ruby-related lists that you can join or read on the Web.
Another venue for communicating about Rails is the #rubyonrails IRC channel on the Freenode IRC network (http://irc.freenode.net). If youâre new to IRC, you can learn more at http://www.irchelp.org. Youâll need an IRC client such as X-Chat (http://www.xchat.org), Colloquy (http://colloquy.info), or for terminal fans, Irssi (http://www.irssi.org).
One great place to ask questions and look for answers is Rails Weenie (http://rails.techno-weenie.net). This site uses a points-based system in an attempt to persuade people to answer more questions, and to ask more sensible questions. When you create an account, you automatically receive five points. You can offer these points as a reward for questions you want answered. If someone answers the question, they get the number of points you offered. Also, if you answer other peopleâs questions, you get the number of points they offered. Itâs not as responsive as IRC, but youâre far more likely to get a more thorough answer to your question.
The Rails Forum (http://railsforum.com) is another active community of Rails users, with members of all levels of Rails experience.
Depending on where you live, you may be able to find a local Ruby or Rails user group you can join. The Ruby-Lang site has a good page on finding Ruby Brigades or Ruby User Groups (RUGs) in your area (http://www.ruby-lang.org/en/community/user-groups). If there isnât a local Rails group where you live, perhaps you can start one!
Lastly, a large part of the Rails community exists in the blogosphere, where participants post anything from tutorials to explorations of the latest new features of the framework as theyâre being developed. Two popular blogs that aggregate individual Ruby and Rails blogs are http://www.rubycorner.com and http://www.planetrubyonrails.org.
Discussion
The Rails community is relatively young, but strong and growing fast. If youâve got questions, there are plenty of people willing to help you answer them. Theyâll help you get the hang of Rails development, and you can return the favor by helping others or even contributing to the project.
The Rails mailing list has lots of traffic: currently about 400 messages per day. This means that you can post a question and soon have it buried under a screen full of newer messages. The trick to coping with this information overload is to use very clear and descriptive subject lines and problem descriptions.
The #rubyonrails IRC channel is also very busy, but it is a great resource for instant feedback. Just make sure you respect simultaneous conversations. Rather than pasting code examples into the channel, post them to an external site (e.g., http://pastie.caboo.se). In fact, when youâre in the IRC channel simply say, âHi pastie,â and the pastie bot will send you a link to where you can post your code.
See Also
Finding Documentation
Problem
Youâre beginning to develop Rails applications, and you have questions. You need to find the latest documentation for Ruby, Rails, and RubyGems libraries.
Solution
The documentation for the latest stable version of the Rails API is online at http://api.rubyonrails.com. A group of hardcore Rails developers also maintains documentation on the bleeding-edge version of Rails at http://caboo.se/doc. The latest Ruby documentation is always available at http://www.ruby-doc.org. Here you can find documentation on the Ruby Core library, the Ruby Standard Library, and the C API. In regards to third-party libraries, a comprehensive set of RubyGems documentation is available at http://www.gemjack.com. You can also view documentation on any RubyGems you have installed on your local system by starting the gem server with the following command:
$ gem_serverWhen the gem server is running, you can view the documentation for your local gem repository at http://localhost:8808. Additional Rails documentation can be found on the wiki at http://wiki.rubyonrails.org/rails. There youâll find a vast amount of user contributed content. While thereâs valuable information on the wiki, be warned that some of it can be out of date or inaccurate.
Of late, thereâs been a growing trend to consolidate essential documentation into so-called cheatsheets. A quick web search for Ruby, Rails, or Prototype cheatsheets should yield some valuable results. One that stands out is the cheat RubyGemâit installs a command-line tool to produce Ruby-centric cheatsheets right from your terminal. For more information, visit http://cheat.errtheblog.com or install the library with:
$ sudo gem install cheat --source require.errtheblog.comLast but not least, GotApi (http://www.gotapi.com) might best be described as a documentation aggregator. Itâs a very useful site for looking up not only Ruby and Rails documentation, but other related docs (like JavaScript and CSS).
Discussion
The API documentation can be a little awkward. The format is
best suited for looking up the methods of a class or the options of a
specific method, and less helpful as an introduction to the framework.
One way to become familiar with the major components of Rails via the
API is to read the documentation for each base class (e.g., ActionController::Base, ActiveRecord::Base). As you become more
proficient with Ruby and Rails, youâll definitely want to browse the
source code itself. This experience can be a little overwhelming if
youâre new to the language or the framework, but thereâs truly no
substitute if you want to understand how all the magic works behind
the scenes. Mauricio Fernandez, a long-time Rubyist, keeps a
self-study guide to the Ruby source code on his web site (http://eigenclass.org/hiki.rb?ruby+internals+guide);
it can be a useful starting point if you wish to understand Rubyâs
internals.
See Also
Installing MySQL
Problem
You want to install a MySQL relational database server to be used by your Rails applications.
Solution
Windows
If youâre a Windows user, download and unzip mysql-5.0.18-win32.zip from http://dev.mysql.com/downloads.
Depending on which version of MySQL you download, you should see
either a setup.exe file or a
.msi file. Click on one of these to start the installation
wizard. For most cases, you can select the standard configuration,
which includes the mysql
command-line client and several other administration utilities, such
as mysqldump.
By default, the installation wizard sets up MySQL as a service
that starts automatically. Another option is to have the installer
include MySQLâs binary directory in the Windows PATH, allowing you to call the MySQL
utilities from the Windows command line. Once the installation is
complete, you can start up mysql
as the root user at the command prompt as shown in Figure 1-1.
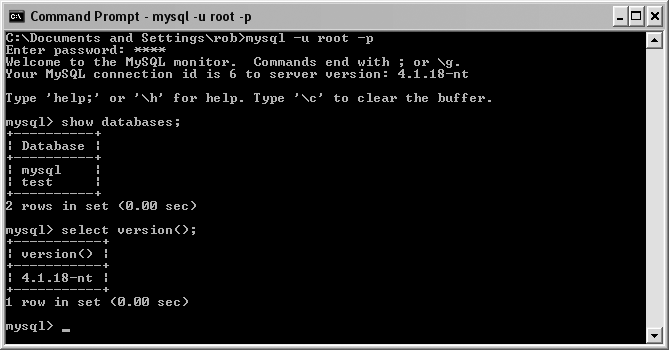
You can stop and start MySQL from the Windows command prompt
using the net command:
C:\> net start mysqlC:\> net stop mysqlLastly, install the MySQL gem for maximum performance:
C:\> gem install mysqlThe gem installer will present you with a list of versions and prompt you for the one you wish to install. Be sure to choose the highest version of the gem that ends with (mswin32).
Linux
To install MySQL on a Debian GNU/Linux system, start by making sure your sources.list file contains the appropriate archive locations:
$ cat /etc/apt/sources.list
deb http://archive.progeny.com/debian/ etch main
deb-src http://archive.progeny.com/debian/ etch main

deb http://security.debian.org/ etch/updates main
deb-src http://security.debian.org/ etch/updates main
Then run apt-get update to
resynchronize the package index files from the repository
sources:
$ sudo apt-get updateTo install MySQL 5.0, install the mysql-server-5.0
package. Installing this package installs a number of
dependencies, including mysql-client-5.0.
$ sudo apt-get -s install mysql-server-5.0Debianâs package manager, dpkg, installs dependencies and deals with
configuration and setup of the server. Once the installation is
complete, start the MySQL server by running /etc/init.d/mysql as root:
$/etc/init.d/mysql --helpUsage: /etc/init.d/mysql start|stop|restart|reload|force-reload|status $sudo /etc/init.d/mysql start
After the server is running, you can
connect to it using mysql as the
root user with no password:
$ mysql -u root -p
Enter password:
Welcome to the MySQL monitor.  Commands end with ; or \g.
Your MySQL connection id is 7 to server version: 5.0.18-Debian_7-log

Type 'help;' or '\h' for help. Type '\c' to clear the buffer.

mysql> show databases;
+--------------------+
| Database           |
+--------------------+
| information_schema |
| mysql              |
| test               |
+--------------------+
3 rows in set (0.00 sec)

mysql>
You should probably modify your startup scripts so that MySQL starts automatically when the system boots. Lastly, youâll want to install the MySQL gem to gain the performance benefits of the native bindings. The following command should do the trick:
$ sudo gem install mysqlThe gem installer will present you with a number of versions and prompt you for the one you wish to install. Select the latest version of the gem that ends with (ruby).
Mac OS X
Mac users should download the appropriate disk image file (.dmg) for their OS version and chip architecture from http://dev.mysql.com/downloads/mysql/5.0.html. Mount the disk image and double-click the package file (.pkg) to begin the installation wizard. You should also install MySQL.prefPane and MySQLStartupItem.pkg , which gives you an easy way to start and stop the MySQL server, and configure it to launch on startup, respectively.
Once the server is installed, you should add the location of
the MySQL command-line tools to your PATH environment
variable. Hereâs an example:
~/.profileexport PATH=/usr/local/mysql/bin:$PATHThe final step is to install the Ruby/MySQL bindings RubyGem. For best results, use
the mysql_config option:
$ sudo gem install mysql -- --with-mysql-config=/usr/local/mysql/bin/mysql_configThe gem installer will present you with a number of versions and prompt you for the one you wish to install. While version numbers may change, your best strategy is to select the highest numbered version of the gem that ends with (ruby).
Discussion
The recommended way to install MySQL on Linux is to use your
distributionâs package management system. On a Debian GNU/Linux
system, package management is handled by dpkg, which is similar to the RPM system
used by Red Hat distributions. The easiest way to administer dpkg is with the apt suite of tools, which includes apt-cache and apt-get.
Once youâve got the MySQL server installed, you need to create
one or more databases and users. While itâs convenient to create a
database from a script, to make it easy to recreate there are also a
number of GUI tools for setting up and administering MySQL databases.
Get the official MySQL GUI tools from http://dev.mysql.com/downloads.
Even if you create a database from the command line or a GUI tool, you
can always use mysqldump to
generate a creation script for your database.
See Also
Installing PostgreSQL
Solution
Windows
If youâre a Windows user, download the latest version from http://www.postgresql.org/download, and unpack the ZIP archive. Inside, youâll find a directory containing the PostgreSQL Windows installer (the filename extension is .msi). Launch the installation wizard by double-clicking on this file.
The installation options allow you to include several database
tools and interfaces. Make sure that the psql tool (the command-line user
interface) is included; if you prefer a GUI administration tool,
also include pgAdmin III.
Linux
To install PostgreSQL on a Debian GNU/Linux system, point your sources.list file to the Debian archive
locations youâd like to use. Then run apt-get update to resynchronize the
package index files from the repository sources.
$ cat /etc/apt/sources.list
deb http://archive.progeny.com/debian/ etch main
deb-src http://archive.progeny.com/debian/ etch main

deb http://security.debian.org/ etch/updates main
deb-src http://security.debian.org/ etch/updates main
$ sudo apt-get updateInstall the PostgreSQL Debian GNU/Linux package (postgresql-8.1 as of this writing) and
development package. These packages include dependent packages for
the PostgreSQL client and common libraries as well as header files
necessary for compilation of the Ruby PostgreSQL driver.
$ sudo apt-get install postgresql-8.1 postgresql-devNow, su to the postgres user, and connect to the server
with the client program psql:
$sudo su postgres$psqlWelcome to psql 8.1.0, the PostgreSQL interactive terminal. Type: \copyright for distribution terms \h for help with SQL commands \? for help with psql commands \g or terminate with semicolon to execute query \q to quit postgres=# \l List of databases Name | Owner | Encoding -----------+----------+----------- postgres | postgres | SQL_ASCII template0 | postgres | SQL_ASCII template1 | postgres | SQL_ASCII (3 rows) postgres=#
Mac OS X
The simplest way to install PostgreSQL on the Mac is to use MacPorts. If you donât already have MacPorts, you can get it from http://www.macports.org. But first, make sure youâve installed Appleâs XCode Tools, X11, and X11SDK, which are located on your Mac OS X installation disk. Once you have MacPorts, simply install PostgreSQL with the following command:
$ sudo port install postgresql8Discussion
PostgreSQL is a popular open source object-relational database thatâs been in active development for more than 15 years. It is an extremely capable alternative to MySQL and commercially available databases such as Oracle. A notable feature of PostgreSQL is its support of user-defined functions and triggers. User-defined functions can be written in a number of scripting languages, including PL/Ruby.
To use PostgreSQL with Rails youâll need to install the Postgres driver:
$ gem install postgresNext, youâll need to specify postgresql in your database.yml file:
development:
  adapter: postgresql
  database: products_dev
  host: localhost
  username: some_user
  password: some_password
See Also
Installing Rails
Solution
Before you can install Rails, you must have a working build environment and install Ruby itself. Ruby comes with most recent Linux distributions, but you should check to make sure you have a version thatâs compatible with Rails: 1.8.5, 1.8.4, and 1.8.2 work; 1.8.3 does not. Hereâs how to check your Ruby version:
$ which ruby
/usr/local/bin/ruby
$ ruby -v
ruby 1.8.4 (2005-10-29) [i486-linux]If you donât have Ruby installed, you can either install it using your distributionâs package manager or download and install it from source. For a source install, get the latest stable version of Ruby from http://rubyforge.org/projects/ruby. Unpack the archive into a convenient place, like /usr/local/src.
$ cd /usr/local/src/ruby-1.8.4
./configure
make
sudo make install
To install Ruby on a Debian system, use Advanced Package Tool
(APT) to download a precompiled binary package from the
Debian package repository. Start by updating APTâs package cache, then
install the Ruby 1.8 package. Youâll also need several other packages
to get the full functionality of your Ruby development environment
(e.g., libreadline is required for
Readline support in irb).
$ apt-get update$sudo apt-get install ruby1.8-dev ruby1.8 ri1.8 rdoc1.8 \irb1.8 libreadline-ruby1.8 libruby1.8
Once youâve made sure you have a âgoodâ version of Ruby on your system, proceed to install RubyGems. You can get the latest version of RubyGems from the RubyForge project page: http://rubyforge.org/projects/rubygems. Download the source code into /usr/local/src or another convenient location. Move into the source directory, and run the setup.rb script with Ruby. Note that the filenames shown here are current as of this writing, but you should use the latest version.
$tar xzvf rubygems-0.9.0.tgz$cd rubygems-0.9.0$sudo ruby setup.rb
Once you have RubyGems installed, you can install Rails:
$ sudo gem install rails --include-dependenciesIf youâre a Windows user, the first step toward getting Rails installed on Windows is (again) to install Ruby. The easiest way to do this is with the One-Click Installer for Windows. The latest stable version can be obtained at the RubyForge project page: http://rubyforge.org/projects/rubyinstaller. Download, and launch the One-Click Installer executable.
The One-Click Installer includes RubyGems, which you can then use to install the Rails libraries. Open a command prompt, and type the following to install Rails:
C:\>gem install rails --include-dependenciesYou can verify that Rails is installed and in your executable path with the following command (your Rails version will likely be higher than 1.0.0):
C:\>rails -v
Rails 1.0.0
Discussion
Although you can download and install Rails from source or as a precompiled package, it makes a lot of sense to let RubyGems handle the task for you. It is likely that youâre going to find other gems that youâll want to use with Rails, and RubyGems will make sure dependencies are satisfied as you install or upgrade gems down the line.
With Rails successfully installed, youâll have the rails command available within your
environment; with it you can create new Rails applications. Running
the following command displays the command-line options:
$ rails --helpThe solution also leaves you with many common command-line tools that are named by their version number. To make these tools a little easier to invoke, you can create a series of symbolic links to them. For example:
$sudo ln -s /usr/bin/ruby1.8 /usr/local/bin/ruby$sudo ln -s /usr/bin/ri1.8 /usr/local/bin/ri$sudo ln -s /usr/bin/rdoc1.8 /usr/local/bin/rdoc$sudo ln -s /usr/bin/irb1.8 /usr/local/bin/irb
Fixing Ruby and Installing Rails on OS X 10.4 Tiger
Problem
Mac OS X 10.4 Tiger ships with a version of Ruby that doesnât work with the latest versions of Rails. You can fix this by installing the latest stable version of Ruby and its prerequisites. With Ruby up to date, you can then install Rails.
Solution
Install the latest stable version of Ruby in /usr/local on your filesystem.
Set your PATH variable to
include /usr/local/bin and
/usr/local/sbin. Add the
following line to your ~/.bash_profile:
~$ export PATH="/usr/local/bin:/usr/local/sbin:$PATH"Make sure to âsourceâ this file to ensure that the value of
the PATH variable is
available to your current shell.
~$ source .bash_profileCreate the directory /usr/local/src, and
cd into it. This will be a working
directory where youâll download and configure a number of source
files.
Install GNU Readline, which gives you command-line editing
features, including history. Readline is needed for the interactive
Ruby interpreter, irb, and the
Rails console to work correctly.
/usr/local/src$curl -O ftp://ftp.cwru.edu/pub/bash/readline-5.1.tar.gz/usr/local/src$tar xzvf readline-5.1.tar.gz/usr/local/src$cd readline-5.1
(If youâre running Panther, youâll need to execute this Perl command; otherwise skip to the next step.)
/usr/local/src/readline-5.1$perl -i.bak -p -e \"s/SHLIB_LIBS=.*/SHLIB_LIBS='-lSystem -lncurses -lcc_dynamic'/g" \support/shobj-conf
Configure Readline, specifying /usr/local as the installation directory by
setting the prefix option of
configure:
/usr/local/src/readline-5.1$./configure --prefix=/usr/local/usr/local/src/readline-5.1$make/usr/local/src/readline-5.1$sudo make install/usr/local/src/readline-5.1$cd ..
Download, and unpack the latest stable version of Ruby. Configure it to install in /usr/local, enable threads, and enable Readline support by specifying the location of the Readline:
/usr/local/src$curl -O \ftp://ftp.ruby-lang.org/pub/ruby/1.8/ruby-1.8.4.tar.gz/usr/local/src$tar xzvf ruby-1.8.4.tar.gz/usr/local/src$cd ruby-1.8.4/usr/local/src/ruby-1.8.4$./configure --prefix=/usr/local \--enable-pthread \--with-readline-dir=/usr/local/usr/local/src/ruby-1.8.4$make/usr/local/src/ruby-1.8.4$sudo make install/usr/local/src/ruby-1.8.4$cd ..
With Ruby installed, download, and install RubyGems:
/usr/local/src$curl -O \http://rubyforge.org/frs/download.php/5207/rubygems-0.8.11.tgz/usr/local/src$tar xzvf rubygems-0.8.11.tgz/usr/local/src$cd rubygems-0.8.11/usr/local/src/rubygems-0.8.11$sudo /usr/local/bin/ruby setup.rb/usr/local/src/rubygems-0.8.11$cd ..
Use the gem command to
install Rails:
~$ sudo gem install rails --include-dependenciesFor a faster alternative to WEBrick during development, install Mongrel:
~$ sudo gem install mongrelDiscussion
On a typical Linux or Unix system, /usr/local is the place to install programs
local to the site. Programs that you install in /usr/local are usually left alone by the
system and not modified by system upgrades. Installing Ruby in
/usr/local and setting your
shellâs PATH variable to include
/usr/local/bin and /usr/local/sbin before any other bin
directories (such as /usr/bin and
/usr/sbin) lets you have two
installations of Ruby on the same machine. This way, the existing
version of Ruby and any system software that may depend on it are not
affected by your local version of Ruby and vice versa.
When you type ruby, it
should now invoke the version you installed in /usr/local. You can verify this with the
which command, and make sure you
have the most current release with ruby
--version:
~$ which ruby
/usr/local/bin/ruby
~$ ruby --version
ruby 1.8.4 (2005-12-24) [powerpc-darwin7.9.0]
With Ruby and Rails successfully installed, you can create Rails
projects anywhere on your system with the rails
command:
~$ rails myProjectOnce youâve created a project, you can start up WEBrick:
~/myProject$ ruby script/serverTo use the Mongrel server instead, start and stop it with the following
(the -d option daemonizes Mongrel,
running it in the background):
~/myProject$mongrel_rails start -d~/myProject$mongrel_rails stop
See Also
The GNU Readline Library, http://cnswww.cns.cwru.edu/~chet/readline/rltop.html
Mongrel home page, http://mongrel.rubyforge.org
Running Rails in OS X with Locomotive
Problem
You donât have administrative privileges to install Rails and its dependencies, system-wide. You want to install Rails on Mac OS X in a self-contained and isolated environment.
Solution
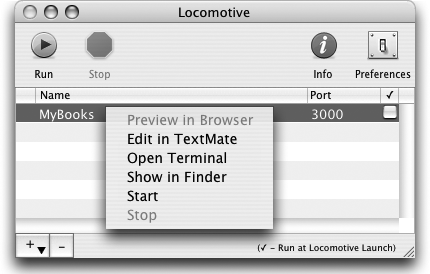
Use Locomotive to run a fully functional Rails environment within Mac OS X. Obtain a copy of the latest version of Locomotive from http://locomotive.raaum.org. The latest version as of this writing is Locomotive 2.0.8.
Open and attach the downloaded disk image (we used Locomotive_1.0.0a.dmg for Figure 1-2) by double-clicking on it. In the disk image, you should see a Locomotive directory and another directory containing license information. Copy the Locomotive directory into your Applications folder. Itâs important to copy the entire Locomotive directory and not just Locomotive.app because the Bundles directory is required to exist next to the Locomotive application under your Applications directory.
Once installed, launching Locomotive opens up a project control window with a list of the Rails projects you have configured, their port numbers, and their status (running or not). You can add existing Rails projects or create new ones by selecting âCreate New...â or âAdd Existing...â from the Rails menu. Creating a new project opens up a dialog box prompting you for the name of your Rails application and its location on your filesystem. If you already have a Rails project on your filesystem, you can add it to your Locomotive projects, specifying its server and environment settings.
Locomotive assumes you have a Rails-compatible database installed and that youâve created three databases based on the name of your Rails application. For example, if your application is named MyBooks, the default configuration expects databases named MyBooks_development, MyBooks_test, and MyBooks_production. The default configuration connects to these databases with the root user and no password.
Click Create to create the structure of your Rails application in the directory you specified. The MyBooks application now appears in the project control window. With that project selected, you can open the project files in your preferred editing environment. View these options by right-clicking to bring up the contextual menu.
To edit the properties of a project, such as the port it runs on or the Rails environment it uses, select a project and click Info to open the project Inspector.
Finally, start your application by clicking Run. If it starts successfully, youâll see a green ball next to that project, and you should be able to access the project in your browser with http://localhost:3000.
Discussion
With your Locomotive projects initially configured you can start developing your Rails application just as if you had a native Rails installation. Figure 1-2 show the options in this menu.
Locomotive ships with Bundles. Bundles are add-ons to the main Locomotive application that include gems and libraries. The Min bundle contains the essential Rails gems, some database adapters, and a few others. For a 45 MB download, the Max bundle adds about two dozen more gems to your arsenal.
See Also
Locomotive home page, http://locomotive.raaum.org
Running Rails in Windows with Instant Rails
Problem
You develop on a Windows box, and youâd like to install and configure Rails and all its dependencies at one time. Youâd also like the entire installation to exist in a self-contained and isolated environment, so that you donât need administrative privileges to install it, and it wonât conflict with any software already installed on the box.
Solution
Download and install Instant Rails to get Rails up and running quickly in a Windows environment. You can get the latest release at the Instant Rails RubyForge page at http://rubyforge.org/projects/instantrails.
Unzip the archive you downloaded, and move the resulting
directory to a file path containing no spaces, such as
C:\rails\InstantRails. To launch Instant Rails,
navigate to that directory, and double-click the
InstantRails.exe executable. When it starts,
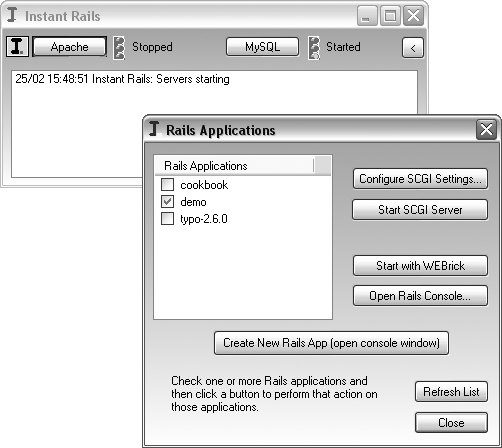
youâll see the Instant Rails status window. Clicking the I graphic in
this window displays a menu that serves as the starting point for most
configuration tasks. To create a new Rails application, click on the I
and select Rails ApplicationâOpen Ruby Console Window. Type the
following command to create an application called demo:
C:\InstantRails\rails_apps>rails demoThe next step is to create and configure your databases. From
the I, select ConfigureâDatabase (via phpMyAdmin). This launches
phpMyAdmin in your default browser with the URL of http://127.0.0.1/mysql. The
default databases for the demo
application are demo_development,
demo_test and demo_production. Youâll need to create these
databases in phpMyAdmin; you
must also create a user named ârootâ with no password.
Now you can start building your Rails application. To create
scaffolding for a cds table that
youâve created in your database, open a Rails console window, and
navigate to the root of the project. To execute a command in the
scripts directory, pass the path to the command
as an argument to the Ruby binary:
C:\InstantRails\rails_apps\demo>ruby script\generate scaffold cdTo start your applications, open the Rails application
management window, and check the application that you want to run. To
start the demo application, check
the box next to it and click Start with WEBrick. Figure 1-3 shows the options available in
the application management window.
Access the application in your browser with http://localhost:3000. To view the
scaffolding you created for the cdâs table use http://localhost:3000/cds.
Discussion
Instant Rails is an extremely convenient solution for running a Rails development environment on a Windows desktop machine. It comes with Ruby, Rails, Apache, and MySQL; if the configuration hasnât been taken care of already, Instant Rails makes configuration as painless as possible.
The solution demonstrates starting an application in Instant Rails using the WEBrick web server, but Instant Rails also ships with the SCGI module for Apache. The SCGI protocol is a replacement for the Common Gateway Interface (CGI), such as FastCGI, but is designed to be easier to set up and administer.
See Also
Instant Rails wiki, http://instantrails.rubyforge.org/wiki/wiki.pl
Updating Rails with RubyGems
Problem
Youâve installed Rails using the gem command and probably other Ruby packages as well. You want to
manage these packages and upgrade as new versions are released, without worrying
about dependencies.
Solution
To upgrade Rails and the gems it depends on (e.g., rake, activesupport, activerecord, actionpack, actionmailer, and actionwebservice), type:
$ sudo gem update rails --include-dependenciesOnce youâve updated the Rails gems, the only remaining step to upgrading your individual Rails applications (Version 0.14.0 and later) is to get the latest JavaScript libraries. Run the following command from your applicationâs root directory:
~/project$ rake rails:update:javascriptsTest your application to make sure that everything works with the updated libraries.
Discussion
RubyGems is Rubyâs package manager. It provides a standard way
to distribute third-party programs and libraries, called
gems. It allows you to install and upgrade gems,
while handling dependencies for you. The gem command-line
utility lets you install, upgrade, remove, and inspect gems.
Using gem list, you can view
which gems you have installed. To get a list of all your installed
gems and their versions, use:
$ gem list --localHereâs how to get a listing of all the gems that are available from the remote repository:
$ gem list --remoteThe syntax for the gem
command is gem command [arguments...]
[options...]. Many of the commands take either --local or --remote as arguments. To search your local
repository as well as the remote repository for gems with âflickâ in
the name, use --both :
$ gem search --both flickHereâs how to install a remote gem locally and build its RDoc:
$ sudo gem install --remote rails --rdocTo view detailed information about the contents of a gem, use
the specification
command:
$ gem specification railsYou can run gem help or just
gem (with no arguments) to get more
information on available gem commands and options.
See Also
The RubyGems Project, http://rubygems.org
Getting Your Rails Project into Subversion
Problem
You want to get your Rails project into a Subversion repository but donât want your logging and configuration files included.
Solution
Create a Subversion repository, and confirm that the repository was created:
/home/svn$ svnadmin create blog/home/svn$ ls blog/
conf dav db format hooks locks README.txtChange to your Rails project directory:
/home/svn$ cd ~/projects/blog; ls
app  components  config  db  doc  lib  log  public  Rakefile  README  script
test  vendor
Import the entire project. The . in the following command is critical. It specifies to
âimport everything within this directoryâ:
~/projects/blog$svn import -m "initial import" . \>file:///home/svn/blogAdding test Adding test/unit Adding test/test_helper.rb ... Adding public/favicon.ico Committed revision 1. ~/projects/blog$
Now, delete the initial project files:
~/projects$ cd ..; rm -rf blog/If this step scares you, move your files somewhere else until youâre satisfied that you wonât need them any more. But trust me: you wonât. You can now check out your versioned project from its repository:
~/projects$ svn checkout file:///home/svn/blog
A    blog/test
A    blog/test/unitL

...

A    blog/public/favicon.ico
Checked out revision 1.
~/projects$
Now, move back into the project directory, and remove the logfiles from the repository using Subversion; then commit the removal:
~/projects$cd blog~/projects/blog$svn remove log/*D log/development.log D log/production.log D log/server.log D log/test.log ~/projects/blog$
~/projects/blog$ svn commit -m 'removed log files'
Deleting       log/development.log
Deleting       log/production.log
Deleting       log/server.log
Deleting       log/test.log

Committed revision 2.
~/projects/blog$
Next, instruct Subversion to ignore the logfiles that get recreated by Rails:
~/projects/blog$ svn propset svn:ignore "*.log" log/
property 'svn:ignore' set on 'log'
~/projects/blog$
Now, update the log directory, and commit the property change:
~/projects/blog$svn update log/At revision 2. ~/projects/blog$svn commit -m 'svn ignore new log/*.log files'Sending log Committed revision 3. ~/projects/blog$
Set up Subversion to ignore your database.yml file. Save a version of the original file for future checkouts. Then tell Subversion to ignore the new version of database.yml that youâll create, which includes your database connection information.
~/projects/blog$svn move config/database.yml config/database.origA config/database.orig D config/database.yml ~/projects/blog$svn commit -m 'move database.yml to database.orig'Adding config/database.orig Deleting config/database.yml Committed revision 4. ~/projects/blog$svn propset svn:ignore "database.yml" config/property 'svn:ignore' set on 'config' ~/projects/blog$svn update config/At revision 4. ~/projects/blog$svn commit -m 'Ignoring database.yml'Sending config Committed revision 5. ~/projects/blog$
Discussion
One great way of practicing DRY is to ensure that youâll never
have to recreate your entire project because of a hardware failure or
a mistaken rm command. I highly recommend learning and using Subversion (or
some form of revision control) for every nontrivial file you create,
especially if your livelihood depends on these files.
The solution runs through creating a Subversion repository and importing a Rails project into it. It may seem a little nerve-racking to delete the project that you created with the Rails command prior to checkout, but until you check out a fresh copy of the project from the repository, youâre not working with versioned files.
Subversionâs designers realize that not all the files in your
repository are appropriate for versioning. The svn:ignore property, which applies to the
contents of a directory, tells Subversion which files should be
ignored by the common commands (svn
add, svn update, etc.).
Note that the svn:ignore property
is ignored by the --force option of
svn add.
Subversion also integrates tightly with Apache. Once youâve
installed the mod_svn module, you
can check out or update your project over HTTP. These features give
you an easy way to deploy your Rails application to remote servers. A
command such as svn checkout
http://railsurl.com/svn/blog run on a remote server, checks
out your current project onto that server. mod_svn is often used in conjunction with
SSL or mod_auth for
security.
See Also
Subversion project, http://subversion.tigris.org
Version Control with Subversion, Ben Collins-Sussman, et al. (OâReilly)
Version Control with Subversion web site, http://svnbook.red-bean.com
Get Rails Cookbook now with the O’Reilly learning platform.
O’Reilly members experience books, live events, courses curated by job role, and more from O’Reilly and nearly 200 top publishers.

