Chapter 1. Setting Up Your Quicken Environment
After you install Quicken (see Appendix C for instructions), you have just a few more steps before you experience the joys of electronic personal finance. Quicken stores all your information and settings in a data file, which is like an electronic version of the filing cabinet that contains your financial papers. (Actually, behind the scenes, it’s a small set of files, as the box on Section 1.2 explains.)
Despite the awkward name, a data file is a good thing, because it lets you back up your Quicken data, move it to another computer, keep different family members’ info in separate files, and so on. The first time you launch Quicken, the program asks you to help set up your data file.
If you’ve used a previous version of Quicken, your setup process is shorter, but even existing data files require a quick conversion to work with the new version of Quicken. If it’s your first time using Quicken, the program asks you a few questions, creates a new data file, and then launches the Quicken Guided Setup to help you tailor the file to your needs.
In addition to setting up your data file, it’s a good idea to take a look at Quicken’s preferences. Preferences (called Options in some other programs) are the settings that control how Quicken looks and acts. You’ll return to the preferences dialog box throughout this book, but there are some you want to set right away—like which currency you’re using and which screen you want to see when you start up each day.
Launching Quicken
To start using Quicken, you launch it like most any program. Here are some popular methods:
Quick Launch toolbar. Clicking the Quicken icon in this toolbar launches Quicken, making it the fastest way to get going.
Tip
The Quick Launch toolbar is to the right of the Start button. If you don’t see Quicken’s icon there—or any icons there—see the box on Section 1.2.
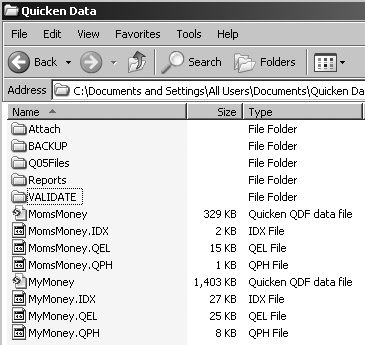
Despite Intuit’s insistence on the singular term data file, Quicken actually stores your data in five separate files, similar to your word processing or spreadsheet files. (Technical types call this kind of file collection a data set, but don’t worry, there’s no quiz later.) Quicken’s data file is the electronic equivalent of the filing cabinet, drawers, and paper folders you use to store your checking account and credit card statements.
The granddaddy of the group is the one with the .qdf file extension. It contains your account information and transactions. In the folder with the .qdf file, you’ll also find files with the same filename but different file extensions: .qel, .qph, .qsd, and .qtx. Quicken updates these other files behind the scenes, and there’s no need to worry about what they do. In fact, you could even delete these additional files, only to find that the program recreates them the next time you open the .qdf file.
Desktop shortcut. Double-click the Quicken 2006 desktop shortcut that Quicken added to your computer during installation.
Programs menu. Without a desktop icon, you can launch Quicken from the Windows Start menu. Click Start, and then choose Programs → Quicken → Quicken 2006.
Setting Up Your Quicken Data File
The first time you launch Quicken, the “Get Started with Quicken 2006” window pops up with two options: If you’re a Quicken neophyte, the program helps you build your data file from scratch; if you’ve used Quicken in the past, you can get started by using an existing Quicken data file. The setup program guides you through the conversion process.
Windows’ Quick Launch toolbar (no relation to Quicken) gives you a fast way to launch programs you use most often, helping keep your desktop from being overrun with shortcut icons. Unlike the Start menu, you won’t see installed programs automatically appear in the Quick Launch toolbar—you have to add them yourself.
The Quick Launch toolbar appears in the taskbar at the bottom of your screen, as shown here. If you don’t see this toolbar, it just means you need to turn it on. To reveal it, right-click an empty area on the taskbar, and then choose Toolbars → Quick Launch from the menu that pops up. A checkmark appears on the menu next to Quick Launch, indicating you’ve turned it on.
To install Quicken’s icon on the Quick Launch toolbar, you simply right-drag it there from somewhere else.
If you have a Quicken desktop shortcut (like the one the
setup program offered to create during installation),
right-drag its icon onto the Quick Launch toolbar and then choose Copy
Here to create a shortcut on the toolbar. (If you’re trying to clean
up your desktop, choose Move Here to move the shortcut to the Quick
Launch toolbar.) You can also use the right-drag technique to copy or
move a shortcut from the Start menu or in Windows
Explorer.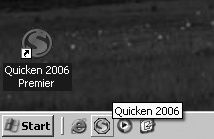
In the “Get Started with Quicken 2006” window, choose one of the following options:
I am new to Quicken. Choose this option if you want to create and set up a brand new Quicken data file using Quicken Guided Setup. Read on for detailed instructions on creating a brand new data file.
I am already a Quicken user. Choose this option to get started without all the handholding; for instance, if you already have a Quicken data file and have installed Quicken on a spiffy new laptop. For your options and instructions, skip to Section 1.2.2.
Tip
If you’re converting a data file from an earlier version of Quicken, you should back up your data and take a few other preliminary steps. See the box on Section 1.4 for instructions.
I Am New to Quicken
When you choose the “I am new to Quicken” option and click Next, the process of setting up a brand new data file begins. The first screen asks, “What do you want to call your data file?” You get two options: Let Quicken name and save your data file, or tell Quicken what you want to name the file and where you want to store it.
I will use the default file name and location. If you choose this option, Quicken creates a folder called Quicken in your My Documents folder and puts your data file in there, with the catchy name QDATA. (It stands for “Quicken data”—get it?)
Tip
Unless you like to hunt around your hard drive for obscurely named files, choose the second option (as described next). But if you’ve already let Quicken name and save a QDATA file and need help finding it, see the box on Section 1.4
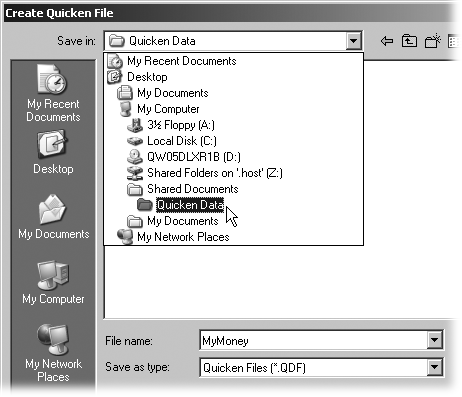
I want to choose a different file name and location. With this option, you can assign your Quicken data file a meaningful name, like MyMoney or Fred’s Finances, and store it in any folder you like. Personalized filenames are essential when you create more than one data file; for instance, when you also track your parents’ finances, or manage money for your geeky child who’s grown rich from her patents.
With this option, clicking Next displays the Create Quicken File dialog box. As demonstrated in Figure 1-1, navigate to the folder you want and, in the File name box, type the name for your data file. Click OK to create the file.
After Quicken creates your data file, it launches the Quicken Guided Setup to help you set up the file—creating accounts, categories, and other features for tracking your finances. To get started, see Section 1.4.
I Am Already a Quicken User
If you have an existing data file from a previous version, first make sure you’ve backed up your existing data (and perhaps printed out parts of it). With your backup and printouts in place, choose the “I am already a Quicken user” option, and then click Next. The Select Your Data File screen offers three options:
Open a file located on this computer. If you have an existing Quicken data file on your hard disk, choose this option and click Next. In the Open Quicken File dialog box, navigate to the folder that contains your data file, select the filename, and click OK to open the file.
Restore a Quicken data file I’ve backed up to CD or disk. This option works only with files backed up with Quicken’s Backup command, as described in Chapter 3. When you choose this option and click Next, the Restore Quicken File dialog box appears. To restore the backup file, navigate to the folder or CD that contains the backup file, select the filename, and click OK. Once the data file is snuggled comfortably in the folder, you can choose File → Open to work with it.
Start over and create a new data file. If you’ve mangled or lost the only copy of your data file in a horrible disk-cleaning accident, take a deep breath, make a mental note to back up your data in the future, and then choose this option to tell Quicken to create a brand new file.
When you click Next and the Create Quicken File dialog box appears, navigate to the folder you use for Quicken data. In the File name box, type a name for the new file and click OK. Quicken creates the data file and launches the Quicken Guided Setup.
Opening a Quicken File
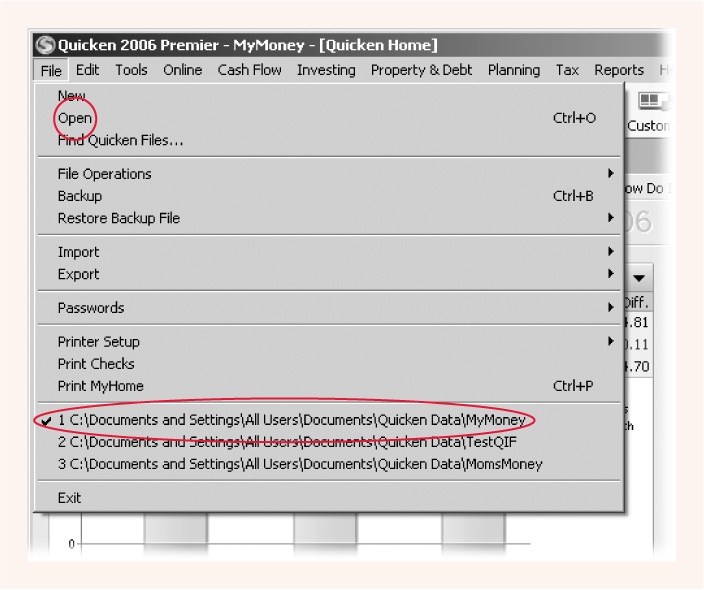
Once you’ve opened a data file, Quicken accommodatingly opens that file the next time you launch the program. If you have only one Quicken data file—and most people do—you may never have to choose File → Open again.
Even with a handful of data files, you need go no further than the File menu to open them, as demonstrated in Figure 1-2.
The Quicken Guided Setup
There’s no escaping the Quicken Guided Setup—Quicken opens it as soon as you create a data file (or convert one from a previous version). If you know your way around Quicken, you can do everything that the Guided Setup does using menu commands. The first time around, though, the Guided Setup’s step-by-step procedure can’t be beat. It clearly lays out all your options, lets you make your own financial choices, and then gives you an error-free data file that’s tailor-made for you.
For example, the setup tool helps you create accounts, which are the electronic cousins of the accounts you have at financial institutions—checking accounts, savings accounts, credit cards, Individual Retirement Accounts (IRAs), and so on. It can also create categories that help organize your budget and track the money you spend. For instance, if you tell the Guided Setup that you own a house, it adds a category for mortgage interest.
From the Quicken Guided Setup Welcome screen, shown in Figure 1-3, you can navigate the setup process in two different ways. Clicking Next Step to proceed to the next setup task is the easiest way to work through the Guided Setup. If this isn’t your first time through the tool, you can also click a category on the left side of the window to jump to the task you want.
Note
If you want to use the Guided Setup but Quicken hasn’t displayed it, simply choose Tools → Quicken Guided Setup.
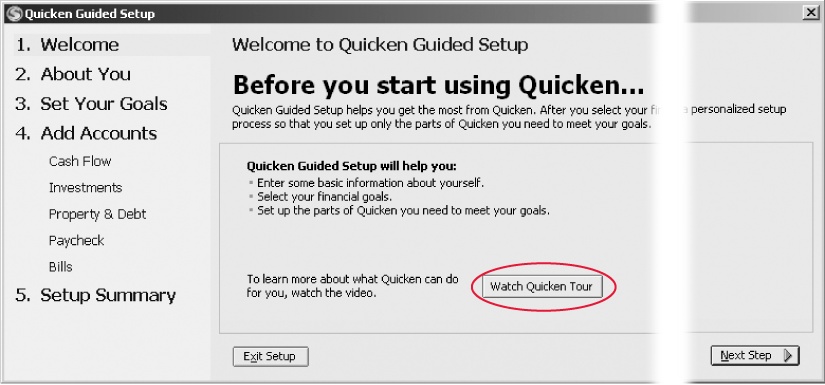
The Welcome screen lists all the things you’ll be doing in the setup. As noted below, the rest of the chapters in this book provide detailed instructions for setting up your data file on your own.
Create cash flow accounts. Cash flow accounts cover checking accounts, savings accounts, credit cards, and plain old cash. Chapter 2 explains how to create them from scratch.
Create investment accounts. Whether your investment accounts are retirement or taxable, brokerage or mutual funds, Chapter 9 explains how to create them from scratch.
Create asset and liability accounts. If you want to track how much you own and owe, Chapter 5 explains how to create accounts for assets and loans.
Set up paychecks. Chapter 4 explains how to use Quicken’s Paycheck Setup tool to automate the entry of paychecks, regardless of how many deductions your company makes.
Set up bills you pay regularly. If you pay the same bills time after time—even if the amount changes from payment to payment—you can automate your bill entry by following the steps described in Chapter 4.
If this process sounds like a lot of work, you’re right! But you can break up the setup process into smaller chunks, as discussed in the box on Section 1.4.2. Before you dive in, you’ll need to have some information handy and think about how you want to use Quicken, as described next.
What You Need for Setup
To set up Quicken to handle your financial needs going forward, you have to gather some information about your present position. At minimum, you need the account balance from the most recent statement for each bank account. With the most recent ending balance, you can begin to manage accounts in Quicken. However, a more useful (though time-consuming) approach is to go back to the beginning of the current year. By starting with the ending balance from the previous year and bringing all your transactions up to date, you can take advantage of Quicken to prepare this year’s tax returns and analyze your yearly finances.
If you’re up to the task of entering a few months of transactions, collect all of your account statements through the last month of the previous year. You can use the account balance from the last statement of the previous year and enter all the transactions from the following statements to bring your Quicken accounts up to date.
Tip
If you plan to use online services (which you can read about in Chapter 6), don’t worry about entering transactions. Your first download may import all the transactions you need. See “Downloading Transactions” on Section 1.5.10 for more detail.
Tell Quicken about Yourself
Quicken starts by asking for a little personal information. Don’t worry—it’s only to determine some of the appropriate accounts and categories to track your finances. On the left side of the Quicken Guided Setup window, click About You, and then provide your age (be honest), whether you’re married, and whether you own a home. Click Next Step when you’re finished.
Set Your Goals
Quicken is a personal finance program with many powerful features, but telepathy isn’t one of them. Nor can Quicken take the place of a personal financial advisor. Before you dive into setting up the accounts in your data file, you need to know what you want to track with Quicken—and more importantly, how diligent you’re likely to be at tracking financial details.
The Set Your Goals screen isn’t about defining your financial goals; it’s about your goals for using Quicken to manage your finances. Each checkbox corresponds to a feature that Quicken offers. Turn on a checkbox to see what setup you need to perform, as illustrated in Figure 1-4. For example, turning on the “Manage my checkbook and bills” checkbox adds an icon to Cash Flow (the category for checking accounts) and Bills.
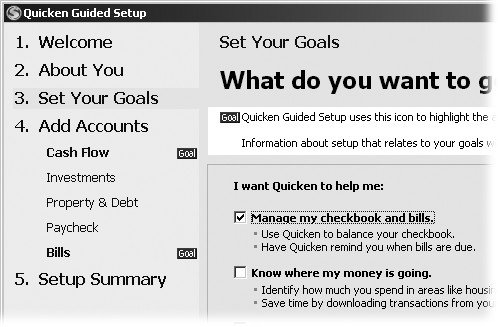
As you can see on the Set Your Goals screen (Figure 1-4), Quicken Guided Setup comes equipped to tailor your data file for a number of common financial concerns. Start by choosing the goal that is closest to your current situation, although you can (and probably will) adjust your goals (and your data file) later.
Manage my checkbook and bills. Turn on this checkbox if you want the Guided Setup to help you create your checking account and set up the bills you pay.
Know where your money is going. If you whip out a calculator at lunch to divvy up the bill to figure out each person’s cost to the penny, you’ll appreciate the tracking that Quicken can perform. Turn on this checkbox if you want the Guided Setup to help you create categories to track your income and expenses.
Save more money. When you turn on this checkbox, Quicken Guided Setup helps you set up a budget to rein in your spending.
Track all my investments in one place. Turn on this checkbox if you want Quicken Guided Setup to help you create investment accounts.
Get out of debt. When you turn on this checkbox, Quicken Guided Setup helps you create accounts for what you own and the money you owe. Once you’ve got Quicken set up, you can choose Planning → Debt Reduction Planner to learn how to get out of debt more quickly.
Make tax preparation easier. If you’re the type of person who jams dollar bills and change into your pocket and notices a problem only when nothing comes out but lint, you might want to track only tax-related income and expenditures. Turn on this checkbox to set up tax-related categories and a link to Intuit’s TurboTax program.
Retire when I want. Turn on this checkbox if you want to prepare an investment plan that helps you retire when you want.
Know my net worth. Turn on this checkbox to make sure you create all the accounts you need to stay on top of how much you’re worth.
Tip
Although it’s good to start with a clear idea of what you’re going to do in Quicken, you don’t have to get the level of detail perfect the first time. As you’ll learn in Chapter 2, you can add, delete, or change categories any time you want.
Add Accounts
In the Quicken Guided Setup, the Add Accounts step is where the real work gets done. Between creating accounts, setting up your paycheck, and setting up the bills you pay, this step hits almost every area of your financial life. In fact, completing this step in one session might be more than you can handle. The good news is that you can stop any time you want and come back to do a bit more (see the box on Section 1.4.2) after you’ve downed a grande latte or two.
Moreover, you can start using any accounts you have created before you complete the setup. Simply click Finish Later to close the Quicken Guided Setup window and perform the financial tasks you want. For example, if you want to enter some checks you’ve written, see “Recording Checks” on Section 4.3.1. When you’re ready to continue, choose Tools → Quicken Guided Setup and you’ll be back where you left off.
Setting up cash flow accounts
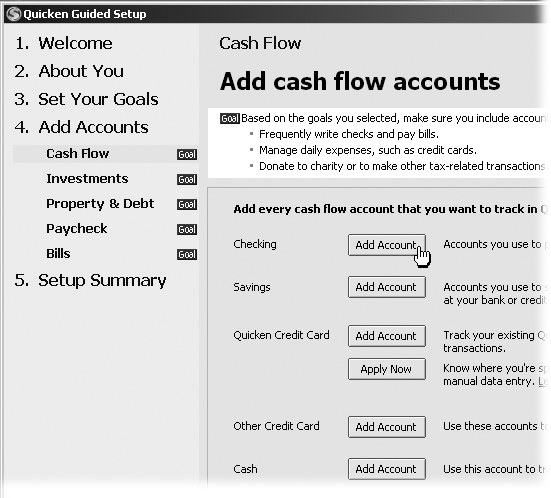
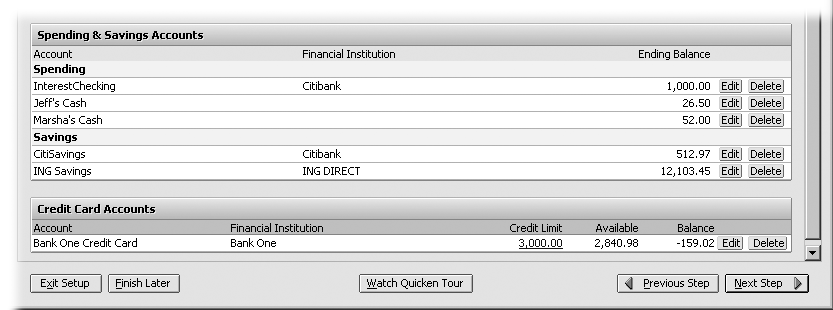
If you click Cash Flow underneath Add Accounts, you’ll see the “Add cash flow accounts” screen. The types of accounts you add on this screen all relate to spending and saving money—checking, savings, credit cards, and, of course, cash. To the right of the type of account you want to start with, click the Add Account button, as shown in Figure 1-5.
Note
The Quicken Credit Card account has two Add buttons (Figure 1-5). If you already use a Quicken credit card, click Add Account to create an account in your data file. Click Apply Now only if you want to succumb to Intuit’s marketing ploy and apply for its credit card.
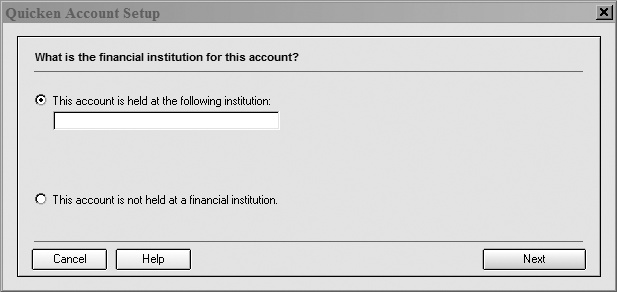
After you click the Add Account button, a Quicken Account Setup dialog box appears, which is the very same dialog box you see if you create an account without the Guided Setup’s help. You can see what it looks like in Figure 1-6.
The setup tool starts by selecting the option to specify the financial institution that holds the account. In the text box, type the name of the bank. For example, the name of the bank where your checking account is, or the bank that issued your Visa card. As you type, Quicken automatically selects the closest matching name from its list of participating financial institutions. For example, by the time you’ve typed citi, Quicken displays Citibank. (On the other hand, if your savings are stuffed in your mattress, you can choose the “This account is not held at a financial institution” option.)
Once you’ve selected your bank, click Next. Then continue to choose options and answer questions, clicking Next to move to the next bit of information required. If you need help, the entire process is described in detail on Section 2.3– Section 2.3.1 in Chapter 2. When you click Done, Quicken creates the account and adds it to the list at the bottom of the screen, as illustrated in Figure 1-7.
Tip
If you don’t have balance information handy, or can’t decide about some account details right now, you can edit these items at any time. See Section 2.4.
Setting up investment accounts
Underneath the Add Accounts step, click Investments to add brokerage, retirement, and mutual fund accounts to your data file. The “Add investment accounts” screen contains buttons for adding brokerage accounts, IRA or Keogh accounts, 401(k) or 403(b) accounts, and single mutual fund accounts.
In a process similar to adding cash flow accounts, you click an Add Account button to open the Quicken Account Setup dialog box. The first screen looks like the one in Figure 1-6, but after that, you’ll see screens with specific investment account options. No request for an ending balance is a pleasant surprise, but you’re not off the hook. As you’ll discover in Chapter 9, you specify the ending balance for an investment account later when you add securities. You’ll find the entire setup process described on Section 9.3, Section 9.3.1, Section 9.3.2 and Section 9.4.
When you’re done, click Done. The Quicken Account Setup dialog box closes and, in Quicken Guided Setup, your new account appears in the list of investment accounts at the bottom of the “Add investment accounts” screen.
Setting up accounts for what you own and what you owe
Also on the Add Accounts setup screen, click Property & Debt to add accounts for your assets and loans. The next screen contains buttons for adding asset accounts for houses, cars, and other items of value (jewelry, Beanie Babies, or the odd Renoir), just like the one in Figure 5-3 (Section 5.2.2). You can set up these accounts to track their value over time, as you buy more Beanie Babies or make improvements on your home, for example. Quicken uses this information to calculate your net worth.
The fourth option on this screen is a bit different from the other three. It’s designed to track not how much you own but how much you owe. While assets add to your net worth, liabilities are in the minus column.
Asset and liability accounts work together with your cash flow accounts, so when you write a check for a loan payment, Quicken lets you immediately see a reduction in the amount you owe and an increase in the equity you own. For example, most people write checks from their checking accounts to pay off their loans. If you track your loans in Quicken, one transaction deducts the money from your checking account and shows that your loan balance goes down as well. If you use Quicken to calculate your net worth, you’ll often find you have both an asset and a liability account for the same piece of property or the same vehicle. (However, you can own an asset without a loan or borrow money without having a corresponding asset, as in the case of a student loan for college.)
If you start by adding a house or car, the Guided Setup creates an account for the asset. But that’s not all. If you borrowed money to buy the asset, the setup can keep going and take you right through the process of setting up the corresponding liability account and even setting up your regularly scheduled loan payment. If setting up the asset account was enough work for the day, in the Quicken Account Setup dialog box, click Cancel. When you’re ready to continue setting up asset and liability accounts, the complete instructions are on Section 5.2.1.
When you’re done setting up accounts for the time being, in the list of steps on the left, click Paycheck.
Setting up your paycheck
Setting up your paycheck in the Guided Setup doesn’t actually create any additional accounts. It does, however, set up a scheduled transaction with as much detail about your paycheck deductions as you can bear to specify. Underneath the Add Accounts step, click Paycheck to launch the Paycheck Setup tool, described in detail in Chapter 4 on Section 4.15, Section 4.15.2, Section 4.15.2.1 and Section 4.15.2.2. If your most recent pay stub isn’t clutched in your hand at the moment, you can also click Next Step to move on to setting up the bills you pay.
Setting up bills to pay
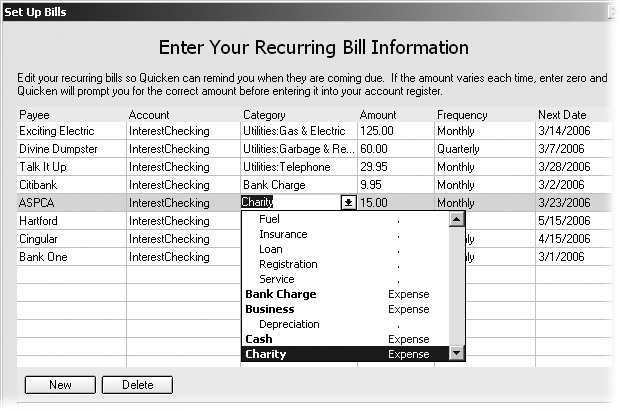
If you pay bills—and who doesn’t—click Bills under the Add Accounts category. Quicken offers an incredibly handy feature, called a scheduled transaction that reminds you to pay your recurring bills. The “Add bills” screen offers a Quicken Bill Pay button. Click it if you’ve signed up to part with your money electronically using this service. Quicken not only remembers that the bill is due, but pays it for you, based on the instructions you give here. (Full details on setting up Online Bill Pay are in Chapter 6.)
If you simply want Quicken to give you a friendly reminder to write paper checks, or you use a different online bill paying service, click Add Bills Manually. Figure 1-8 shows how easy it is to schedule your bills, but for further instruction, see Section 4.13.2, Section 4.14.1, Section 4.14.1.1, Section 4.14.1.2, Section 4.14.2 and Section 4.15 in Chapter 4.
Click OK when you’re done adding bills. The Set Up Bills dialog box closes and you can click Setup Summary in the step list on the left to survey how much of the setup you’ve completed.
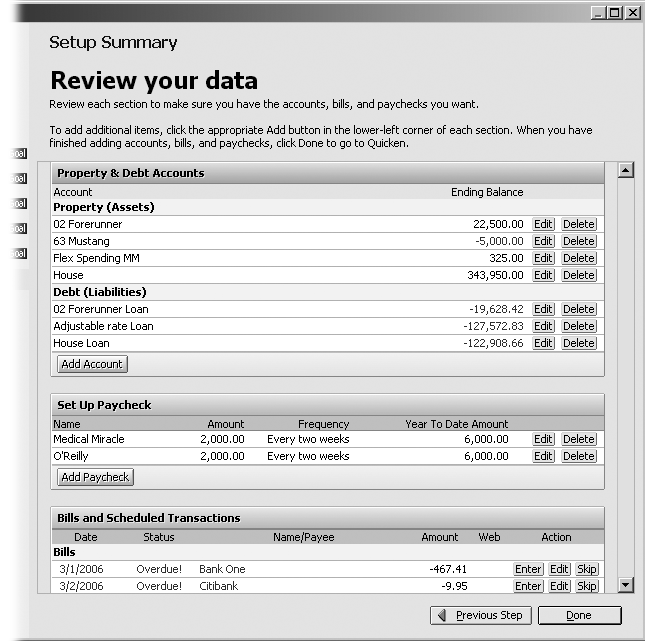
Finishing Up the Guided Setup
When you’re done setting up Quicken (or getting antsy to do something else), click Exit Setup to close the Guided Setup tool. On the other hand, if you’ve dutifully clicked Next Step on each Guided Setup screen, you reach Setup Summary nirvana. As shown in Figure 1-9, the final screen shows every account you’ve created, the paychecks you’ve set up, and the bills you’ve created for regular payment. Click Done and vigorously congratulate yourself.
A Quick Guide to Quicken Preferences
Quicken doesn’t give you as much control over its behavior as some other programs. You won’t find anything like the vast array of options in Microsoft Word, for example. Some of Quicken’s preferences make tiny changes barely worth noticing, while others—like Backup—just might save your sanity. This section describes the preferences you’re most likely to change and why.
To open the Quicken Preferences dialog box, choose Edit → Preferences and then choose Quicken Program. These preferences determine Quicken’s basic behavior and appearance, so you might find yourself drawn back from time to time to make adjustments as your experience grows and your needs change.
Note
When you choose Edit → Preferences, you’ll see two other menu choices: Customize Online Updates and Internet Connection Setup. Both of these categories let you control how Quicken handles your online transactions. See Chapter 6 for the details.
Startup
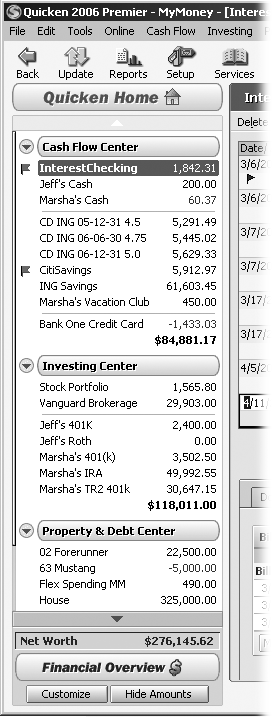
The Startup preference tells Quicken what to display when you first launch the program. Out of the box, the program displays Quicken Home, a financial shopping mall for all your Quicken tasks. To choose a different view, or even a single account, choose Startup. In the “On startup open to” drop-down menu, choose the Quicken Center or account you’d rather see. For example, if you use Quicken as a checkbook, choose your checking account or Cash Flow Center to see checking, saving, and credit card accounts and options.
Setup
The Setup category is home to settings that control Quicken’s basic appearance, keyboard shortcuts, and sounds, shown in Figure 1-10. Since your preferences for keyboard shortcuts and your noise tolerance are individual matters, this panel can have a big impact on your Quicken experience.
Turn on Quicken sounds
If your PC or laptop has speakers, you can’t help but notice the odd noises that erupt as you use Quicken. If you prefer to listen to Brandenburg concertos on your stereo without Quicken’s percussion section, turn off the “Turn on Quicken sounds” checkbox, as illustrated in Figure 1-10.
Account Bar display
You can display the handy Account Bar, shown in Figure 1-11, on the left or right side of the Quicken window. If you almost always work in the same account (or can’t afford to give up any screen real estate), hide the Account Bar by turning on the “Never display Account Bar” checkbox.
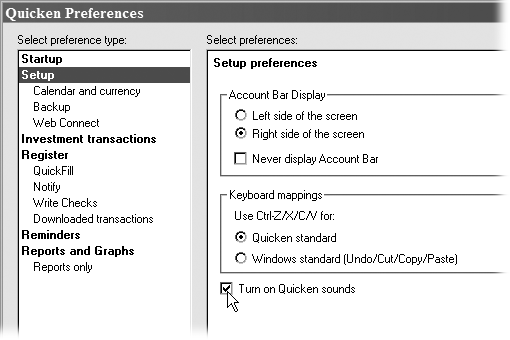
Keyboard mappings
If you’re a speed demon with Windows programs, you’ve probably burned Ctrl+Z, Ctrl+X, Ctrl+C, and Ctrl+V into your muscle memory. But undo, cut, copy, and paste don’t come up much in Quicken activities, so the program automatically chooses the “Quicken standard” setting to assign different meanings to these keyboard shortcuts, as shown in Table 1-1. If the idea of two different meanings for the same keyboard shortcut is more than you can bear, choose the “Windows standard (Undo/Cut/Copy/Paste)” setting.
Keyboard shortcut | WINDOWS COMMAND | WHAT IT DOES IN QUICKEN | QUICKEN COMMAND |
Ctrl+Z | Undo | Displays a QuickZoom report | Double-click a report entry |
Ctrl+X | Cut | For active transaction, jumps to transaction in transfer account | Right-click transfer and, on shortcut menu, choose “Go to matching transfer” |
Ctrl+C | Copy | Displays Category List | Tools → Category List |
Ctrl+V | Paste | Voids active transaction | Right-click transaction and, on shortcut menu, choose “Void transaction(s)” |
Calendar and Currency
If your year begins in January and ends in December, and you deal with only U.S. dollars, you can skip right past the “Calendar and currency” preferences. But if your life is just not that simple, you can tell Quicken to follow your fiscal year. This panel is also where you turn on the program’s currency exchange feature.
Working calendar. Quicken sets the “Calendar year” option automatically. If you want to work with a fiscal year (for example, to track a home-based business), choose the “Fiscal year” option and choose the month in which your fiscal year begins.
Multicurrency support. If your income is in Euros rather than U.S. dollars or you travel the world spending money in dozens of local currencies, turn on the "Multicurrency support” checkbox. Quicken sets the currency for all your current transactions to the currency you’ve chosen in Windows’ Regional and Language Options control panel (see the box on Section 1.5.4).
Backup
If you use your computer for more than managing your money, you probably run backup software, like Windows Backup, to protect all of your data. One backup procedure can capture letters to your mom, your Quicken data file, and pictures of your dog.
So why should you care about Quicken’s backup preferences? For one thing, your Quicken data file may change more often than your other information. Unless you’re disciplined about running a regular backup procedure, Quicken’s backups provide extra insurance for your finances. Likewise, if you often mutter “I should really back up my data today” but rarely follow through, Quicken’s backup reminders could be the nudge you need.
Tip
Another reason you might fall to your knees in gratitude for Quicken backup copies is when you’ve forgotten the new password you recently set. As long as at least one of the Quicken backup copies doesn’t have the new password assigned, you can open that data file, recreate the missing transactions, and you’re set. Oh yeah, and assign a new password that you’ll be able to remember.
Quicken’s backup preferences control how often the program’s automatic backup (Section 3.1.3) runs and how many backup copies it keeps. The following are some guidelines for setting these preferences.
Remind after running Quicken_times. When you type a number in this box, Quicken reminds you to back up your data file after you’ve launched Quicken that number of times. If you tend to slog through marathon Quicken sessions entering dozens of transactions, set the reminder to 1.
If only one or two transactions dribble in each time you run Quicken, set this preference to 3 or higher. You still won’t spend much time recreating lost transactions, but you’ll have backups that span a longer timeframe.
Maximum number of copies. Quicken automatically saves several copies of the backups it creates on your hard disk, so you can retrieve lost data from several sessions past. Quicken sets this preference to 5—the middle ground between safety and disk space conservation. To recover older files (and if you’ve got disk space to spare), choose a higher number (up to 9). To use less disk space, choose a number as low as 1. See Section 3.2 to learn where Quicken stores these backups and how it cycles through the copies.
Warn before overwriting old files. Quicken turns on this checkbox automatically to make sure you don’t accidentally overwrite backup files that you want to keep. This preference applies to the backups you tell Quicken to make (not the ones it makes automatically each week). Turn it off if you’re satisfied that your Quicken and Windows backup routines are keeping your data safe and want Quicken to stop asking.
Investment Transactions
Investment transaction preferences are a new addition to Quicken. These settings give you more control over how your investment register looks onscreen.
List display. Choose One Line or Two Line in the drop-down menu to specify whether Quicken shows one or two lines in the investment register. If you prefer to conserve screen space, choose One Line. With this setting, Quicken shows each transaction on one line—except the currently selected one, which expands to two lines for better visibility.
Sort choice. In this drop-down menu, you can choose Ascending Date or Descending Date to show your investment transactions from earliest to most recent or vice versa. If you add new transactions frequently, stick with Ascending Date, which the program chooses automatically. That way, your new transactions appear at the bottom of the list as you add them.
Show hidden transactions. Quicken leaves this checkbox turned off initially, but you can turn it on if you want to see placeholder transactions or balance adjustments. If you notice an error and can’t seem to find its source, turning on this checkbox to show all transactions can help you find the problem.
Register
Unlike your paper check register, you can change how the Quicken register looks and behaves. Because entering transactions in registers is such a big part of using Quicken, it pays to set up the Register preferences to your liking. Most of these options are a matter of taste, but a few are worth special mention because they have a direct effect on your working speed.
Remove memorized payees not used in last_months. The memorized payees feature alone is almost worth Quicken’s purchase price (see “Managing Memorized Payees” in Chapter 4). As soon as you type a memorized payee name in a transaction, Quicken fills in the amount, category, and memo for you. Unfortunately, as you buy stuff from more companies, the Memorized Payee list can bloat bigger than the aunt who super-sizes all her meals, ultimately slowing down your data entry. The more names in the Memorized Payee list, the more characters you have to type before Quicken finds the matching payee, and the more names you must slog through in the payee drop-down menu.
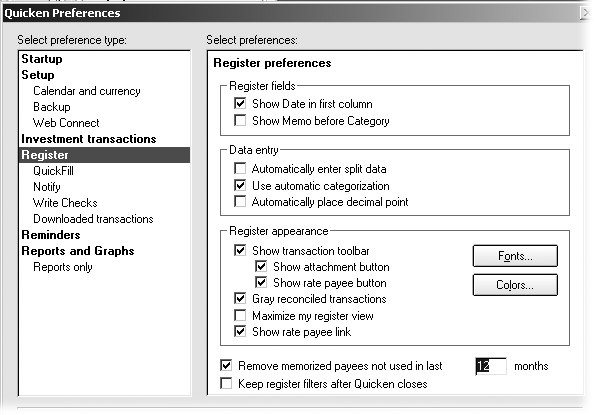
To tell Quicken to remove companies you haven’t purchased from in the last year from your Memorized Payee List, turn on this checkbox and type 12 in the box, as shown in Figure 1-12.
Maximize my register view. Turning on this checkbox (or pressing F11 when a register is visible) hides the Account Bar and fills the Quicken main window with the register. As a result, the register fields get larger, so you can see more payee name and memo information.
Figure 1-12. For a leaner list, choose a lower number of months than the 12 months shown here. To keep payees around longer, choose a higher number.Note
Maximizing the register view makes the fields larger, but the type-face remains the same size. Unfortunately for baby boomers, there isn’t a way to change the font size in Quicken. But there are quite a few things you can do in Windows to make text easier to read onscreen: Choose Start → Control Panel → Display tab or Start → Control Panel → Accessibility Options. Consult Windows XP for Starters: The Missing Manual by David Pogue for more information on accessibility.
Use automatic categorization. Quicken turns this preference on initially, with good reason. It tells the program to fill in the transaction category automatically if the payee you type matches a company in the Quicken database, which is, of course, likely to be the correct category. Otherwise, you’d have to remember to choose a category manually every time.
QuickFill
QuickFill (Section 4.3) is Quicken’s attempt to speed up your data entry. Most of the time, it works surprisingly well. If you approve of Quicken’s fill-in assistance, you can bypass this panel altogether. But if transactions seem to take on a life of their own during data entry, turn off this checkbox to rein in QuickFill’s assistance:
Automatically memorize new payees. Quicken comes with this checkbox turned on, which tells the program to save new payees you use in transactions to the Memorized Payee List. Although this setting ensures that the next transaction for a payee fills in automatically, it can lead to overpopulation, too. And then there are the vendors you’d rather not memorize—like the diner that gave you food poisoning. To decide which payees to add to the Memorized Payee List, turn off this checkbox.
As if you need more justification to turn off this checkbox, consider that Quicken stops memorizing new payees automatically once your Memorized Payee List hits 2,000 entries. The automatic memorization gunks up the list with payees you don’t want and then may not memorize payees you do want.
Notify
The Notify preferences tell Quicken when to warn or remind you about potential problems as you work. Here are the settings and when you may want to turn them on or off:
When entering out-of-date transactions. This notification warns you when you type a date that is more than twelve months away from today’s date. It’s a godsend those first few weeks (or months) or every year, before you get used to typing the new year in dates.
Before changing existing transactions. This option warns you when you try to save an existing transaction that you’ve changed. If you know your way around Quicken and often change existing transactions (say, to add memos to downloaded transactions), turn off this checkbox to eliminate the frequent interruptions.
When entering uncategorized transactions. Almost every transaction should have a category. This notification simply reminds you to do the right thing and supply one. Don’t turn it off.
To run a reconcile report after reconcile. You can turn off this checkbox without a trace of guilt. Reconcile reports tell you mostly what you already know: which transactions have cleared, which haven’t, and whether there’s a discrepancy between your and your bank’s records. If you’ve had to do some fancy footwork to reconcile your checking account one month, you can document that with a reconciliation report by choosing Reports → Cash Flow → Reconciliation.
Warn if a check number is reused. About the only time you’ll use the same check number is when you’re renumbering checks that you entered out of order. Keep this checkbox turned on to receive well-deserved warnings when you type a check number you’ve already written.
Write Checks
The Write Checks preferences control the appearance of checks you write through the Write Checks window and subsequently print. If you write your paper checks by hand, skip this section altogether. This section describes the few preferences you might want to change and why.
Allow entry of extra message on check. If the company you’re paying wants you to include your account or member number, you can type that information in the Write Checks window. If you turn on this checkbox, Quicken prints the message on the check.
Change date of checks to date when printed. Quicken initially turns off this checkbox, which means that the date on the check is the date that you type in the Write Checks window, regardless of when you print the check. If your budget is tight and you consider post-dating checks a critical cash management technique, this setting is ideal. On the contrary, if you’re a stickler for accuracy, turn this option off so checks always show the exact date you print them.
Downloaded Transactions
When you download transactions from your bank or credit card carrier into Quicken, you’re at the mercy of somebody’s (or more likely, some machine’s) bizarre naming schemes. Your first instinct is to pounce on the keyboard and rename the transactions to something that will actually help you remember what you did or bought. Quicken’s ready to help: It automatically creates renaming rules by “watching” you edit the transactions. The next time you download, the program then substitutes your preferred payee names for you.
For example, perhaps you stopped at 40 different Texaco gas stations on a cross-country vacation, and each downloaded charge shows “Texaco” followed a bunch of cryptic numbers. If all you care about is that you spent that money on gas, you simply replace “Texaco 140562789” with “Gas.” Quicken sets its "Downloaded transactions” preferences to create renaming rules automatically when you change a payee name, and tells you it’s doing so.
Here’s what the “Downloaded transactions” preferences do:
Apply renaming rules to downloaded transactions. Quicken automatically turns on this checkbox, which applies existing renaming rules to transactions as you download them. As in the above example, when you download a Texaco fill-up, Quicken changes the payee name to “Gas.”
Automatically create rules when manually renaming. Quicken comes with renaming rules turned on. Turning off this checkbox blocks Quicken from creating rules based on your edits, so that when you edit a transaction, you’re only editing that one transaction.
Don’t display a message when renaming. This checkbox is initially turned off, so you’ll see a message any time Quicken renames a payee. Turn this checkbox off to tell Quicken to rename payees without notifying you.
Reminders
The one preference in this category tells Quicken which calendar notes you want to see. For example, you can change the “Show calendar notes for” preference to “Next 14 days” to see your notes to yourself about what’s coming up in the next two weeks. Or, if you’re at the other end of the dependability spectrum, change it to “Last week” to see tasks you’ve missed.
Reports and Graphs
Quicken wouldn’t be much good if it couldn’t produce a list of your tax-deductible expenses or a pie chart showing your investment diversification. In this category of preferences, you can specify the data range for reports and graphs you generate and what to do when you customize a report. Here are the options and why you may want to adjust them:
Default date range. In the Default date range drop-down menu, choose the period that you use most often in reports; for example, “Year to date” or “Current month.”
Default comparison date range. For reports that compare two time periods, choose the period for the comparison date range. For example, if you set the Default date range to Current Year, set this preference to Last Year to compare the two years.
Customizing reports and graphs. If you frequently customize reports, you can choose options to either create new reports and graphs from the customized report or save the customizations to the current report or graph.
Customize report/graph before creating. If you tweak every report you produce, turn on this checkbox to open the Customize dialog box immediately when you choose a report from the Reports menu. (See Chapter 10 for the full story on Quicken’s reports and graphs.)
Reports Only
These preferences control the appearance of reports, not graphs, and are mostly innocuous. You may want to tinker with the following settings:
Use color in report. If you prefer to see reports in black and white, turn off this checkbox. However, keeping it turned on shows any shortfalls or investment losses in red to catch your attention.
Remind me to save reports. If you’ve customized every report to meet your needs, you probably don’t need a reminder to save reports and can turn this checkbox off.
Decimal places for prices and shares. Quicken sets this preference to 3. If you reinvest dividends, you’re likely to own infinitesimally small fractions of shares. The best setting for this preference is the number of decimal places for the most exacting of your financial institutions. For example, if your Vanguard IRA reports prices and shares to six decimal places, type 6 in the box.
Get Quicken 2006 for Starters: The Missing Manual now with the O’Reilly learning platform.
O’Reilly members experience books, live events, courses curated by job role, and more from O’Reilly and nearly 200 top publishers.

