You may be fond of strutting around your sales department proclaiming, “Nothing happens until somebody sells something!” As it turns out, you can quote that tired adage in your accounting department, too. Whether you sell products or services, the first sale to a new customer often initiates a flurry of activity, including creating a new customer in QuickBooks, assigning a job for the work, and the ultimate goal of all this effort—invoicing your customer (sending an invoice for what you sold that states how much the customer owes) to collect some income.
The people who buy what you sell have plenty of nicknames: customers, clients, consumers, patrons, patients, purchasers, donors, members, shoppers, and so on. QuickBooks throws out the thesaurus and applies one moniker to every person or organization that buys from you: customer. In QuickBooks, a customer is a record of information about your real-life customer. The program takes the data you enter about customers and uses it to fill in invoices and other sales forms with your customers’ names, addresses, payment terms, and other info.
Real-world customers are essential to your success, but do you need customers in your QuickBooks company file? Even if you run a primarily cash business, creating customers in QuickBooks could still be a good idea. For example, setting up QuickBooks records for the repeat customers at your store saves you time by automatically filling in their information on each new sales receipt.
If your business revolves around projects, you can create a job in QuickBooks for each project you do for a customer. To QuickBooks, a job is a record of a real-life project that you agreed (or perhaps begged) to perform for a customer—remodeling a kitchen, designing an ad campaign, or whatever. Suppose you’re a plumber and you regularly do work for a general contractor. You could create several jobs, one for each place you plumb: Smith house, Jones house, and Winfrey house. In QuickBooks, you can then track income and expenses by job and gauge each one’s profitability. However, if your company doesn’t take on jobs, you don’t have to create them in QuickBooks. For example, retail stores sell products, not projects. If you don’t need jobs, you can simply create your customers in QuickBooks and then move on to invoicing them or creating sales receipts for their purchases.
Even before you start receiving payments from customers, you’re going to do business with vendors and pay them for their services and products. The telephone company, your accountant, and the subcontractor who installs Venetian plaster in your spec houses are all vendors. The information QuickBooks needs about vendors isn’t all that different from what you specify for customers.
This chapter guides you through creating and managing customers, jobs, and vendors in QuickBooks. It also helps you decide how to apply the program’s customer, job, and vendor fields to your business.
The Customer Center (Figure 4-1) is a one-stop shop for customers and jobs; you can create, modify, and view their records, as well as create transactions for them. QuickBooks gives you four easy ways to open the Customer Center window:
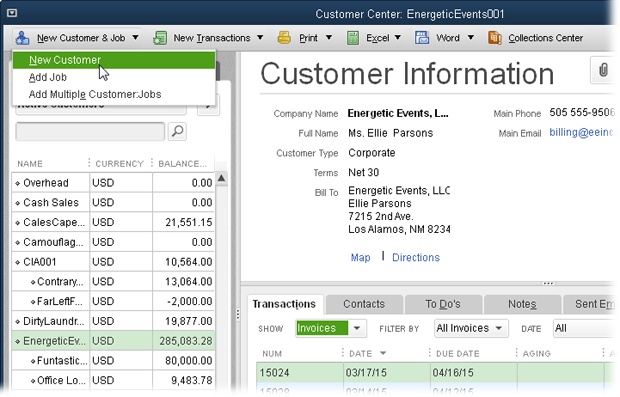
Figure 4-1. To create a new customer in the Customer Center, click New Customer & Job→New Customer. To view a customer’s details and transactions, on the Customers & Jobs tab on the left side of this window, click the customer’s name. If the Transactions tab is selected instead, you’ll see a New Customer button on the Customer Center menu bar; clicking it opens the New Customer window.
Here’s a quick overview of some of the customer- and job-related tasks you can perform within the Customer Center:
Create a new customer or job. In the Customer Center toolbar at the top of the window, click New Customer & Job. In the drop-down menu, choose New Customer to create a new customer record (Creating a New Customer), or choose Add Multiple Customer:Jobs to add several customers.
Add a job to an existing customer. Select the customer in the Customers & Jobs tab on the left side of the Customer Center, and then click New Customer & Job→Add Job (Creating a New Job).
Find a customer. You can filter the list in the Customers & Jobs tab to show active customers, only customers who owe you money (customers with open balances), and so on, simply by choosing an option in the tab’s unlabeled drop-down list (it’s initially set to Active Customers). Choose Custom Filter to specify criteria for the customers you want to see. To search for a specific customer, type part of the customer’s name in the tab’s second unlabeled box, and then click the Find button (it has a magnifying glass on it). The Find button then changes to an X, which you can click to clear the value in the Find box and redisplay the complete list.
Review a customer or job record. When you select a customer or job on the Customers & Jobs tab, the right side of the center displays the basic 411 about that customer or job. In the Customer Information (or Job Information) section, shown in Figure 4-2, you can get directions to its location, look at key information like the open balance for the customer or job, attach electronic documents to the record, or run reports about the customer or job.
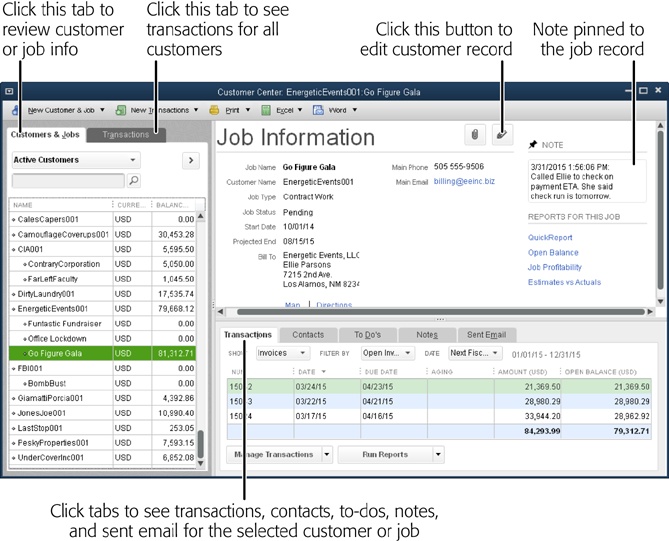
Figure 4-2. To open or edit a customer’s or job’s record, in the Customers & Jobs tab, select the customer or job so it appears in the Customer Information (or Job Information) section, as shown here. To edit it, click the Edit button labeled here. To see more info about the selected customer or job, click the Transactions, Contacts, To Do’s, Notes, or Sent Email tabs at the bottom right of the window. To see transactions for all customers, click the Transactions tab on the left side of the window.
Review a customer’s or job’s status. Suppose you want to look at a bar graph of sales you’ve made to a customer by time period, review the items that customer buys the most, and then scan a customer’s recent invoices and payments. First, select the customer in the Customers & Jobs tab. Then, on the right side of the Customer Center, click the Customer Snapshot link to open the Company Snapshot window (Getting a High-Level View with the Company Snapshot) to the Customer tab.
Edit a customer or job. To open the Edit Customer or Edit Job window, in the Customers & Jobs tab, right-click the name of a customer or job, and then choose Edit Customer or Edit Job, respectively. Or select a customer or job, and then click the Edit button labeled in Figure 4-2.
Create transactions for a customer or job. If you’re reviewing a customer’s or job’s transactions and realize you forgot to record an invoice or other transaction, you can easily create transactions right from the Customer Center window. Select the customer or job in the Customers & Jobs tab and then, in the window’s toolbar, click New Transactions and choose a transaction type from the drop-down menu, such as Estimates, Invoices, or Receive Payments. The items in this menu are the same as the icons in the Customers panel on the Home Page and open the corresponding window to record that type of transaction.
Review and manage transactions, contacts, to-dos, notes, and emails for a customer or job. When the Customers & Jobs tab is displayed on the left side of the window, the bottom right of the Customer Center includes tabs for transactions, contacts, to-dos, notes, and sent emails. If you click the Transactions tab at the bottom right of the window, you’ll see a table with the transactions for the customer or job you selected in the Customers & Jobs tab. You can filter these transactions by type (estimates or invoices, for example), status, and date. Double-click a transaction in the list to open a window with details about it. Click the Contacts, To Do’s, Notes, or Sent Email tabs to create, edit, or view contacts, to-dos, notes, or emails for the selected customer.
Review transactions for all customers. When you click the Transactions tab on the left side of the window and then click a type of transaction (such as Estimate, Invoices, or Received Payments), the right side of the window displays transactions of that type for all customers. Depending on the type you choose, you can filter these transactions by status (such as open or overdue), payment method, and date.
Print or export customer information. When you click the Customers & Jobs tab on the left side of the window, you can print, copy, import, or export customer info. In the center’s toolbar, click Print to print customer information (Printing Lists) or click Excel to import or export customer and job info (Exporting QuickBooks Data). If you click the Transactions tab on the left side of the window instead, you can print or export customer transactions.
Alas, you first have to persuade customers to work with your company. But once you’ve cleared that hurdle, creating those customers in QuickBooks is easy. (The box on Tracking Donors for Nonprofits describes how to use QuickBooks customer records to set up donors for nonprofits, and the box on Making Customers Easy to Identify provides some hints on keeping customers straight in QuickBooks.) The program offers several methods for creating customer records:
QuickBooks Setup. When you’re getting started with the program, you can use the QuickBooks Setup dialog box to quickly import piles of customer, vendor, and employee information from your email program or by copying and pasting data from Excel, as described on Adding Details to Your Company File. To return to the QuickBooks Setup dialog box’s “Get all the details into QuickBooks” screen at any time (Adding Details to Your Company File) to add more records, simply choose Company→Bulk Enter Business Details.
One at a time. The New Customer window is perfect when you land a new customer and need to add their info to your QuickBooks company file. It lets you create one customer at a time, although you can create several records in a row without closing the window. The next section (Creating a New Customer) describes how to create customers with this window and explains what each customer field represents.
Tip
If you don’t add customers very often, you can create a customer record when you create that customer’s first invoice or sales receipt: In the invoice’s or sales receipt’s Customer:Job box (Creating an Invoice), type the customer’s name, and then press Tab to move to the next field. When you do that, the Customer:Job Not Found dialog box appears. To add the new customer to the Customer:Job List without filling in any other info, click Quick Add. Alternatively, click Set Up to open the New Customer dialog box, where you can fill in as many fields as you want. If you typed a nonexistent customer name by mistake, click Cancel.
Copying data. You can also create customers in batches. With the Add/Edit Multiple List Entries feature (Adding and Editing Multiple Records), you can paste data from Excel or copy values from customer to customer.
Importing data. This method is ideal when you have scads of customer records to set up. After you create a map between QuickBooks’ fields and fields in another program, you can transfer your customer info as described on Importing Customer, Vendor, and Item Information.
Here’s the short and sweet method of creating one customer in QuickBooks:
In the Customer Center toolbar, click New Customer & Job→New Customer (or press Ctrl+N).
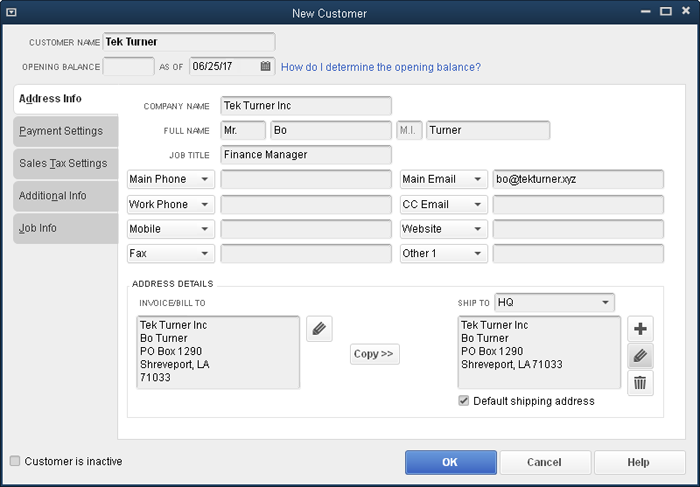
The New Customer window opens (Figure 4-3).
Figure 4-3. Although the Opening Balance box beckons from below the Customer Name field here, it’s better to leave it blank. The box on page 67 explains the best way to define a customer’s opening balance, and the following sections explain what’s on each of this window’s tabs (Address Info, Payment Settings, and so on).
In the Customer Name field, type a unique name or code for this customer, following the naming convention you’ve chosen (see the box on Making Customers Easy to Identify).
This is the only field you have to fill in—the rest are optional.
To save this customer’s record and close the New Customer window, click OK.
To discard what you entered and close the window, click Cancel instead.
Tip
If you buy from and sell to the same company or individual, you probably already know that you can’t use the same name in the Customer, Vendor, Employee, and Other Names lists. If a customer is also a vendor, you need two records for that company or individual—and they have to have different names. The solution? Add text to the Customer Name and Vendor Name fields to identify which list the record belongs to, such as “Tek Turner (Cust)” in the customer record’s Customer Name field and “Tek Turner (Vend)” in the vendor record’s Vendor Name field. Fortunately, QuickBooks doesn’t care if the other fields in the customer and vendor records contain the same info.
The box below tells you how to prevent your QuickBooks Customer:Job List from growing out of control.
The New Customer (and Edit Customer) windows group info onto several tabs so it’s easier to find the fields you want to fill in. The contact and address info is all on the first tab, Address Info. All the fields related to payments are on the Payment Settings tab. The Sales Tax Settings tab contains fields for sales tax, so you can skip it entirely if you don’t sell taxable goods. The Additional Info tab holds a few miscellaneous fields like customer type, sales rep, and any custom fields you’ve created. You’ll learn about the Job Info tab on Creating a New Job. The next several sections step you through each tab and the fields on each one.
If you plan to bill your customers, ship products to them, or call them to make them feel appreciated, address and contact information is important. You record this info on the New Customer window’s Address Info tab. Here’s a guide to what you enter on this tab:
Company Name. Unlike the Customer Name field, where you enter whatever name or code you want to use to identify this customer, this field is where you enter the customer’s name as you want it to appear on invoices and other forms you create. QuickBooks automatically copies what you type here into the Invoice/Bill To box below.
Full Name. To address invoices, letters, and other company communications, enter the primary contact’s salutation or title, first name, middle initial, and last name in the appropriate fields here. QuickBooks automatically copies what you type in these fields into the Invoice/Bill To fields. You can also fill in the Job Title box with this person’s title.
Note
After you create a customer, you can add additional contacts for that customer in the Customer Center. Adding More Customer Contacts tells you how.
Tip
The Address Info tab has additional fields for contact information, including four phone numbers, two email addresses, the company’s website, and a field labeled “Other 1.” If you look closely, you’ll notice that the labels for these eight fields have down arrows on them, so you can set these fields to any of 24 contact-related fields, such as Home Phone, LinkedIn, Facebook, Twitter, URL 1, and Skype ID.
Invoice/Bill To. QuickBooks uses the address you enter in this box on invoices. To edit this address, click the Edit button to its right (it has a pencil icon on it). Then, in the Edit Address Information dialog box, fill in the street address, city, state, country, and postal code, or paste that info from another program. QuickBooks automatically turns on the “Show this window again when address is incomplete or unclear” checkbox, which tells the program to notify you when you forget a field like City or when the address is ambiguous. For example, say you fill in the Invoice/Bill To box with “Santa Claus, North Pole.” If you then click Copy>> to use that address as a shipping address, QuickBooks opens the Edit Address Information dialog box so you can flesh out the address with a street, city, and arctic postal code.
Tip
You can quickly enter addresses and contact info for all your customers by importing data from another program (Importing Customer, Vendor, and Item Information) or by using QuickBooks’ Add/Edit Multiple List Entries feature (Adding and Editing Multiple Records).
Ship To. If you don’t ship products to this customer, you can skip this field. If the billing and shipping addresses are the same, click Copy>> to replicate the contents of the Invoice/Bill To field in the Ship To field. (The greater-than symbols on the button indicate the direction that QuickBooks copies the address—left to right.) Otherwise, click the + button to this field’s right, and then fill in the Add Shipping Address Information dialog box.
Tip
You can define more than one ship-to address for a single customer, which is perfect if that customer has multiple locations. To add another ship-to address, click the + button to the field’s right, and then fill in the Add Shipping Address Information dialog box. Once you’ve added shipping addresses, you can choose the one you want from the Ship To drop-down list. When the shipping address you use most often is visible, turn on the “Default shipping address” checkbox below the Ship To field to tell QuickBooks to pick that address automatically. Click the Edit button (the pencil icon to the field’s right) or the Delete button (the trash can icon) to modify or remove a shipping address, respectively.
The Payment Settings tab (Figure 4-4) is the place to indicate how the customer pays and how much credit you’re willing to extend.
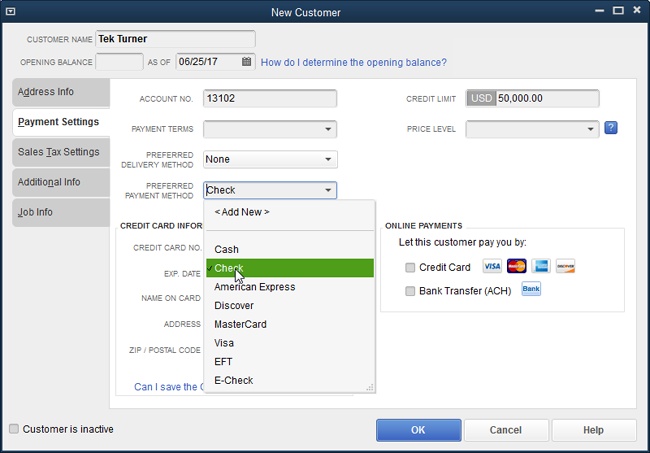
Figure 4-4. Several of the fields on this tab use QuickBooks’ lists. To jump directly to the list entry you want, in any text box with a drop-down list, type the first few characters of the entry. QuickBooks selects the first entry that matches what you’ve typed and continues to reselect the best match as you continue typing. You can also scroll to the entry in the list and click to select it. If the entry you want doesn’t exist, click <Add New> to create it.
You can use the following fields to specify the customer’s payment info:
Account No. Account numbers are optional in QuickBooks. Large accounting programs often assign unique account numbers to customers, which reduces the time it takes to locate a customer’s record. In QuickBooks, the Customer Name field works like an identifier, so you’re best off reserving the Account No. field for an account number generated by one of your other business systems.
Payment Terms. What you select here represents the payment terms the customer has agreed to. The entries in this drop-down list come from the Terms List (Job Type List), which QuickBooks uses for both payment terms for your customers and the ones you accept from your vendors. Out of the box, this list includes several of the most common payment terms, such as “Due on receipt” and Net 30, but you can choose <Add New> at the top of this list to define additional payment terms. If you leave this field blank in a customer’s record, you have to choose the payment terms every time you create an invoice for that customer.
Preferred Delivery Method. Choose E-mail, Mail, or None to identify the method that your customer prefers for receiving information. If you choose E-mail, QuickBooks automatically turns on the E-mail checkbox when you create forms (such as invoices) for this customer. The Mail method represents snail-mailing your customers’ info. When you choose that option, you’re on your own: QuickBooks doesn’t change any settings for you. Choose None if you typically print documents and mail them the old-fashioned way. You can’t add a new entry to the Preferred Delivery Method list, so if you use carrier pigeons to correspond with your incarcerated customers, you’ll just have to choose None and remember that delivery method.
Preferred Payment Method. Choose the form of payment that the customer uses most frequently. This drop-down list includes several common ones, such as Cash, Check, and Visa, but you can add others by choosing <Add New>. The payment method you specify automatically appears in the Receive Payments window (Receiving Payments for Invoiced Income) when you choose this customer. If a regular customer pays with a method different from the one you chose here, you can simply select that method in the Receive Payments window.
Credit Card Information. For credit card payments, you can specify the customer’s card number, the name on the card, the billing address, the Zip/postal code, and the expiration date. (You can enter only one credit card number for each customer.)
Note
If you store customer credit card numbers in QuickBooks, turn on the Customer Credit Card Protection feature (choose Company→Customer Credit Card Protection, and then click Enable Protection). That way, the program helps you comply with credit card industry security requirements (Complying with Credit Card Security Regulations). For example, any user who views complete credit card information has to create a complex password. In addition, QuickBooks doesn’t let you store the card’s security code (the three-digit number on the back of the card) because doing so violates your merchant account agreement and PCI (Payment Card Industry) standards.
Credit Limit. This is where you can specify the amount of credit that you’re willing to extend to the customer. If you do, then QuickBooks warns you when an order or invoice exceeds this customer’s credit limit, but that’s as far as it goes—it’s up to you to reject the order or to ship your products COD. If you don’t plan to enforce the credit limits you assign, then don’t bother entering a value in this field.
Price Level. More often than not, customers pay different prices for the same product. Just think about the labyrinth of pricing options for seats on airplanes, for instance. In QuickBooks, price levels represent discounts or markups that you apply to transactions. For example, you might have one price level called Top20, which applies a 20 percent discount for your best customers, and another price level called AuntMabel that extends a 50 percent discount to your Aunt Mabel because she fronted you the money to start your business. (Creating a Price Level explains how to define price levels.) Once you create a price level, you can tell QuickBooks to apply it to every transaction for a customer by choosing it in this box.
Note
Intuit e-Invoicing (introduced in QuickBooks 2015 R4) is the new and improved online payment subscription service. It replaces the Online Payment service available in previous versions of QuickBooks. If you want to email invoices to customers and receive payments electronically, head to online Appendix E (available from this book’s Missing CD page at www.missingmanuals.com/cds) for the full scoop on Intuit e-Invoicing.
The Sales Tax Settings tab appears whether or not you turn on QuickBooks’ Sales Tax preference (Sales Tax). However, if sales tax isn’t turned on, the fields on this tab are grayed out. If the customer pays sales tax, choose Tax in the Tax Code drop-down list. Then, in the Tax Item drop-down list, choose the option that specifies the tax rate the customer pays. (Chapter 21 tells the whole story of setting up, charging, and remitting sales tax.)
The New Customer window’s Additional Info tab serves up a few fields that let you categorize your customers. Here are the fields and some ways to use them:
Customer Type. You might want to classify customers so you can send customized communications to each type or determine which types are the most profitable. (Turn to Categorizing Customers, Jobs, and Vendors to learn how to set up customer and job types and different ways to use them.) Once you’ve set up customer types, you can categorize a customer by choosing from this drop-down list, which displays the entries from your Customer Type List, such as government, health insurance, or private pay, if you run a healthcare company.
Rep. Choosing a name in this field links a customer to a sales representative, which is helpful if you want to track sales reps’ results. But reps don’t have to be sales representatives: One of the best ways to provide good customer service is to assign a customer service rep to each customer. When you choose <Add New> here to create a new Rep entry (Sales Rep List), you can select existing names from the Employee List, Vendor List, or Other Names List, or add a new name to one of those lists to use as a rep.
Custom Fields. QuickBooks offers 15 custom fields, which you can use to store important info that QuickBooks doesn’t include fields for out of the box. Because custom fields don’t use drop-down lists, you have to type your entries and take care to enter values consistently. The box below has more about custom fields.
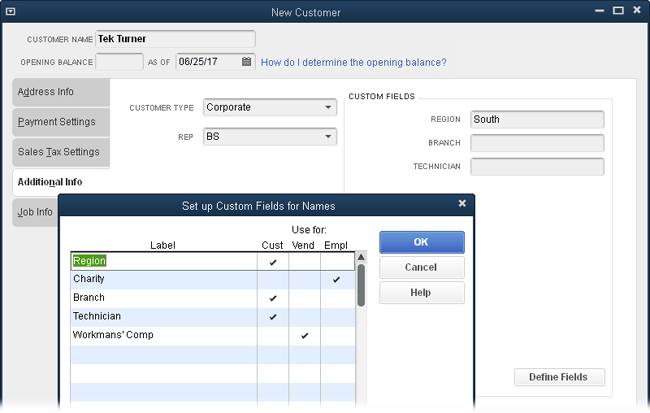
Figure 4-5. The “Set up Custom Fields for Names” dialog box (which opens when you click Define Fields in a New or Edit window for customers, vendors, or employees) lets you create up to 15 custom fields. To associate a custom field with a customer, vendor, or employee, click the corresponding cell in the field’s row in the table. You can associate a custom field with one or more types of names; for example, with both customers and employees.
Note
The New Customer window also includes a Job Info tab, which (not surprisingly) has fields for job-related information. If a customer hires you to do more than one job, skip the Job Info tab, since you’ll create separate jobs to track that info, as described on Creating Jobs in QuickBooks. On the other hand, if you don’t track jobs, you could use this tab’s Job Status field to store the overall status of your work for the customer, although a contact-management or project-management program is probably more useful.
When you create a customer, you can specify information about one contact (typically the primary contact) on the New Customer window’s Address Info tab (Entering Contact Information). After you finish creating the customer’s record, you can then add more contacts to it. For example, you might add contacts for the person who handles day-to-day billing questions, the employee who resolves shipping issues, and the person to contact if you need to escalate a problem. You can also edit or delete contacts as the people you deal with change offices or transfer to new jobs.
When you select a customer in the Customer Center’s Customers & Jobs list, you see contact info for that customer on the right side of the window. Here’s how you add more contacts to the customer’s record:
Click the Contacts tab in the window’s lower-right pane (Figure 4-6).
The Contacts table appears, listing the existing contacts for the selected customer.
To add a new contact, click Manage Contacts at the bottom of the pane, and then choose Add New to open the Contacts window.
The Contacts dialog box opens.
Fill in the boxes, such as Job Title, First Name, Last Name, and so on. In the Contact Type drop-down list, choose Primary Contact, Secondary Contact, or Additional Contact.
The fields in the Contacts dialog box are a subset of those on the New Customer window’s Address Info tab. They include Job Title and Name fields, as well as five other fields that are initially set to Work Phone, Work Fax, Mobile, Main Email, and Additional Email. If you contact the person via Skype or LinkedIn instead, click the field label and then choose the appropriate type of contact info from the drop-down list to switch the customer field associated with that box.
Click “Save and New” to add another contact or “Save and Close” to close the window.
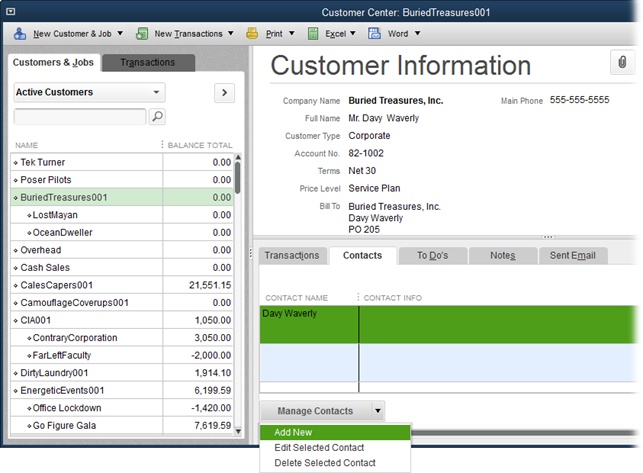
Figure 4-6. To add another contact, click Manage Contacts→Add New, as shown here. Anytime you want to see information about one of the additional contacts you’ve created, select the contact in the Contacts tab visible here, and then click Manage Contacts→Edit Selected Contact. To delete the selected contact instead, click Manage Contacts→Delete Selected Contact.
Project-based work means that your current effort for a customer has a beginning and an end (even if it sometimes feels like the project will last forever). Whether you build custom homes or custom home entertainment systems, you can use QuickBooks’ job-tracking features to analyze financial performance by project (known as job costing).
Suppose you want to know whether you’re making more money on the mansion you’re building or on the bungalow remodel, and the percentage of profit you made on each project. As long as you create jobs for each project you want to track, QuickBooks can calculate these financial measures.
Note
If you sell products and don’t give a hoot about job tracking, you can simply invoice customers for the products you sell without ever creating a job in QuickBooks.
In QuickBooks, jobs cling to customers like baby possums to their mothers. A QuickBooks job always belongs to a customer. In fact, if you try to create a job before you create a customer, you’ll see a message box telling you to create a customer first. Both the New Customer and Edit Customer windows include tabs for customer info and job info. So when you create a customer, in effect, you create one job automatically, but you can add as many as you need. This section explains how.
Because jobs belong to customers, you have to create a customer (Creating a New Customer) before you can create any of that customer’s jobs. Once the customer exists, follow these steps to add a job to the customer’s record:
In the Customer Center’s Customers & Jobs tab, right-click the customer you want to create a job for, and then choose Add Job from the shortcut menu.
You can also select the customer in the Customers & Jobs tab and then, in the Customer Center toolbar, choose New Customer & Job→Add Job. Either way, the New Job window opens.
In the Job Name box, type a name for the job.
This name will appear on invoices and other customer documents. You can type up to 41 characters in this box. The best names are short but easily recognizable to both you and the customer.
QuickBooks fills in most of the remaining job fields with the information you entered for the customer associated with this job. The only time you have to edit the fields on the Address Info, Payment Settings, and Additional Info tabs is when the information on these tabs is different for this job. For example, if materials for the job go to a different shipping address than the customer’s, type the address in the fields on the Address Info tab.
If you want to add info about the job type, dates, or status, click the Job Info tab and enter values in the appropriate fields.
If you add job types (Categorizing Customers, Jobs, and Vendors), you can analyze jobs with similar characteristics, no matter which customer hired you to do the work. Filling in the Job Status field lets you see what’s going on by scanning the Customer Center, as shown in Figure 4-7. If you want to see whether you’re going to finish the work on schedule, you can document your estimated and actual dates for the job in the Date fields; see the box on Specifying Job Information for more about these fields.
Note
To change the values you can choose in the Job Status field, modify the status text in QuickBooks’ preferences (see Jobs & Estimates).
After you’ve filled in the job fields, click OK to save the job and close the New Job window.
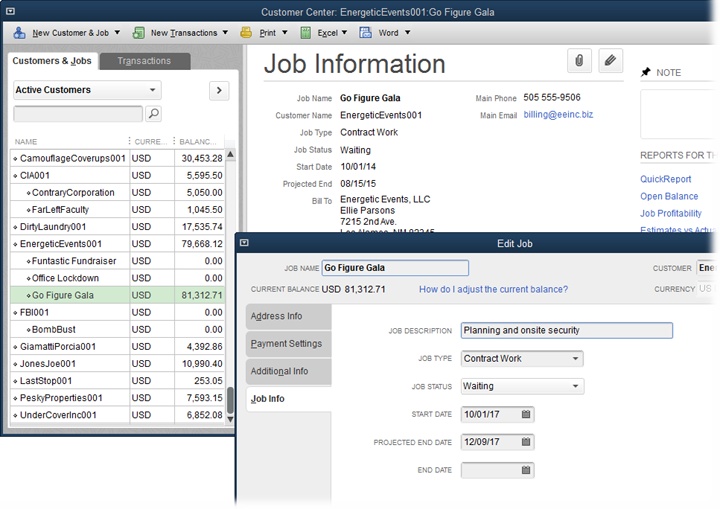
Figure 4-7. When you select a job in the Customer Center (jobs are indented below their customers), the Job Information section of the window displays Job Status, Start Date, Projected End, and End Date (if you’ve added values to those fields). To edit info you’ve entered for a job, double-click the job’s name in the Customers & Jobs tab to open the Edit Job dialog box or click the Edit button (its icon is a pencil) to the right of the Job Information heading.
Tip
You can create a new job for a customer right in the Create Invoices window or the Enter Sales Receipts window. To do so, in either window’s Customer:Job box, type the name of the existing customer, type a colon, and then type the name of the job. When you press Tab or click in another field, the Customer:Job Not Found message box opens. To simply add the new job to the Customer:Job List, click Quick Add. To open the New Job window so you can enter detailed job info, click Set Up instead. Or click Cancel to close the message box without creating a new job. (This shortcut works only if you haven’t filled in the Job Info tab of the customer’s record. If the customer’s Job Info tab already has data in it, then you’ll have to create the job using the New Job window.)
Whether you purchase products and services to run your company or to sell to your customers, the Home Page’s Vendors panel steps you through purchasing and paying for those goods and services; these steps are described in detail in Chapter 9.
The Vendor Center (Figure 4-8) is the best place to create, edit, and view what’s going on with your vendors and vendor-related transactions. To open it, click the Vendors button at the top of the Home Page’s Vendors panel or choose Vendors→Vendor Center. Here are some of the things you can do there:
Create a new vendor. In the Vendor Center toolbar at the top of the window, click New Vendor→New Vendor and the New Vendor window opens so you can create a new vendor record, as described on Creating a Vendor. If you click New Vendor→Add Multiple Vendors instead, QuickBooks lets you create several vendors in one window (Adding and Editing Multiple Records).
Find a vendor. If you have a bazillion vendors, you can shorten the vendor list that you see in the Vendors tab on the window’s left side. The tab’s unlabeled drop-down list is initially set to Active Vendors. If you want to see active and inactive vendors alike, click the field and choose All Vendors instead. If you’d rather see only the vendors you owe money to, choose “Vendors with Open Balances.” Choose Custom Filter to specify exactly the criteria you want.
To do a quick search of vendor records, type part of a vendor’s name in the Vendors tab’s second unlabeled box, and then click the Find button, which has a magnifying glass on it. (The Find button then changes to an X, which you can click to clear the value in the Find box and redisplay the full list.)
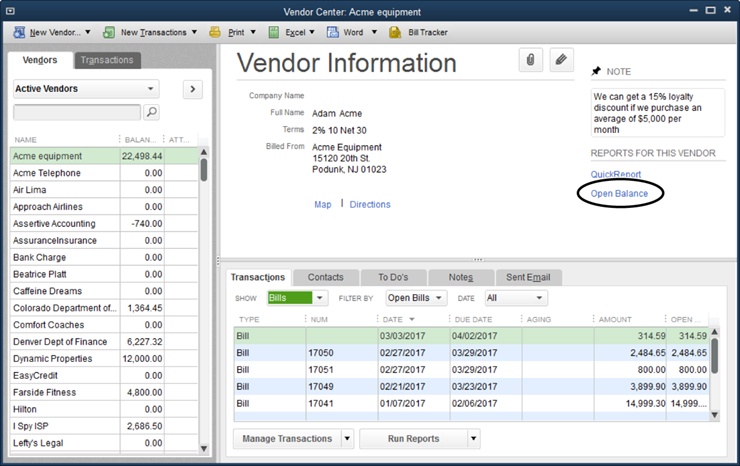
Review a vendor’s record. When you select a vendor on the Vendors tab, basic info about that vendor appears at the window’s top right, as shown in Figure 4-8.
Figure 4-8. The Vendor Center puts all vendor-related tasks in a single window. When you choose a vendor in the list on the left, the Vendor Information pane on the right displays info about that vendor. Click the Open Balance link (circled) to see the transactions that contribute to your balance with that vendor. You can even click the Map or Directions links to find out how to get to your vendor.
Edit an existing vendor’s record. To change a vendor’s record, on the Vendors tab, right-click the vendor’s name, and then choose Edit Vendor; or, on the right side of the Vendor Center, click the Edit button (its icon looks like a pencil tip). Either way, the Edit Vendor window opens with the same fields you filled in when you created the vendor’s record (Creating a Vendor).
Create transactions for a vendor. In the Vendor Center toolbar, click New Transactions to display a drop-down menu of vendor-related features like Enter Bills, Pay Bills, and Receive Items. (These do the same thing as the icons in the Home Page’s Vendors panel.) If you need to review and record several transactions for the same vendor, this drop-down menu is a real timesaver. After you select the vendor in the Vendors tab and then choose an entry on this drop-down menu, the corresponding transaction window opens with that vendor already selected.
Review and manage transactions, contacts, to-dos, notes, and emails for a vendor. When the Vendors tab is displayed, the bottom-right part of the Vendor Center displays tabs for transactions, contacts, to-dos, notes, and sent email. When you select a vendor in the Vendors tab, the Transactions tab at the bottom right of the Vendor Center lists that vendor’s transactions. To see a specific kind of transaction, in the Show drop-down list, choose a type, like Bills or Bill Payments. The Filter By drop-down list lets you restrict the transactions in the table by their status, so you can find out which purchase orders are still open or whether any bills are overdue. To track down transactions within a specific date range, choose an option from the Date drop-down list. (The options in this menu are the same as the ones available in report windows; see Choosing Date Ranges.)
Tip
To view a transaction in its corresponding window, double-click it in the Transactions tab’s table.
Click the Contacts, To Do’s, Notes, or Sent Email tab to create, edit, or view contacts, to-dos, notes, or sent email for the selected vendor.
Review transactions for all vendors. When you click the Transactions tab on the left side of the window (not the one on the bottom right) and then click a type of transaction, such as Bills or Bill Payments, you’ll see transactions of that type for all vendors on the right side of the window. You can filter these transactions by status (such as open or overdue), by date, and, if you use multiple currencies, by currency.
Print or export vendor information. When you click the Vendors tab on the left side of the window, you can easily print, copy, import, or export vendor info. In the Vendor Center toolbar, click Print to print vendor lists, vendor info, or vendor transactions. Click Excel to paste, import, or export vendor info and transactions (Categorizing with Classes). If you click the Transactions tab on the left side of the window instead, you can print or export transactions.
Prepare vendor letters. When the Vendors tab on the left side of the window is selected, click Word in the Vendor Center toolbar to create letters to vendors (Mail Merge to a Word Document).
The methods for creating vendor records are similar to those for creating customers:
One at a time. The New Vendor window lets you create one vendor at a time, although you can create several records in a row without closing the window. Creating a Vendor describes how to create vendors with this window and explains what each field represents.
Copying data. You can also create multiple vendor records with the Add/Edit Multiple List Entries feature (Adding and Editing Multiple Records), which lets you paste data from Excel or copy values from vendor to vendor.
Tip
You can create a vendor record when you create that vendor’s first bill (Entering Bills). Simply choose <Add New> in the Enter Bills window’s Vendor drop-down list.
Importing data. This method is another fast way to create oodles of vendor records. After you create a map between QuickBooks’ fields and the fields in another program, you can transfer all your vendor info, as described on Importing Customer, Vendor, and Item Information.
You create a new vendor from the Vendor Center window by pressing Ctrl+N or, in the Vendor Center menu bar, by clicking New Vendor→New Vendor. Either way, the New Vendor window opens.
Many of the fields in this window should be familiar from creating customers in QuickBooks. For example, the Vendor Name field corresponds to the Customer Name field, which you might remember is actually more of a code than a name. Use the same sort of naming convention for vendors that you use for customers (see the box on Making Customers Easy to Identify). And, as with customer records, you’re better off leaving the Opening Balance field blank and building your current vendor balance by entering the bills they send.
The following sections explain how to fill out the rest of the fields in a vendor record.
If you print checks and envelopes to pay your bills, you’ll need address and contact information for your vendors. The New Vendor window’s Address Info tab has fields for the vendor’s address and contact info, which are almost identical to customer address and contact fields, so see Entering Contact Information if you need help filling them in.
The fields related to payments reside on the Payment Settings tab. Here are the fields and how you fill them in:
Account No. When you create customers, you can assign account numbers to them; when it’s your turn to be a customer, your vendors return the favor and assign an account number to your company. If you fill in this box with the account number that the vendor gave you, QuickBooks prints it in the memo field of checks you print. Even if you don’t print checks, keeping your account number in QuickBooks is handy if a question arises about one of your payments.
Payment Terms. Choose the payment terms that the vendor extended to your company. The entries in this drop-down list come from the Terms List (Job Type List), so they’re the same as for customers.
Print Name On Check As. QuickBooks automatically fills in this box with whatever you enter in the vendor’s Company Name field on the Address Info tab. When you print checks, QuickBooks fills in the payee field with the contents of this box, so to print a different name, simply edit what’s in this box. For example, say you hire subcontractors and fill in the Company Name field with last names followed by first names. You can then fill in this box with first name followed by last name so the payee on a check appears the way people’s names are usually written.
Credit Limit. If the vendor has set a credit limit for your company (like $30,000 from a building supply store), type that value in this box. That way, QuickBooks warns you when you create a purchase order that pushes your credit balance above this limit.
Billing Rate Level. If you use the Contractor, Professional Services, or Accountant edition of QuickBooks, this is another list that lets you set up custom billing rates for employees and vendors. Billing rates let you price the services you offer the same way a Price Level helps you adjust the prices of products you sell. Say you have three carpenters: a newbie, an old-timer, and a finish carpenter. You can set up a Billing Rate Level for each one based on experience. Then, when you create an invoice for your carpenters’ billable time, QuickBooks automatically applies the correct rate to each carpenter’s hours.
QuickBooks keeps the two sales tax–related fields on the Tax Settings tab. Here’s what they do:
Vendor ID. You have to put the vendor’s Employer Identification Number (EIN) or Social Security number in this field only if you plan to create a 1099 for this vendor.
Vendor eligible for 1099. Turn on this checkbox if you’re going to create a 1099 for this vendor (1099s).
Note
When you hire subcontractors to do work for you, you have them fill out a W-9 form, which tells you the subcontractor’s Taxpayer Identification Number. Then, at the end of the year, you fill out a 1099 tax form that indicates how much you paid them, which they use to prepare their tax returns. See Merging Accountant Changes into Your Company File to learn how QuickBooks can help with 1099s.
When you write checks, record credit card charges, or enter bills for a vendor, you have to indicate the expense account to which you want to assign the payment. The Account Settings tab of the New Vendor (and Edit Vendor) window lets you tell QuickBooks which accounts you typically use. But there’s an easier approach to filling in expense accounts than selecting accounts on this tab: telling QuickBooks to automatically recall your previous transactions. That way, when you record a bill, check, or credit card charge for a vendor, the program creates a new transaction using the total amount and the accounts you chose on the previous transaction. Tuning QuickBooks to Your Liking explains how to set the “Automatically recall last transaction for this name” preference.
This tab is rather sparse—it contains only one field: Vendor Type. However, if you associated custom fields with your vendors, as described on Adding More Customer Contacts, then you’ll see those fields, too. Here’s what these fields do:
Vendor Type. If you classify vendors or generate reports based on their types, choose an entry in this drop-down list or choose <Add New> to create a new type in the Vendor Type List (Creating Entries). For example, if you assign a Tax type to all the tax agencies you remit taxes to, you can easily prepare a report of your tax liabilities and payments.
Custom Fields. If you want to track vendor information that isn’t handled by the fields that QuickBooks provides, you can add up to seven custom fields here (see the box on Defining Custom Fields for Lists). Say your subcontractors are supposed to have current certificates for workers’ comp insurance, and you could be in big trouble if you hire one whose certificate has expired. If you create a custom field to hold the expiration date for each subcontractor’s certificate, you can generate a report of these dates.
After you create customer, job, and vendor records, you might have to come back to add more data or change what’s already there. For example, you can add contact info as you gather it over time. Or you may decide to categorize customers, jobs, and vendors, which is handy for slicing and dicing your financial performance to analyze income, expenses, profitability, and so on.
Because customers, jobs, and vendors come and go, eventually your Customer:Job List and Vendor List will become cluttered with people and organizations you no longer do business with. Hiding these obsolete names keeps your lists focused. Of course, if you create records by mistake, you can delete them. You can also merge records to, for example, combine the records of two companies that merged in real life. This section explains how to perform all these modifications.
You can edit customer, job, and vendor records at any time after you create them. For example, you might change address and contact info, increase a credit limit, or shorten payment terms.
QuickBooks gives you a few ways to open the edit windows for these records (Edit Customer, Edit Job, and Edit Vendor). Here are your options:
Edit a customer or job. In the Customer Center (choose Customers→Customer Center), on the Customers & Jobs tab, double-click the customer or job you want to tweak. Alternatively, right-click the customer or job, and then choose Edit Customer:Job from the shortcut menu. You can also select the customer or job you want to edit, and then press Ctrl+E or, on the right side of the Customer Center, click the Edit button (its icon looks like a pencil).
Edit a vendor. In the Vendor Center (choose Vendors→Vendor Center), on the Vendors tab, double-click the vendor you want to modify. You can also right-click the vendor and then choose Edit Vendor from the shortcut menu. Another method is to select the vendor in the list and then press Ctrl+E or, on the right side of the Vendor Center, click the Edit button (its icon looks like a pencil).
Note
If you want to modify multiple customer, job, or vendor records at once, see Adding and Editing Multiple Records.
When you edit these records, you can make changes to all the fields except Current Balance. QuickBooks calculates that value from the opening balance (if you provide one) and any unpaid invoices for that customer or job (or unpaid bills for a vendor). Once you create a customer, job, or vendor record, QuickBooks modifies its current balance when you create transactions like invoices (Creating an Invoice), credit memos (Creating a Credit Memo from an Invoice), bills (Entering Bills), journal entries (Creating Journal Entries), or payment discounts (Modifying Payment Amounts).
Warning
Unless you’ve revamped your naming standard (Creating a New Customer), don’t edit the value in a record’s name field (Customer Name, Job Name, or Vendor Name). Why? Because doing so can mess up things like customized reports you’ve created that are filtered by a specific name; such reports aren’t smart enough to automatically use the new name. So if you do modify a Customer Name, Job Name, or Vendor Name field, make sure to modify any customizations to use the new name.
If you want to report and analyze your financial performance to see where your business comes from and what you spend your money on, categorizing your QuickBooks customers, jobs, and vendors is the way to go. For example, customer and job types can help you produce a report of kitchen remodel jobs that you’re working on for residential customers. With that report, you can order catered dinners to treat those clients to customer service they’ll brag about to their friends. If you run a construction company, knowing that your commercial customers cause fewer headaches and the work you do for them is more profitable than residential jobs is a strong motivator to focus future marketing efforts on commercial work. Similarly, you might categorize vendors to track what you spend with companies versus individual contractors or to classify vendors by geographic location. (Categorizing with Classes explains other ways to analyze your business.)
You can add and assign customer, job, and vendor types anytime. If you don’t have time to add types now, come back to this section when you’re ready to learn how.
Business owners often like to look at the performance of different segments of their businesses. Say your building-supply company has expanded over the years to include sales to homeowners, and you want to know how much you sell to homeowners versus professional contractors. In that case, you can make this comparison by using customer types to designate each customer as a homeowner or a contractor, and then total sales by Customer Type, as shown in Figure 4-9. Job types and vendor types work similarly. For example, job types could help you evaluate the profitability of new construction, remodeling, and maintenance work. As you learned on Specifying Sales Tax Information, categorizing a customer, job, or vendor is as easy as choosing from the Customer Type, Job Type, or Vendor Type lists.
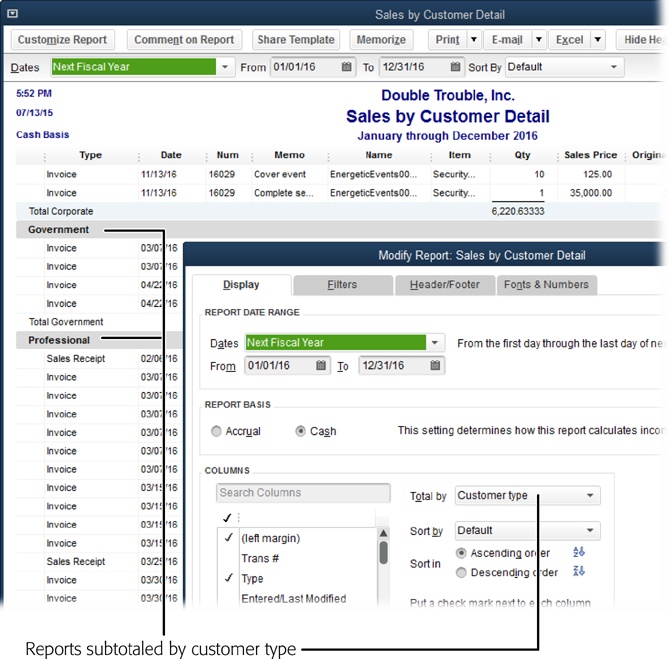
Figure 4-9. The Sales by Customer Detail report initially totals income by customer. To subtotal income by customer type (in this example, government, professional, and so on), click Customize Report in the report window’s button bar. On the Display tab of the Modify Report dialog box that appears, choose “Customer type” in the “Total by” drop-down list (labeled), and then click OK.
Types are yours to mold into whatever categories help you analyze your business. A healthcare provider might classify customers by their insurance, because reimbursement levels depend on whether a patient has Medicare, uses major medical insurance, or pays privately. A clothing maker might classify customers as custom, retail, or wholesale, because the markup percentages are different for each. And a training company could categorize customers by how they learned about the company’s services. This flexibility applies to job and vendor types, too.
Note
The Class Tracking feature is a powerful way to categorize results. Classes are particularly potent because of their ability to cross income, expense, account, customer, job, and vendor boundaries (which types can’t do). To see whether classes can help you analyze your business, turn to Categorizing with Classes.
If you create a company file by using an industry-specific edition of QuickBooks or you select an industry when creating your company file (Using QuickBooks Setup), QuickBooks fills in the Customer Type, Job Type, and Vendor Type lists with a few types that are typical for your industry. If your business sense is eccentric, you can delete QuickBooks’ suggestions and replace them with your own entries. For example, if you’re a landscaper, you might include customer types such as Green Thumb, Means Well, and Lethal, so you can decide whether orchids, cacti, or Astroturf are most appropriate.
Tip
A common mistake is creating customer types that don’t relate to customer characteristics. (The same holds true for job types and vendor types.) For example, if you provide several kinds of services—like financial forecasting, investment advice, and fortunetelling—your customers might hire you to perform any or all of those services. So if you classify your customers by the services you offer, you’ll wonder which customer type to choose when someone hires you for two different services. Instead, go with customer types that describe the customer in some way, like Corporate, Individual, and Government.
Here are some suggestions for using customer, job, and vendor types and other QuickBooks features to analyze your business in different ways:
Customer business type. Use customer types to classify your customers by their business sector, such as Corporate, Government, and Small Business.
Nonprofit “customers.” For nonprofit organizations, customer types such as Member, Individual, Corporation, Foundation, and Government Agency can help you target fundraising efforts.
Job type. Jobs are optional in QuickBooks, so job types matter only if you track your work by the job. If your sole source of income is selling chocolates in your store, jobs and job types don’t matter—your relationship with your customers is one long run of selling and delivering products. But for project-based businesses, job types add another level of filtering to the reports you produce. If you’re a writer, then you can use job types to track the kinds of documents you produce (Manual, White Paper, and Marketing Propaganda, for instance) and filter the Job Profitability Report by job type to see which forms of writing are most lucrative. (Sorting Reports describes how to filter reports.)
Vendor type. Use vendor types to categorize vendors in different ways, such as by industry, location, or type of company.
Location or region. If your company spans multiple regions, offices, or business units, classes can help track business performance. See Categorizing with Classes for info.
Services. To track how much of your business comes from each type of service you offer, set up separate income accounts or subaccounts in your chart of accounts, as outlined on Creating Accounts and Subaccounts.
Products. To track product sales, create one or more income accounts or subaccounts in your chart of accounts.
Tip
Create income accounts for broad categories of income, such as services and products. Don’t create separate accounts for each service or product you sell; instead, you can use items to track sales for each service and product, as described in Chapter 5.
Expenses. To track expenses, create one or more expense accounts or subaccounts in your chart of accounts.
Marketing. To identify your income based on how customers learned about your services, enter this info in a custom field (Specifying Additional Customer Information). That way, you can create a report that shows the revenue you’ve earned from different marketing efforts—and figure out which ones are worth the money.
You can create these types when you set up your QuickBooks company file or at any time after setup. See Customer Type List to learn how to create customer, job, and vendor types and subtypes. Here’s how to see the different type lists:
Customer types: Choose Lists→Customer & Vendor Profile Lists→Customer Type List.
Job types: Choose Lists→Customer & Vendor Profile Lists→Job Type List.
Vendor types: Choose Lists→Customer & Vendor Profile Lists→Vendor Type List.
Hiding customers, jobs, and vendors isn’t about barricading them in a conference room when the competition shows up to talk to you. Because QuickBooks lets you delete these records only in very limited circumstances, hiding them helps keep your lists manageable and your financial history intact.
Although your work with a customer, job, or vendor might be over, you still have to keep records about your past relationship. But old records can clutter up your QuickBooks lists, making it difficult to select the people and companies you still work with. The solution is to hide old records, which also removes those names from all the lists that appear in transaction windows so you can’t select them by mistake. Hiding old records is better than deleting them because QuickBooks retains the historical transactions for those customers, jobs, and vendors so you can reactivate them if you renew the relationship.
To hide a customer or job, in the Customer Center’s Customers & Jobs tab, right-click the customer or job and then, from the shortcut menu, choose Make Customer:Job Inactive. The customer and any associated jobs disappear from the list. Figure 4-10 shows you how to unhide (reactivate) customers.
To hide a vendor, in the Vendor Center’s Vendors tab, right-click the vendor and then, from the shortcut menu, choose Make Vendor Inactive.
Figure 4-10. To make hidden customers visible again and reactivate their records, in the drop-down list at the top of the Customers & Jobs tab, choose All Customers, as shown here. When you do that, QuickBooks displays an X to the left of every inactive customer in the list. Simply click that X to restore the customer to active duty.
You can delete customers, jobs, or vendors only if there’s no activity for them in your QuickBooks file. If you try to delete a record that has even one transaction associated with it, QuickBooks tells you that you can’t delete that record. In that case, you can still hide the customer, job, or vendor, as described in the previous section.
If you created a customer, job, or vendor by mistake and the record has no transactions associated with it, here’s how to delete it:
In the Customer Center, on the Customers & Jobs tab (or in the Vendor Center, on the Vendors tab), select the customer, job, or vendor you want to delete.
Press Ctrl+D (or choose Edit→Delete Customer:Job or Edit→Delete Vendor.)
If the customer, job, or vendor has no transactions, QuickBooks asks you to confirm that you want to delete the record; click OK. If you see a message stating that you can’t delete it, read the previous section (Creating a Vendor, Customer, or Job Type) to learn how to hide the record instead.
Suppose you remodeled buildings for two companies run by brothers: Morey’s City Diner and Les’ Exercise Studio. Morey and Les conclude that their businesses have a lot of synergy—people are either eating or trying to lose weight, and usually doing both. To smooth out their cash flow, they decide to merge their companies into More or Less Body Building and All You Can Eat Buffet. Your challenge: to create one customer in QuickBooks from the two businesses, while retaining the jobs, invoices, and other transactions that you created when the companies were separate. The solution: QuickBooks’ merge feature, which works the same way whether you’re merging customers, jobs, or vendors.
Tip
Here’s another instance when merging can come in handy: If you don’t use a standard naming convention (Creating a New Customer offers several easy conventions), you could end up with multiple customer records representing one real-life customer, such as Les’ Exercise Studio and LesEx. You can merge these doppelgangers into one customer just as you can merge two truly separate companies into one.
When you merge records in QuickBooks (customers, for example), one customer retains the entire transaction history for the two original customers. In other words, you don’t so much merge two customers as turn one customer’s records into those of another. If you want to merge two customers’ records into one, the secret is to rename one customer to the same name as another. Likewise, if you want to merge two jobs’ or vendors’ records into one, you rename one job or vendor to the same name as another.
Note
There’s a catch to renaming customers: The customer you rename can’t have any jobs associated with it. So if there are jobs associated with the customer you want to rename, you have to move all those jobs to the customer you intend to keep before you start the merge. Your best bet: Subsume the customer with fewer jobs so you don’t have to move very many. (If you don’t use jobs, then subsume whichever customer you want.)
To merge customer, job, or vendor records with a minimum of frustrated outbursts, follow these steps:
If you work in multi-user mode, switch to single-user mode for the duration of the merging process.
See Switching Between Multi- and Single-User Mode to learn how to switch to single-user mode and then back to multi-user again after the merge is complete.
Open the Customer Center or Vendor Center.
To open the Customer Center, in the Home Page’s Customers panel, click Customers. To open the Vendor Center, in the Home Page’s Vendors panel, click Vendors.
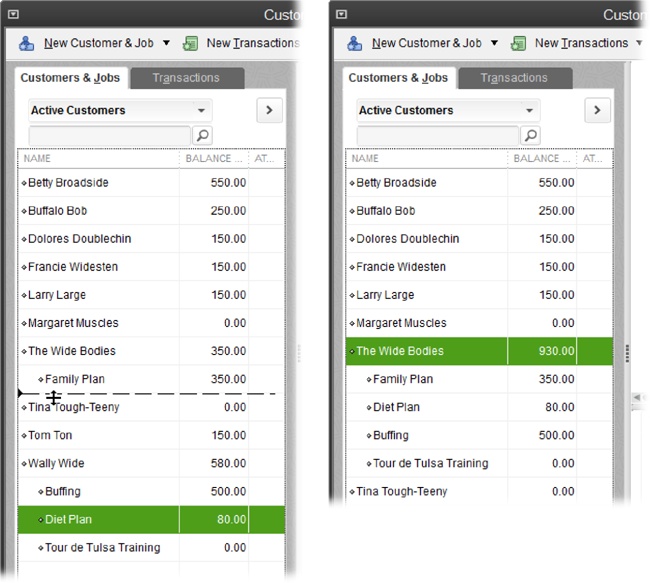
If you’re going to subsume a customer that has jobs associated with it, on the Customers & Jobs tab, position your cursor over the diamond to the left of the job you want to reassign. If you’re merging jobs or vendors instead, jump to step 6.
Jobs are indented beneath the customer to which they belong.
When your cursor changes to a four-headed arrow, drag the job under the customer you plan to keep.
As you drag, the cursor changes to a horizontal line between two arrowheads, as shown in Figure 4-11, left.
Figure 4-11. Left: When your cursor changes to a four-headed arrow, drag within the Customers & Jobs tab to move the job. As you drag, a horizontal line between two arrowheads shows you where the job will go when you release the mouse button. Right: After reassigning all the jobs to the customer you intend to keep, you can merge the now-jobless customer into the other. When the merge is complete, you see only the customer you kept.
Repeat steps 3 and 4 for each job that belongs to the customer you’re going to subsume.
If the customer has hundreds of jobs, moving them is tedious at best—but move them you must.
For a customer or job, on the Customers & Jobs tab, double-click the name of the customer or job you want to subsume. For a vendor, on the Vendors tab, double-click the name of the vendor you want to subsume.
You can also edit a record by selecting its name on the Customers & Jobs or Vendors tab and then, on the right side of the Customer or Vendor Center, clicking the Edit button (the pencil icon). Depending on the type of record you selected, the Edit Customer, Edit Job, or Edit Vendor dialog box opens.
In the edit dialog box, edit the Customer Name, Job Name, or Vendor Name field to match the name of the record you intend to keep, and then click OK.
QuickBooks displays a message letting you know that the name is in use and asking if you want to merge the records.
Click Yes to complete the merge.
In the Customer or Vendor Center, the record you renamed disappears and any balances it had now belong to the remaining entry, as shown in Figure 4-11, right.
Suppose you attend a tradeshow and return to your office with a stack of leads. If you want to turn those leads into new sales, you usually have a host of to-dos, like following up on the questions that prospects asked, sending out more info about your products and services, or simply taking the next step in your sales process. The information you collect about leads is similar to that for customers, but leads aren’t customers—yet. If your lead-tracking needs are simple, QuickBooks’ Lead Center can help you track prospects while you’re trying to turn them into customers. Then, if your persuasion pays off, you can transform leads into customers in QuickBooks.
To work with leads, open the Lead Center by choosing Customers→Lead Center. The Lead Center looks a lot like the Customer Center with a few exceptions. The Leads list on the left shows the leads’ names and status. And because leads don’t have transactions, the tabs at the bottom of the Lead Center focus on to-dos, contacts, locations, and notes.
Note
The Lead Center’s features aren’t as powerful as the ones you find in market-leading customer relationship management (CRM) programs. For example, you can’t send an email to a lead from the Lead Center or create an estimate for a lead. But if your leads are scribbled in a notebook or listed in a spreadsheet, the Lead Center can help you organize them—and because it’s built into QuickBooks, it doesn’t cost extra.
If you need more sophisticated lead-tracking tools, QuickBooks integrates with Salesforce, a major CRM provider. You can learn about this program in the Lead Center window by clicking the “Learn about Salesforce” button to the right of the Lead Information heading.
Here are some of the actions you can perform with leads:
Create a new lead. In the Lead Center toolbar, click New Lead. In the Add Lead dialog box, name the lead. The Status field lets you classify leads as Hot, Warm, or Cold, so you know which ones to focus on first. The Company tab contains fields for info such as company name, telephone number, email address, website, and main address. (You can add other addresses if the company has several locations.) The Contacts tab lets you add contact info for people in the company. The first contact you enter is designated the Primary Contact, but you can add other contacts by clicking the Add Another Contact button.
View leads. Like the Customer Center, the Lead Center lists your leads on the left side of the window. The list shows the leads’ names and status. You can filter the list by choosing an entry from the drop-down menu above the lead list. For example, choose Active Leads to see all the leads you’re working on, or choose Hot to filter the list for all your most promising leads.
Search leads. If your sales team is prolific, your lead list could be quite long. You can search for specific leads by typing part of the lead’s name in the unlabeled text box above the lead list and then clicking the magnifying glass icon. QuickBooks filters the list to show all the leads that contain the text you typed.
Edit a lead. After you create a lead, you can view its information and edit it. Simply double-click the lead in the list on the left side of the Lead Center.
Create a to-do. To add a to-do for a lead, select the lead in the Lead Center’s list. Next, click the To Do’s tab at the bottom right of the Lead Center, and then click To Do at the bottom of the tab. (See Tracking To-Dos to learn how to create different types of to-dos.) The To Do’s tab shows info about that lead’s to-dos, including the type of to-do, its priority, when it’s due, and whether it’s complete.
Add notes. To add notes about a lead, first select the lead in the Lead Center’s list. Next, click the Notes tab at the bottom right of the Lead Center, and then click Add Notes. In the “Note For [lead]” dialog box, type the information you want to record. For example, you might specify the particular products or services that lead is interested in or her budget. When you add a note, QuickBooks automatically records the date you wrote it. To filter the notes by date, choose a time period in the Notes tab’s Date drop-down list.
Convert a lead to a customer. Leads are stored in a separate list from your customers. When you turn a lead into a customer in real life, you can easily do the same in QuickBooks. Simply right-click the lead in the Lead Center’s list and choose “Convert to a Customer” in the shortcut menu (or click the “Convert this Lead to a Customer” button in the Lead Center’s upper right). QuickBooks asks you to confirm this action, because you can’t undo it. When you click OK, the lead disappears from the Active Leads list. You can see the leads you’ve converted to customers by choosing Converted Leads from the drop-down list at the top left of the Lead Center. Although you can still view converted leads in the Lead Center, you can no longer edit them there. They now appear as customers in the Customer Center, and you can edit them there as you do other customers (Working with Customers, Jobs, and Vendors).
Import leads. To import information about several leads, in the Lead Center toolbar, click Import Multiple Leads. The Import Leads dialog box that appears lets you type values into a table, but you can also copy and paste information from an Excel spreadsheet like you do in the Add/Edit Multiple List Entries window (Adding and Editing Multiple Records).
Get QuickBooks 2016: The Missing Manual now with the O’Reilly learning platform.
O’Reilly members experience books, live events, courses curated by job role, and more from O’Reilly and nearly 200 top publishers.

