A company file is where you store your companyâs financial records in QuickBooks, so itâs the first thing you need to work on in the program. You can create a company file from scratch or convert records previously kept in a small-business accounting program or Quicken. Another approach is to use a file that someone else created. For example, if youâve worked with an accountant to set up your company, she might provide you with a QuickBooks company file already configured for your business so you can hit the ground running.
This chapter starts by explaining how to launch your copy of QuickBooks. Then, if you need to create your own company file, youâll learn how to use the QuickBooks Setup dialog box and the EasyStep Interview to get started (and find out which other chapters explain how to finish the job). Finally, youâll learn how to open a company file, update one to a new version of QuickBooks, and modify basic company information.
Here are the easiest ways to open QuickBooks:
Desktop icon. Double-click the desktop shortcut that QuickBooks created during installation to launch the program.
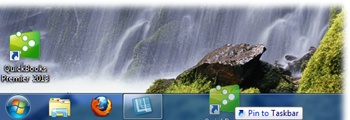
Windows taskbar. The fastest way to open QuickBooks is to click its icon on the Windows taskbarâbut first you have to put it there. In Windows 7, right-drag (thatâs dragging while holding down the right mouse button) the programâs desktop shortcut onto the taskbar, as shown in Figure 1-1. (The right-drag technique also works for copying or moving a shortcut from Windows Explorer or from the Start menu.)
Start menu. Without a desktop icon, you can launch QuickBooks from the Start menu. Click StartâQuickBooks Pro 2013 (or QuickBooks Premier 2013). If QuickBooks isnât already listed on the Start menu, choose StartâAll ProgramsâQuickBooksâQuickBooks Pro 2013 (or QuickBooks Premier 2013).
The first time you launch QuickBooks, youâre greeted by the QuickBooks Setup dialog box, whose sole purpose is to help you create a company file in one way or another. The rest of this chapter explains how to create a company file and then how to open company files you create. After that, youâll be ready to dive into bookkeeping.
Tip
If youâre running QuickBooks Accountant edition, the Accountant Center opens every time you launch the program. The Tools section at the top of this center includes shortcuts to features that accountants use all the time: the Chart of Accounts window, the Fixed Asset Item List (for entering depreciation), Make General Journal Entries, Client Data Review for checking the data your client entered, Reclassify Transactions for correcting transactions that were assigned to the wrong accounts, and so on. However, if you donât want this window to open automatically, turn off the âShow Accountant Center when opening a company fileâ checkbox at the bottom-left of the center. (You can open the Accountant Center anytime by choosing AccountantâAccountant Center.)
If youâve just started a business and want to inaugurate your books with QuickBooks, your prep work will be a snap. If, on the other hand, you have existing records for your business, you have a few small tasks to complete before you jump into QuickBooksâ setup. Whether your books are paper ledgers or electronic files in another program, gather your company information before you open QuickBooks. That way, you can hunker down in front of your computer and crank out a company file in record time. This section explains what you need to create a company file in QuickBooks.
To keep your entire financial history at your fingertips, you need to put every transaction and speck of financial information in your QuickBooks company file. But you have better things to do than enter yearsâ worth of checks, invoices, and deposits, so the comprehensive approach is practical only if you just recently started your company.
The more realistic approach is to enter your financial data into QuickBooks starting as of a specific date and, from then on, add all new transactions to QuickBooks. The date you choose is called the start date. (The start date isnât something that you enter in a field in QuickBooks; itâs simply the earliest transaction date in your company file.) You shouldnât choose it randomly. Here are your start date options and the ramifications of each one:
The last day of the previous fiscal year. The best choice is to fill in your records for the entire year. Choose the last day of your companyâs previous fiscal year as the company file start date. That way, the account balances on your start date are like the ending balances on a bank statement, and youâre ready to start bookkeeping fresh on the first day of the fiscal year.
Yes, you have to enter checks, credit card charges, invoices, payments, and other transactions that have happened since the beginning of the year, but that wonât take as much time as you think. And youâll regain those hours when tax time rolls around, as you nimbly generate the reports you need to complete your tax returns.
If more than half of the year has already passed, the best approach is to be patient and postpone your QuickBooks setup until the next fiscal year. (Intuit releases new versions of QuickBooks in October or November each year for just that reason.) But waiting until next year isnât always an option. In cases like that, go with the next option in this list.
Tip
For practice, you can decide to start entering transactions that occur after the closing date of one of your bank statements. Then you can enter transactions for the month and try reconciling your QuickBooks records with your bank statement (Reconciling Accounts).
The last day of the previous fiscal period. The next best start date is the last day of the previous fiscal quarter (or fiscal month at the very least). Since your company file doesnât contain a full yearâs worth of detail, youâll have to switch between QuickBooks and your old filing cabinets to prepare your tax returns and look up financial information. Starting just before a fiscal period reduces this hassle but doesnât eliminate it.
Unless you begin using QuickBooks when you start your business, you need to know your account balances as of your selected start date to get things rolling. For example, if your checking account has $342 at the end of the year, that value goes into QuickBooks during setup. You also need every transaction thatâs happened since the start dateâsales youâve made, expenses youâve incurred, payroll and tax transactions, and so onâto establish your asset, liability, equity, income, and expense accounts. So dig that information out of your existing accounting system (or shoebox). Here are the balances and transactions you need and where you can find them in your records:
Cash balances. For each bank account you use in your business (checking, savings, money market, and so on), find the bank statements with statement dates as close toâbut earlier thanâthe start date of your QuickBooks company file. Gather deposit slips and your checkbook register to identify the transactions that havenât yet cleared; youâll need them to enter transactions, unless you download transactions from your bank (Online Banking Using Side-by-Side Mode). If you have petty cash lying around, count it and use that number to set up your petty cash account (Recording Purchases Made with Petty Cash).
Customer balances. If customers owe you money, pull the paper copy of every unpaid invoice or statement out of your filing cabinet so you can give QuickBooks what it needs to calculate your Accounts Receivable balance. If you didnât keep copies, you can ask your customers for copies of the invoices they havenât paid or simply create invoices in QuickBooks to match the payments you receive.
Vendor balances. If your company thinks handing out cash before you have to is more painful than data entry, find the bills you havenât yet paid and get ready to enter them in QuickBooks so you can generate your Accounts Payable balance. (Or, to reduce the number of transactions you have to enter, simply pay those outstanding bills and record the payments in QuickBooks.)
Asset values. When you own assets such as buildings or equipment, their value depreciates over time. If you included a balance sheet with the tax return you filed for your company, you can find asset values and accumulated depreciation on your most recent tax return (yet another reason to start using QuickBooks at the beginning of the year). If you havenât filed a tax return for your company yet, an assetâs value is typically the price you paid for it.
Liability balances. Find the current balances you owe on any business loans or mortgages.
Inventory. If you stock products that you sell and track as inventory, you need to know how many items you had in stock as of the start date, how much you paid for them, and what you expect to sell them for.
Payroll. Payroll services are a great value for the money, which youâll grow to appreciate as you collect the info you need for payroll (including salaries and wages, tax deductions, benefits, pensions, 401(k) deductions, and other stray payroll deductions you might have). You also need to know who receives withholdings, such as tax agencies or the company handling your 401(k) plan. Oh, yeahâand you also need payroll details for each employee. Chapter 14 explains the payroll options that are available inside and outside of QuickBooks.
Keeping books requires accuracy, attention to detail, and persistenceâhence the customary image of spectacled accountants scanning row after row of numbers. QuickBooks can help you keep your books without ruining your eyesightâas long as you start your company file with good information. If you want to practice with QuickBooks, you can experiment with a sample file, as the box on Getting Help Creating a New Company File explains.
QuickBooks makes it easy to create a company file from scratch. (The box on Getting Help Creating a New Company File tells you how to find someone who can help you create one.) You can opt for a short and sweet process, which asks you for the bare minimum of info before it creates your file. Or you can use a wizard that guides you through the process with a series of questions that takes about 30 minutes to answer. The questions cover the basics of creating and customizing a company file to fit your business. The program wants to know some company information, the industry youâre in, and the features you want to use. QuickBooks then sets your preferences and creates a few accounts (like basic income and expense accounts and your checking account). Of course, you have to do the bulk of the setup work later, which you learn in the section Whatâs Next? on page 18.
You can create a company file in several ways, and the QuickBooks Setup dialog boxâwhich opens automatically the very first time you start QuickBooksâis your ticket to all of them. If you donât see this dialog box, choose FileâNew Company (or click âCreate a new companyâ in the No Company Open window). The dialog box takes up most of the screen, so you can stay focused on creating your company file.
The three basic approaches to creating a company file are covered by the QuickBooks Setup dialog boxâs three buttons:
Express Start. This button is in pole position because itâs the best option if this is your first time creating a company file. QuickBooks holds your hand and asks for a few bits of info at a time before moving to each new screen. If you stop filling in information before QuickBooks creates your company file, the program wonât save any of the values you entered. So make sure you have at least 15 minutes to complete the first set of steps. The instructions for Express Start begin below.
Advanced Setup. If youâve been around the QuickBooks block before, this option launches the EasyStep Interview window, which asks for more information on each screen than Express Start does. If you need help during the process, you can always click the âGet answersâ link at the top right of the window. You can also use Advanced Setup to go back and modify info you entered previously, whether you entered it using Express Start or the EasyStep Interview. (The instructions for the EasyStep Interview begin on Creating Your Company File. If youâre unsure what to put in any of the fields youâre supposed to fill in, theyâre described in the Express Start section, because you fill in much of the same information regardless which approach you use.)
Other Options. This button covers the rest of the bases. You can use it to open an existing company file or to convert existing records that are in Quicken or another accounting program (Converting from Quicken Home & Business) for use in QuickBooks.
Note
If you use the QuickBooks Accountant Edition, you can create a company file from an existing file. Choose FileâNew Company from Existing Company File.
Whether you use Express Start or the EasyStep Interview, you tell QuickBooks the basic 411 about your company, such as its name and tax ID. (If any of the fields confuse you, try clicking the âNeed help? Give us a callâ button in the QuickBooks Setup dialog box or the âGet answersâ link in the upper-right corner of the EasyStep Interview dialog box.) The next section provides the full scoop on the information you need to provide.
As its name implies, Express Start gets you going as quickly as possible by asking for the minimum amount of info (you can go back later to fill in the details). To use it, choose FileâNew Company and then, in the QuickBooks Setup dialog box, click Express Start. The âTell us about your businessâ screen appears, and you can start entering info. The following sections explain what the program needs to know to create your company file.
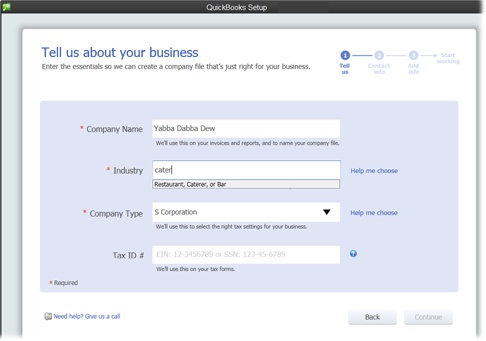
In the âTell us about your businessâ screen, shown in Figure 1-2, you need to cough up only three answers, but these responses are the foundation of many of the preferences that QuickBooks sets:
Company Name. Type the name you want to appear on invoices, reports, and other forms. Later on, you can specify your companyâs legal name (Business Contact Information).
Figure 1-2. QuickBooksâ list of industries is robust, so chances are good youâll find one thatâs close to what your company does. You can start typing an industry and the program will display options that match what youâve typed so far, such as âcaterâ to display the industry âRestaurant, Caterer, or Barâ shown here. Or you can click the âHelp me chooseâ link to see all the industries the program offers. The Tax ID box is for the federal tax ID number you use when you file your taxesâyour Social Security number or Federal Employer Identification Number.
Industry. Choose your industry carefully. Based on your choice, QuickBooks adjusts its settings and chart of accounts to match how your business operates. For example, the program creates income and expense accounts for your type of business and automatically turns on features like sales tax and inventory if your industry typically uses them. If QuickBooks makes assumptions you donât like, you can alter your preferences (Deleting Downloaded Transactions) and accounts (Creating Accounts and Subaccounts) later.
If you donât see an obvious choice in the Industry list, scroll to the bottom and choose either General Product-based Business or General Service-based Business.
Company Type. The tax form you use depends on the type of business entity you have. This drop-down list contains the most common types, from sole proprietorships and partnerships to corporations and nonprofits. When you select a type, QuickBooks assigns the corresponding tax form to your company file. After you finish creating your company file, you can see the tax form the program selected by choosing CompanyâCompany Information, which brings up the Company Information window shown in Figure 1-7 (page 18). The Income Tax Form Used box at the bottom of that window lists the tax form for your company type.
Tax ID. This box is for the federal tax ID number you use when you file taxes. You donât have to enter it now, but youâll need it come tax time. Youâll use a Federal Employer Identification Number (EIN) if your company is a corporation or partnership, you have employees, or fit a few other criteria (go to www.irs.gov to see if you need an EIN). Otherwise, your tax ID is your Social Security number or Individual Tax Identification Number (ITIN).
When you finish filling out the first screen, click Continue.
Next, you can enter your basic contact info. If youâre itching to start printing and emailing invoices, bills, and other forms, fill in the following fields:
Legal Name. This is the name you use on contracts and other legal documents. Your company name and legal name are usually the same unless you use a DBA (doing business as) company name. If you own a corporation, the legal name is what appears on your Certificate of Incorporation.
Contact info. Enter your mailing address, telephone number, email address, and website address, if you have one. The Zip and Phone fields are the only ones that are required.
Click Preview Your Settings to see which features QuickBooks selected for you based on the industry and company type you provided (Figure 1-3), and to specify the accounts you want to use and where you store your company file. Hereâs what you can do on each tab in this dialog box:
Features Selected. This tab is purely informational. You canât modify the features that QuickBooks chooses for your company in this dialog box, but once youâve used QuickBooks for a while, you can change the programâs preferences (Chapter 23) to suit your needs.
Chart of Accounts. This tab lists accounts typically used in your industry. The accounts that the program chose have checkmarks next to their names. You can include or exclude accounts in your chart of accounts by turning their checkmarks on or off.
Company File Location. This tab shows the path on your computer where the program plans to save your company file. To choose a different spot, click Change Location and then select the folder you want. If the folder doesnât exist, in the Browse For Folder dialog box, click Make New Folder. Click OK to close the Browse For Folder dialog box.
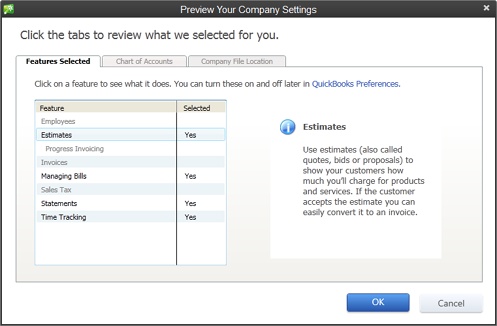
Figure 1-3. You canât use this dialog box to change the features listed on the Features Selected tab. However, you can adjust those settings later in the Preferences dialog box (page 608). To modify the accounts in your company file or where the file is stored, click the Chart of Accounts or Company File Location tabs, respectively.
When youâve made the changes you want to your company settings, in the Preview Your Company Settings dialog box, click OK to return to the main QuickBooks Setup dialog box.
Once everything is the way you want it, click Create Company File. A Working message box appears to show QuickBooksâ progress in creating your file. You know itâs finished when the âYouâve got a company file! Now add your infoâ screen appears. If you have time, you can add your customers, vendors, and employees; the products and services you sell; and your bank accounts. To learn how to do these tasks, jump to Beginning to Use QuickBooks on page 15.
The EasyStep Interview also guides you through the setup process, but it gives you more control over setting up your company file than Express Start does. For example, you can provide more info about your company up front and choose which features to turn on.
To access the EasyStep Interview, choose FileâNew Company and then, in the QuickBooks Setup dialog box, click Advanced Setup. The âEnter your company informationâ screen appears. As you enter the following info, click Next to proceed to each new screen:
Name and contact info. The first screen wants to know the name of your company, its legal name, tax ID, and your contact info. The âCompany nameâ field is the only one thatâs requiredâyou can fill in the other fields later on by choosing CompanyâCompany Information.
Industry. On the âSelect your industryâ screen, choose the industry closest to yours. That way, most of the settings the program chooses will be what you want.
Type of company. On the âHow is your company organized?â screen, select the option for your company type. This setting determines which tax form, accounts, and tax form lines youâll use to prepare your business tax return.
First month of fiscal year. When you start a company, you choose a fiscal year. On the âSelect the first month of your fiscal yearâ screen, QuickBooks automatically sets the âMy fiscal year starts inâ box to January because so many businesses stick with the calendar year for simplicity. If you start your fiscal year in another month, choose it from the drop-down list.
Administrator password. The administrator can do absolutely anything in your company file: set up other users, log in as other users, and access any area of the company file. Although QuickBooks lets you click Next and skip right past the âSet up your administrator passwordâ screen, this is no time for shortcuts, as the box on Safe Login Practices explains. Type the password you want to use in both the âAdministrator passwordâ and âRetype passwordâ boxes, and then keep the password in a safe but memorable place. (Setting Up the Administrator explains how to change the administrator name and password.)
After you set the administrator password and click Next, the âCreate your company fileâ screen appears. (If youâre new to QuickBooks, click the âWhere should I save my company file?â link, which opens a Help Article dialog box that explains the pros and cons of storing company files in different places.) When youâre ready to create the file, on the âCreate your company screen,â click Next to specify the filename and location.
QuickBooks opens the Filename for New Company dialog box, which is really just a Save As dialog box. Navigate to the folder where you want to store your company file. QuickBooks automatically sets the âFile nameâ box to the company name you entered, and the âSave as typeâ box to âQuickBooks Files (*.QBW, *.QBA).â Here are some guidelines for naming and saving your company file:
If you want to call the file something other than the company name you entered earlier in the interview, simply type a new name in the âFile nameâ box. For example, you may want one thatâs shorter or that better identifies the companyâs records within.
Consider storing your company file in a folder with the rest of your company data so that it gets backed up along with everything else. For example, if youâre the only person who uses QuickBooks, you could create a Company Files folder inside your My Documents folder. See Where to Store Your Company Files for more about choosing a location for company files.
When you click Save in the Filename for New Company dialog box, QuickBooks may take a minute or so to create the new file. In the meantime, a message box with a progress bar appears. When the company file is ready, the EasyStep Interview displays the âCustomizing QuickBooks for your businessâ screen. Click Next to dig in.
Tip
At this point, the progress bar in the left margin of the EasyStep Interview window is depressingly short because you still have to do the bulk of the company file setup. If you need a break before continuing, click Leave. The next time you open that company file, the EasyStep Interview continues where you left off.
After you click Next on the âCustomizing QuickBooks for your business screen,â the next several screens of the EasyStep Interview ask questions about your business to help QuickBooks decide which features to turn on, what to include on your QuickBooks Home page, and so on. The interview displays â(recommended for your business)â next to the options that are typical for a company in your industry, as shown in Figure 1-4.
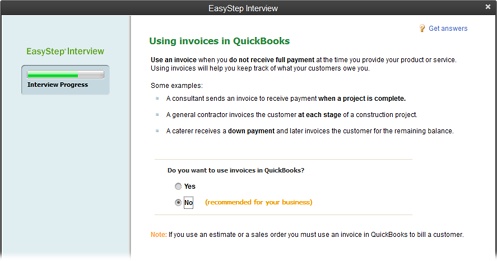
Figure 1-4. The EasyStep Interview sticks to the basics, so youâll have more setup to do later. As you step through the screens in this section, make a list of the features youâre turning on (and the corresponding page numbers in this book) for reference. If you decide to change any of these settings later, Chapter 23 tells you how.
Here are some guidelines for answering the questions on the screens that follow:
The What do you sell? screen is where you tell QuickBooks whether you offer services, products, or both. When you choose one of these options, the program figures out which types of income accounts you need. If you select âProducts onlyâ or âBoth services and products,â another screen later in the interview asks whether you want to track inventory.
The Do you charge sales tax? screen has only two options: Yes and No. If youâre one of the unfortunate souls who has to navigate the rocky shoals of sales tax, select Yes. If you donât charge sales tax, select No. For detailed instructions on dealing with sales tax in QuickBooks, see Setting Up Sales Tax.
On the Do you want to create estimates in QuickBooks? screen, select Yes or No to turn the estimate feature on or off. If you prepare quotes, bids, or estimates for your customers and want to do so in QuickBooks (Estimating Jobs), select Yes.
Note
If you use QuickBooks Premier, the âTracking customer orders in QuickBooksâ screen appears, asking whether you want to use sales orders to track backorders (Checking for Unbilled Costs) or other orders that you plan to fill at a later date. QuickBooks Pro doesnât include this sales order feature.
The Using statements in QuickBooks screen is where you tell the program whether you generate statements to send to customers (Generating Statements). For example, your wine-of-the-month club might send monthly statements to its members. Or a consultant could send invoices for work performed and then send a statement that summarizes the fees, payments, and outstanding balance.
On the Using invoices in QuickBooks screen, select Yes to tell the program that you want to use invoices, which you probably do because invoices are the most flexible sales forms (Invoices). If you answer No (if, for example, you own a restaurant), QuickBooks jumps to the âManaging bills you oweâ screen.
If you answer Yes on the âUsing invoices in QuickBooksâ screen, the Using progress invoicing screen asks whether you invoice customers based on the percentage youâve completed on a job. To learn why (and how) you might use this feature, see Comparing Estimates to Actuals.
The Managing bills you owe screen asks whether you plan to write checks to pay bills immediately (select No) or enter bills in QuickBooks and then pay them later (select Yes). You can read about bill preferences on Bills and payment preferences on Payments.
Tip
Entering bills in QuickBooks (Entering Bills) requires more steps than simply writing checks without entering the bills in QuickBooks, but thereâs a benefit to the extra effort: the program can remind you when bills are due or qualify for timely payment discounts, and keep track of the total you owe.
Tracking inventory in QuickBooks is the screen where you tell the program whether you keep track of the products you have in stock. This screen provides a few examples of when to track or bypass inventory, and When You Donât Need Items has more about how to decide whether tracking inventory makes sense for your business.
Tracking time in QuickBooks is ideal if you bill by the hour. In that case, select Yes on this screen to track the hours people work and create invoices for their time. Chapter 8 explains how to set up time tracking.
The Do you have employees? screen is where you specify whether you want to use QuickBooksâ payroll and 1099 features (select Yes). If you use non-Intuit services to run payroll or generate contractorsâ 1099s, select No.
When you click Next on the âDo you have employees?â screen, you see the âUsing accounts in QuickBooksâ screen, and the progress bar indicates that youâre almost done with the interview. Click Next to set up these final things:
The Select a date to start tracking your finances screen summarizes what you learned about start dates on Choosing a Start Date. To start at the beginning of this fiscal year (which QuickBooks can figure out using the current calendar year and the starting month you select), choose the âBeginning of this fiscal year: 01/01/13â option. (The year you see listed depends on the current calendar year.) If youâve decided to start on a different date, select the âUse todayâs date or the first day of the quarter or monthâ option instead. You can then type or choose any date you want in the box, such as the last day of the previous fiscal period.
The Review income and expense accounts screen lists the accounts typically used by companies in your industry, as shown in Figure 1-5.
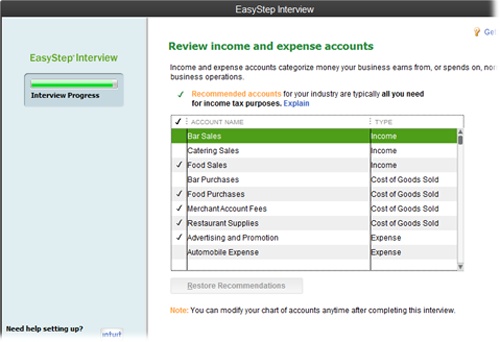
Figure 1-5. QuickBooks places a checkmark in front of the accounts that are typical for your industry. Click the checkmark cell for an account to add one that the program didnât select, or click a cell with a checkmark to turn that account off. You can also drag your cursor over checkmark cells to turn several accounts on or off.
When you click Next, youâll see a bright orange, but premature, âCongratulations!â You still have a few more steps to complete before you can open your company file. Click Go to Setup and then read the next section.
After you create your company file with Express Start or the EasyStep Interview, youâll see the âYouâve got a company file!â screen, which is where you perform the additional steps you have to complete, such as adding bank accounts and items you sell. If you want step-by-step guidance through these processes, click one of the Add buttons in these sections:
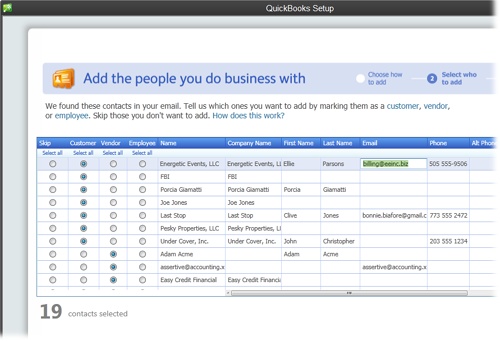
Add the people you do business with. Adding people you do business with is a snap. Click the first Add button and you can import names from your email program (Outlook, Yahoo, or Gmail), paste data from an Excel workbook, or enter info manually. If you select one of the import options and click Continue, youâll see a table with the names from your email program, as shown in Figure 1-6.
Figure 1-6. Initially, QuickBooks selects the Skip option for all the names. That way, you can select the option in the Customer, Vendor, or Employee column for each name you want to import to designate whether itâs a customer, vendor, or employee. You can select a cell with info in it (like a name or an email address) and edit the info.
Add the products and services you sell. When you click the Add button in this section, you first choose either the Service or Non-inventory part option, because you fill in different fields for each type of item. Select the Service option to set up services you sell, or select the Non-inventory part option to create products you sell (see Inventory Part Fields to learn about products you keep in inventory), and then click Continue. Fill in the names, description, and prices, and click Continue again to save your items.
Add your bank accounts. For bank accounts, you fill in the account name, account number, opening balance, and opening balance date.
Tip
If youâre in the middle of entering names, products and services, or bank accounts, and want to get back to the âYouâve got a company file!â screen, click Cancel.
After you finish these additional steps, click Start Working to open the Quick Start Center window. You can click icons and links in this window to open the corresponding features, click âReturn to Add Infoâ to reopen the QuickBooks Setup dialog box, or click the X at the top right of the window to close it so you can work directly in the program.
Tip
If youâd rather perform these tasks later or want more control over setup, click the Close button (the X at the top-right corner of the Quick Start Center dialog box). Whatâs Next? tells you where to turn in this book for more detailed instructions on the rest of the setup you need.
After you close the QuickBooks Setup dialog box or Quick Start Center window, you see the QuickBooks Home page (The Home Page), which includes icons for the features you turned on during the EasyStep Interview.
Note
You may also see the QuickBooks Learning Center window (you can open this window anytime by choosing HelpâLearning Center Tutorials), which includes links to tutorials (Other Kinds of Help). In the window, click a link (blue text) to watch a video on that topic.
As youâve learned in the previous sections, the QuickBooks Setup dialog box offers shortcuts for adding info to your company file. If your data-entry session was cut short by other pressing tasks, you can jump back to this dialog box later to finish the job. Hereâs how:
Choose HelpâQuick Start Center. At the top right of the Quick Start Center, click âReturn to Add Info.â
The QuickBooks Setup dialog box opens to the âYouâve got a company file!â screen.
Click the Add button for the type of info you want to enter and then jump back to the instructions on Beginning to Use QuickBooks.
When youâre done, click the Close button (the X) at the top right of the QuickBooks Setup dialog box to close it and get to work.
In Express Start and the EasyStep Interview, QuickBooks gets the basic facts about your company in small chunks spread over several screens. But after you create your company file, you can edit any of this information in one dialog box, shown in Figure 1-7. To open it, choose CompanyâCompany Information. Remember, your companyâs legal name and address are the ones you use on federal and state tax forms.
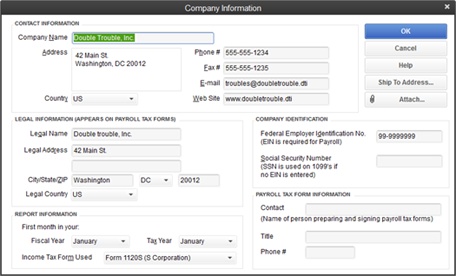
Figure 1-7. Some bits of company information change more often than others. For instance, you might relocate your office or change your phone number, email address, or website address. But stuff like your companyâs legal name and address, Federal Employer Identification Number, and business type (corporation, sole proprietor, and so on) usually stays the same.
Whether you used Express Start or the EasyStep Interview, quite a bit of setup is complete, but you may need guidance for the rest. Look no further than the book in your hands. Here are the ways you can flesh out your company file:
Set up your users and passwords. See Assigning the Administrator User Name and Password on page 684.
Review and/or change the preferences that QuickBooks set. See Preferences: The Basics on page 596.
Set up or edit the accounts in your chart of accounts. If you didnât set up all your accounts yet, you can create them now. See Creating Accounts and Subaccounts on page 51.
Create a journal entry to specify accountsâ opening balances. See Creating General Journal Entries on page 454.
Note
See Recording Ownersâ Contributions to learn how to record your initial contribution of cash or assets to your company.
Create items for the products and services you sell. See What Items Do on page 111.
Set up sales tax codes. See Setting Up Sales Tax on page 140.
Set up your 1099 tracking. See Tax: 1099 on page 632.
Sign up for Intuit Payroll Service. See Using an Intuit Payroll Service on page 409.
Enter your historical transactions. For invoices, see Creating Invoices on page 276; for bills, see Entering Bills on page 219.
After youâve opened a company file in one QuickBooks session, the next time you launch the program, it opens that same company file automatically. If you keep the books for only one company, you might never have to manually open a QuickBooks company file again.
But if youâre an irrepressible entrepreneur or a bookkeeper who works on several companiesâ books, you donât have to close one company file before you open another. You can open another company file in QuickBooks anytime you want and the program automatically closes the previous one. (Because QuickBooks stores data in a database, you donât have to save a company file before you close it. And if you use QuickBooks Accountant or Professional Bookkeeper editions, you can have two company files open at the same time, as the Tip below explains.) The following sections describe the different ways to open a company file.
Tip
With QuickBooks Accountant, QuickBooks Professional Bookkeeper, and QuickBooks Enterprise, you can have two company files open at the same time. Choose FileâOpen Second Company, and your computer launches a new instance of QuickBooks. In the new window, double-click the name of the file you want to open. The second company file opens with the text â(Secondary)â after the company name in the QuickBooks windowâs title bar. (In the first QuickBooks window, the company name is followed by the text â(Primary).â) There are some restrictions when you open two files, mostly on the secondary file. To learn about these restrictions, search QuickBooks Help for âsecond company.â
If you work on more than one company file, you may frequently switch between them. The easiest way to open a recent file is to choose FileâOpen Previous Company, and then choose the file you want to open, as shown in Figure 1-8. If the Open Previous Company submenu doesnât list the file you want, follow the steps in the next section instead.
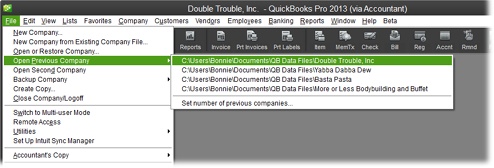
Figure 1-8. To open a company file youâve worked on recently, select it on the Open Previous Company submenu. If the No Company Open window (not shown here) is visible, you can open a recent file by double-clicking its filename in that windowâs list. (Opening a sample file is the only task the No Company Open window performs that you canât do from the File menu.)
Sometimes, a company file you want to open falls off the recent-file list. (The box on Fast Access to Several Companies explains how to tell QuickBooks how many files to include on the Open Previous Company submenu.) Say your bookkeeping business is booming and you work on dozens of company files every month. Or maybe you want to update a file from a previous version (see the box on Updating a QuickBooks File). Hereâs how to open any company file, no matter how long itâs been since you last used it:
Choose FileâOpen or Restore Company.
If the No Company Open window is visible, you can click âOpen or restore an existing companyâ instead.
In the Open or Restore Company dialog box, select the âOpen a company fileâ option and then click Next.
The Open a Company dialog box appears.
Navigate to the folder with the company file you want and double-click the fileâs name.
You can also click the filename and then click Open.
If the QuickBooks Login window appears (which it will if youâve assigned a password to the Administrator user account or set up multiple users), type your user name and password.
If the Administrator is the only user, the Password box is the only one that appears. But if you have more than one user for the company file, both the User Name and Password boxes appear.
Click OK.
QuickBooks opens the company file, and youâre ready to keep the books.
Backup files are the answer to the adrenaline rush you get when you do something dumb with your company file, your hard drive crashes, or a plume of smoke wafts up from your computer. To restore a backup file, choose FileâOpen or Restore Company. In the Open or Restore Company dialog box, select the âRestore a backup copyâ option, click Next, and then choose the file you want. (To learn how to create backup files, as well as the details on restoring them, see Backing Up Files on page 175.)
A portable file is a special type of file that makes QuickBooks company files compact so you can email them more easily. Opening a portable file is similar to opening a regular file:
Choose FileâOpen or Restore Company.
The Open or Restore Company dialog box opens.
Select the âRestore a portable fileâ option and then click Next.
The Open Portable Company File dialog box appears. QuickBooks automatically changes the âFiles of typeâ box to âQuickBooks Portable Company Files (*.QBM).â
Navigate to the folder with the portable file and double-click its name.
QuickBooks opens the file.
If you launched your small business from your basement and kept your records with Quicken Home & Business, your accountant has probably recommended that you make the leap to QuickBooks. On the other hand, you may have used another accounting program like Peachtree or Small Business Accounting and have decided to move to QuickBooks. Regardless of which other program you used, the command to convert your records to QuickBooks is the same: FileâUtilitiesâConvert. Then choose From Quicken, From Peachtree, From Microsoft Small Business Accounting, or From Microsoft Office Accounting. (You can also convert a file from the QuickBooks Setup dialog box: Click Other Options and then choose Convert Quicken Data or Convert Other Accounting Software Data.) The rest of this section explains what else you need to know.
Quicken doesnât report your business performance in the way that most accountants want to see, nor does it store your business transactions the way QuickBooks does. So if you want the conversion to proceed as smoothly as possible, do some cleanup in your Quicken file first.
For example, record overdue scheduled transactions and send online payments before you convert your Quicken file. Also, while youâre in Quicken, delete accounts you no longer need, because once theyâre in QuickBooks, you canât delete them if they contain any transactions. And make sure that customer names are consistent and unique. QuickBooks doesnât support repeating online payments, so you also have to tell Quicken to delete any repeating online payments youâve set up. In addition, you need complete reports of your past payrolls because Quicken payroll transactions donât convert to QuickBooks.
Warning
When you convert from Quicken to QuickBooks, all the names that are converted are added to the Other Names List. You can then change which list the names belong to (Customer Type List but if your Quicken data file has tons of names, itâs easier to export those names to a spreadsheet and then import them by using QuickBooksâ Add/Edit Multiple List Entries feature (Adding and Editing Multiple Records).
Intuit publishes a detailed guide to help you prepare for a Quicken conversion. Go to http://tinyurl.com/2af78q5 and follow the instructions there.
Note
If youâve already cleaned up your Quicken file and run into conversion problems in QuickBooks, check the QuickBooks company file for errors by choosing FileâUtilitiesâVerify Data, as described on Verifying Your QuickBooks Data. Another potential solution is to remove transactions prior to the current fiscal year before converting the file. If nothing you try works and youâre willing to send your Quicken file to Intuit, contact QuickBooks technical support by choosing HelpâSupport. (A browser window opens to the Intuit QuickBooks Support page. In the horizontal navigation bar, click Contact Us.) They may agree to convert the file for you (for a fee).
When your Quicken file is ready for conversion to QuickBooks, you have two options in QuickBooks:
To convert files created in other accounting programs, like Peachtree or Small Business Accounting, you have to download a conversion tool from the QuickBooks website. Choose FileâUtilitiesâConvert and then choose the program you want to convert from. In the browser window that opens, fill in the boxes for your name, company name, and email address, and then click Submit.
Get QuickBooks 2013: The Missing Manual now with the O’Reilly learning platform.
O’Reilly members experience books, live events, courses curated by job role, and more from O’Reilly and nearly 200 top publishers.

